Improved AI Assistant with chat and its own panel – Class Tree inspector for Tailwind CSS – Bug fixes
Download Pinegrow 7.72
The package includes Pinegrow PRO, WordPress, WooCommerce, Interactions and Tailwind editor.
Pinegrow for Mac (Intel) Antivírus checkedMac: 8fc62d5ce341aee21851eeb8eeb1ce0d3c829967
Pinegrow for Mac (M1 / M2) Antivírus checkedMac: 5688a76765d3108bc4e7ca56a99639efd2d5b446
Pinegrow for Windows 64 (Installer) Antivírus checkedWindows: 38ffd9a3e022a37b3b4112c6ceaebf0a7b65352c
Pinegrow for Linux (Zip, 64bit) Antivírus checked Linux: 165eb13033ff0f5eda6ec15a2beeba4632d159ff
Download Pinegrow 7.6
The package includes Pinegrow PRO, WordPress, WooCommerce, Interactions and Tailwind editor.
Pinegrow for Mac (Intel) Antivírus checkedMac: b050e43feb764e5e82a83e793a62f3715ea17797
Pinegrow for Mac (M1 / M2) Antivírus checkedMac: 0c11a80469c3ae389e8f2d51b387ea522abf8654
Pinegrow for Windows 64 (Installer) Antivírus checkedWindows: afeeefb3424e60f45a991a26811aedf45708e462
Pinegrow for Linux (Zip, 64bit) Antivírus checked Linux: 4196e62fbc56f91ca2f928d077a17c78467b05ab
Download Pinegrow 7.5
The package includes Pinegrow PRO, WordPress, WooCommerce, Interactions and Tailwind editor.
Pinegrow for Mac (Intel) Antivírus checkedMac: 23cd4449006d315b5b9825cc2d6976758423a95c
Pinegrow for Mac (M1 / M2) Antivírus checkedMac: 8688b47acbae1523b030b0d1c7ec923b890c4f76
Pinegrow for Windows 64 (Installer) Antivírus checkedWindows: b322e67373644e9558ab1f3897971558f1869de9
Pinegrow for Linux (Zip, 64bit) Antivírus checked Linux: abd452ceeb082c009474ae0a3fd047c97a26bfbf
Download Pinegrow 7.4
The package includes Pinegrow PRO, WordPress, WooCommerce, Interactions and Tailwind editor.
Pinegrow for Mac (Intel) Antivírus checkedMac: 23cdbd7a24cce183268c7cd47fe0f94a941e9fba
Pinegrow for Mac (M1 / M2) Antivírus checkedMac: b84a266ce222e27ce44ce27b9be91efda6753440
Pinegrow for Windows 64 (Installer) Antivírus checkedWindows: bfcba642254734bb77de59efa956cc5f9c98fe67
Pinegrow for Linux (Zip, 64bit) Antivírus checked Linux: b69944aa1eca7bf5ad19b3c8b16a84939ee98615
Download Pinegrow 7.3
The package includes Pinegrow PRO, WordPress, WooCommerce, Interactions and Tailwind editor.
Pinegrow for Mac (Intel) Antivírus checkedMac: 2f81fdad251123158639f335178d91023f2b9d57
Pinegrow for Mac (M1 / M2) Antivírus checkedMac: a7e94474ea5e0b320d645eb25e77a4a5b5230afc
Pinegrow for Windows 64 (Installer) Antivírus checkedWindows: f7fb920a7a610943cffb3208d6fac250dfb30136
Pinegrow for Linux (Zip, 64bit) Antivírus checked Linux: 9d0a0b667977f743e5ab7ccd684358edd3133f8c
The smarter AI Assistant
Pinegrow AI Assistant now uses ChatGPT-3.5 and GPT-4 models. It comes with its own panel and lets you chat about the current task to get it just right.
This document explains how the AI Assistant changed from the previous version. Read this complete guide to learn how to use the AI Assistant.
AI Assistant panel
With these improvements AI Assistant become more useful and therefore deserves to have its own UI panel. The AI Assistant panel is shown by default. If you don’t use it, hide it in the Windows menu.
The AI Assistant floating window is deprecated. Pressing the / key or the icon now displays the AI Assistant panel.
We might being the / command back in the context of a general purpose command interface, not just limited to AI.
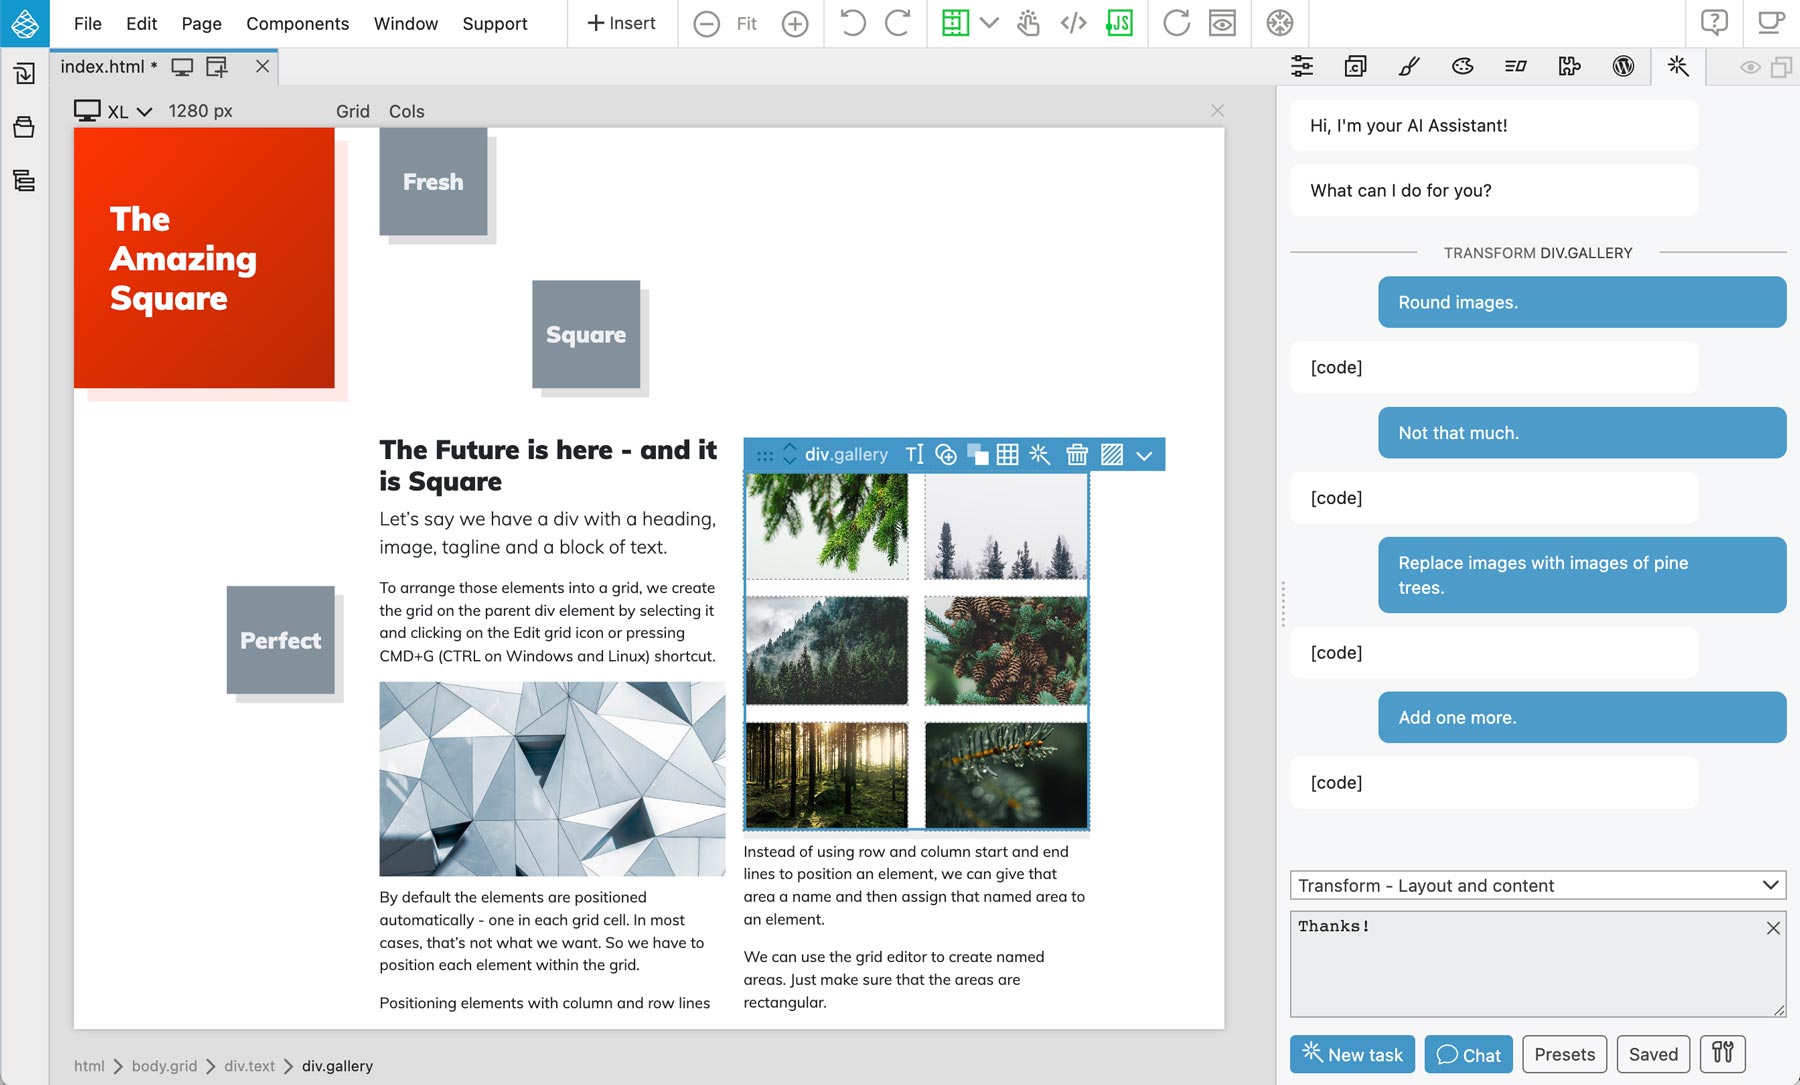
Chat about the current task
After starting a new task by telling the AI Assistant what to do, you can use the chat interface to follow up on the task, until the assistant gets it right.
Clicking on the New task button (or pressing CMD+Enter) starts a fresh new task. Only your instruction and any relevant code are included in the prompt. This is the most cost effective way to run commands.
Once the result of the task comes back you can use the Chat button (or pressing the Enter key) to follow up and instruct the assistant on how to fine tune the current task. Chat prompts includes all previous requests and responses and therefore spends more tokens, making the API call more expensive.
That said, at least with the ChatGPT-3.5 model the costs are tiny and chatting about a task is an effective way to get the assistant do precisely what you want.
The Chat button is enabled only if the same element and action are selected. If you select another element you can not chat about the previous task. Reselecting the original element brings the chat option back.
When to use New task and when to Chat?
The general guideline is to use New task when doing an action that does not require the context of the previous task, and to use Chat when telling the assistant how to do the current task right.
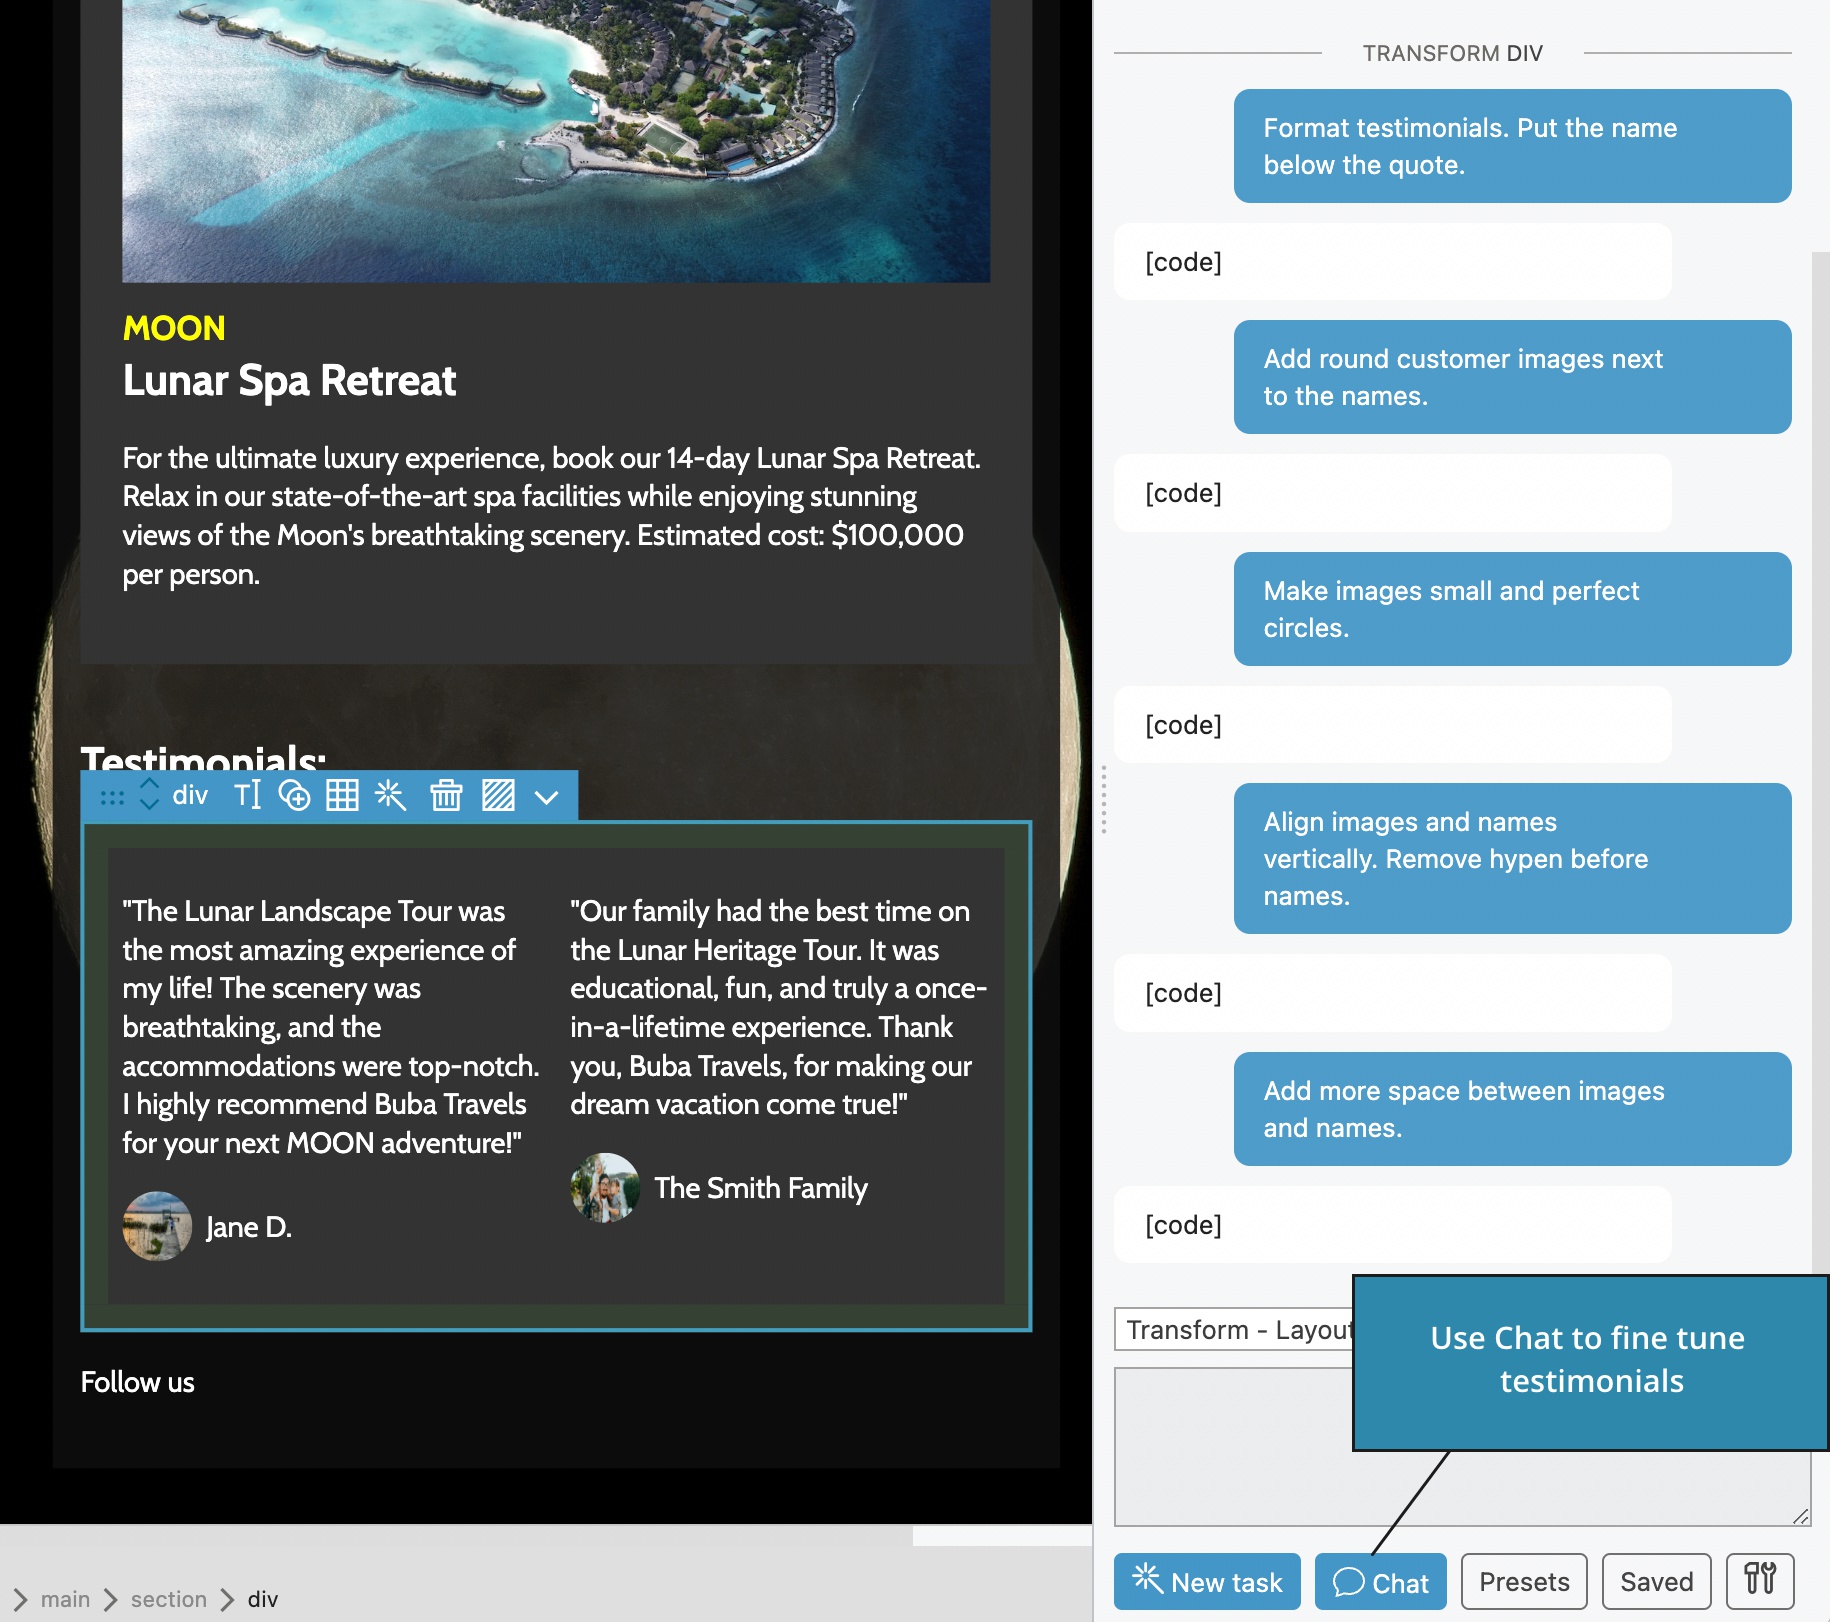
Here is an example. We want to add Testimonials section to the page.
We first select the whole main element because we want the assistant to be aware of the styling and structure of the website. The action is Transform element layout and content. The prompt is “Add testimonials of happy customers.”
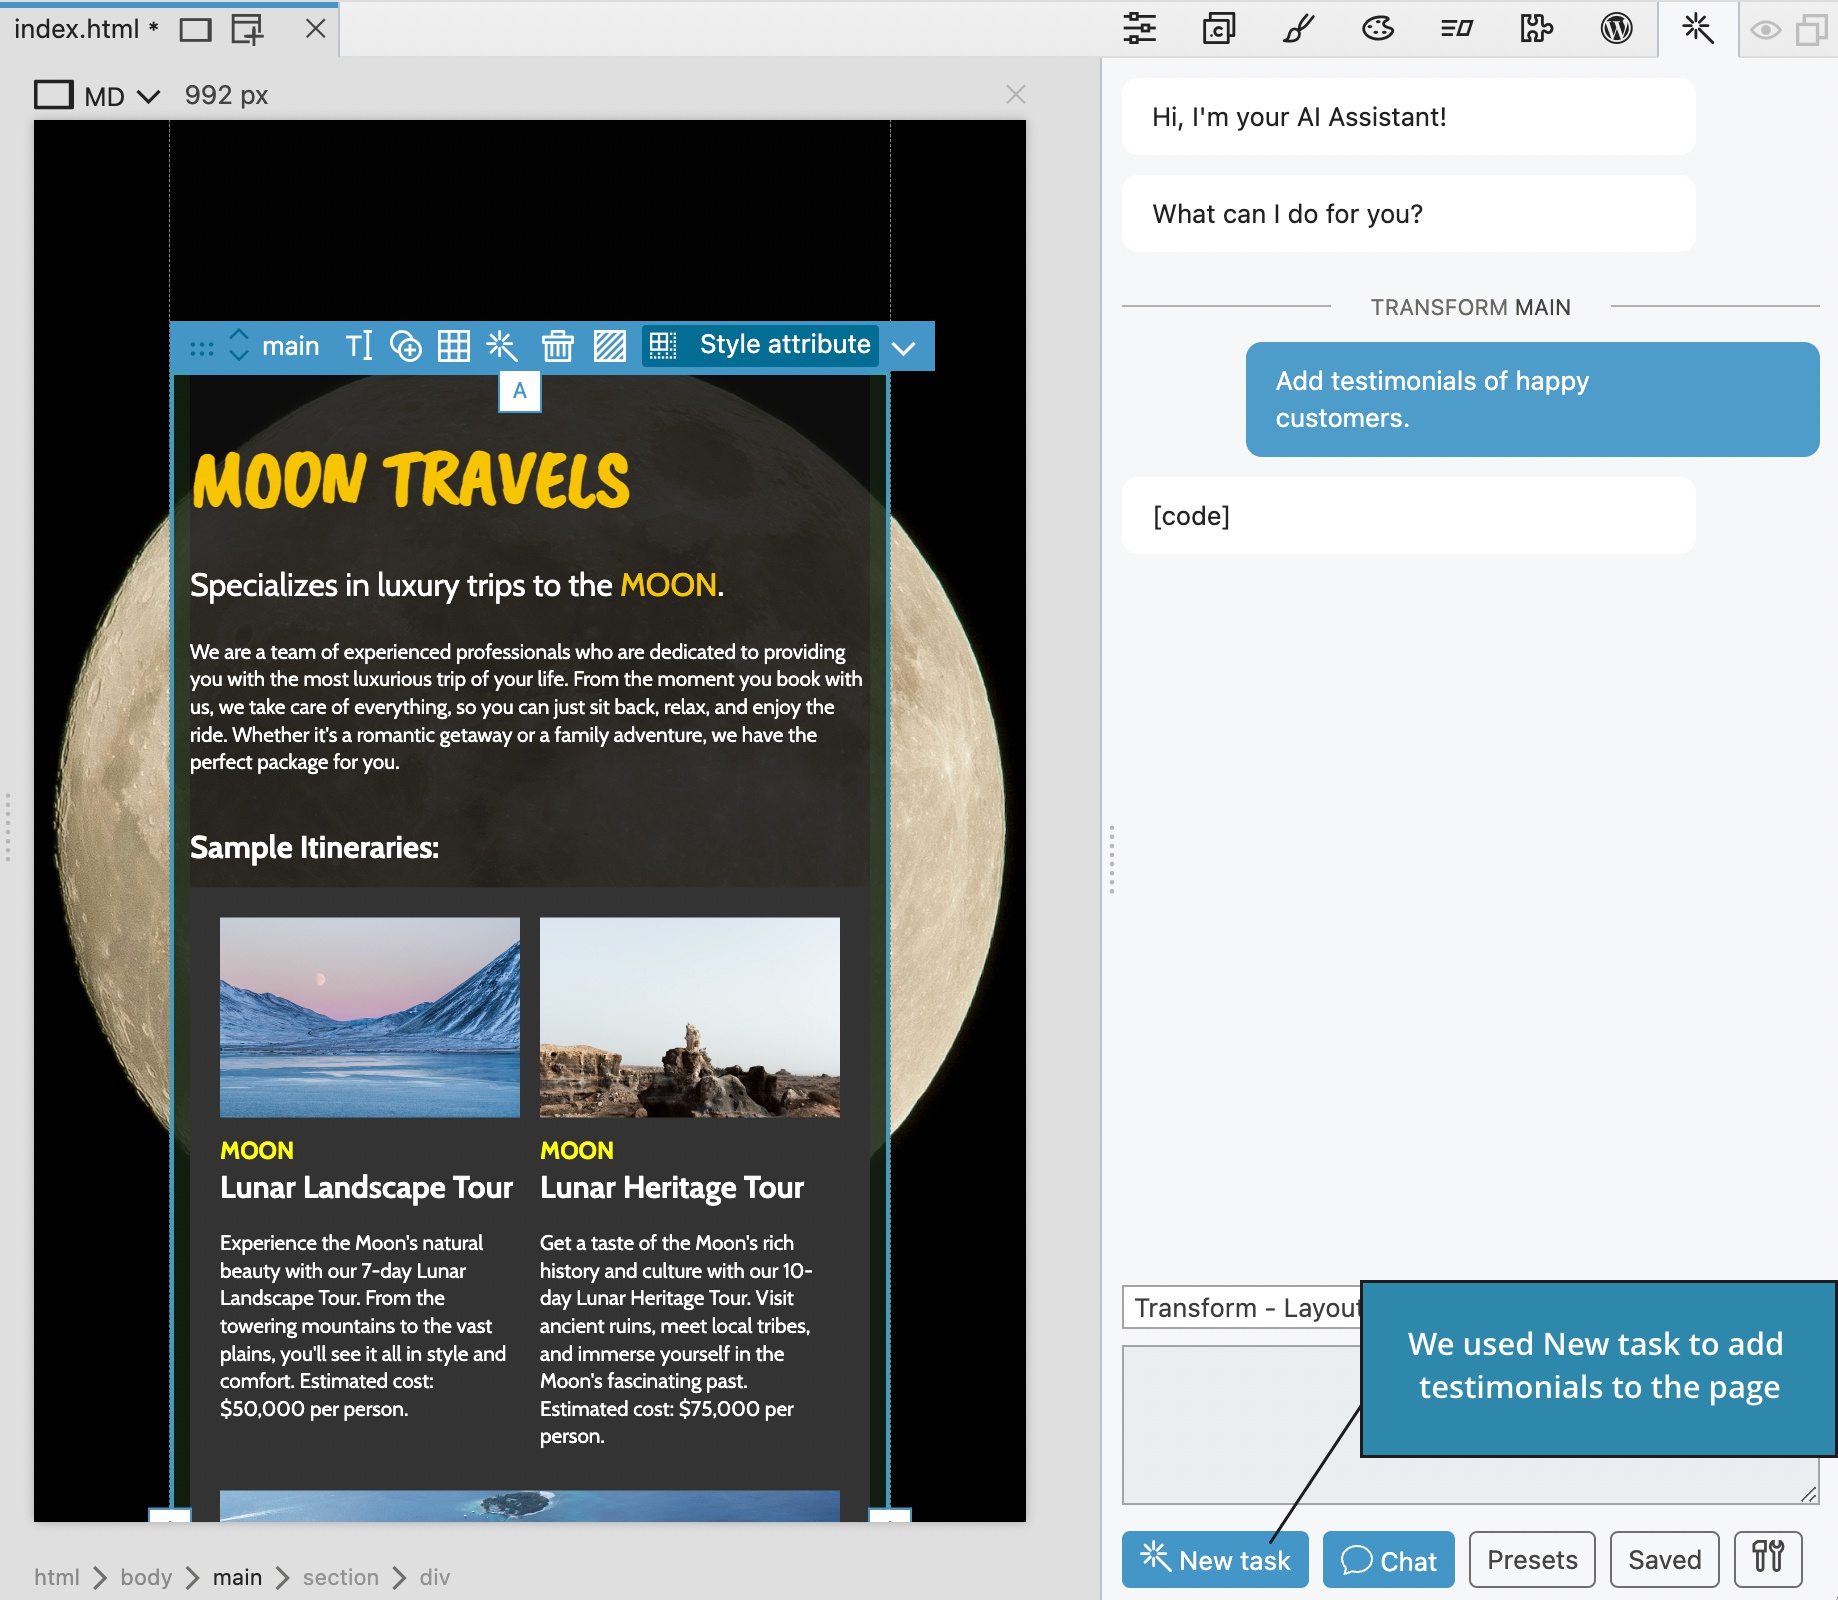
The assistant adds the testimonials section.
Instead of using Chat to fine tune the testimonials (and include the whole main section in every prompt and result) we select the section with testimonials and start a new task with the prompt “Format testimonials. Put name below the quote.”
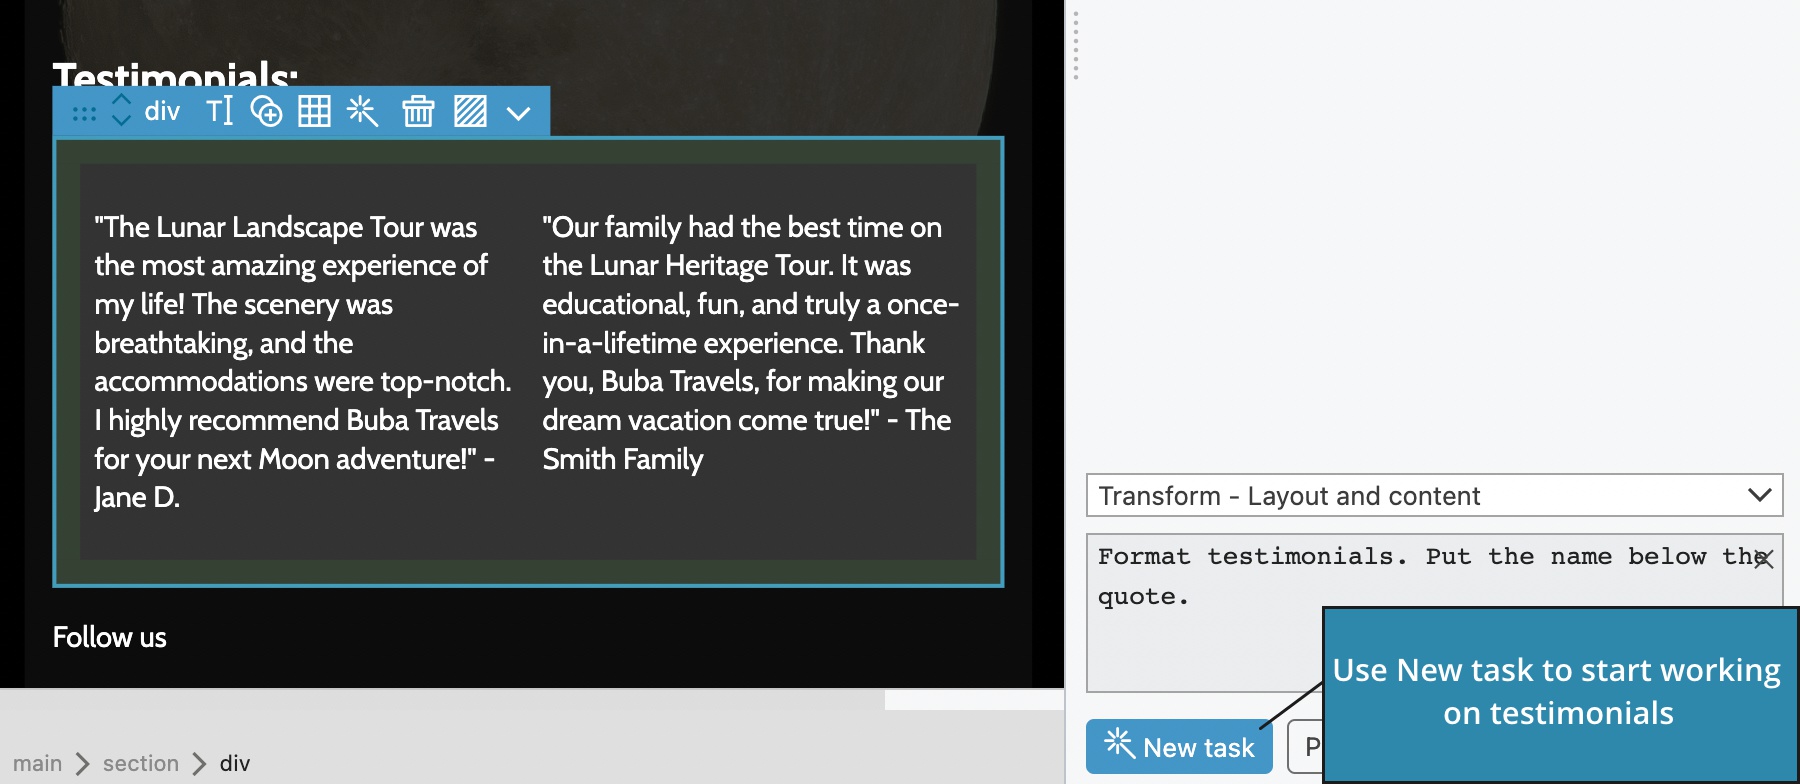
In the followup steps we use the Chat button to fine tune the testimonials:
GPT-4 support
Use Settings ( icon) to select the model for API calls. ChatGPT-3.5 is the default model. If your OpenAI account has access to GPT-4 models you can use them instead.

Note that the cost of using GPT-4 model is significantly higher.
Project brief
The project brief field in Settings lets you include a project description and any relevant instructions into every prompt performed on the current project. Keep it concise because the brief gets included into every prompt.

The project brief is stored in project settings, so that every project can have its own brief.
New action – Transform whole page
This action includes the complete HTML code of the selected page in the prompt and replaces the page with the generated code. The action is useful for editing the page as a whole and for editing component files.
Note, the whole page and the generated code must fit into the maximum token length. For GPT-4 this is 8k tokens.
Class Tree inspector for Tailwind CSS
Visual controls for Tailwind CSS are nice, but for more experienced users working with them requires too much clicking and scrolling around.
We now have alternative tool for working with Tailwind CSS classes – the Class Tree inspector.
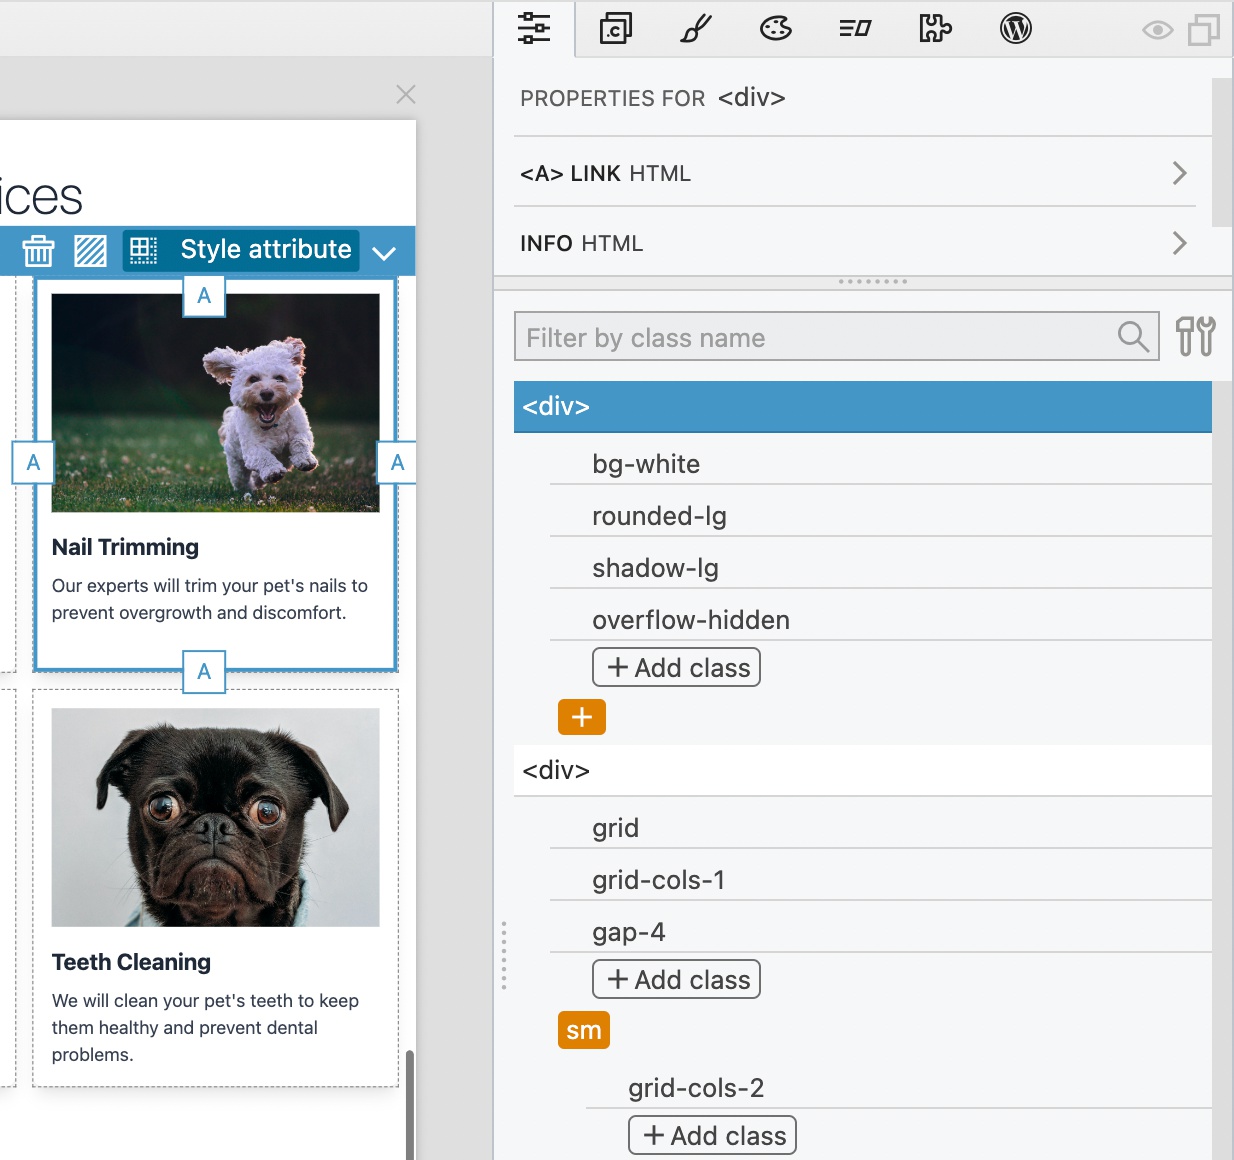
The Class Tree displays a tree grid with all the variants and classes of the selected element and all its parent elements.
This gives a complete view of all classes that affect the selected element.
How to show the Class Tree?
There are two ways:
Use Class Tree instead of visual controls in the Properties panel
Click on the Tools menu in the Properties panel and activate tree Class Tree.
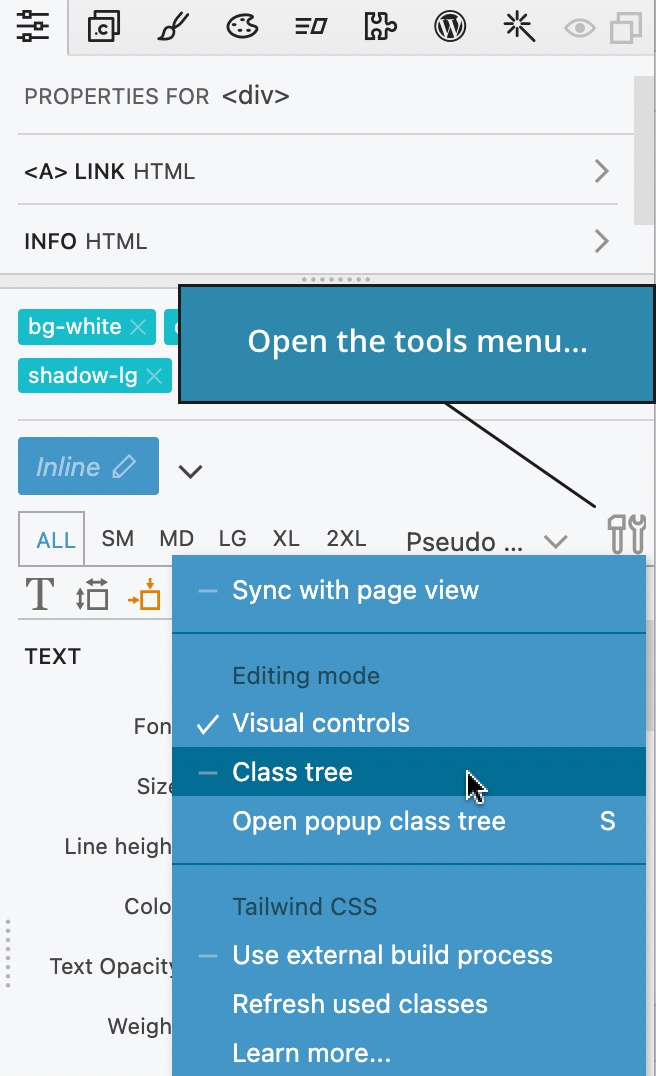
It will be shown instead of visual controls, as shown on the image above. To get the visual controls back use the Tools menu in the Class Tree.
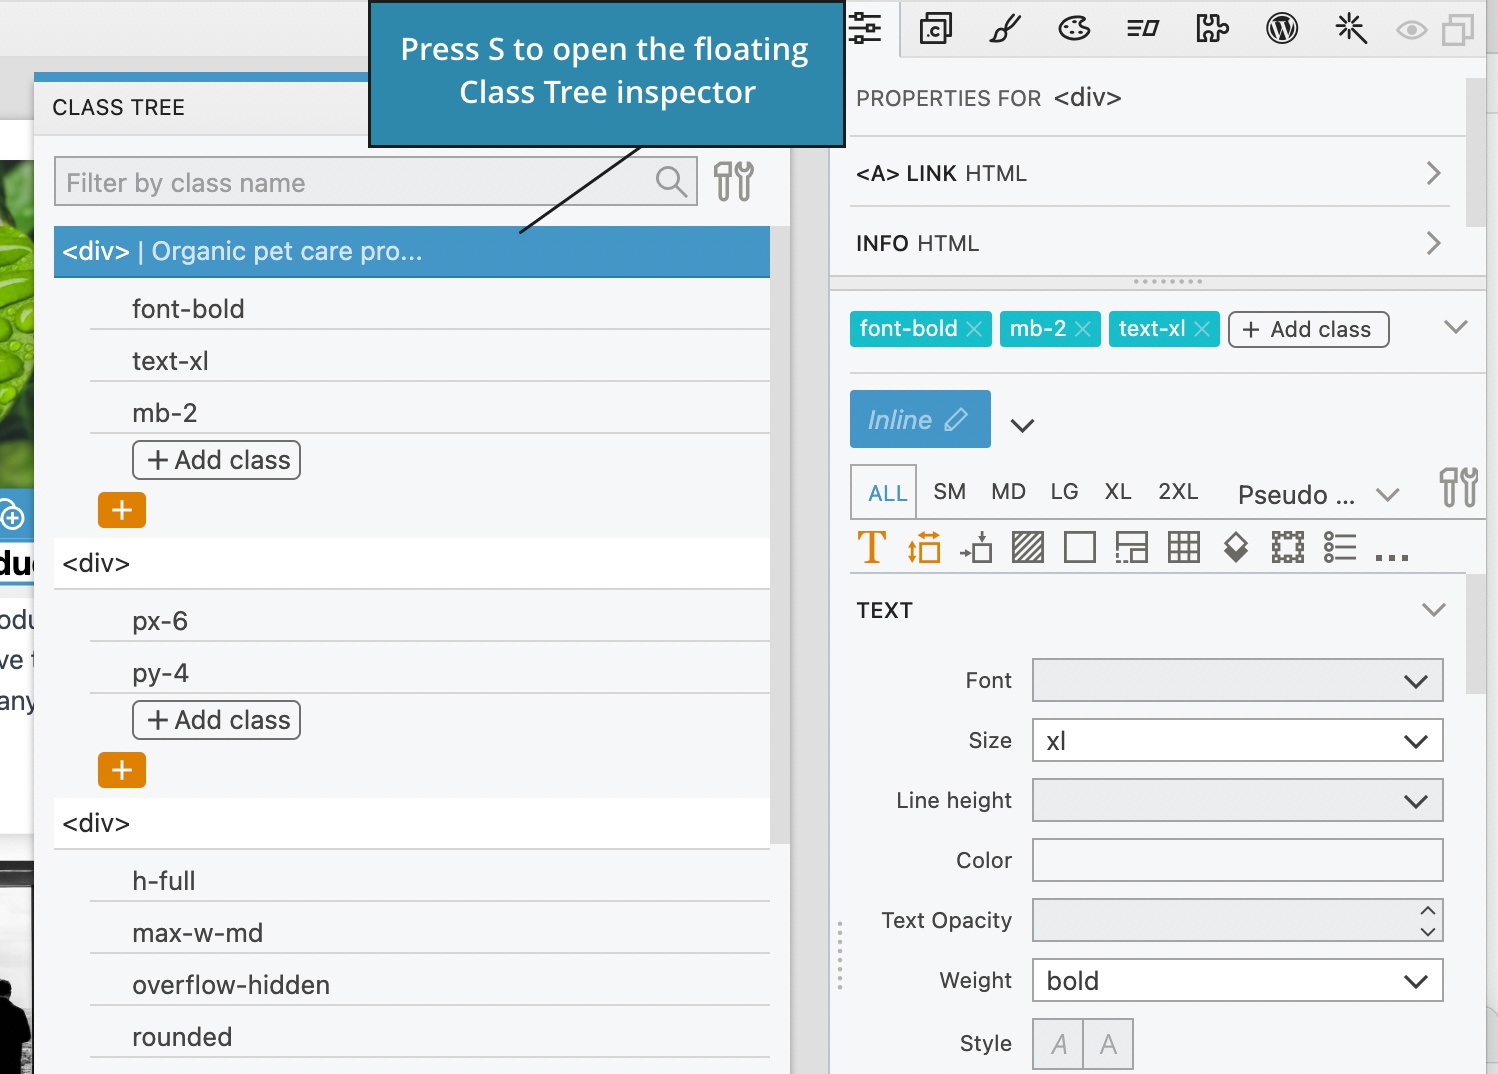
Use floating Class Tree inspector
Press the S key to bring up the Class Tree in the floating panel. This lets you use the Class Tree inspector alongside the visual controls.
The Class Tree is not just showing the classes. It also lets you manipulate the classes.
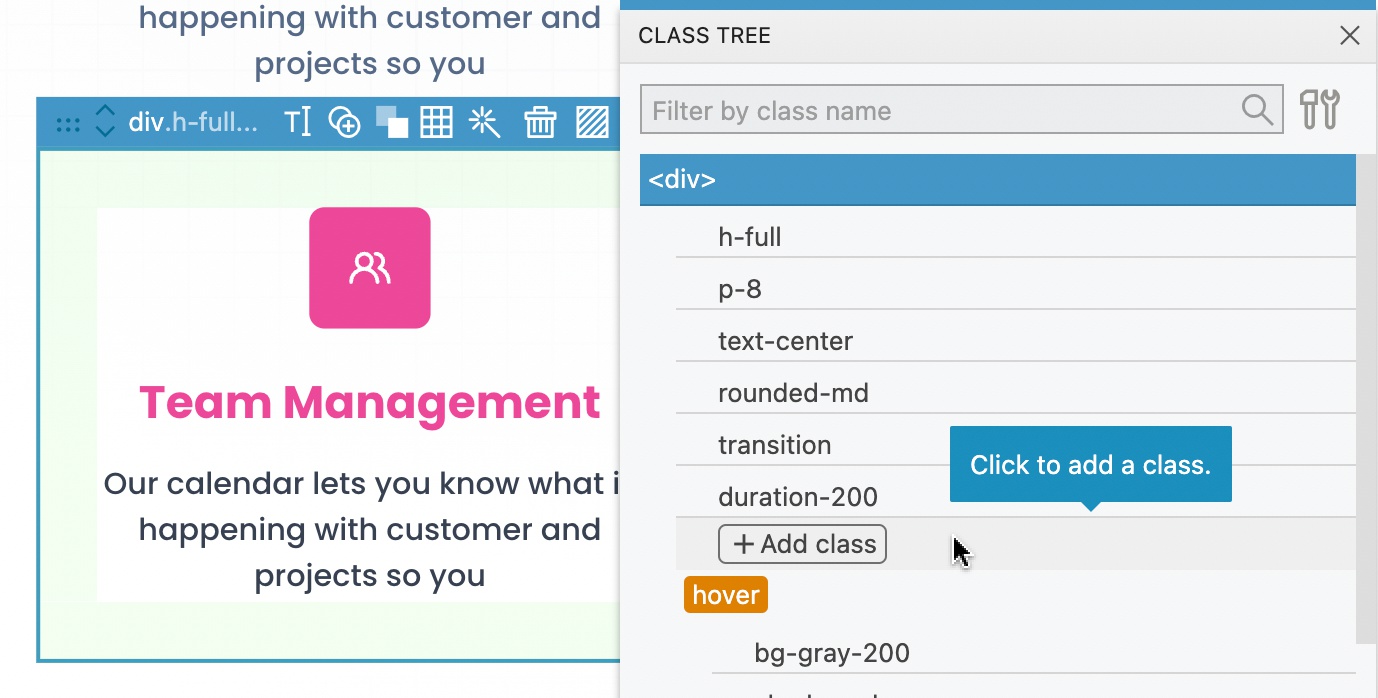
Adding a class
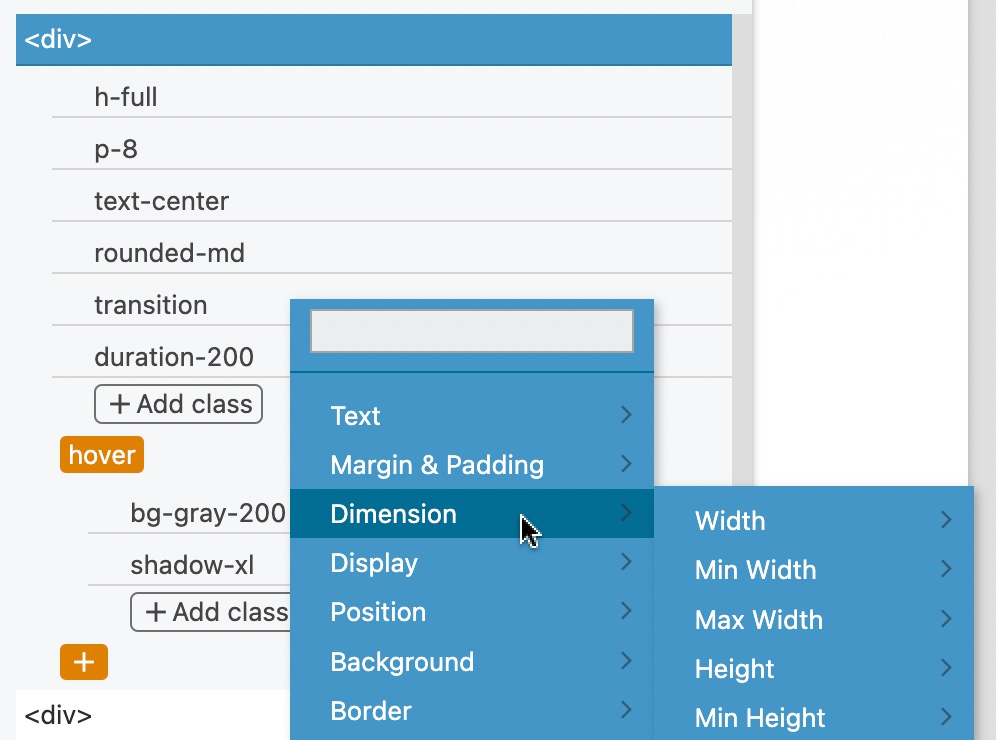
To add a new class click on the Add Class button:
There, select the property and its class value from the menu:
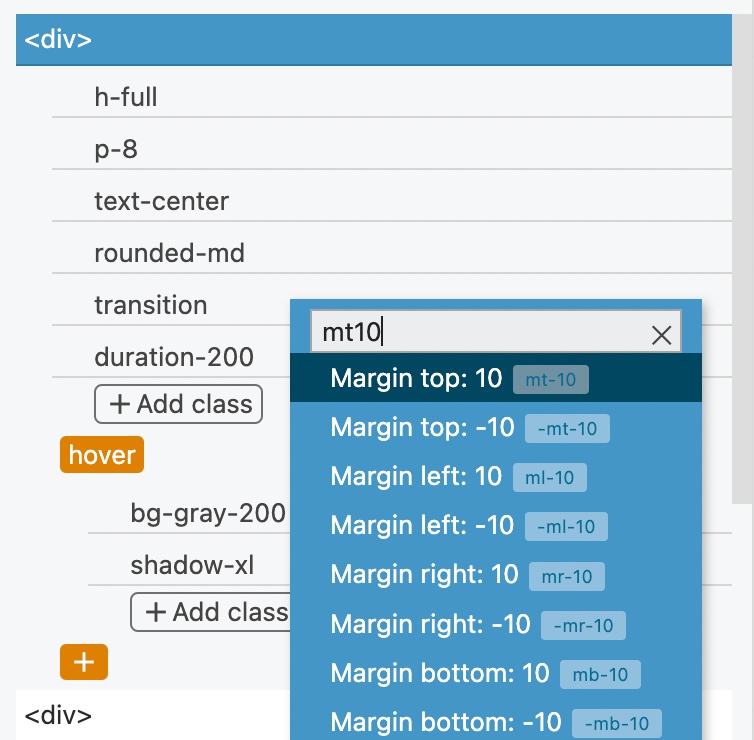
Or, start typing to quickly find the class. For example, typing mt10 will list the Margin top 20 class. Use up and down arrow keys to highlight the class and press Enter to select it:
Change the class value
Click on the class to display a list with all possible values of the class property. Hover over values to preview their effect and click to replace the value.

Removing a class
To remove the class hover over it and then uncheck its checkbox. The class remains displayed so that you can easily toggle it back. If you leave the class unchecked and reselect the element (thus repainting the Class Tree) the class will no longer be listed.

Add a variant
Click on the orange plus button to add a variant, such as hover, display size or any combination of variants.
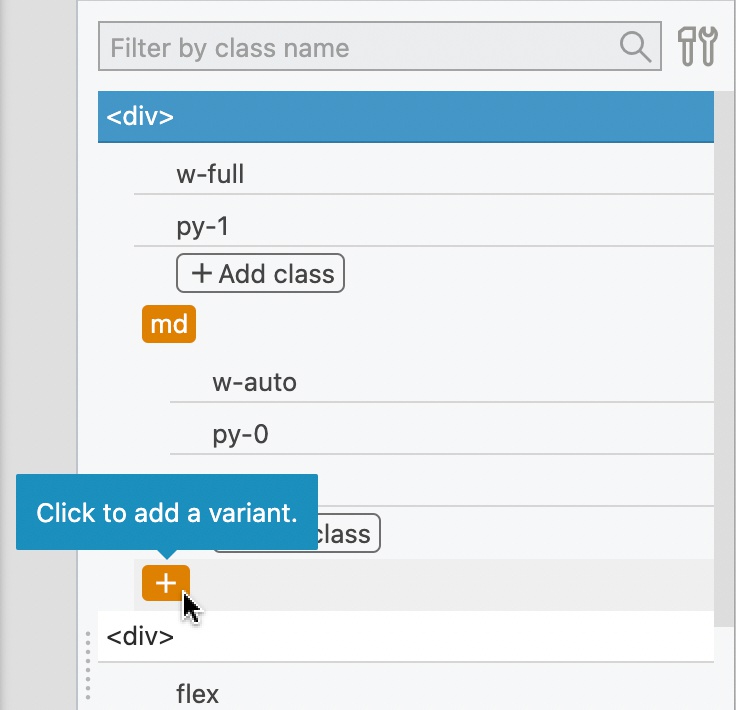
Select a variant from the dropdown menu:

Once the variant is added use its Add Class button to add classes.
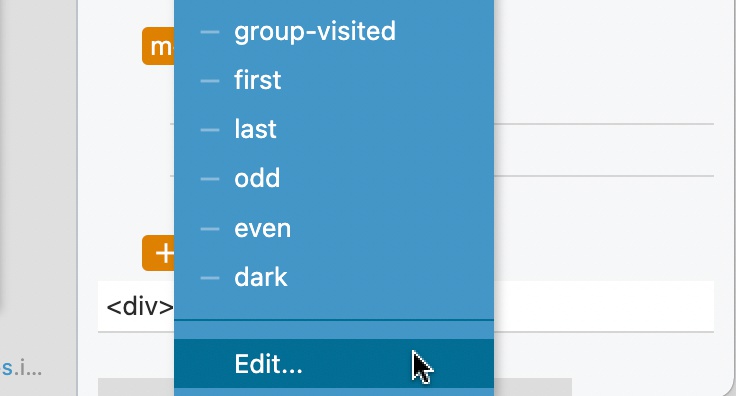
Edit a variant
To edit a variant click on the orange variant field and add or remove a variant selector.
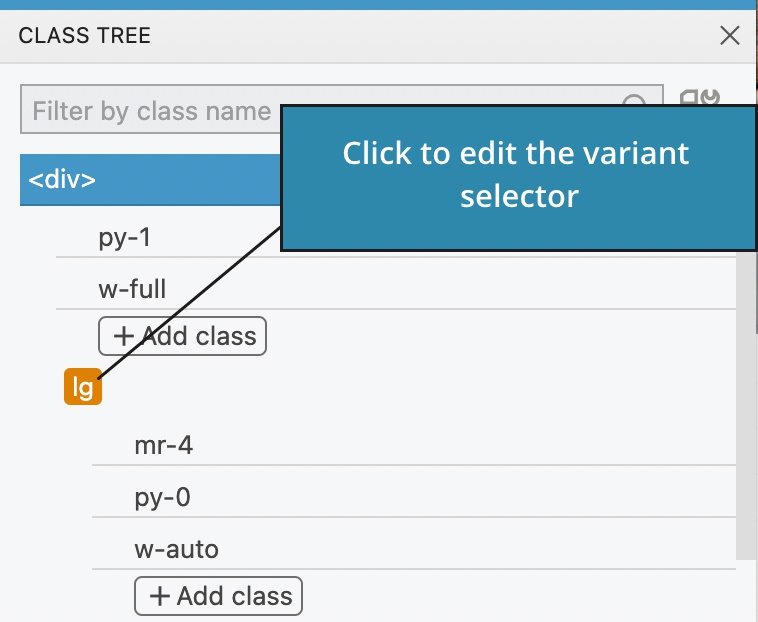
Note, this only works if the variant has at least one class.
Alternatively, select Edit to edit the variant selector as a text. For more complex variants, editing the text is the only option.
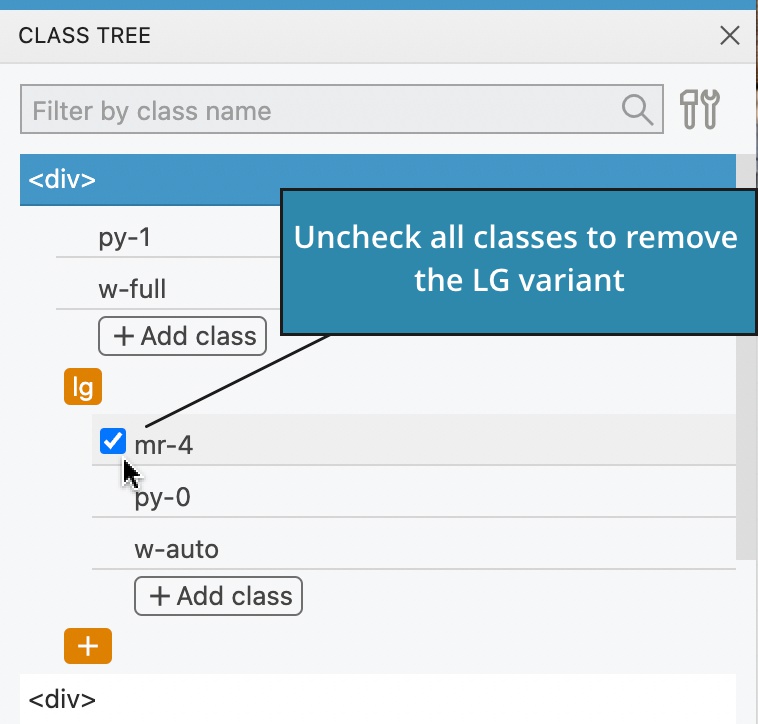
Remove a variant
Uncheck all the variant’s classes to remove the variant:
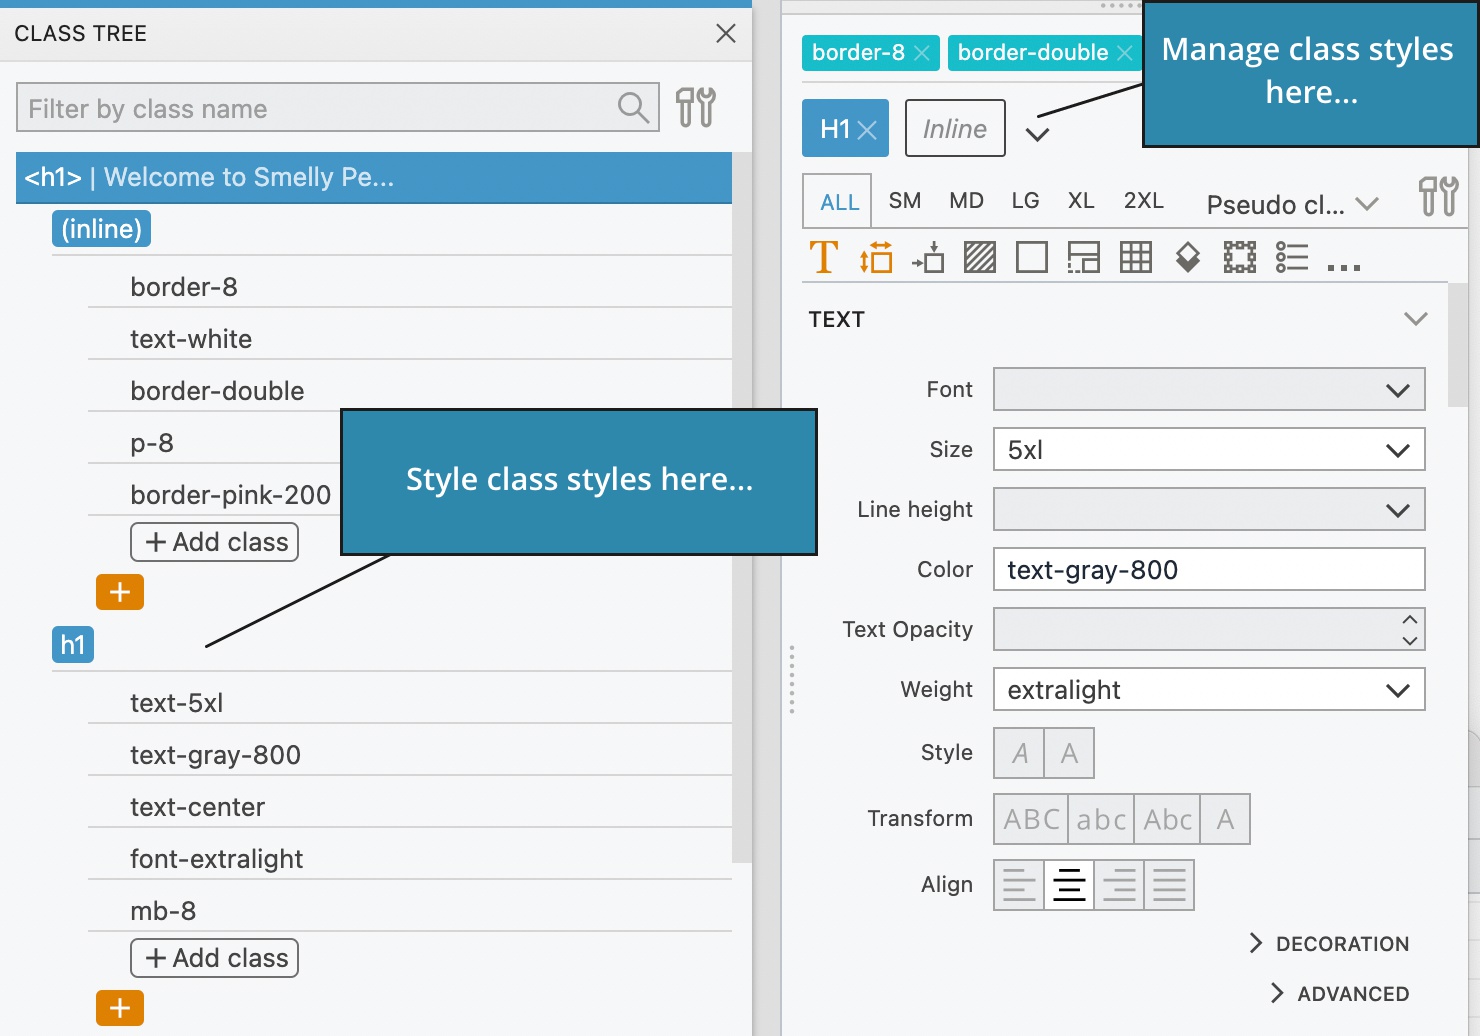
Class styles
The Class Tree inspector displays class styles if the element is using them. At this moment, it is not possible to add, edit or remove class styles with the Class Tree inspector. Use visual controls for that.
Less crowded Tailwind CSS visual controls
Less commonly used controls are now grouped in sub-sections to make the Properties panel easier to navigate:

Download Pinegrow 7.72
The package includes Pinegrow PRO, WordPress, WooCommerce, Interactions and Tailwind editor.
Pinegrow for Mac (Intel) Antivírus checkedMac: 8fc62d5ce341aee21851eeb8eeb1ce0d3c829967
Pinegrow for Mac (M1 / M2) Antivírus checkedMac: 5688a76765d3108bc4e7ca56a99639efd2d5b446
Pinegrow for Windows 64 (Installer) Antivírus checkedWindows: 38ffd9a3e022a37b3b4112c6ceaebf0a7b65352c
Pinegrow for Linux (Zip, 64bit) Antivírus checked Linux: 165eb13033ff0f5eda6ec15a2beeba4632d159ff
Download Pinegrow 7.6
The package includes Pinegrow PRO, WordPress, WooCommerce, Interactions and Tailwind editor.
Pinegrow for Mac (Intel) Antivírus checkedMac: b050e43feb764e5e82a83e793a62f3715ea17797
Pinegrow for Mac (M1 / M2) Antivírus checkedMac: 0c11a80469c3ae389e8f2d51b387ea522abf8654
Pinegrow for Windows 64 (Installer) Antivírus checkedWindows: afeeefb3424e60f45a991a26811aedf45708e462
Pinegrow for Linux (Zip, 64bit) Antivírus checked Linux: 4196e62fbc56f91ca2f928d077a17c78467b05ab
Download Pinegrow 7.5
The package includes Pinegrow PRO, WordPress, WooCommerce, Interactions and Tailwind editor.
Pinegrow for Mac (Intel) Antivírus checkedMac: 23cd4449006d315b5b9825cc2d6976758423a95c
Pinegrow for Mac (M1 / M2) Antivírus checkedMac: 8688b47acbae1523b030b0d1c7ec923b890c4f76
Pinegrow for Windows 64 (Installer) Antivírus checkedWindows: b322e67373644e9558ab1f3897971558f1869de9
Pinegrow for Linux (Zip, 64bit) Antivírus checked Linux: abd452ceeb082c009474ae0a3fd047c97a26bfbf
Download Pinegrow 7.4
The package includes Pinegrow PRO, WordPress, WooCommerce, Interactions and Tailwind editor.
Pinegrow for Mac (Intel) Antivírus checkedMac: 23cdbd7a24cce183268c7cd47fe0f94a941e9fba
Pinegrow for Mac (M1 / M2) Antivírus checkedMac: b84a266ce222e27ce44ce27b9be91efda6753440
Pinegrow for Windows 64 (Installer) Antivírus checkedWindows: bfcba642254734bb77de59efa956cc5f9c98fe67
Pinegrow for Linux (Zip, 64bit) Antivírus checked Linux: b69944aa1eca7bf5ad19b3c8b16a84939ee98615
Download Pinegrow 7.3
The package includes Pinegrow PRO, WordPress, WooCommerce, Interactions and Tailwind editor.
Pinegrow for Mac (Intel) Antivírus checkedMac: 2f81fdad251123158639f335178d91023f2b9d57
Pinegrow for Mac (M1 / M2) Antivírus checkedMac: a7e94474ea5e0b320d645eb25e77a4a5b5230afc
Pinegrow for Windows 64 (Installer) Antivírus checkedWindows: f7fb920a7a610943cffb3208d6fac250dfb30136
Pinegrow for Linux (Zip, 64bit) Antivírus checked Linux: 9d0a0b667977f743e5ab7ccd684358edd3133f8c