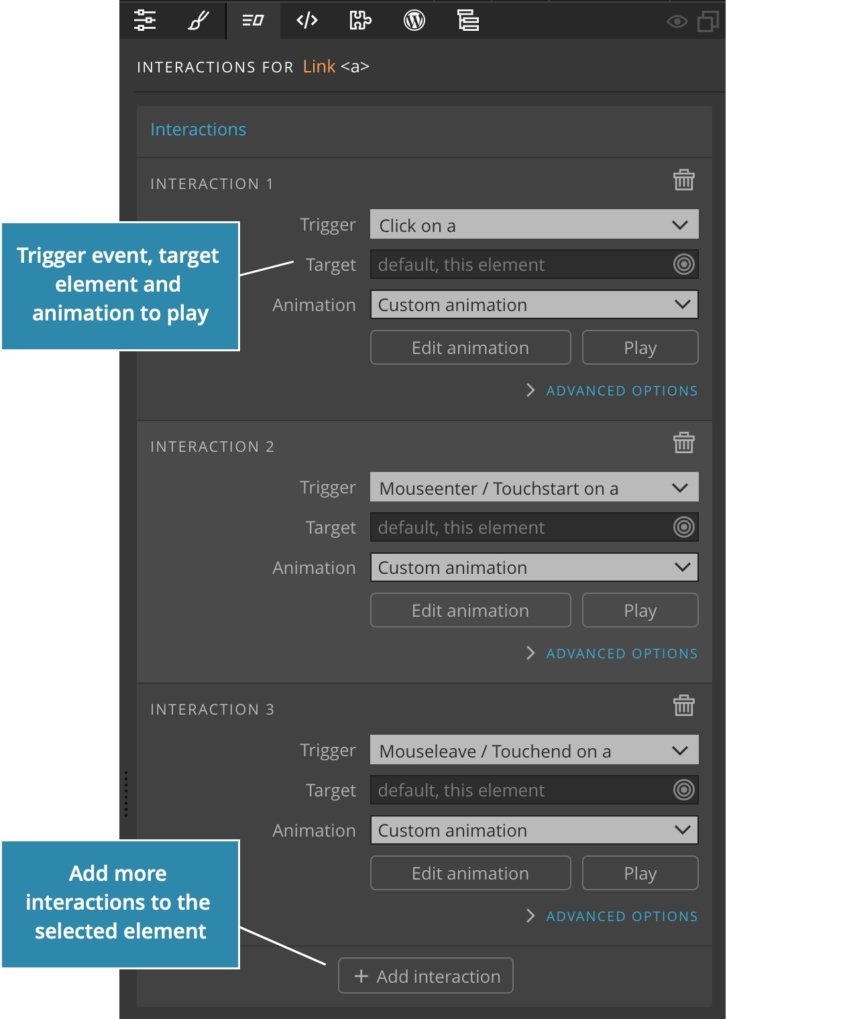
Use the Interactions action to add one or more interactions to the selected element.
Interactions action can be added to elements in the Interactions panel.
Interaction = Trigger Event + Animation
Every interaction is a combination of:
- the event that triggers the animation
- the target element on which the animation will be played
- and the animation itself
An element can have up to 10 different interactions.
A typical case for multiple interactions would be a button with three interactions:
- Mouseover animation to display the hovered state
- Mouseout animation that returns the button to the normal state
- Click animation that plays when the button is pressed
Click on the Add interaction button to add another interaction to the element.
Interaction
Let’s take a look at the individual interaction.
Name
Interactions can be named and these names are then used to reference the interaction when playing it as a part of another animation, instead of using indexes like 1, 2 and so on.
Another benefit of giving names to interactions is that they serve as comments, helping us to quickly see what the interactions does, especially when we have a lot of them.
Trigger
Trigger is the event that will cause the animation to be played. In most cases triggers correspond to events that happen in the browser.
User interaction events
Some events represent the user action on the selected element, for example clicking the element, moving the mouse over it and so on.
Such events are always listened to on the element with Interactions action. If you want to handle events that happen on another element you need to add Interactions action to that element and use the Target to set where the animation is played (see below).
Mouse, touch or both?
With pointer events you have the choice to use Mouse & Touch combinations or, if needed, to target mouse or touch events exclusively.
In most cases using the combination will do the trick.
Most triggers just play the animation when they occur. For example, Click plays the animation when the element is clicked.
There are two exceptions to this:
Mousemove event
Mousemove (and touch move) trigger doesn’t just play the animation and let it run according to its natural duration. Instead, it controls the playback of the animation relative to the position of the pointer.
Action setting lets you set how the animation should be controlled:
- Animate X position will seek the animation based on the relative X position of the pointer. Moving the pointer to the start of the element will seek the animation to its start and moving the pointer to the end of the element will seek the animation to the end.
- Animate Y position is similar, but it seeks the animation relative to the Y position of the pointer.
- Animate distance from the center controls the animation relative to the distance from the element center. Moving the pointer to the outside edge will seek the animation to the start and moving it to the element center will seek the animation to the end.
- Just run the animation will simply play the animation whenever the move event occurs.
Note that multiple Mousemove animations can be active on the same element. For example, one can animate the X position by rotating the element on the X axis and another can animate the Y position by rotating over the Y axis.
see what happens…
Rest at % is used to set at what position the animation should rest after the mouse leaves the element.
Scrolling the page
“Scrolling the page” trigger controls the playback of the animation relative to the scroll position of the page. At the top, the animation will be set at its starting position and as the scroll progresses, it will be moved towards the end position. This is useful for implementing scroll indicators.
Page load / When created
This group of triggers will play the animation:
- Immediately when during the page load and the Interactions JavaScript code is loaded, or immediately after the element with interactions is created by cloning or using the API.
- On load event that is triggered after the page loads completely.
Media events
Media events let us play the animation when the media starts loading or is loaded.
Timer – every N seconds
Selecting the timer will play the animation every N seconds. A field for setting the time is shown when this trigger is selected.
No event
Selecting No event lets us define the animation without setting a specific event that will trigger it. We can then play such animation from Scroll Scene pagination or from other animations.
Custom event
Here we can enter an event name that occurs on the interaction element, for example dblclick.
Controlling animations from the custom code
It is also possible to control playing the interaction from custom JavaScript code, for example from handlers of gesture events, sensors or any other custom process.
Interactions API exposes methods like play, pause and seek that are used to play or scrub animations.
Target
Target is the element on which the animation will be played.
By default, this is the element with the Interactions action, where the trigger event is caught. Let’s call this element the main element.
But in many cases we want to listen for the trigger on one element and play the animation on another.
For example, we want to show the modal when a button is clicked. In such case we add Interactions action on the button, set Trigger to Click and Target to the modal box.
Target is selected with the Element selector tool. The selector lets you pick any descendant of the main element, choose any element on the page or enter a custom selector. See the details here.
Note that the target selector can select multiple elements.
Animation
Animation is the animation that will be played on target elements when the trigger event happens.
You can select one of predefined animations or chose to create a custom animation with the Timeline editor.
You can also select a predefined animation and then customize it in the Timeline editor by clicking on the Edit animation button.
See Timeline Editor for information on creating custom animations.
About targets and custom animations
Custom animation can contain multiple timelines involving multiple elements on the page. That means that it is possible to leave the Target parameter empty and select the actual target in the Timeline editor.
But in most cases that’s not the best practice.
To create modular and easy to maintain animations, use the Target parameter to select the top element where animations will happen (for example, a div.modal) and then use the Timeline editor to animate this element and its descendants.
Advanced options
Each interaction has a set of options that lets you fine-tune the interaction.
Repeat
Set how many times the animation should be repeated each time it is played. Default is 1.
Duration
Override the duration of the animation. This will make the animation speed up or slow down, depending on what is its natural duration.
Delay
Delay the animation each time it is played.
Trigger condition
Add a trigger condition based on what classes the target element has. Note that classes are evaluated on the target element (the first target element if there are more than one), not on the main element with Interactions action.
When active, Trigger condition value is used to set the name of the class.
This is useful for triggering different animations based on what classes the target element has.
For example, you can play the open animation if modal doesn’t have the class “open” and play the close animation if it has. Both animations are triggered by a click on a button.
Hello!
I’m a popup box.
Enable on
Enable the interaction only on mobile or only on non-mobile devices. This is useful for creating different sets of interactions for mobile devices or for disabling interactions on mobile devices altogether.
Prevent default action
Certain trigger events have default actions. For example clicking on a link will open the link. Check this setting to prevent the browser from executing default event action.
Another example is Touchstart event that leads to selecting the content, if not prevented.
Restart on play
Active animations can be paused (see below) or played again before they finish playing (for example, when clicked repeatedly).
By default, the animation continues playing at the current time position when played again.
Use this setting to play the animation from the beginning on each play, even if it was not played till the end previously.
Stop other animations
Check this to stop any active animations from the same Interactions action.
For example, animations on Mouseover, Mouseout and Click events should most likely not be run in parallel because they are animating exclusive element states.
Mouseover might make the element larger and mouseout might scale it back to its original size. These two animations should not be run at the same time.
Note that Restart on play is usually needed as well and that the animations should not start with a Set transition, but instead just start animation from whatever the current state of the element might be.
Checking Stop other animations shows the “Animations to stop” field where you can specify that only certain animations should be stopped, by listing their index numbers or names, separated by commas. Index numbers correspond to numbers in “Interaction 1”, “Interaction 2”… headings.
Recreate on play
Checking this option will recreate the animation every time it is played. This is useful if target elements of the animation change dynamically, for example if they are dynamically added or removed from the page. Recreating the animation evaluates all its targets at the time the animation is played.
Reset on end
Reset on end will move the playhead to the beginning when animation stops. That means that the element will be returned to the initial state.
Reverse play
Play the animation in reverse.
Alternate forward / reverse play
Play animation forward on the first play and in reverse on the next play and then continue with the same pattern on subsequent plays.
If “Reverse play” is checked the animation will be first played in reverse and then forward.
This setting is useful for situations when click animated the element to its active state and the next click returns it to the original state by playing the animation in reverse.
For example, clicking on a link can open a popup box and clicking on the link again can close it.
Hello!
I’m a popup box.
When this is active you also get the chance to “Speed-up the animation on reverse” by setting the speed as % of the original speed. This is useful to speed-up animations that return the element into its original state, for example, closing a popup.