Roel Van Eyken, a graphic/Web designer from Belgium offers us an excellent guide to integrate Snipcart in your WordPress themes created with Pinegrow.
Snipcart is a powerful, developer-first HTML/JavaScript shopping cart platform with a full back-office management dashboard to track abandoned carts, sales, orders, customers and more…
This article was originally posted on the Pinegrow Forum

Dear Pinegrow users,
I have recently mentioned the combination of WordPress and Snipcart (a lightweight front-end ecommerce solution) using Pinegrow on Twitter when I was contacted by a Pinegrow representative, asking whether I was willing to share my workflow with them. And as such, here I am.
Below here I will detail a basic integration with Pinegrow and WordPress (note, this is basic. In a later post I may detail to which heights this can be taken, but for now, it will just be the basic one).
I refer to this as a “sort of” tutorial because it is more like a showcase of the general principle of a snipcart integration using a basic example rather than a step by step guide. It is intended to serve as educational content to specify how Snipcart works and how you can make it work within WordPress using Pinegrow. So my recommendation is to go over this guide first, than download the project in chapter 5 and go over this guide again with the project itself close at hand. This way I hope it will be clear how it was build and why the parts that are there are located where they are.
A short description of Snipcart’s more technical side is that it is build around html attributes and the key to integrating it is to get WordPress (or any other CMS for that matter) to insert the right data into the right html attributes, which this guide will explain how to do (in a basic sense).
I will divide this into a few chapters for easier reading:
Chapter 1: Create layout
Chapter 2: Include snipcart assets
Chapter 3: Create product page
Chapter 4: Test implementation
Chapter 5: Download project
Prologue
As mentioned, Snipcart is a relatively lightweight front-end eCommerce solution.
Compared to WooCommerce it has a much lower footprint and is tech agnostic (meaning it can be applied to pretty much any web technology, including WordPress). There is an entire article (by the people of Snipcart) comparing Snipcart to Woocommerce (which you can find here) and details Snipcart’s strengths compared to it. Yet, in my opinion the biggest one is the styling freedom one gets when using this solution.
In order to use it you need to sign up on their website which will give you acces to their Dashboard.
As far as WordPress is concerned, it is important that the ACF plugin (free or pro) is installed.
Chapter 1, Create layout:
the first step is relatively straightforward. Just create a standard Pinegrow WP layout as most of you are probably already familiar with. In this exmaple I will be working with an index page and a front page (important that it is called front-page.html, or otherwise exported as such in Pinegrow WordPress settings).
In this example I’ve created a simple grid layout (using flexbox) in the front page file as demonstrated below:
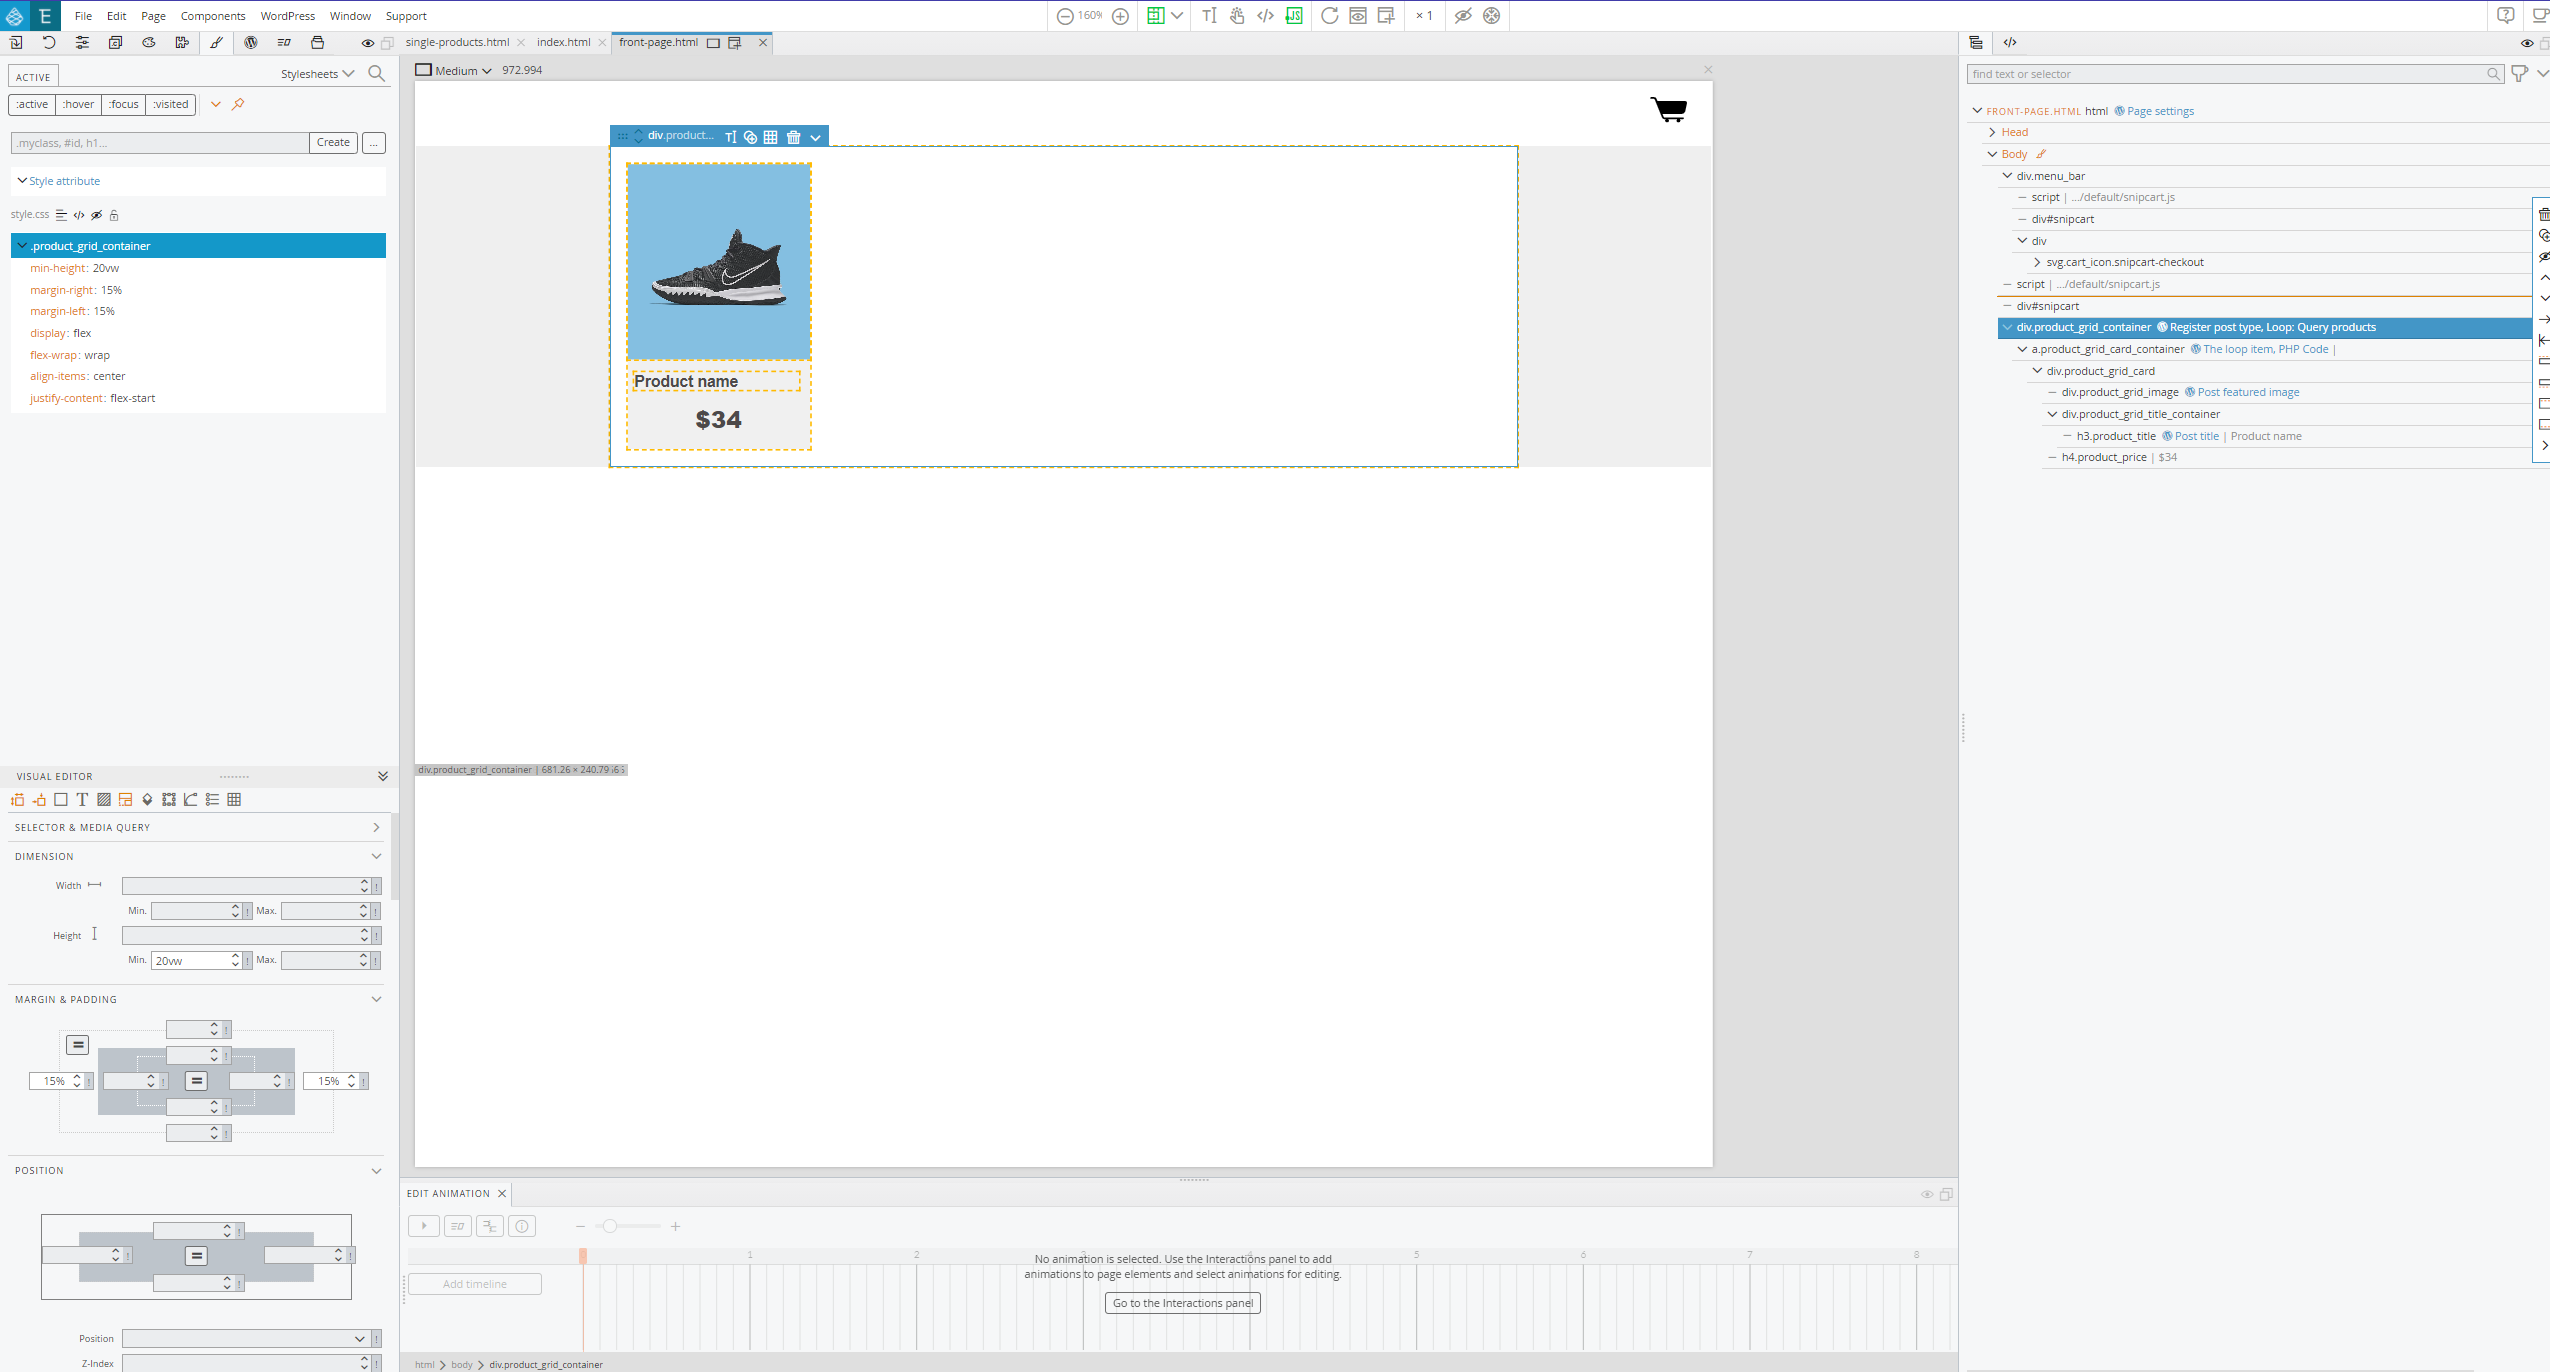
This example will generate cards that correspond to the custom post type it is assigned to (which we will register shortly).
The most important aspect here, is the loop assigned to the main grid like so:
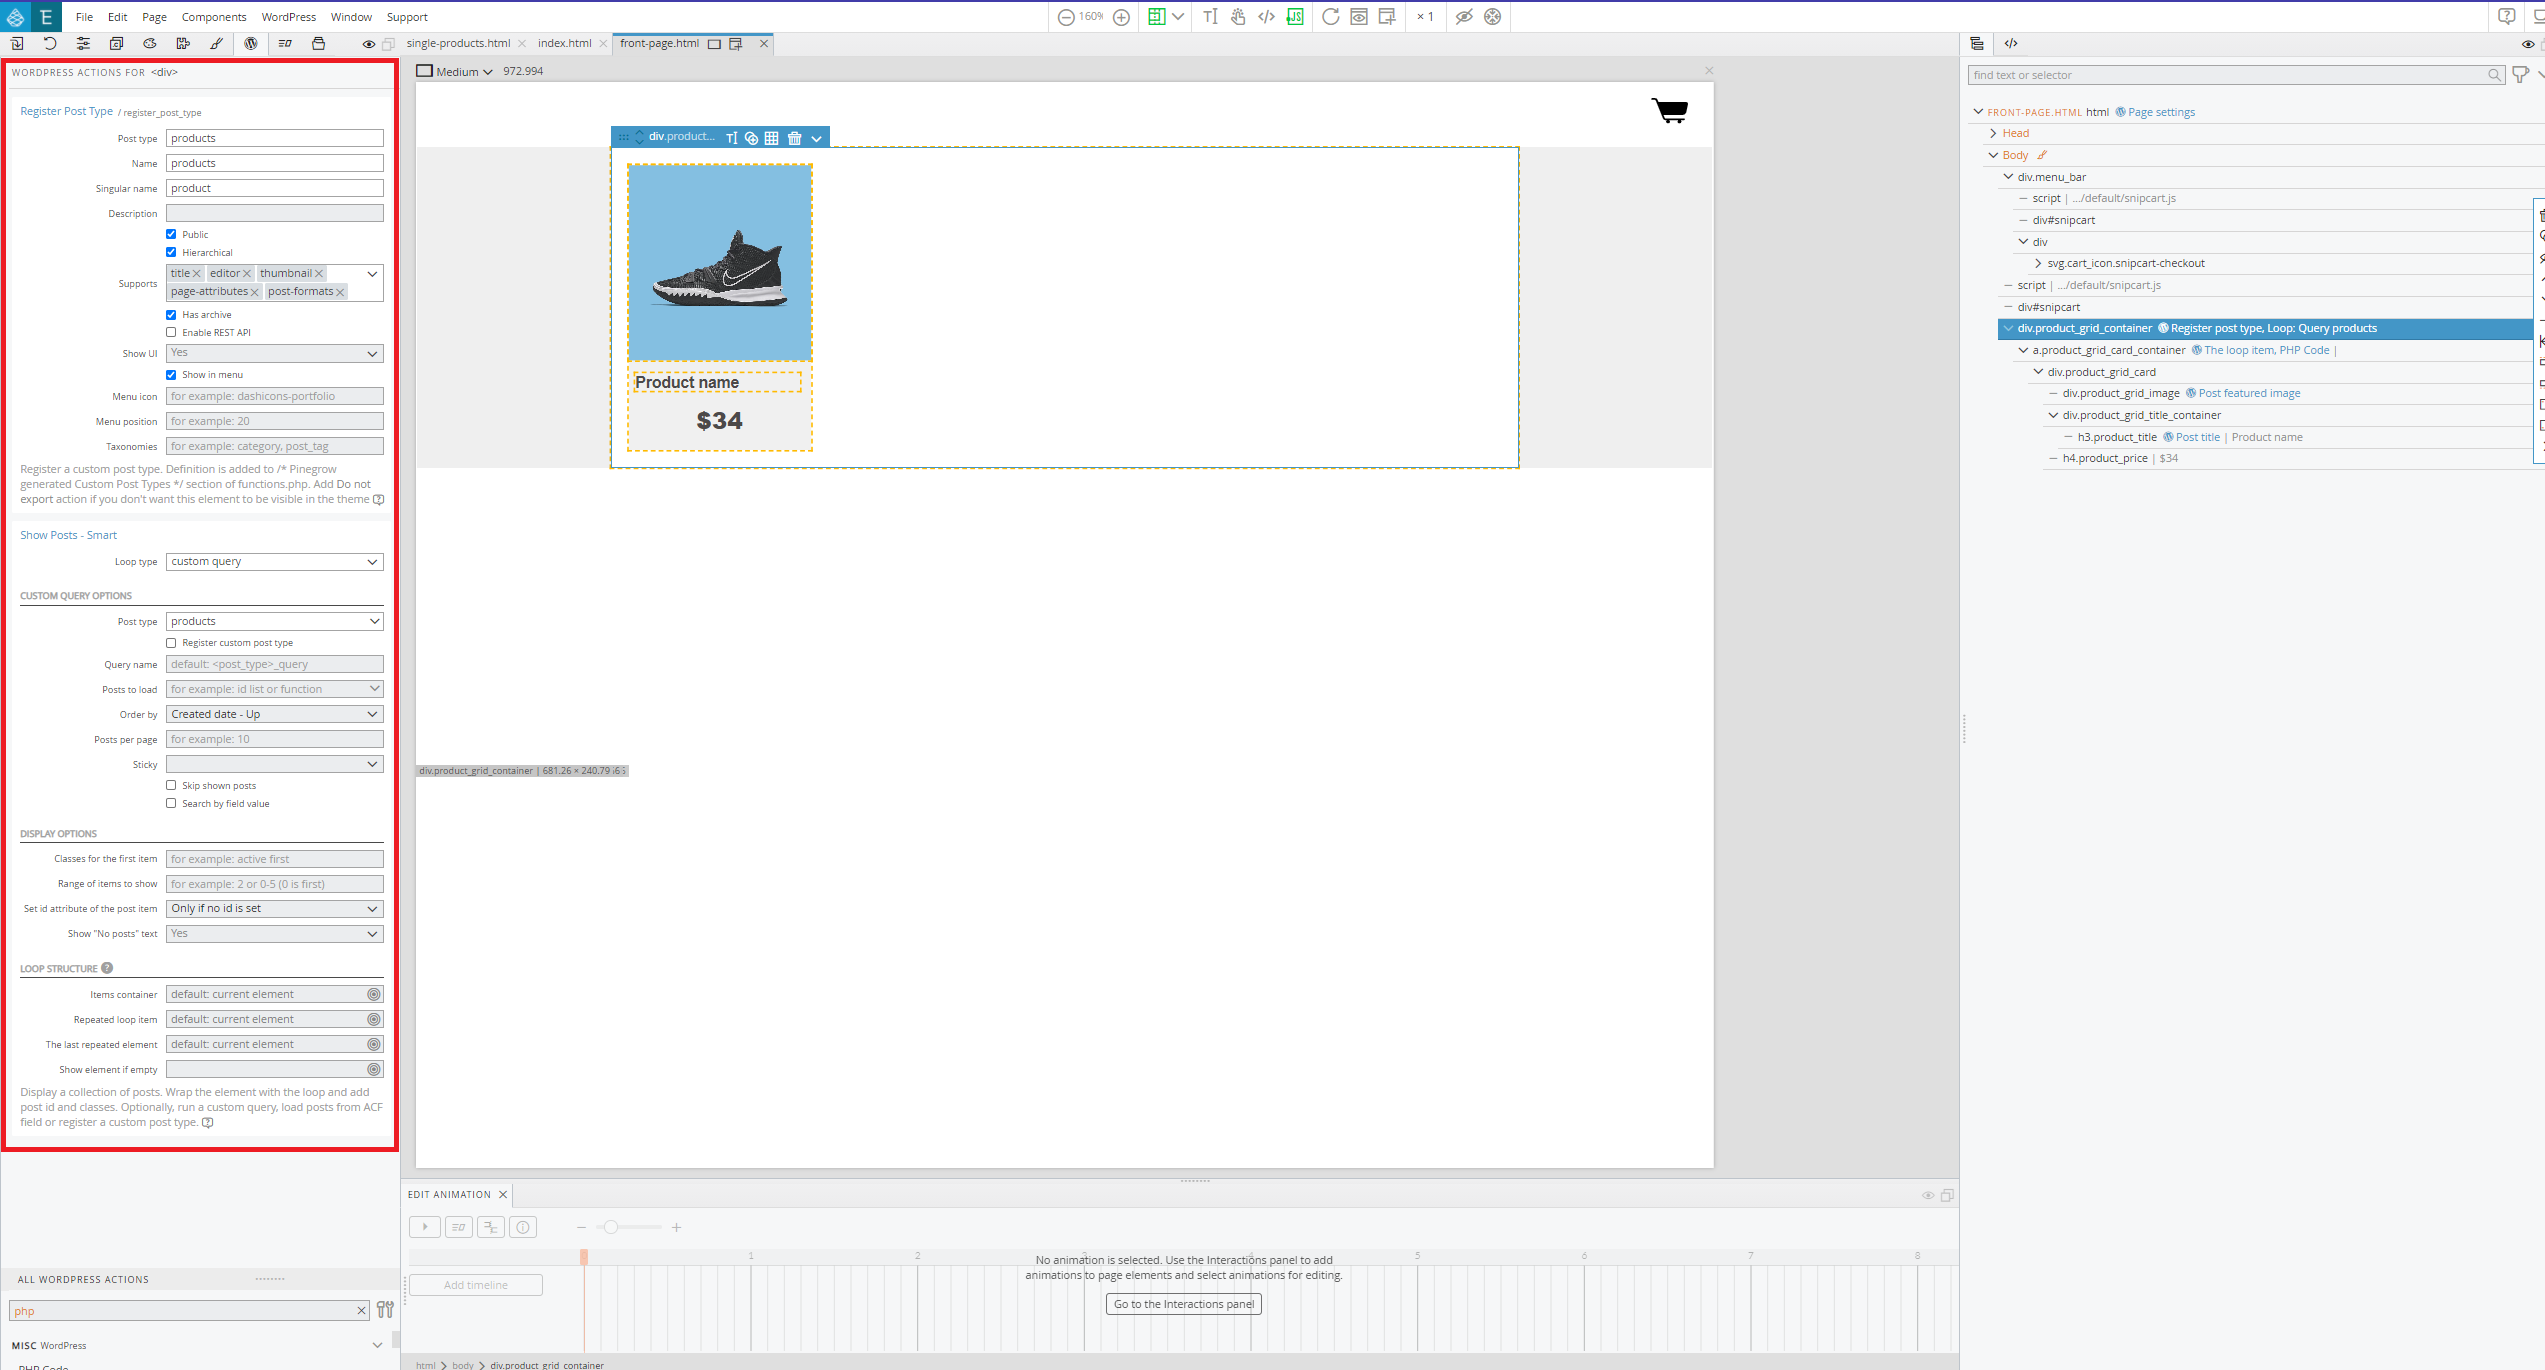
Also, notice that a post type is registered at the top which will provide a seperate menu item in WordPress which is where we will define the products.
In the below example the loop item WordPress action is attached to the a, link element with the .product_grid_card_container class.
There is also a PHP code action present which is set to replace attribute
The value this action contains is the get_permalink() WordPress function. (I find this to be an easier method of inserting the post link than the standard Pinegrow action).

As for the rest:
the post featured image action attached to the image (div with background-image).
And the post title smart action set to the h3 element with the .product_title class.
What this basically does, as most of you are probably aware, is displaying the elements of the individual posts present in the product custom post type in the cards representing them.
The price identifier is a little more tricky. In this example the H4 element that is meant to show the price, has a PHP code action attached to it.
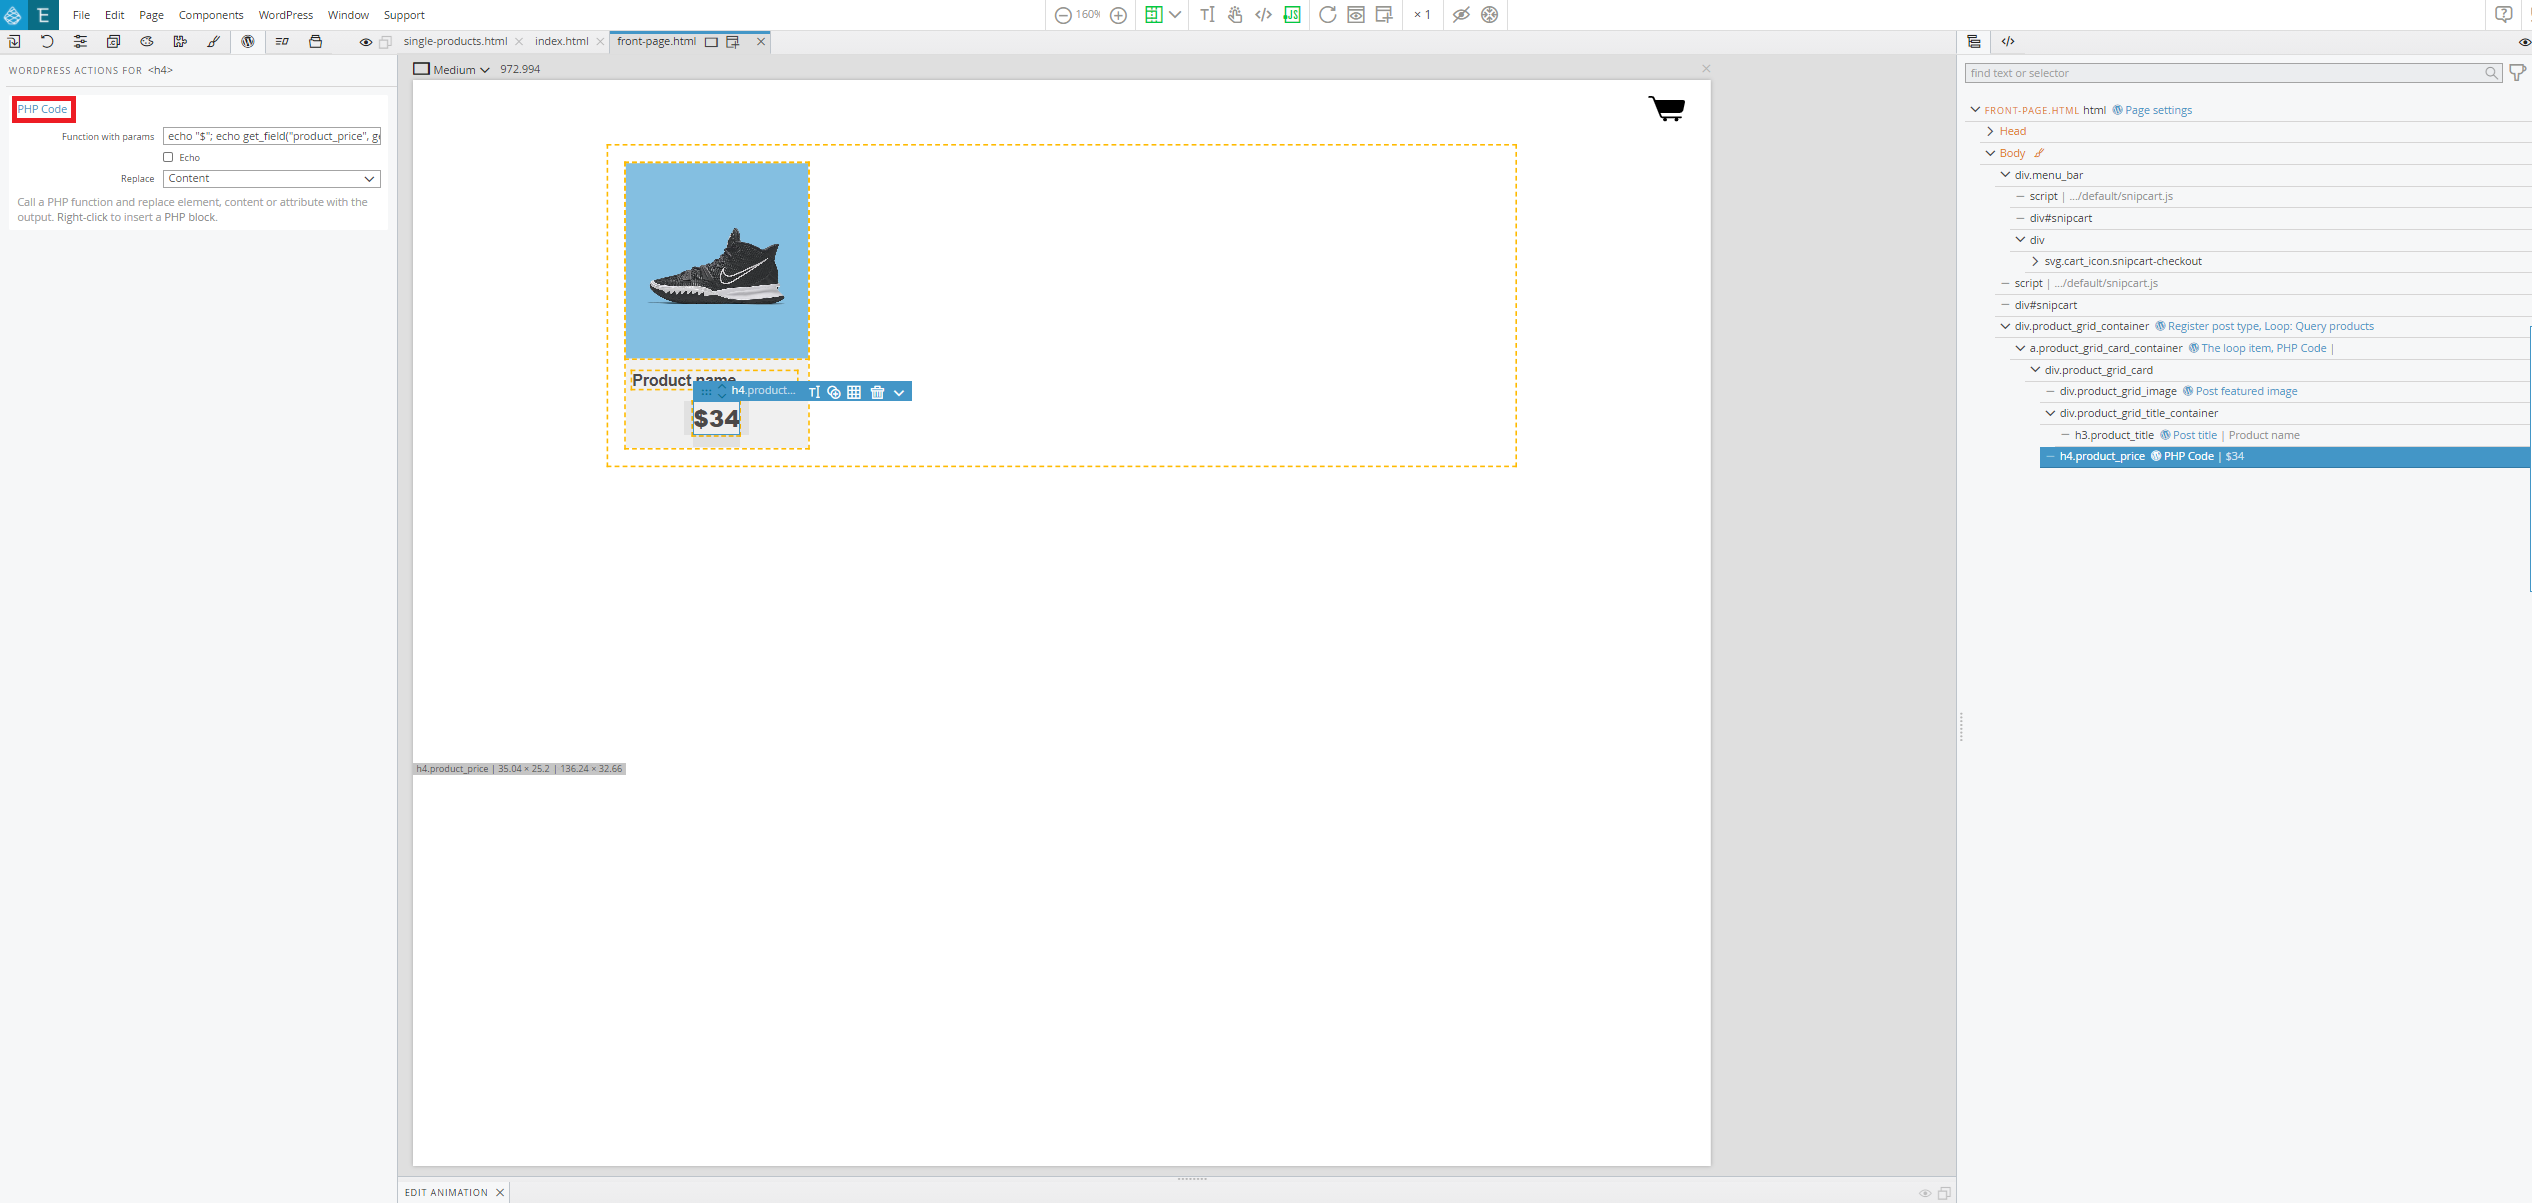
In this PHP code action the following PHP code is pasted:
echo “$”; echo get_field(“product_price”, get_the_ID() );The first part echo “$”; echo get_field(“product_price”, get_the_ID() ); makes sure that the currency symbol is inserted.
The second part echo “$”; echo get_field(“product_price”, get_the_ID() ); Loads a value from an ACF field called product_price that is set to appear on the product posts.
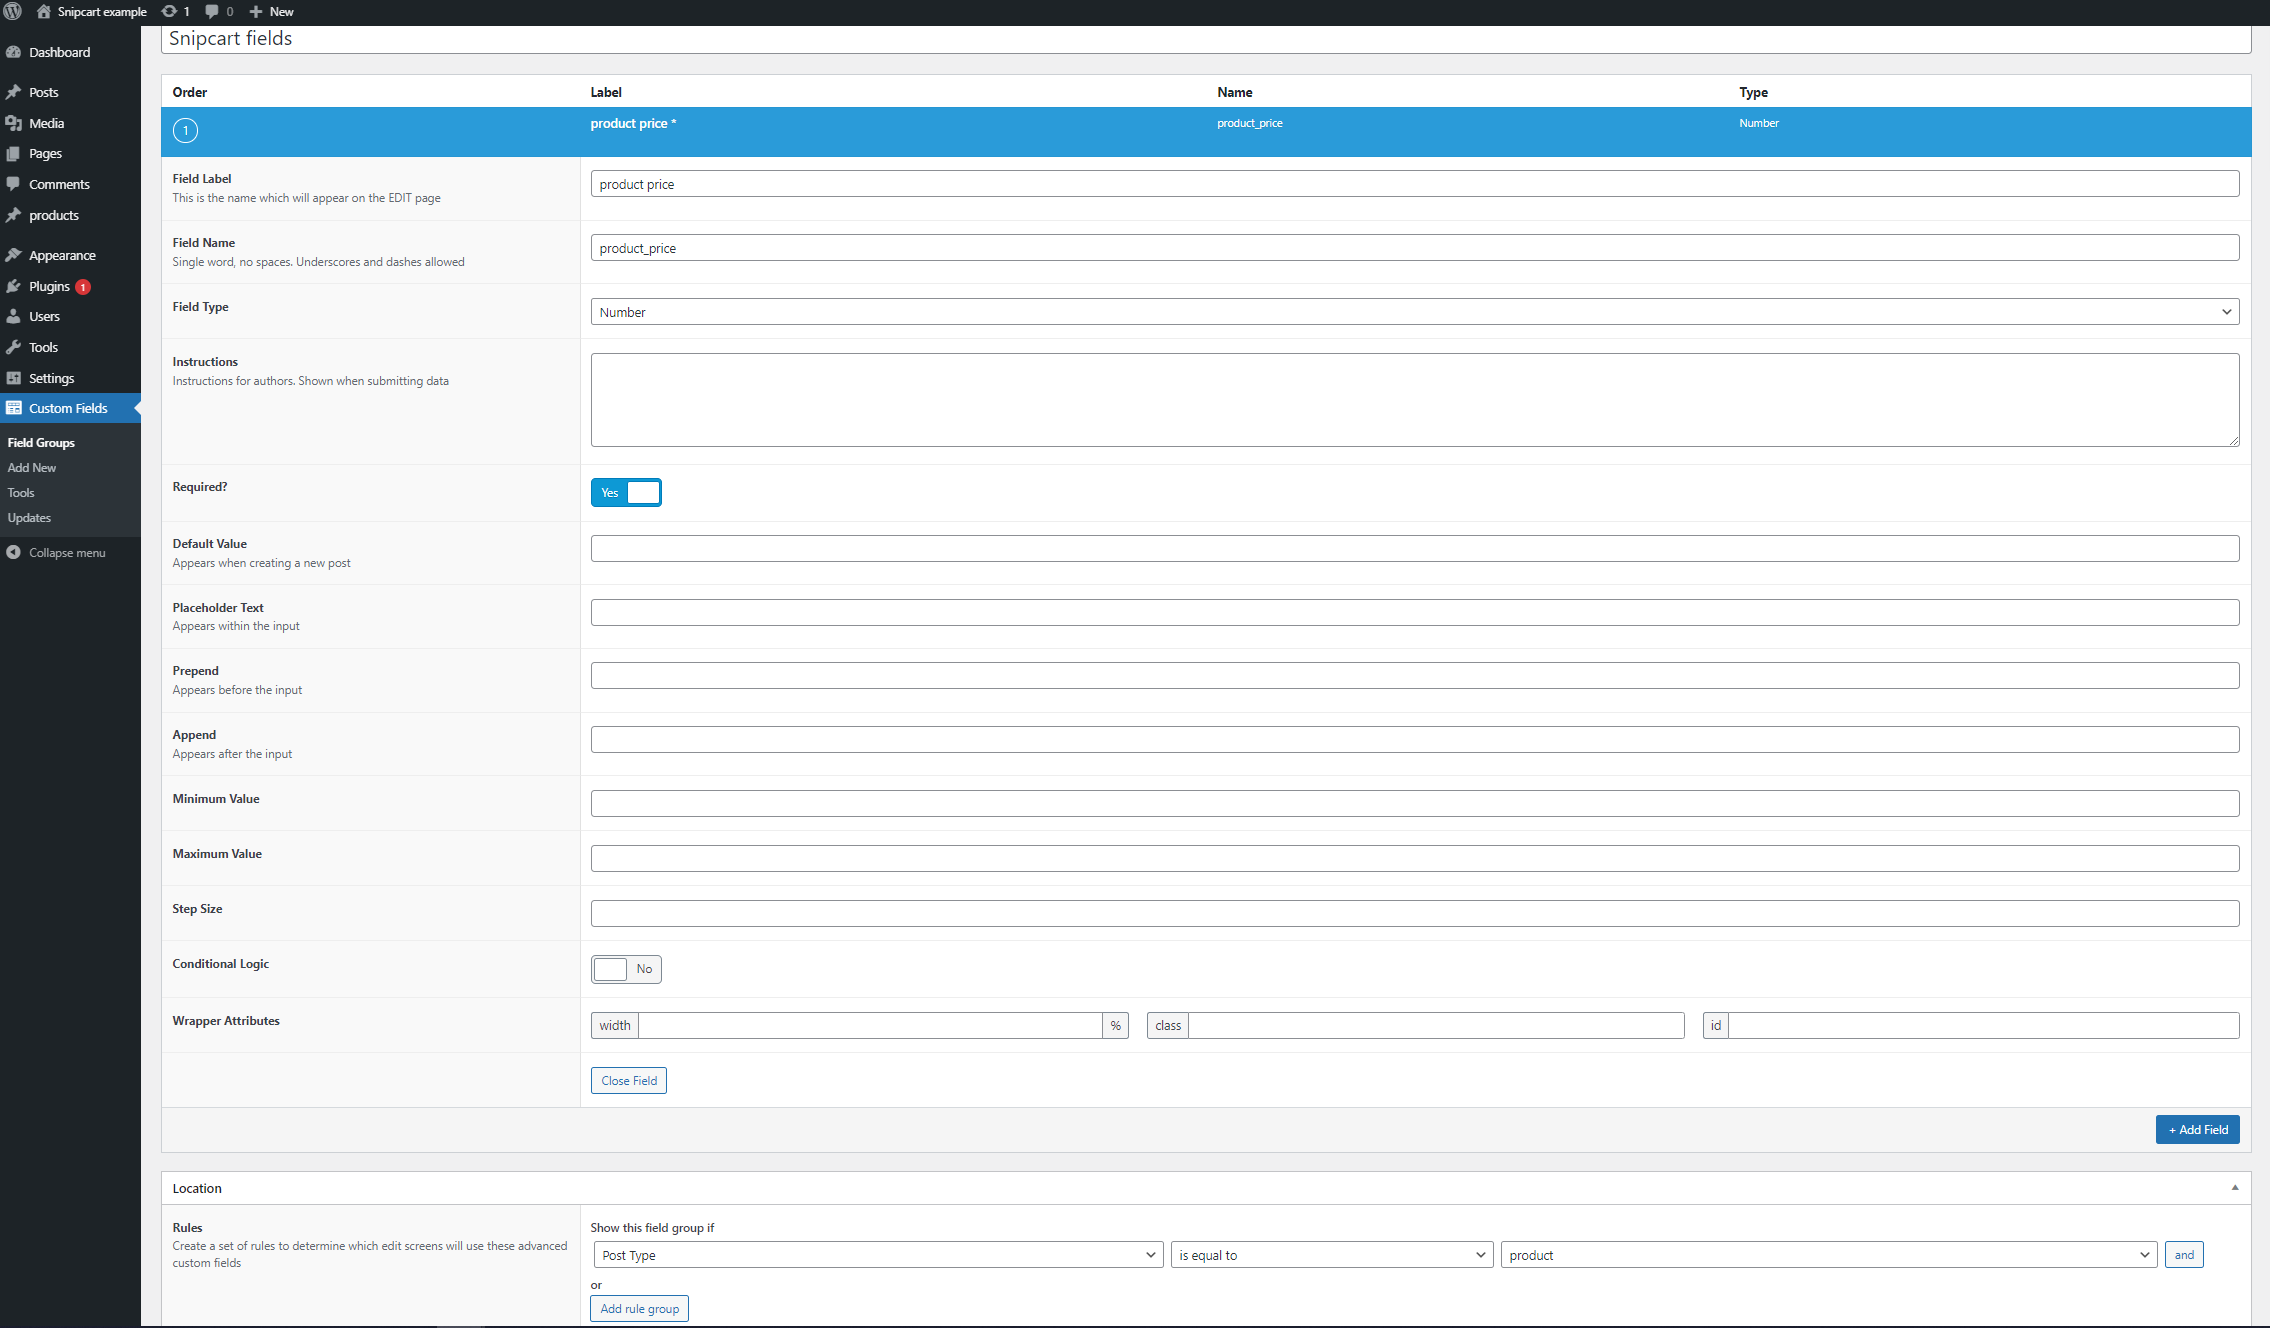
The ACF field is defined like this:
This setup generates a grid like this (with three example posts defined):
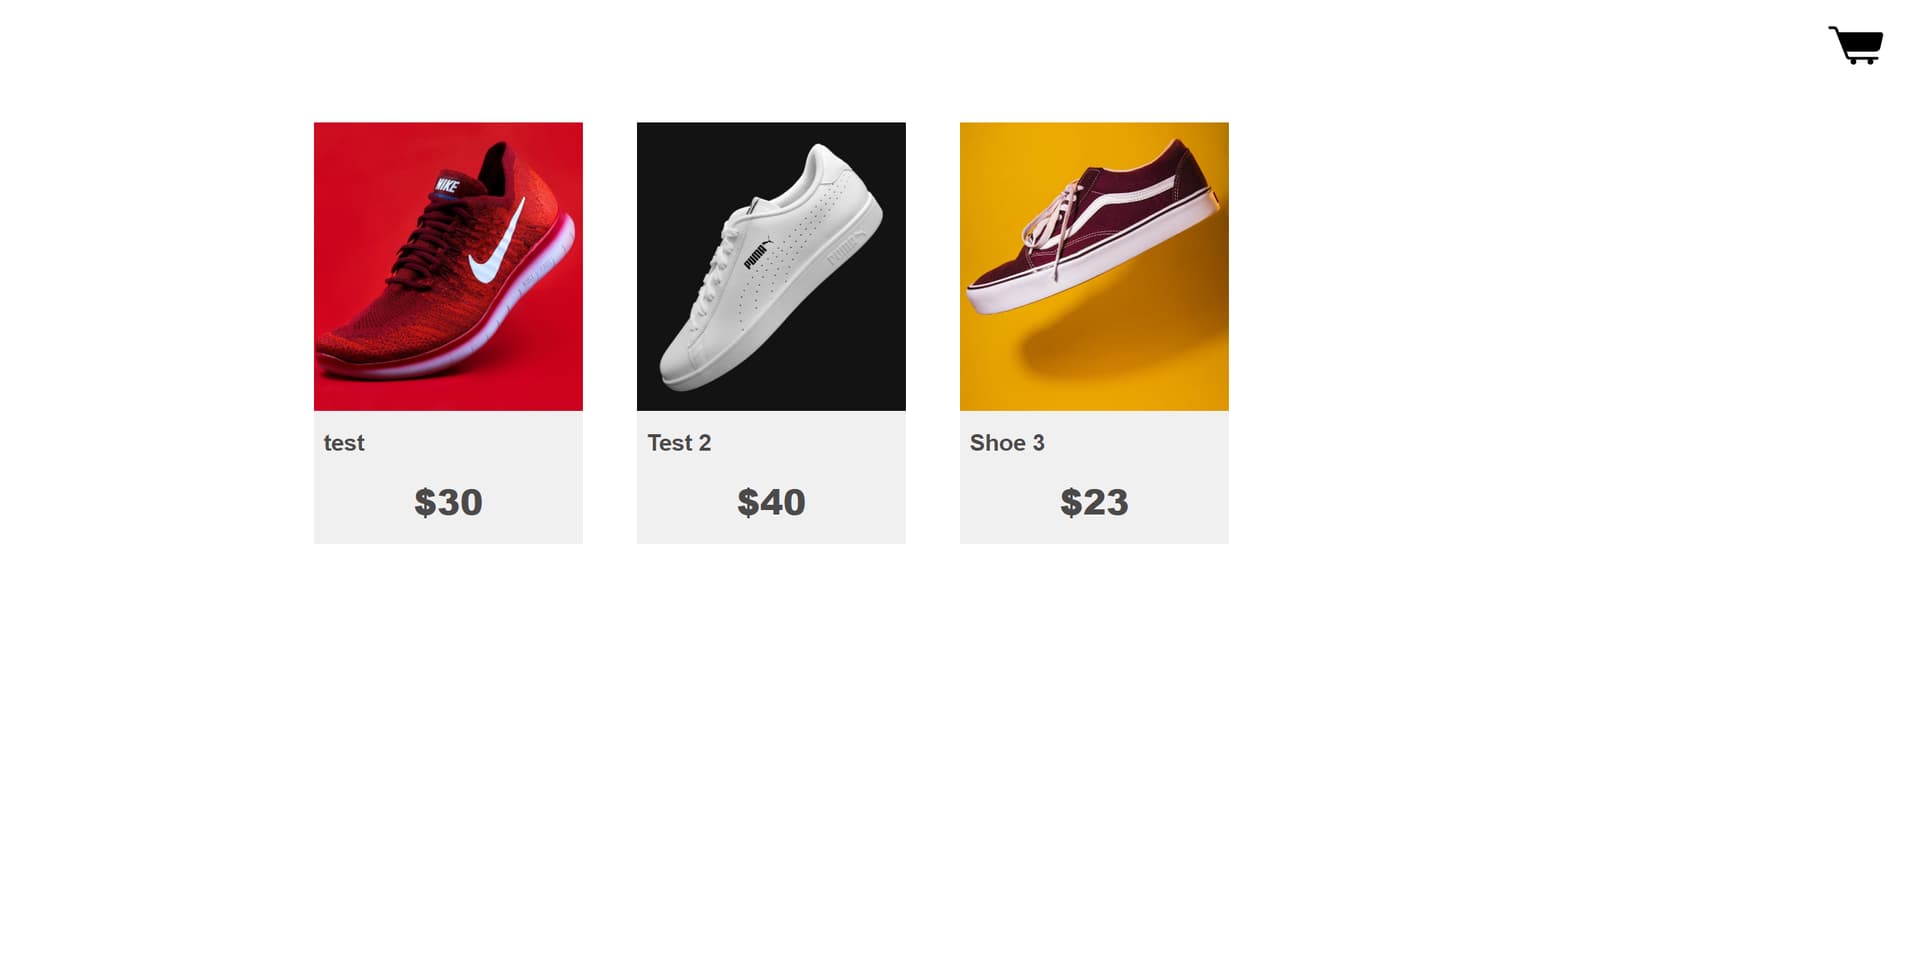
The individual “cards” should also link to their respective post pages (although we haven’t discussed the single.html file yet that will define the look and feel of the post page. As well as the Snipcart integration, more on this late)
Chapter 2, include Snipcart assets:
Until now, Snipcart hasn’t yet come into the picture. Now however, I will explain how Snipcart is integrated into the website. (official Snipcart documentation on this can be found here)
In both the index and front-page file (or in any other template definition Snipcart has to appear) the following elements are added in the <head> element:
<link rel="preconnect" href="https://app.snipcart.com">

<link rel="preconnect" href="https://cdn.snipcart.com">
<link rel="stylesheet" href="https://cdn.snipcart.com/themes/v3.2.1/default/snipcart.css" />
An the following inside the <body> tag
<script async src="https://cdn.snipcart.com/themes/v3.2.1/default/snipcart.js"></script>

<div hidden id="snipcart" data-api-key="YOUR_PUBLIC_API"></div>
Like this:

The part that says “your public api key” needs to be replaced with the public api key that you can find on snipcart dashboard here:
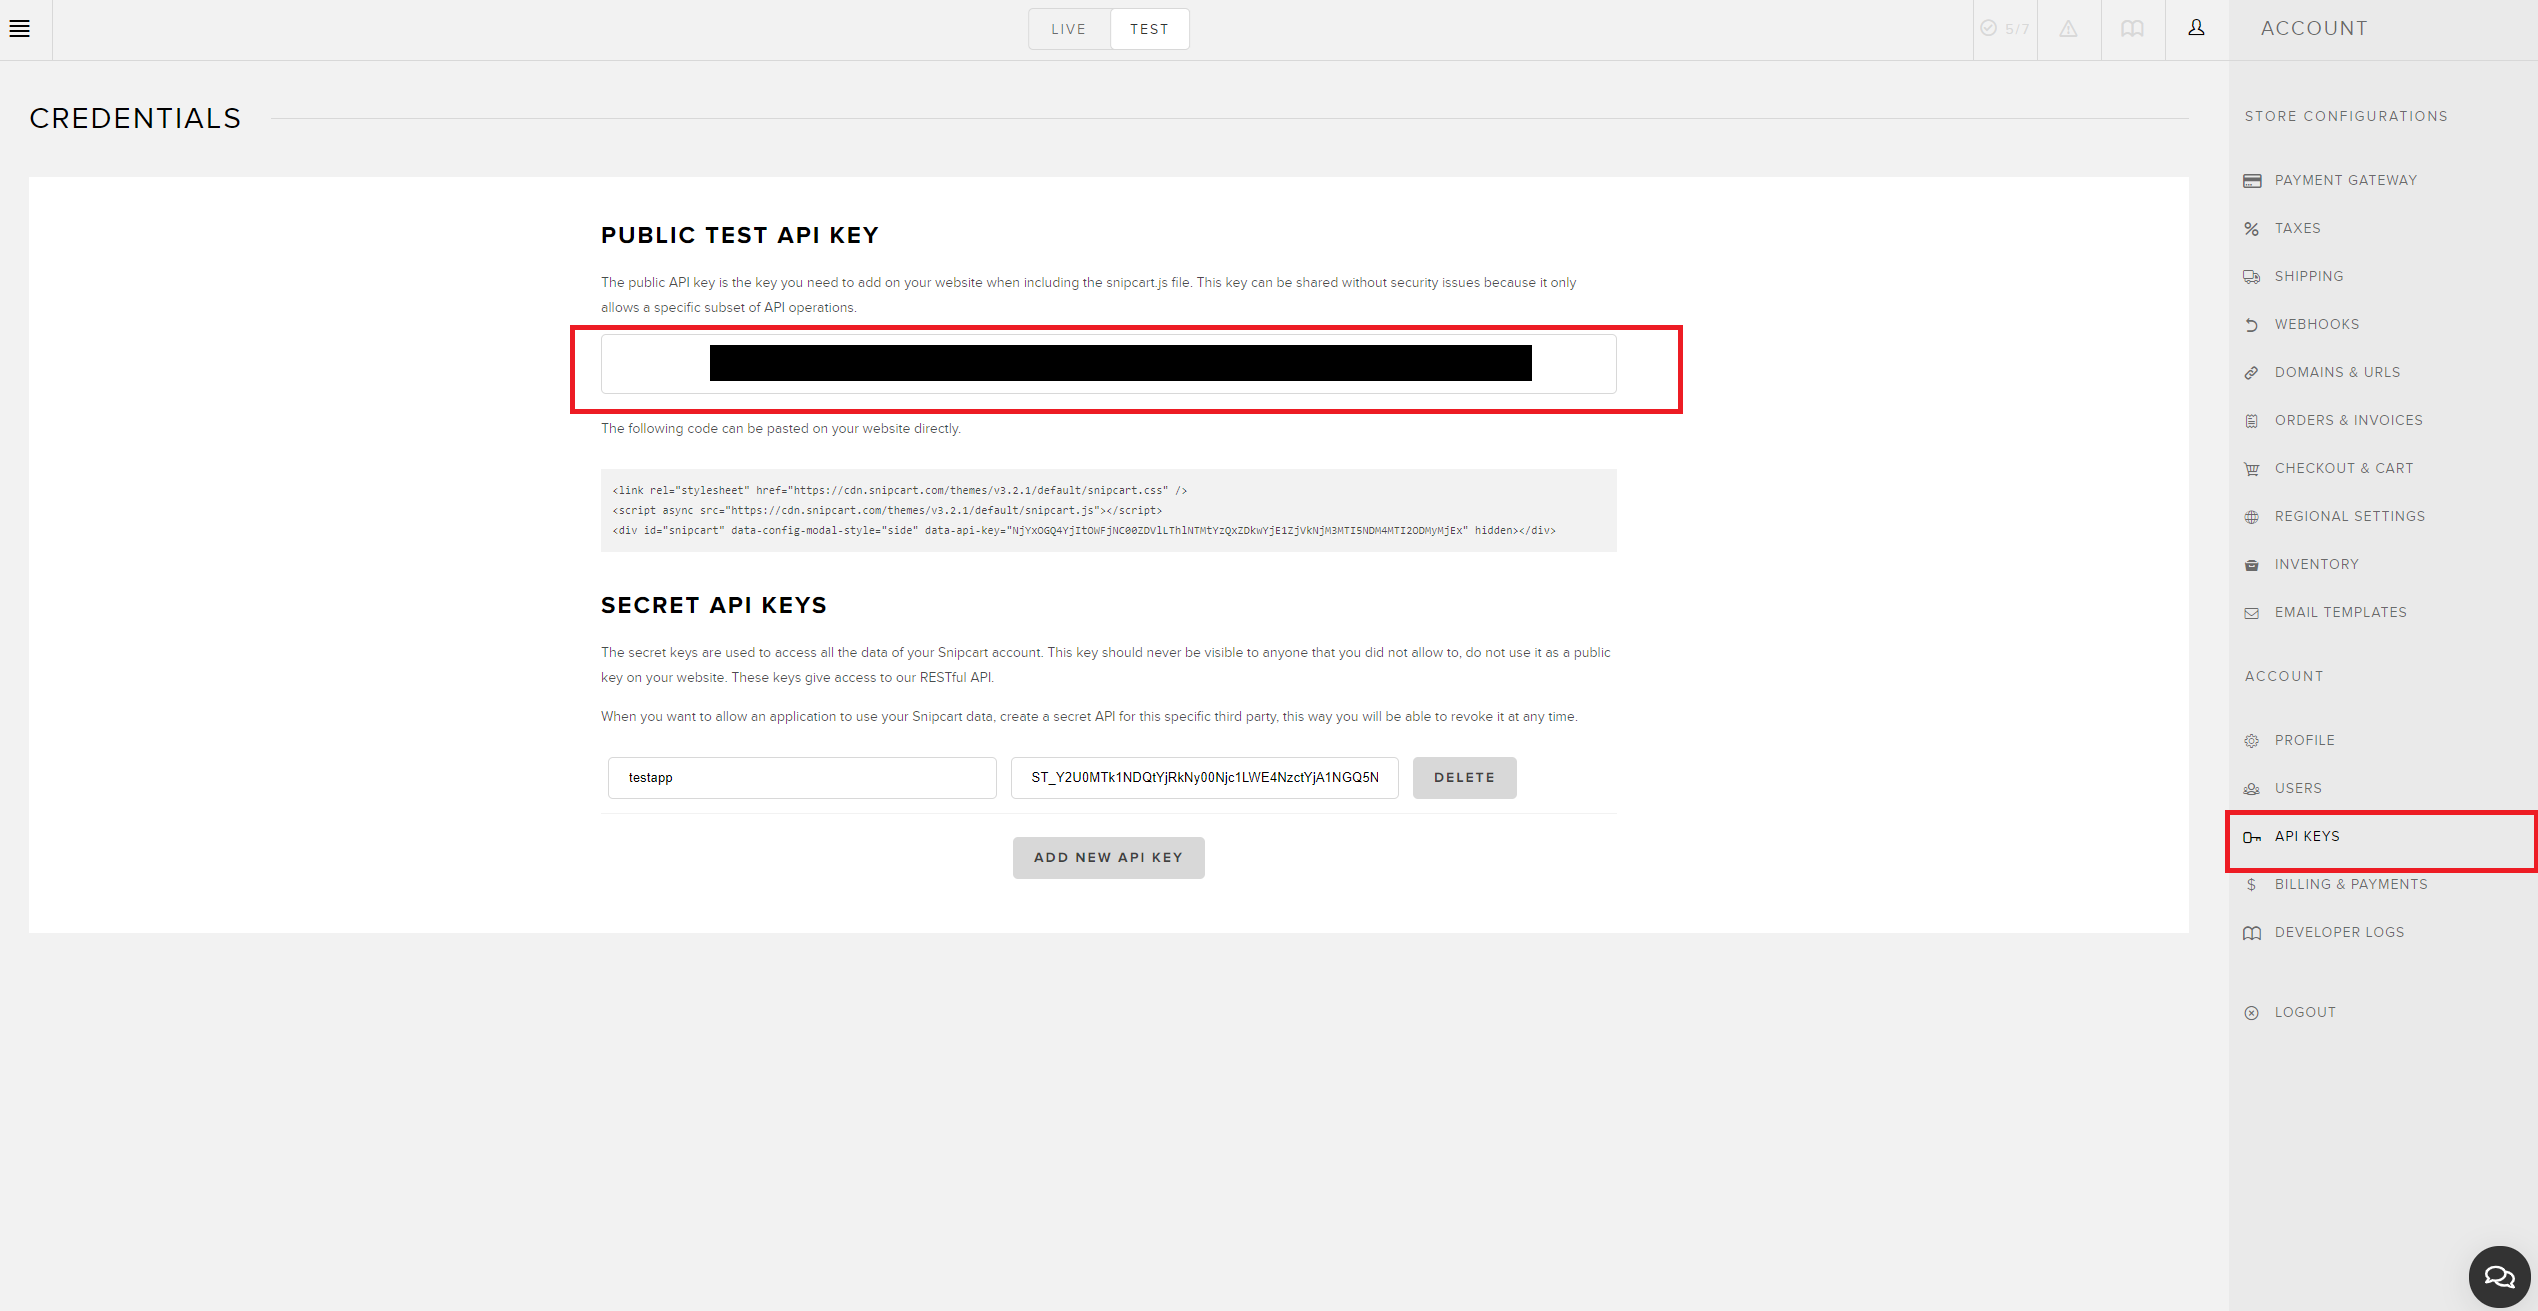
(I blacked mine out, in case you were wondering what that black bar was.)
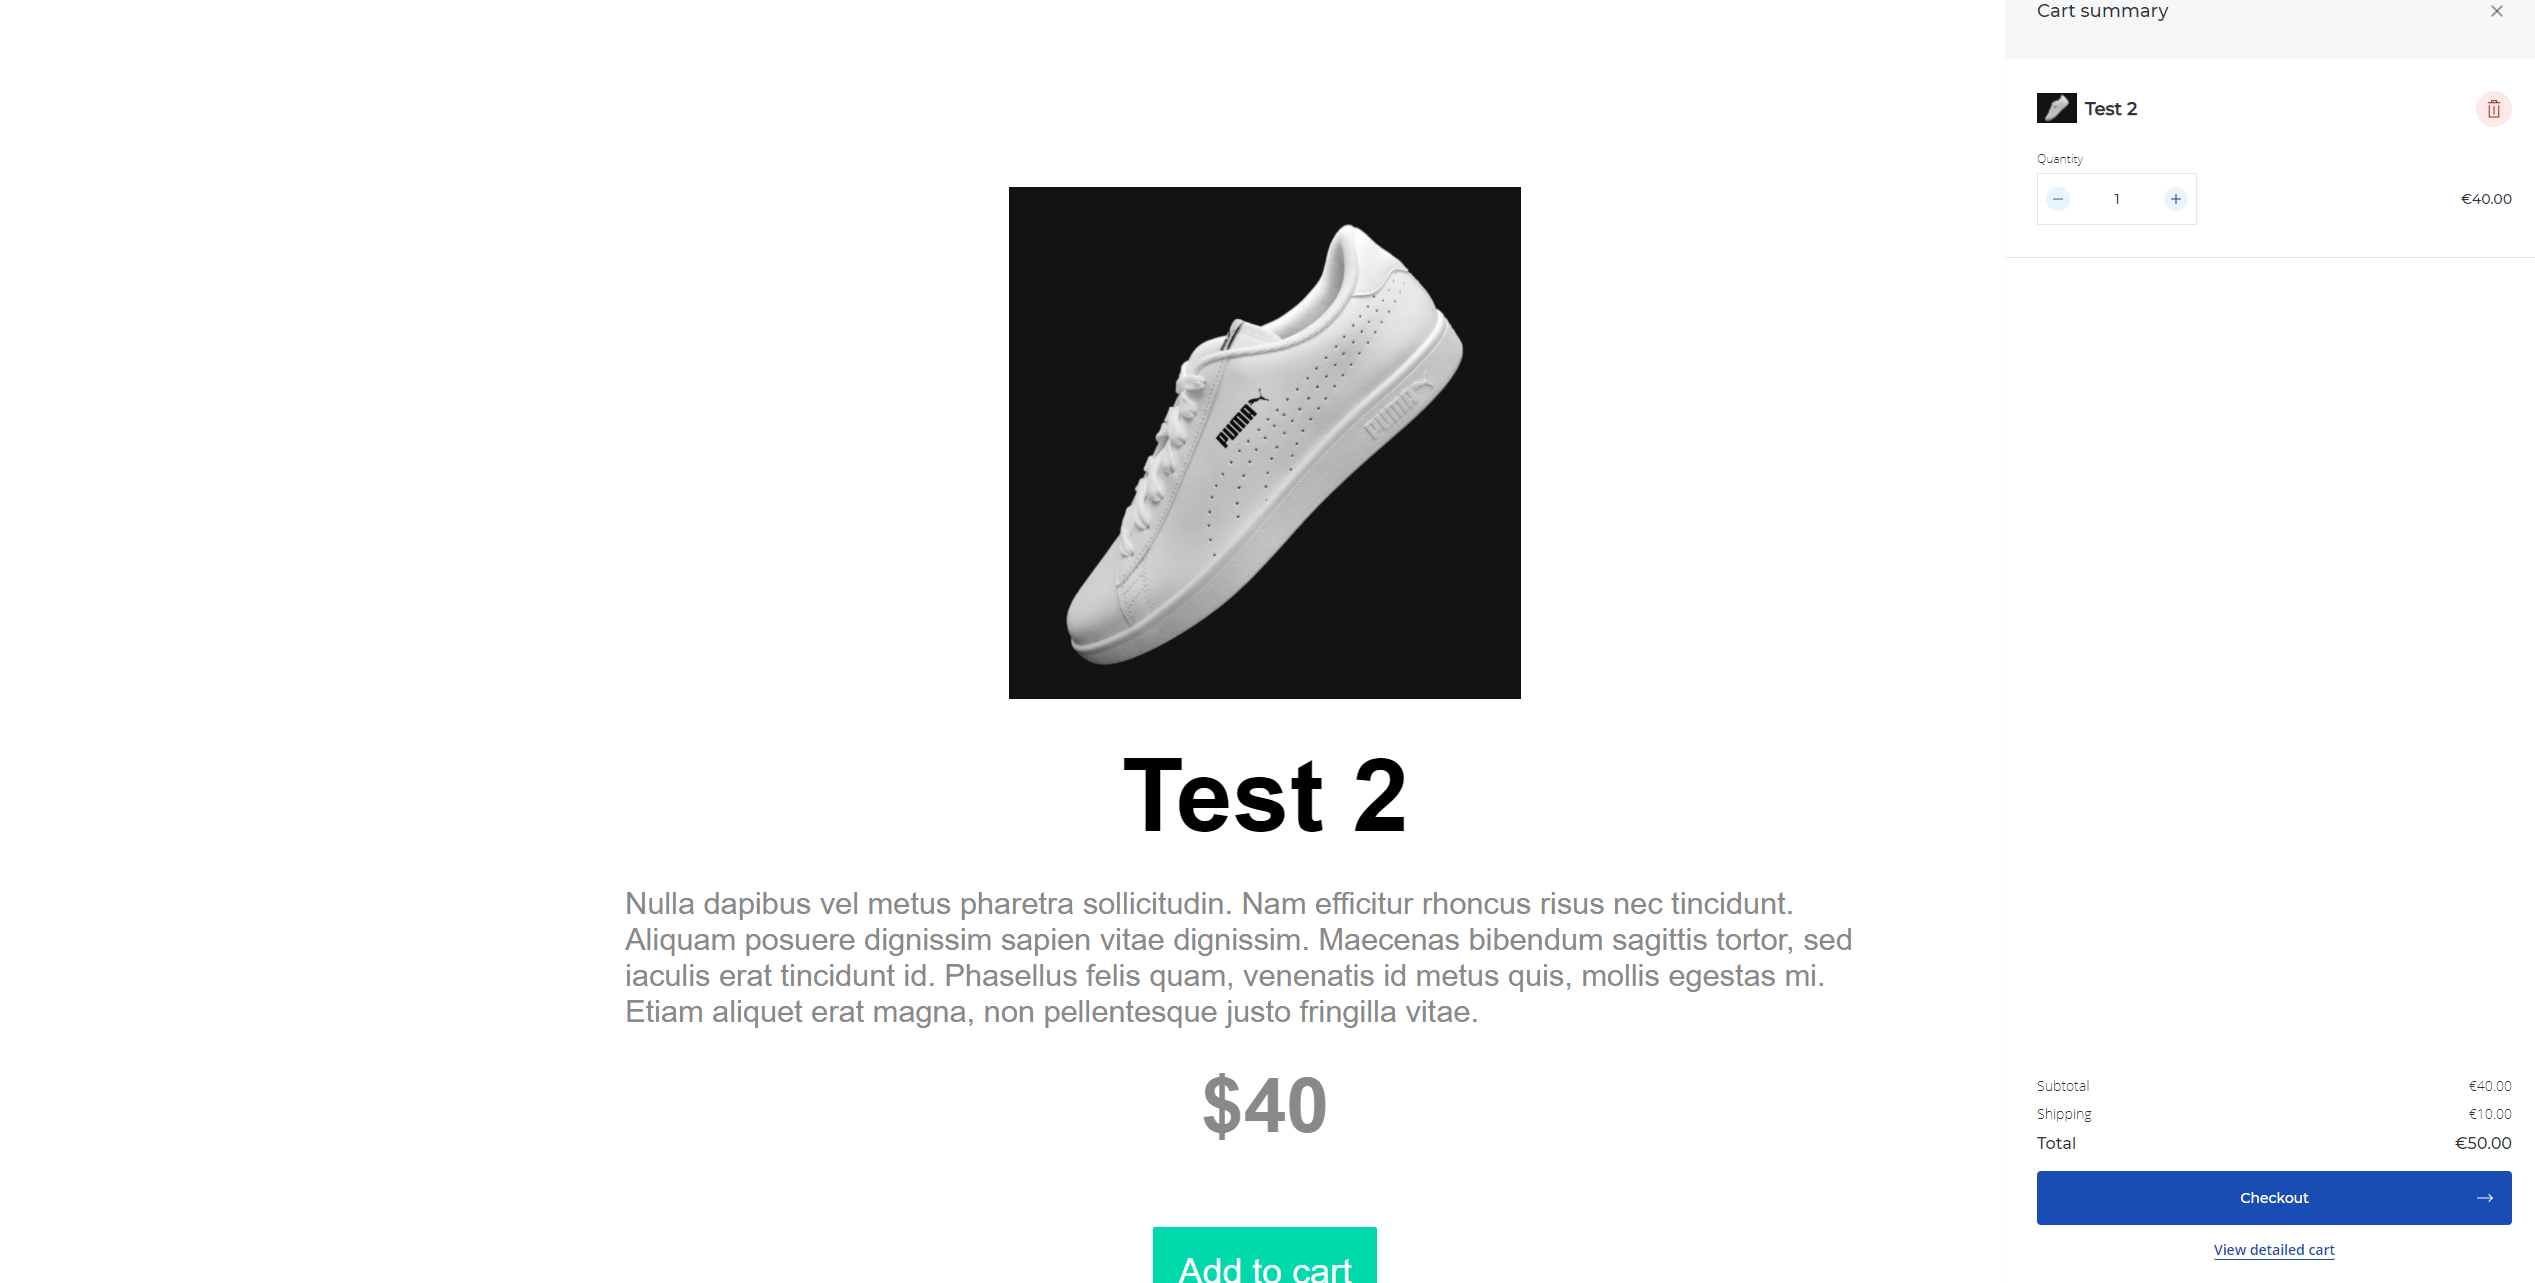
In order to create a button that will make the cart appear the following class needs to be applied to the element you whish it to trigger (which can theoretically be any HTML element):
.snipcart-checkoutIn this example the SVG cart icon in the upper right corner is used for this purpose.
Which results in this screen when clicked:
Chapter 3, create product page
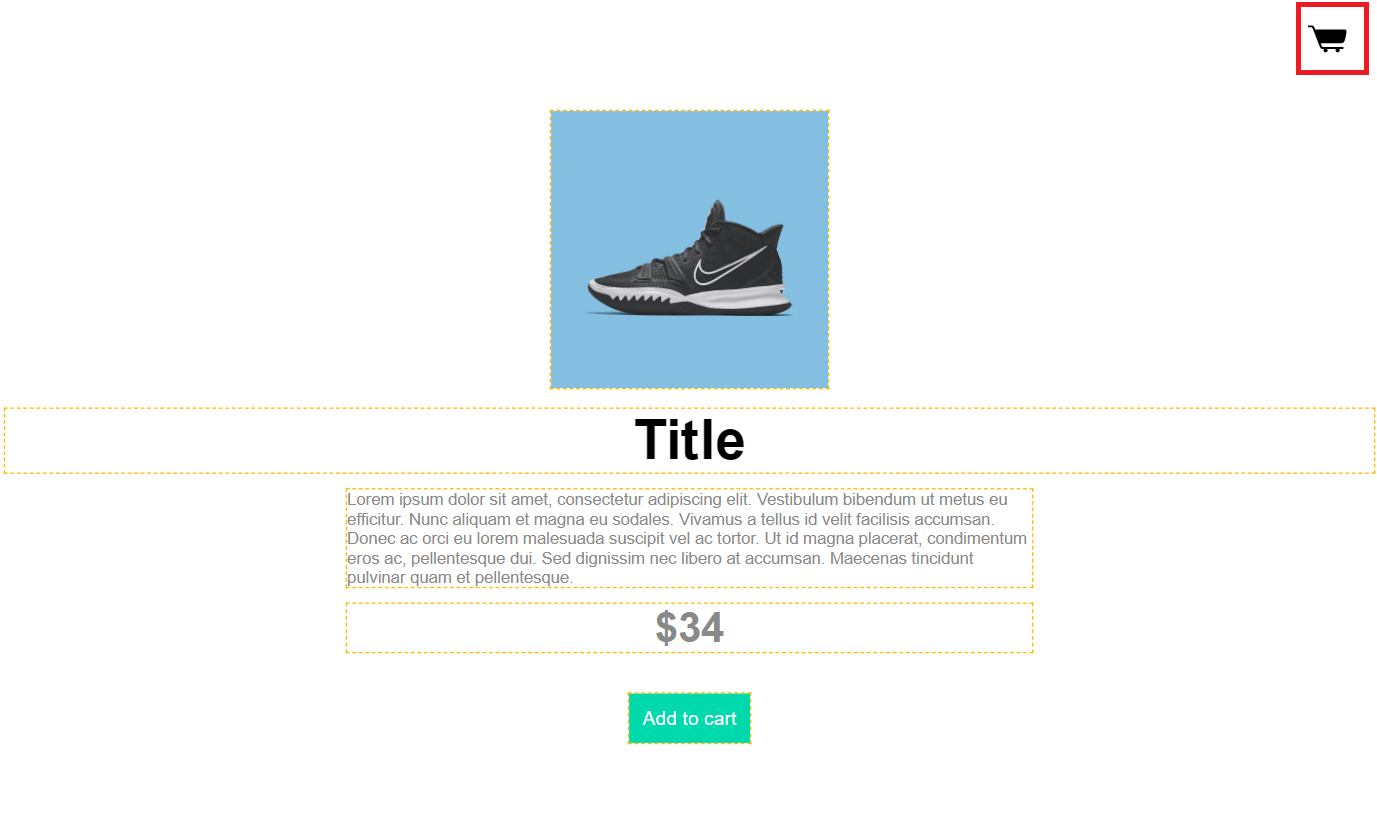
The single page for the product page is where the snipcart integration will be localised. It is important that this file be called single.html so that WordPress knows that it has to load this template when accessing the pages generated by the product custom post type.
In theory any html element can be a Snipcart product but Snipcart needs a URL to check the validaty of the price of the product. To do this, this example uses the page that is generated by the custom post type for each post.
The layout in this example is as follows: An image, a short description, a price and a buy button.
The button is the most important part of this page. It’s relatively basic.
As in the front-page, several Pinegrow WordPress actions are present again.
The post featured image action is present on the div with the background image in the center.
The post-title smart action is present on the “title” paragraph in below it.
The post-excerpt smart action is present on the paragraph below the title.
On the price below the description the same PHP code action is present as on the price section of the front-page:
echo “$”; echo get_field(“product_price”, get_the_ID() );As explained in the first chapter.
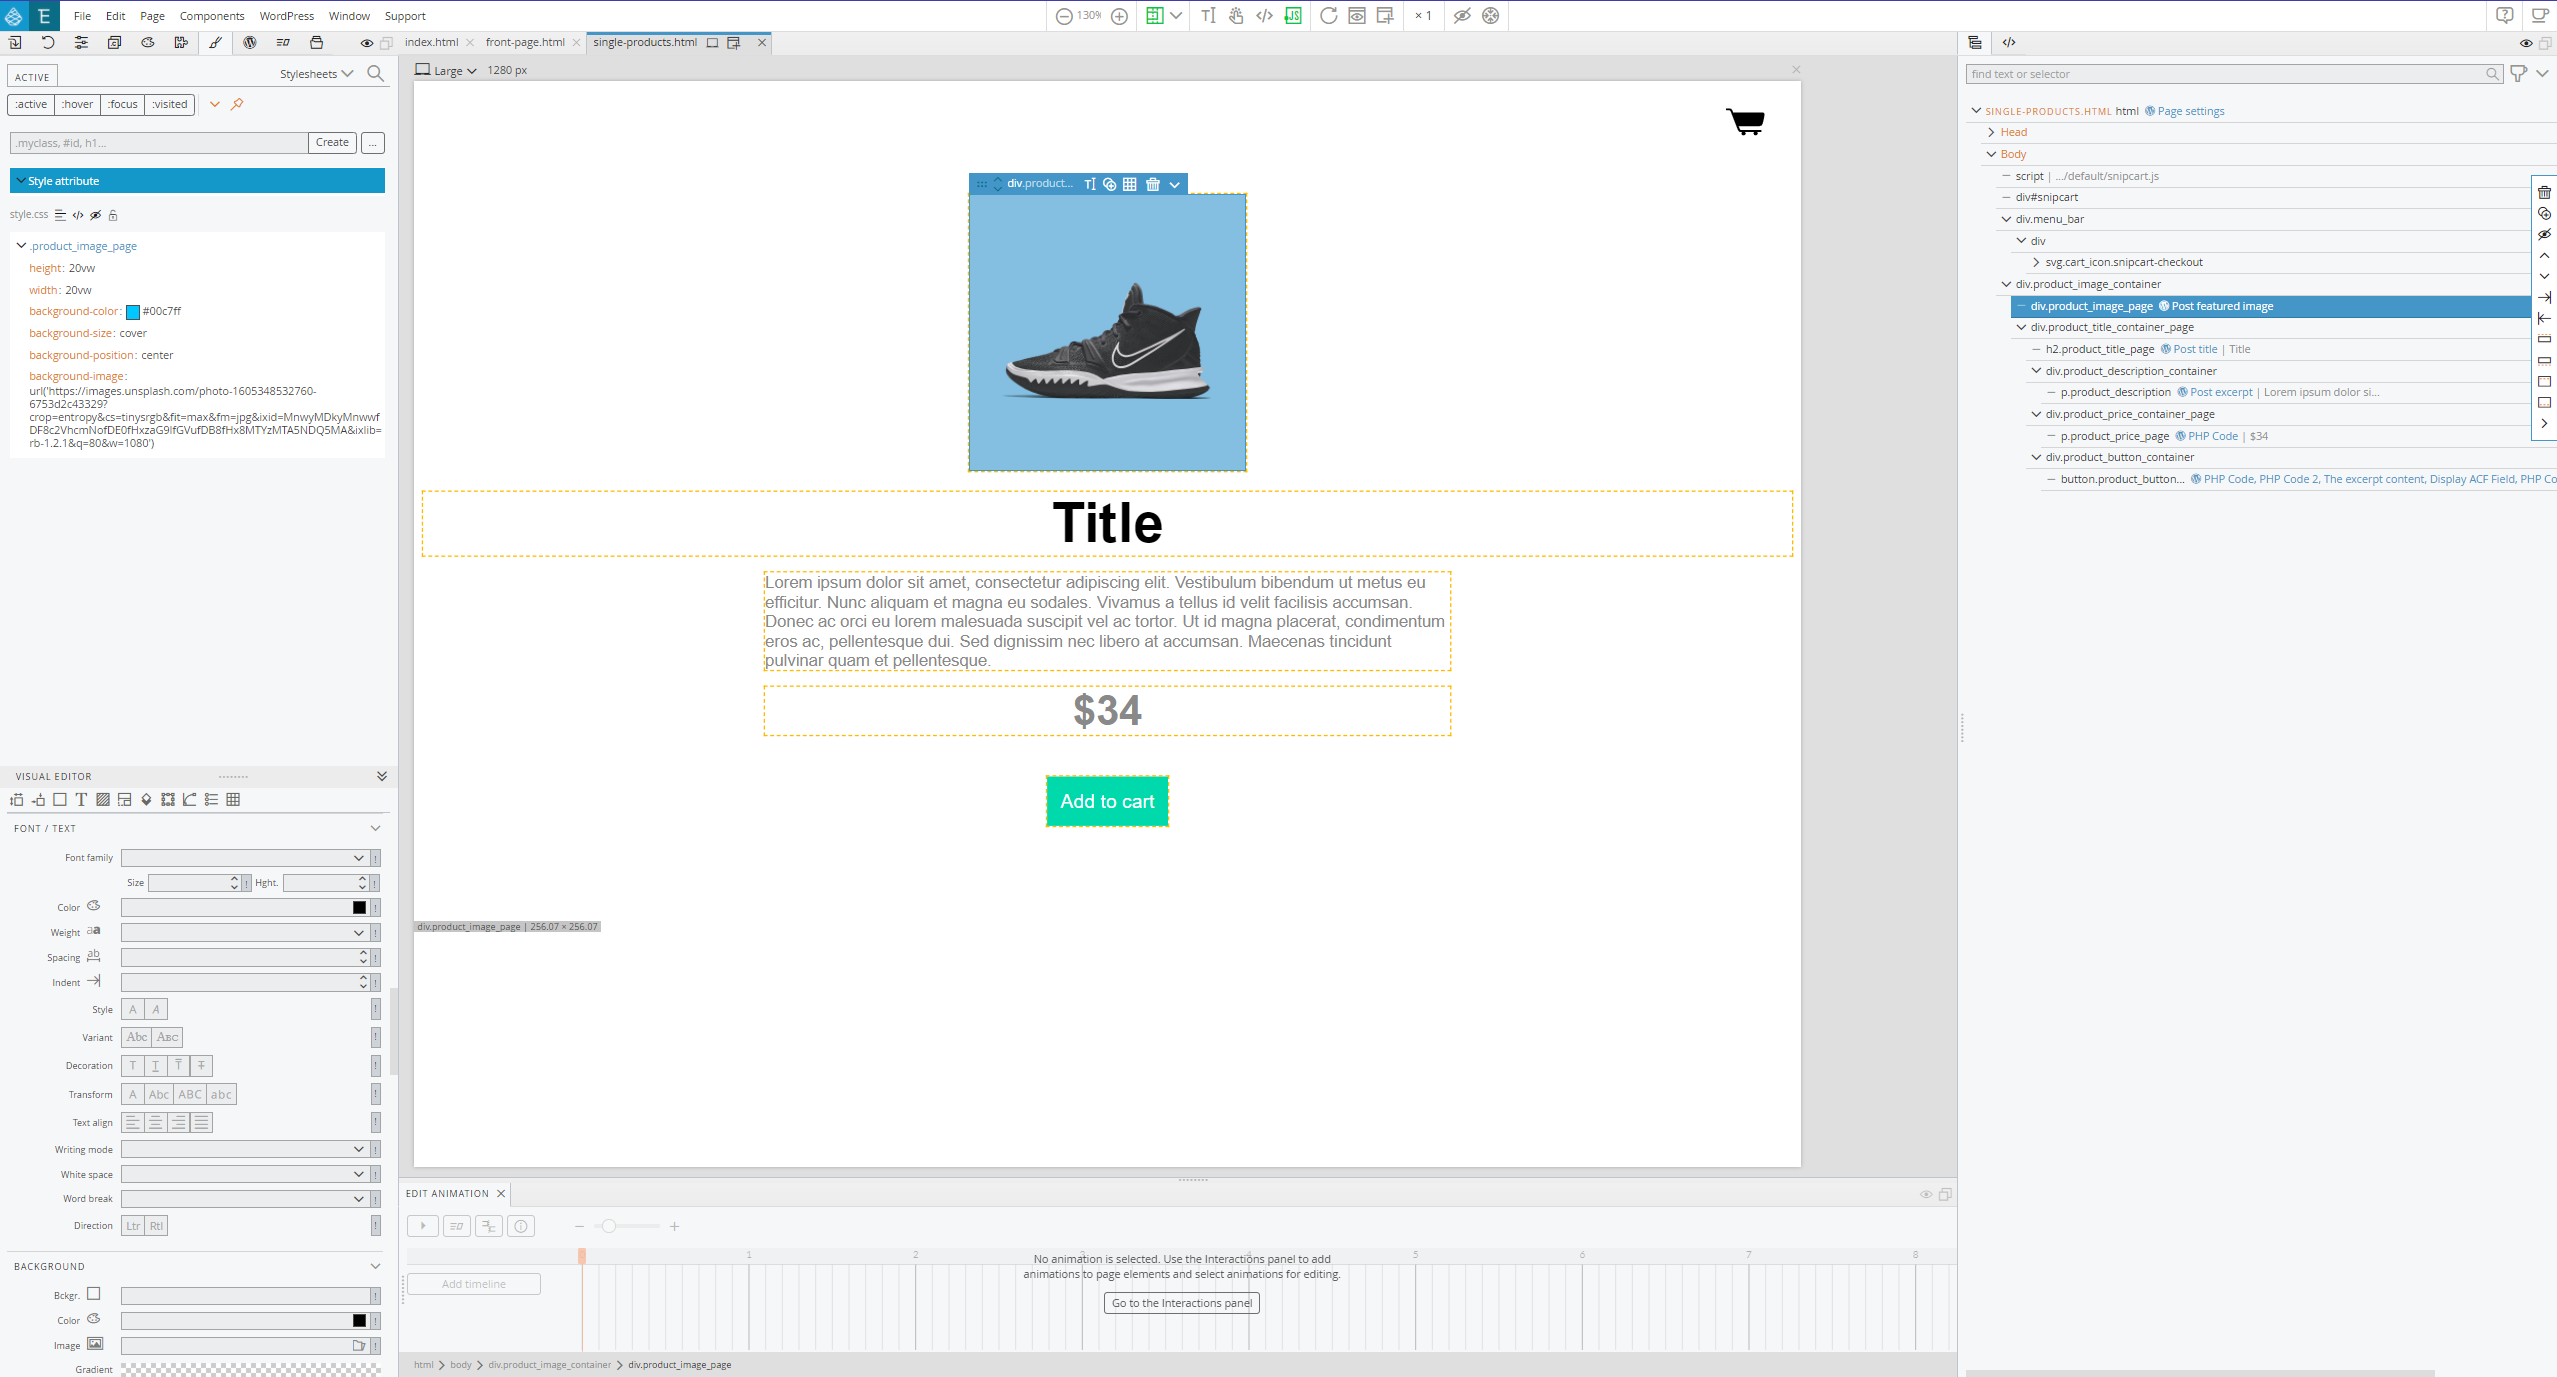
The button is the most important part of this page as this is where the details that are passed to Snipcart are located.
As such the following actions are necessary:

This is a more detailed image:

This is how the product is defined. You can read Snipcart’s docs about it here.
In the above image the following actions are present (from top to bottom):
- The first PHP code action contains the following code:
echo str_replace( site_url(), “”, get_post_permalink() );What this does is modify the link of the current post to only retain the final part of it.
For example:
https://testsite.local/product/testwill become
/product/testWhich is important for Snipcart to link to the right address.
And then places it in the html attribute data-item-url, the attribute Snipcart needs to check the validity of the product.
- The second PHP code action contains a WordPress function
the_title()which returns the title of the current post item. The code action puts this information in thedata-item-idattribute. This is an identifier for the product for Snipcart.
- The third action is an The Excerpt content action which result is placed in the data-item-description html attribute. This is optional but passes the description of the product as defined in WordPress to the Snipcart Cart.
What this does is the following:
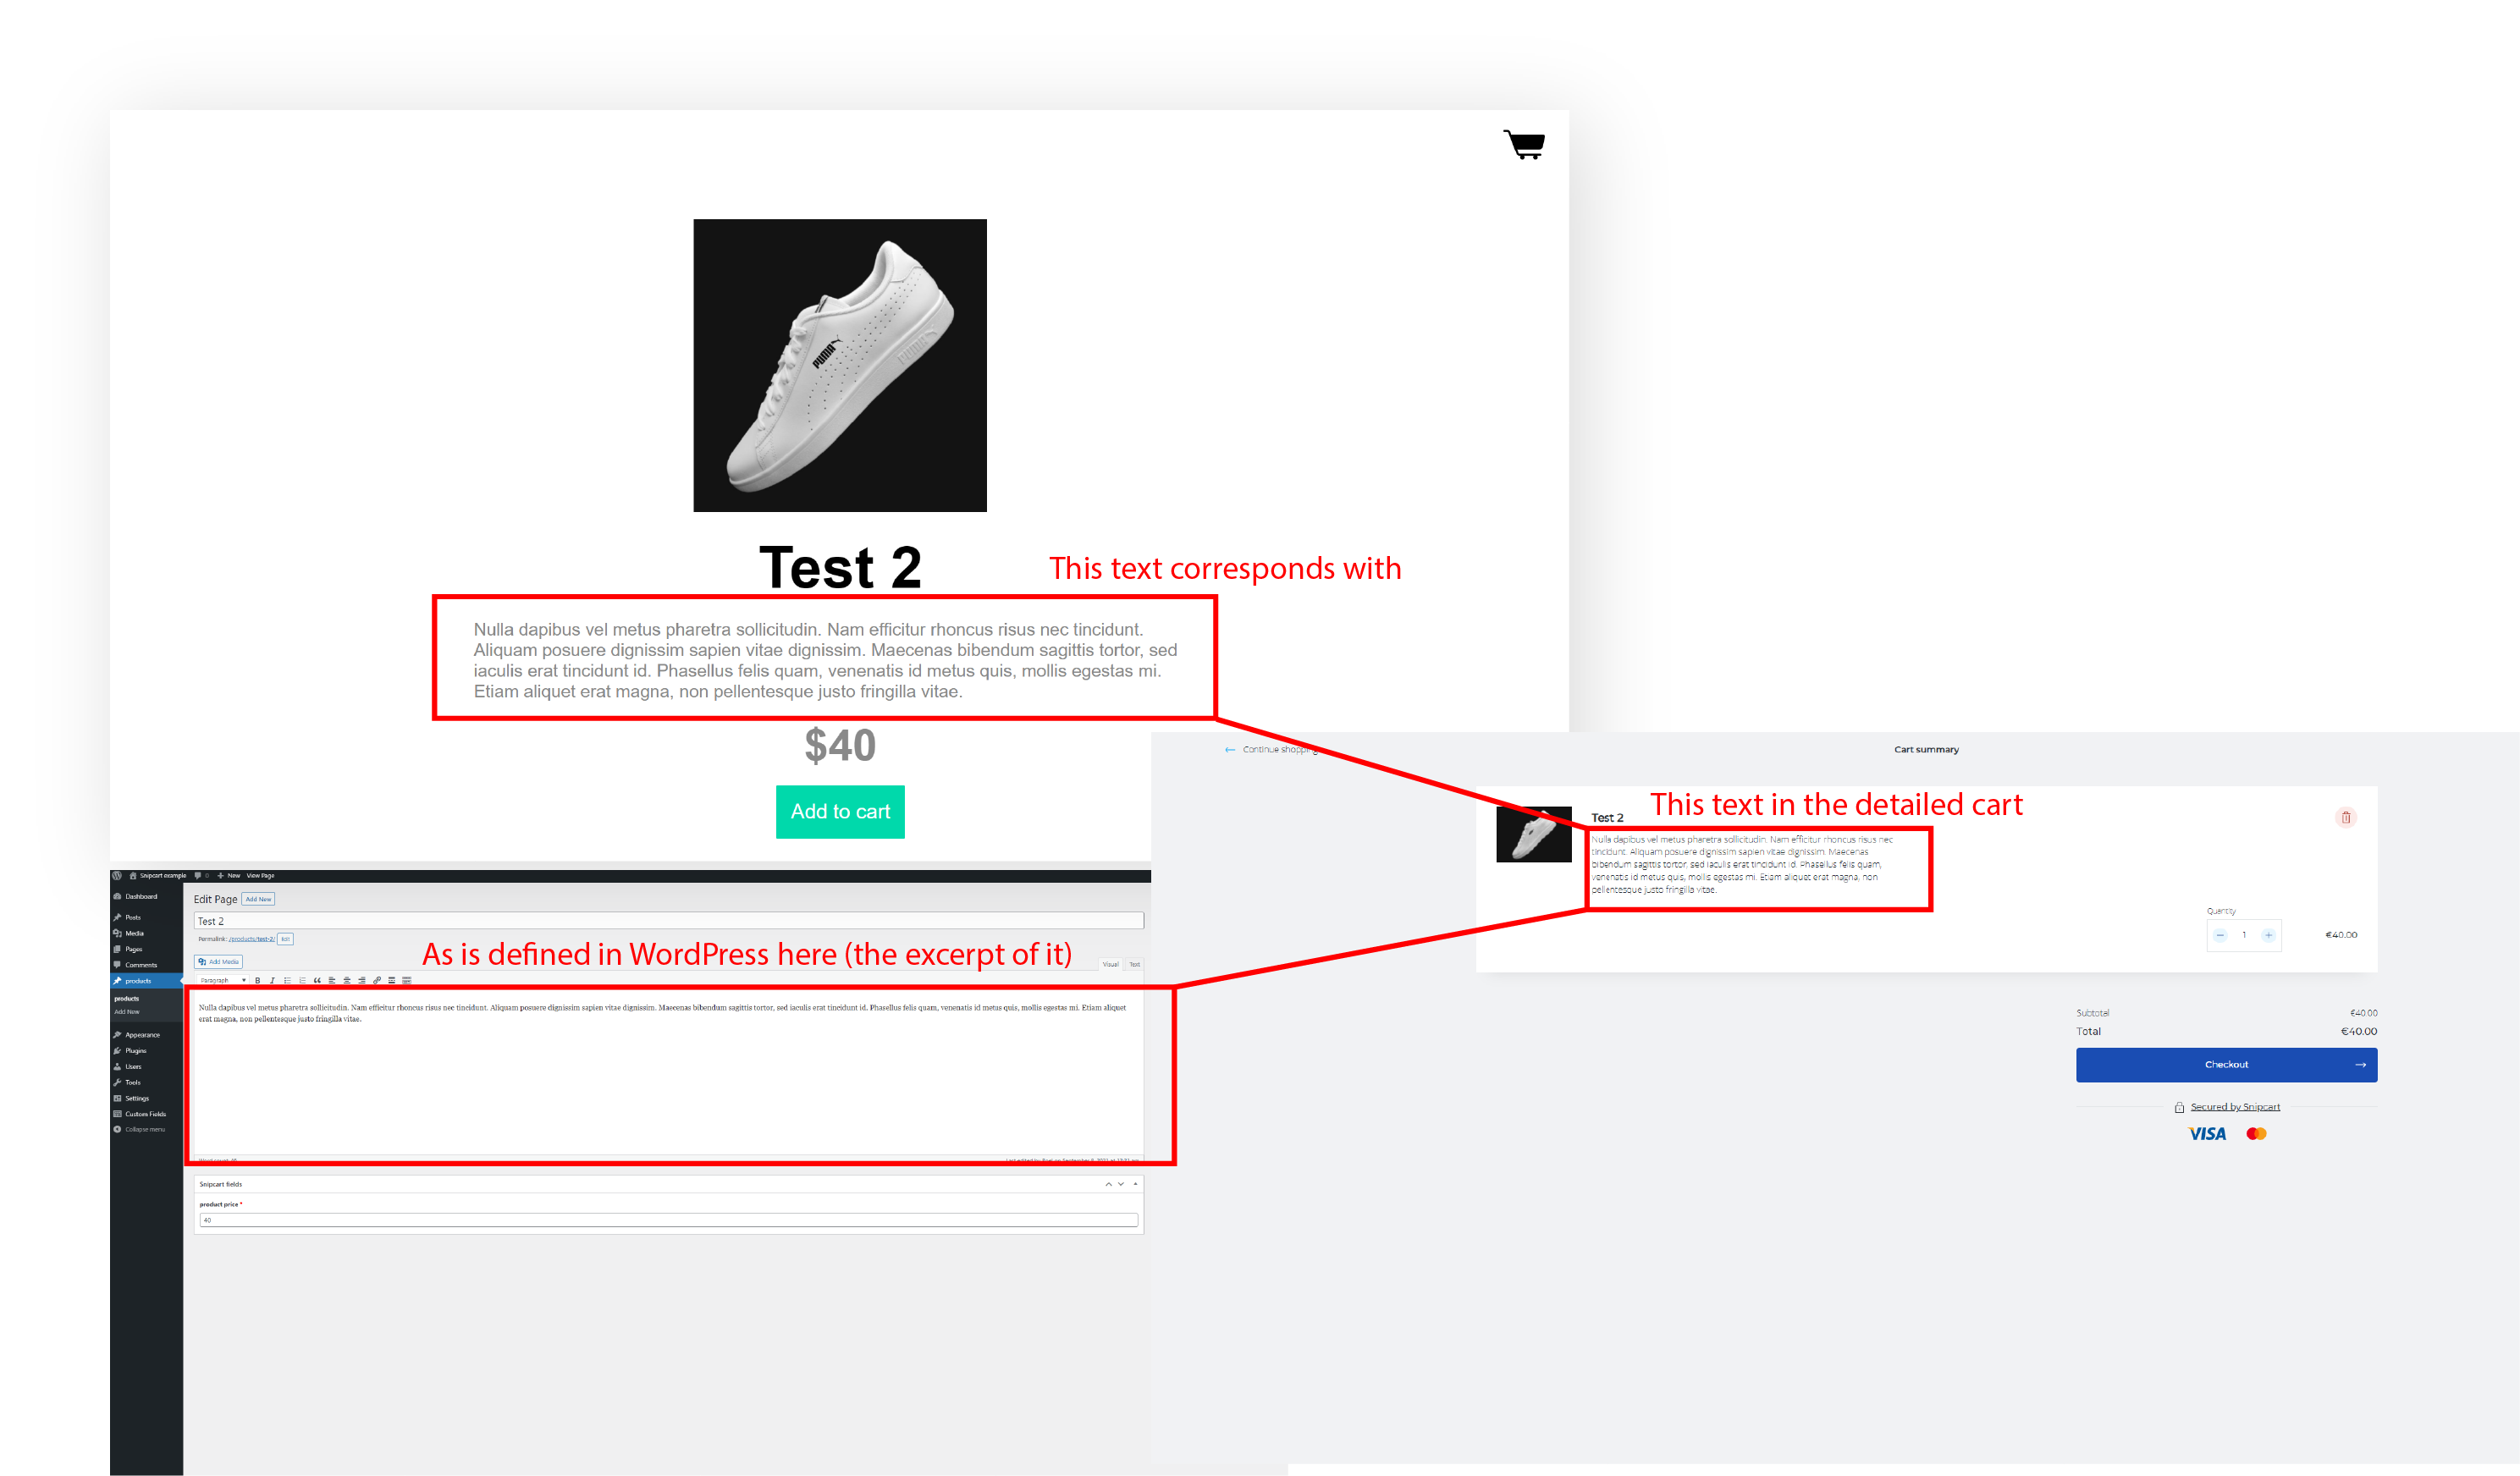
- The Display ACF field action here does the same thing as it does on the front-page. It gets the value from the ACF field as defined in chapter 1 and loads the value into the
data-item-pricehtml attribute in order to pass the price of the product to Snipcart.
- The PHP code action in the fifth position is in essence the same as the PHP code action on the second position but here it is loaded into the
data-item-namehtml attribute. This provides Snipcart with the name of the product which it will display in the cart.
- This one is also optional but highly recommended. This PHP code action provides Snipcart with the product’s image. This action contains the
get_the_post_thumbnail_url()WordPress function which returns the URL of the featured image. The action puts this in thedata-item-imageattribute which passes this value to Snipcart.
Chapter 4, Test implementation
Here is where it becomes a bit technical and only applies when you host your WordPress sites locally for testing purposes.
When you test the cart checkout purely on your local installation you’ll most likely be presented with this error:
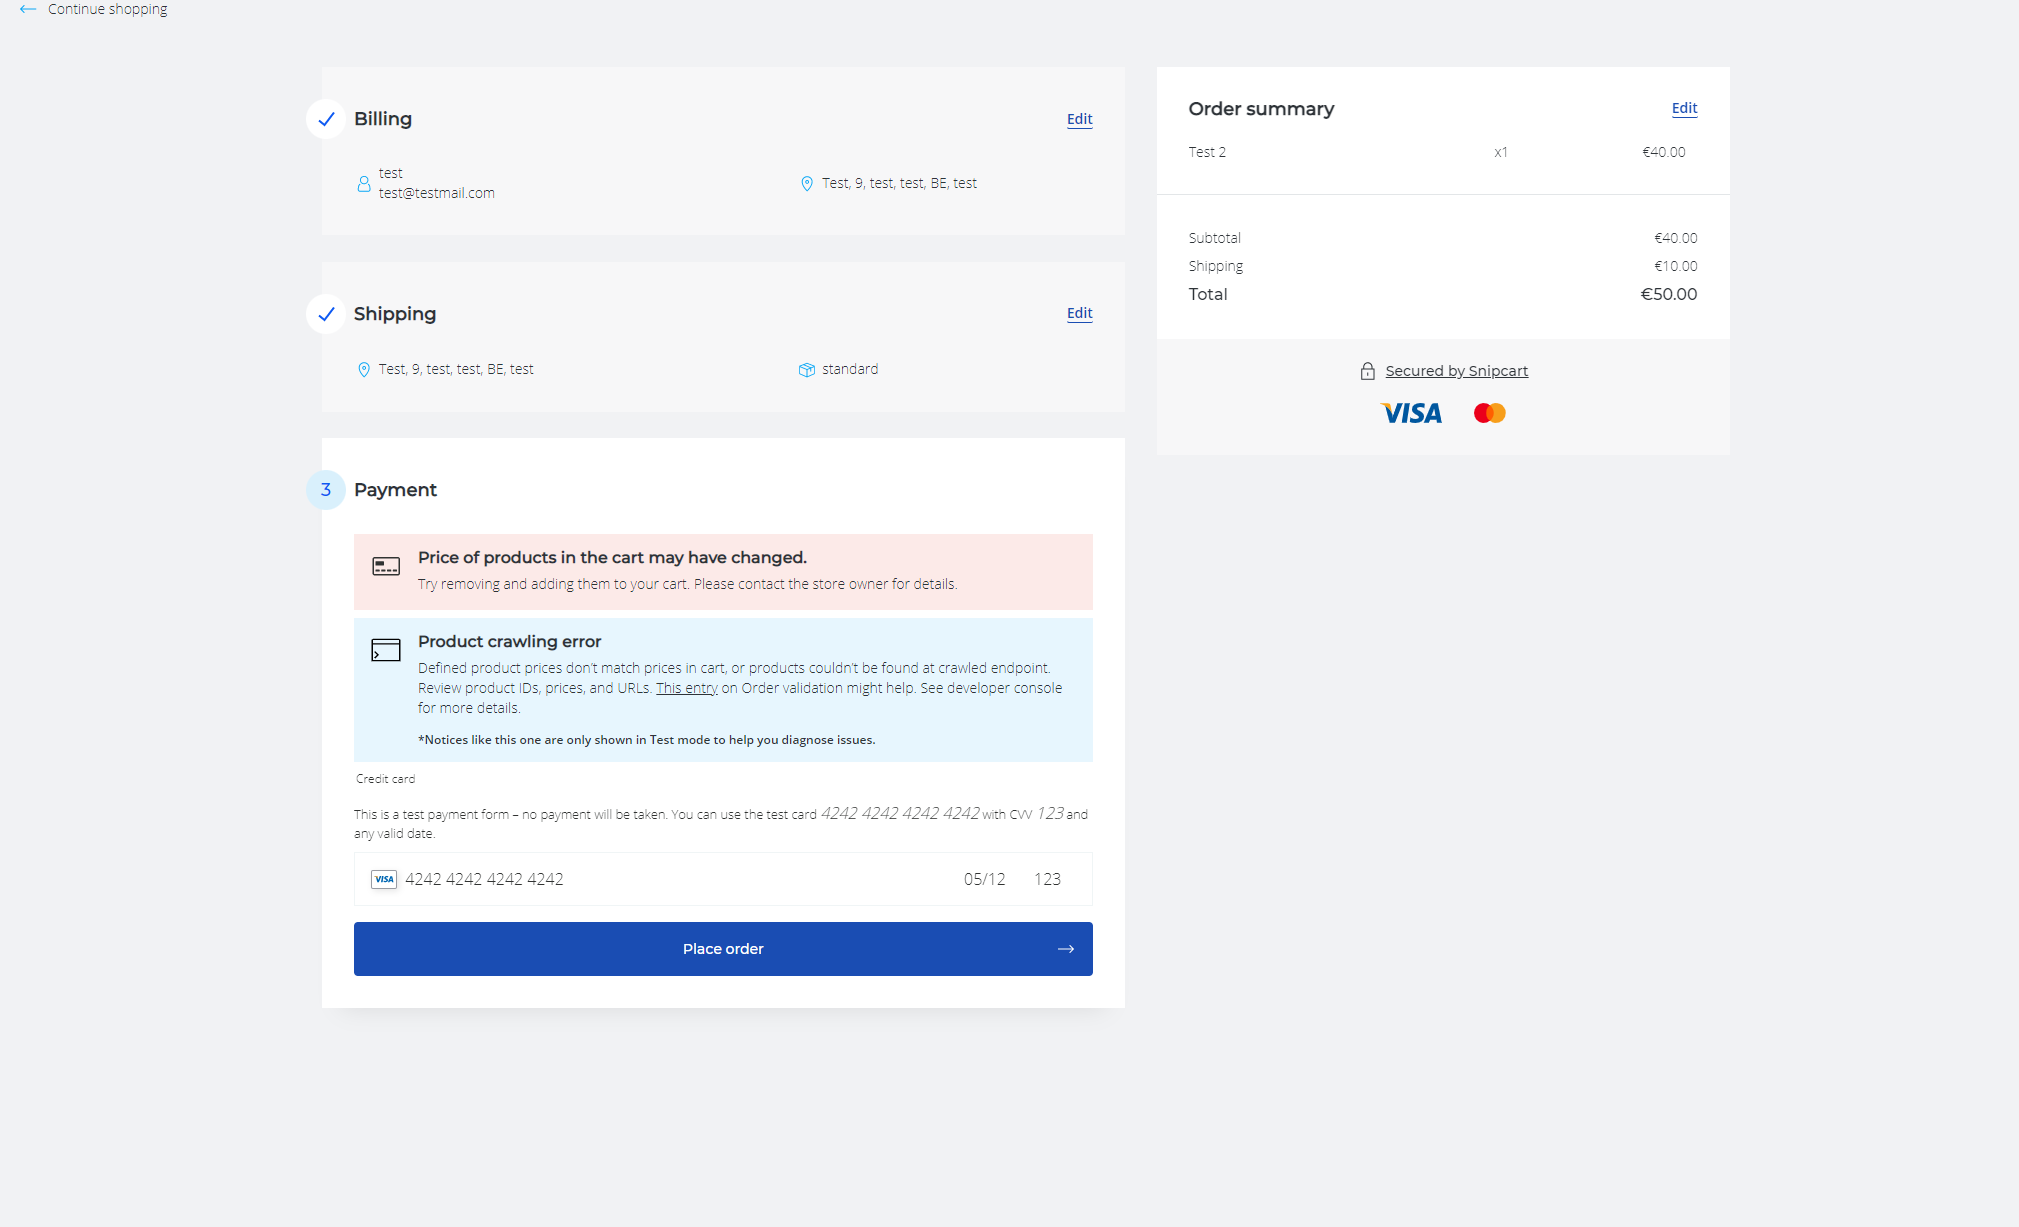
That is because the cart can’t connect to the local page and as such throws a crawl error.
I mainly use Local ( https://localwp.com ) as a testing solution (as I imagine many of you do). Snipcart needs a live connection in order to crawl the page. In previous iterations the live link integration (which opened an outside connection over NGROK) allowed anyone to access it who had the link. In the new version however this connection is put behind a password and as such can no longer be used in this way.
As such, a custom NGROK connection needs to be set up.
To do this, you need to sign up for NGROK (it has a free version) and dowload the program for your respective operating system.
Additionally, you need to make some adjustments to the WordPress installation.
First you need to download and install the Relative URL plugin.
And add these code lines to the WP-config file (which you can find in the main directory of your local WordPress installation):
define('WP_SITEURL', 'http://' . $_SERVER['HTTP_HOST']);
define('WP_HOME', 'http://' . $_SERVER['HTTP_HOST']);
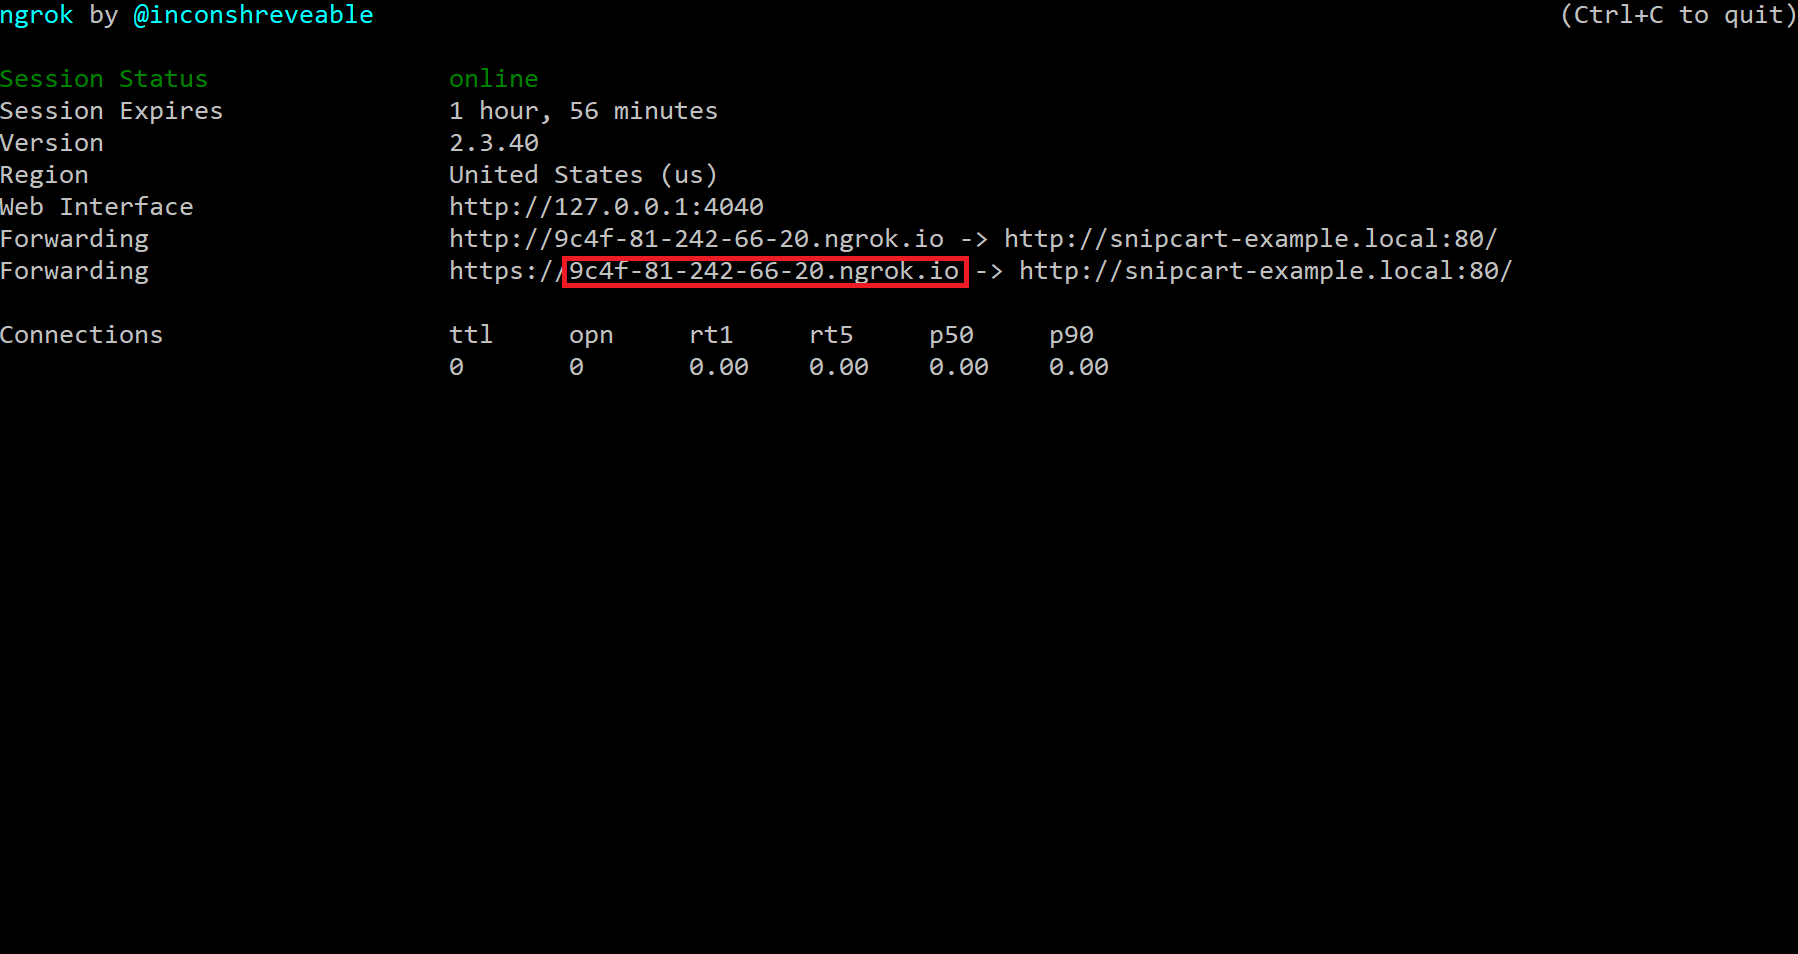
When that is done you need to run NGROK and type the following command into it:
ngrok http -host-header=rewrite put_url_here
So for instance, if your domain url is the following: http://testsite.local the command should be this:
ngrok http -host-header=rewrite http://testsite.local
This will start the server and provide you with this kind of screen that will provide you the links to the server:

This part of the domain name should be inserted into the snipcart dashboard
here:
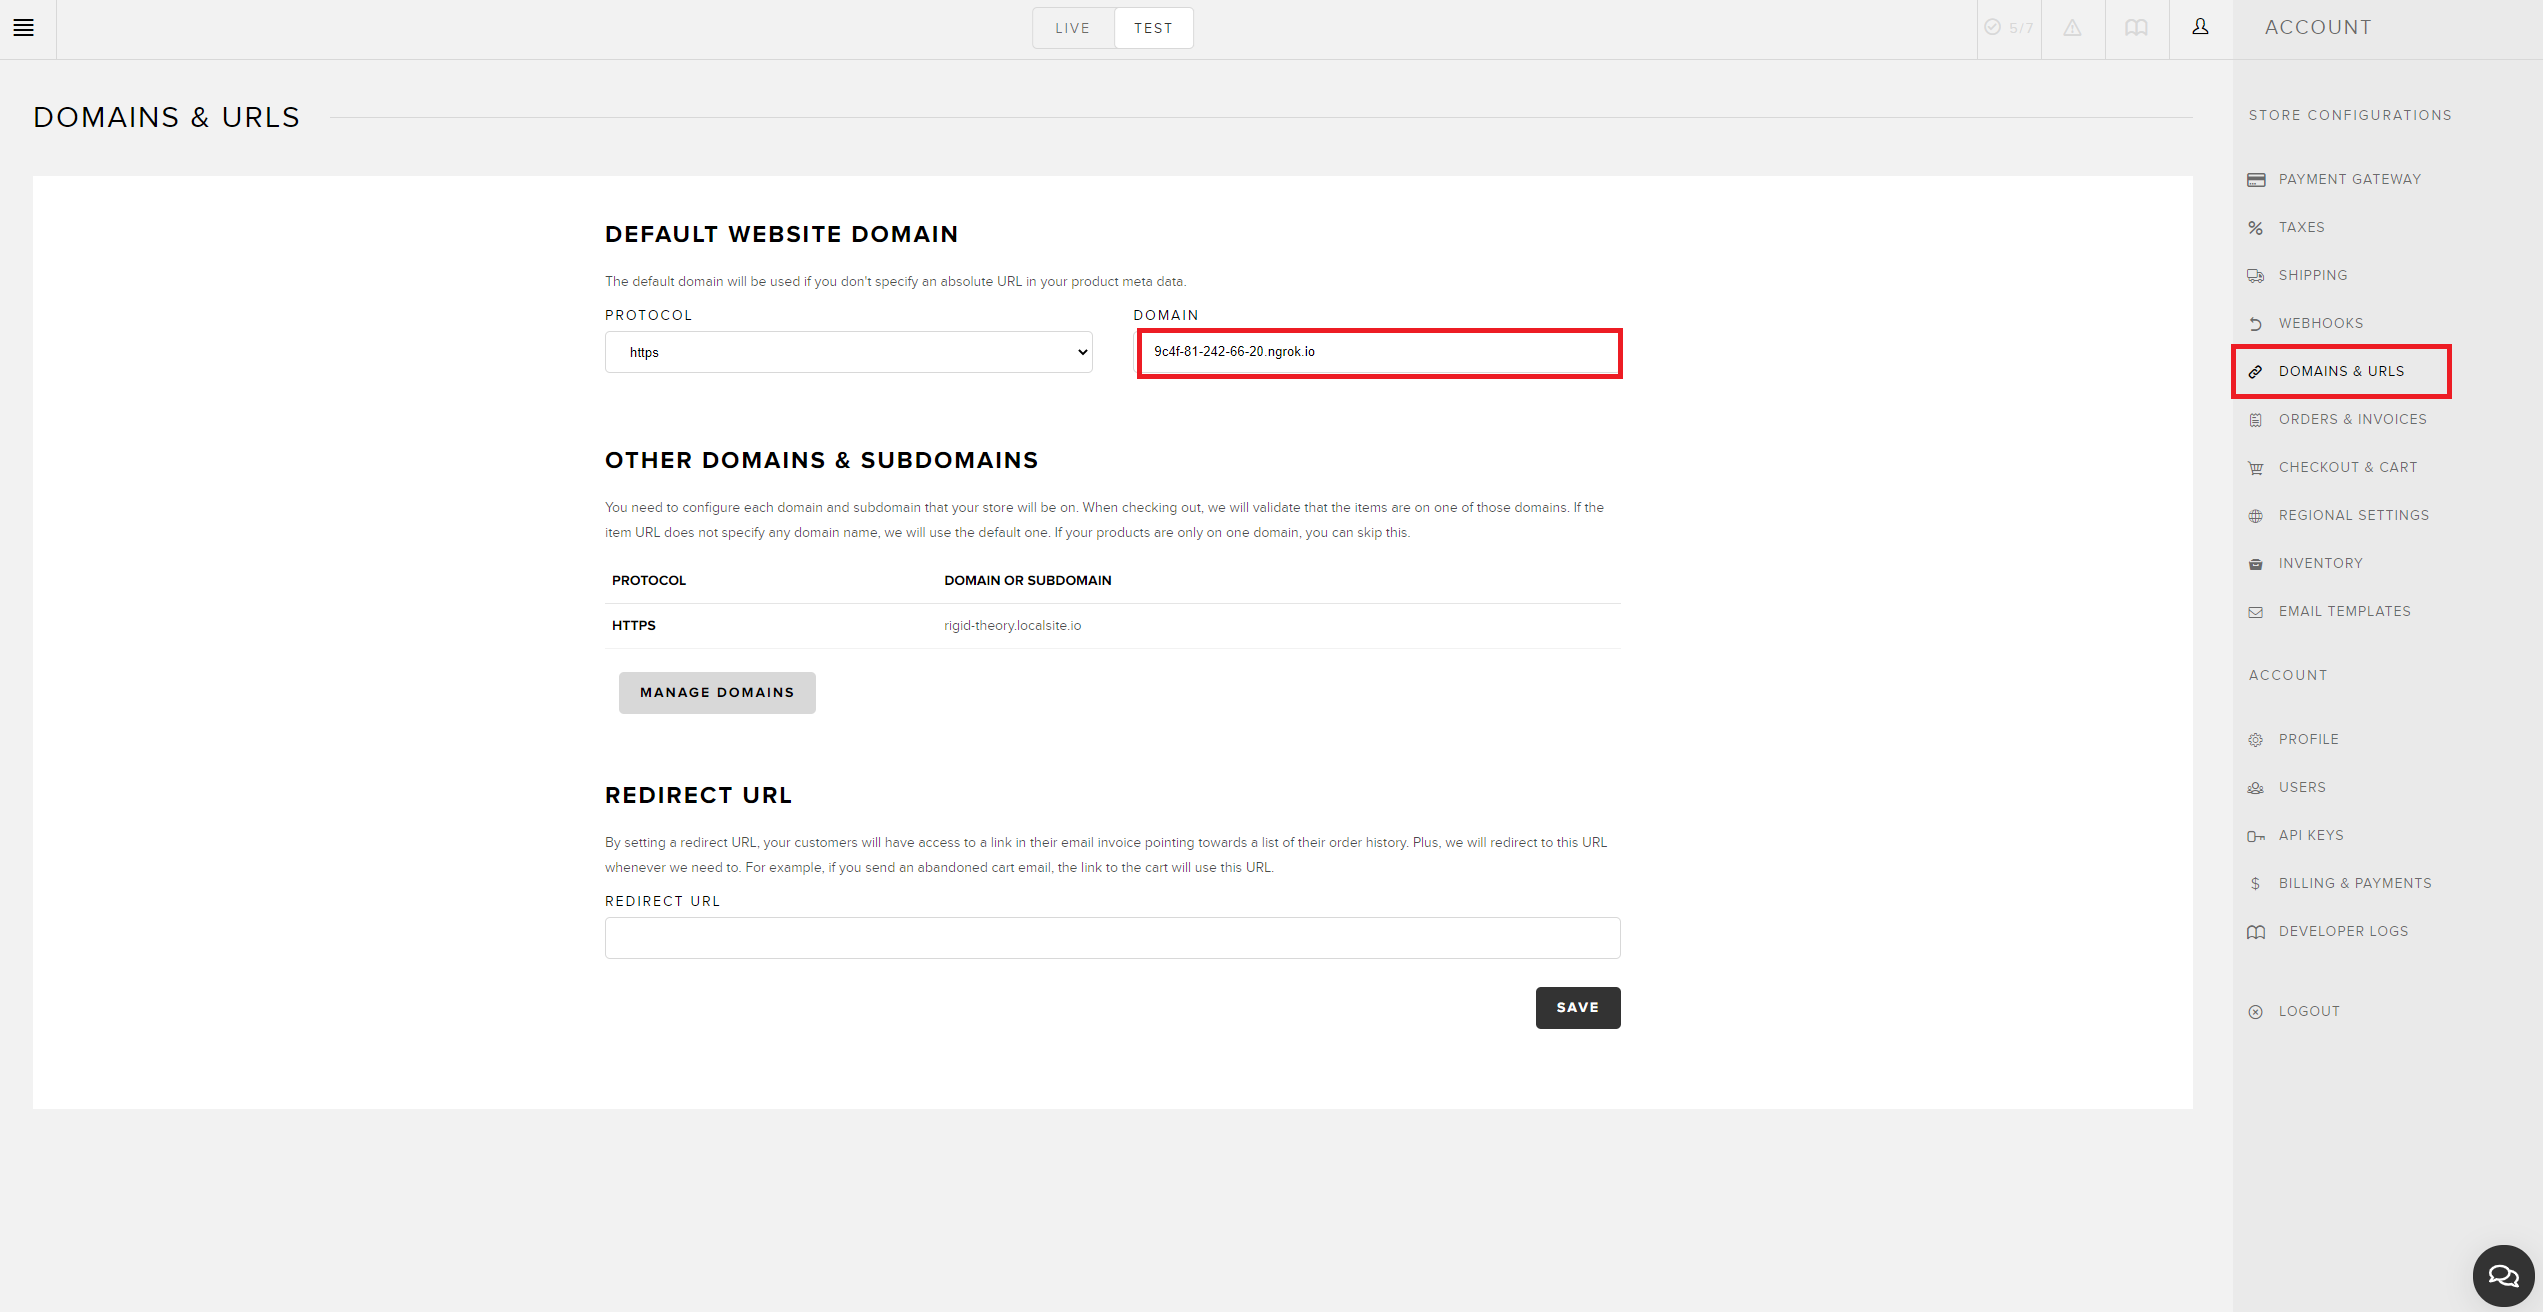
(don’t forget to press the save button in the bottom right corner).
The link is generated randomly each time and as such you need to insert the newly created link each time you start up the server.
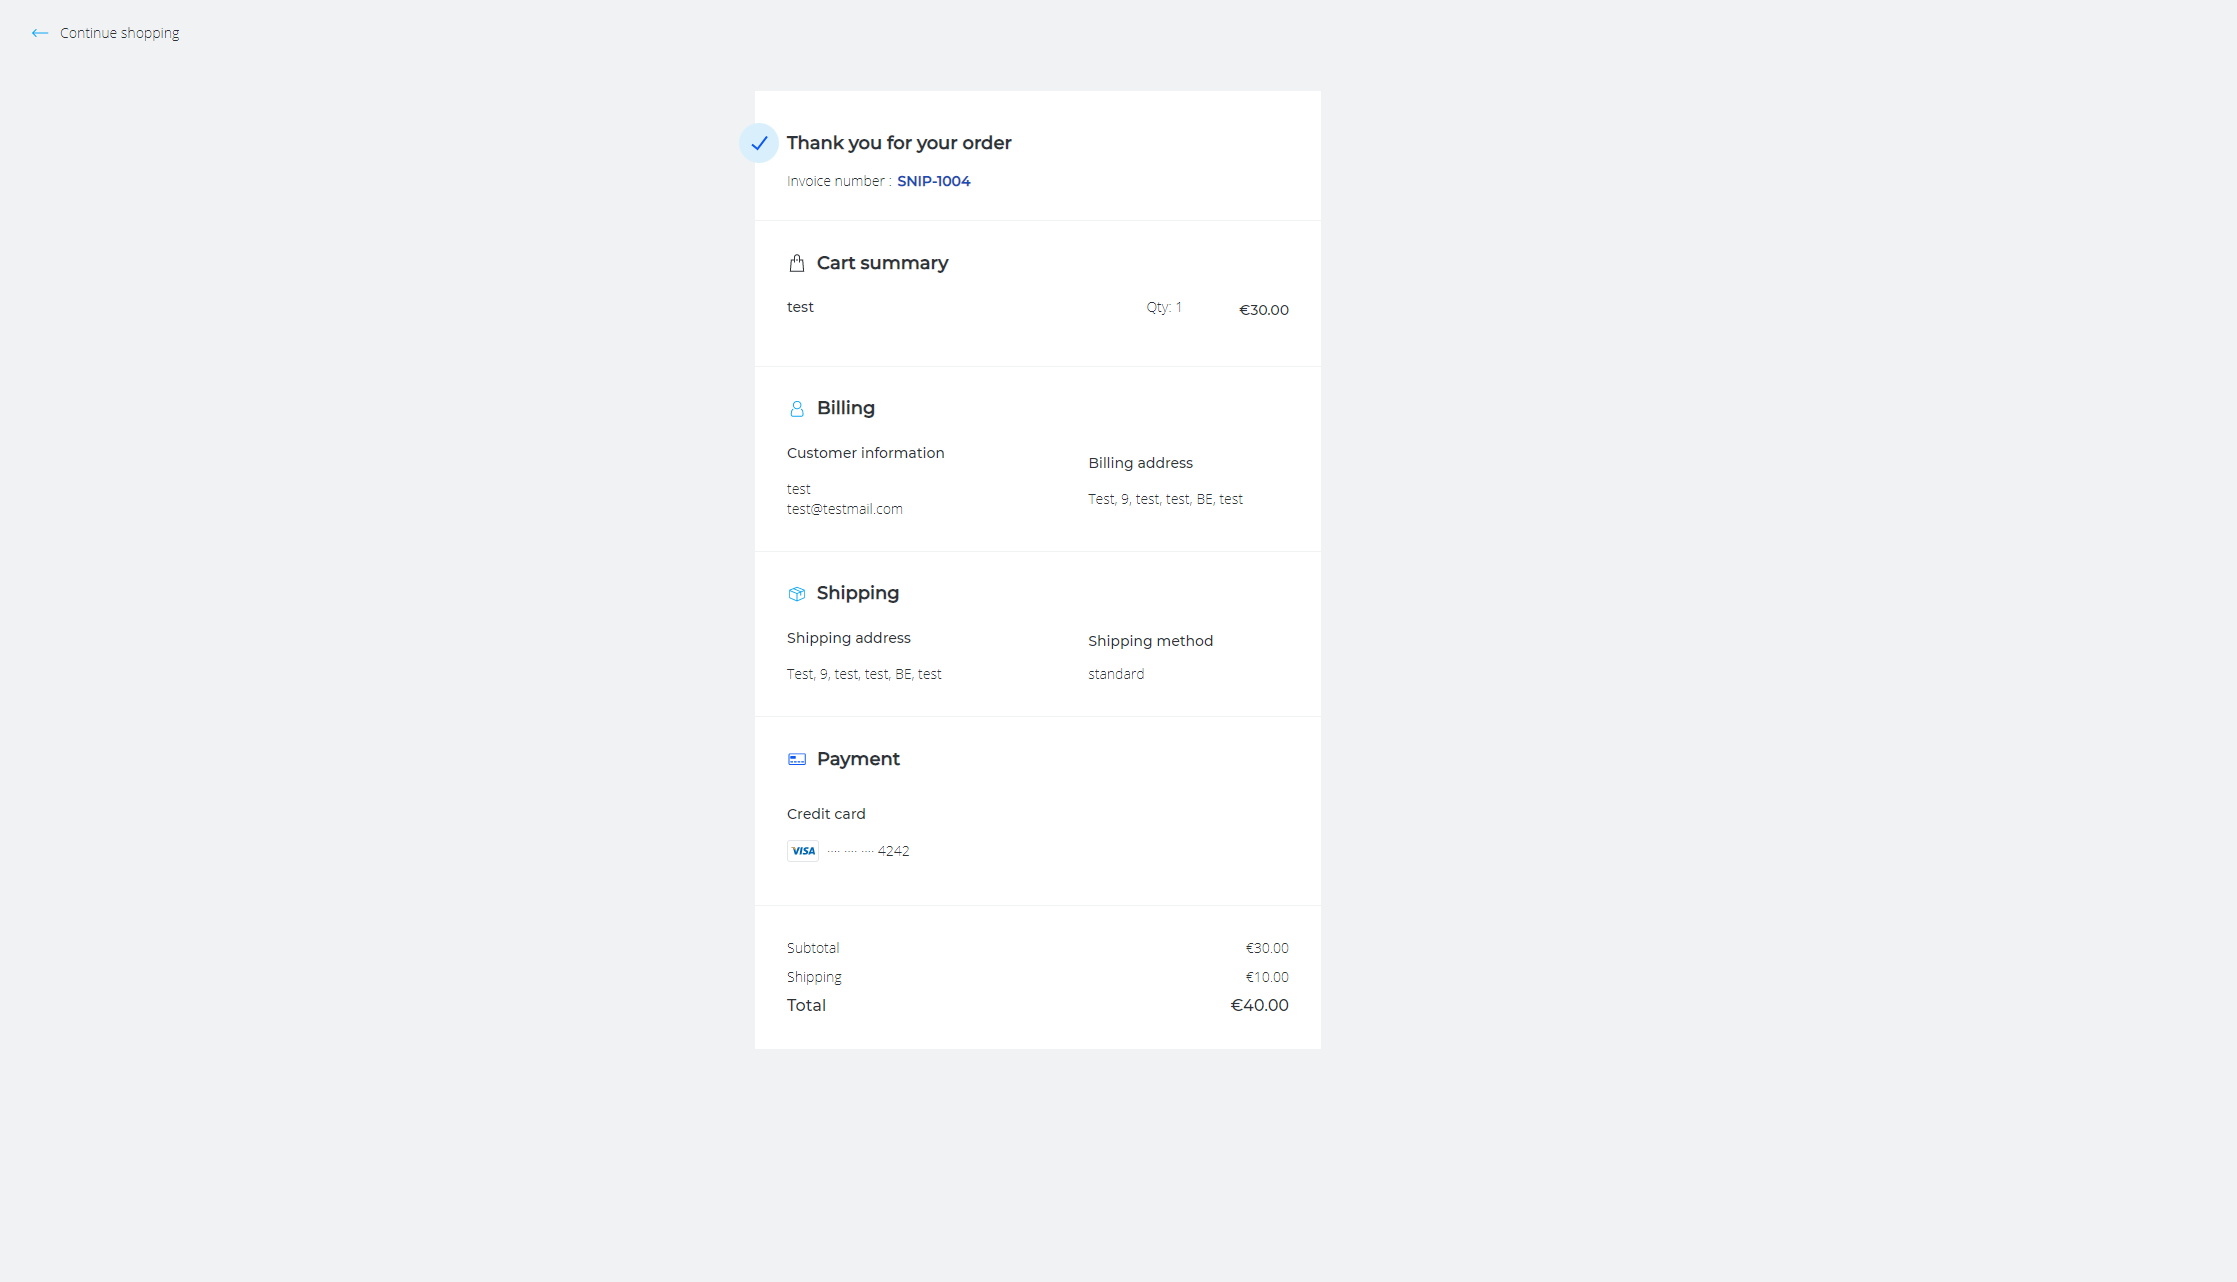
If you test the checkout now the cart should work and present you with this kind of screen
Chapter 5, Download project
I have provided a download link for the Pinegrow project of the above example at this link:
(let me know if any of you have trouble downloading it)
snipcart_example.zip
It might be a little rough around the edges as it is a minimum viable implementation but it does showcase a working concept.
Epilogue
The length of this post may present you with the impression that this is might be quite hard to pull off. The only thing I can say is that it is far less hard than it appears. I whish everyone who wants to give this a try good luck!
I may in the future create a more elaborate example which showcases how far you can take this concept and how much styling freedom you have with it. (like implementing it with ACF blocks if you have the ACF pro version). But for now, this will have to do.
Sincerly
Roel