Show Posts action loops through a collection of posts. Post smart actions can then be used on and inside the Show Posts element to display post content.
The structure of a typical Show Posts action is:
div.article       <— Show Posts action
    h2 Title      <— Post Title action
    img.featured  <— Post Featured Image
    div.conten    <— Post Content action
    …
When we’re talking about posts here, we’re referring to all different post types, like posts, pages, attachments and custom post types.
There are three types of Show Posts loop:
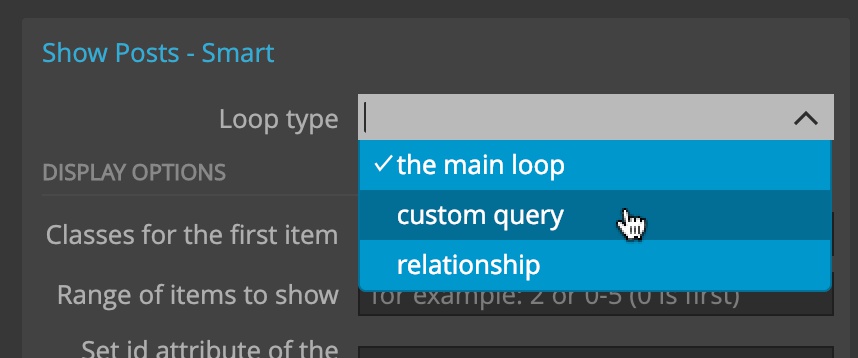
The main loop – display default collection of posts for the current request.
For every page view, WordPress returns one or more posts that should be displayed on the view. For the home page it might return the last ten posts. For a single post view it returns a list of posts with just the selected post. For a page view it returns the single page.
With the main loop our theme has no control over what posts are displayed. WordPress decides about that, the theme just displays the provided posts.
Custom query – select the type of posts to show, search parameters, ordering… Optionally, register a new custom post type.
Relationship – show posts from Advanced Custom Fields relationship field. Optionally, register a new custom post type.
We’ll first take a look at loop options that are common to all three loop types and then we’ll cover Custom queries and Relationships.
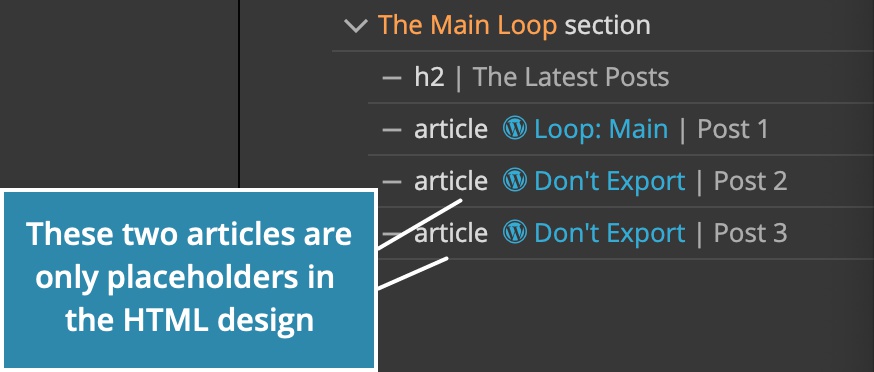
Note, if you have multiple posts displayed in your HTML design, add “Don’t export” action on all but the first post items, so that they are not exported to the theme.
Display options
Display options lets us customize how the post collection is displayed. It has no effect on what posts are fetched from WordPress, only on how they are displayed.
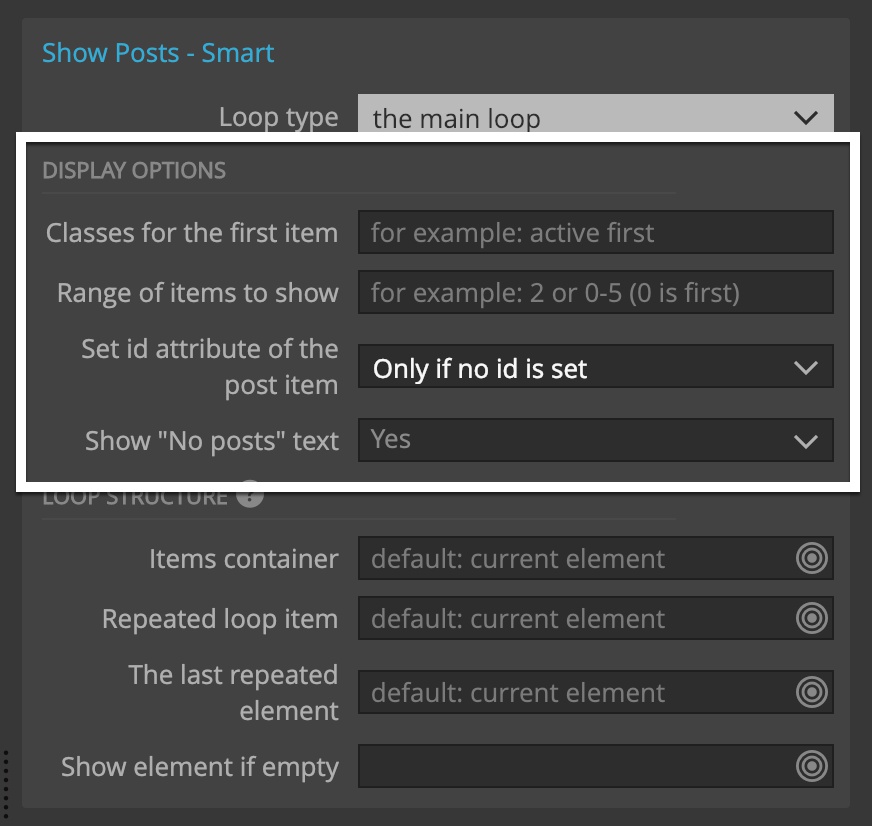
Classes for the first item
Classes for the first item lets us add one or more classes only to the first element in the loop.
div.featured Post 1  <— the first item has “featured” class
div Post 2
div Post 3
...
For example we can add “featured” class to the first post in order to display it more prominently (of course, we have to also add appropriate CSS rules targeting .featured posts).
Showing a subset of returned posts
Use the “Range of items to show” setting to specify which of the returned posts to actually display.
Use a number, for example 2 or a range, for example 0-5. 0 is the first element.
Note that this setting doesn’t affect which posts are returned by the loop query, only which of the returned posts are displayed.
This is useful when having to display posts in fixed positions on the page, for example in specific CSS grid items, or when we want to divide the display of returned items between multiple containers.
For example, imagine we have a CSS grid and we want to display the first two posts in the two of the grid cells:
div.grid
    div.cell1   <— One posts should go here
    div.cell2
    div.cell3   <— Another post goes here
    div.cell4
We can’t just output loop items because each div needs to have its classes and thus its styling preserved.
The solution is to add Show Posts with “range of items to show” 0 on the div.cell1 and another Show Posts with the range 1 on div.cell3.
div.grid
    div.cell1   <— Show Posts with range "0"
    div.cell2
    div.cell3   <— Show Posts with range "1"
    div.cell4
Using the range with the main loop will rewind the loop to the beginning, so that we can repeat the loop in multiple places on the page.
Let’s take a look at another range example:
We have two separate lists. We want to show the first five projects in the first list and the rest in the second list.
div.left
    ul
        li.project
        li.project
        ...

div.right
    ul
        li.project
        li.project
        ...
To accomplish that we add Show Posts with range 0-4 on the first list item in the first list and Show Posts with range 5-9 on the first list item in the second list. Of course, we also need to add appropriate “Don’t export” actions on placeholder elements.
div.left
    ul
        li.project   <— Show Posts with range "0-4"
        li.project   <— Don't export
        ...

div.right
    ul
        li.project   <— Show Posts with range "5-9"
        li.project   <— Don't export
        ...
Setting the id of the post item
In the WordPress world there is a convention of setting the id attribute of post items to values that reflect their post id, for example “post-108”.
But changing the id can mess up the display if CSS rules target elements with the id selectors.
In order to be on the safe side, Show Posts doesn’t change element ids, if ids are set in HTML.
We can customize this behavior with this setting, either force the ids to be set or not.
Loop structure
By default, the Show Posts element is repeated for all returned posts. If there are no posts, nothing – or the optional “No posts found.” paragraph – will be displayed.
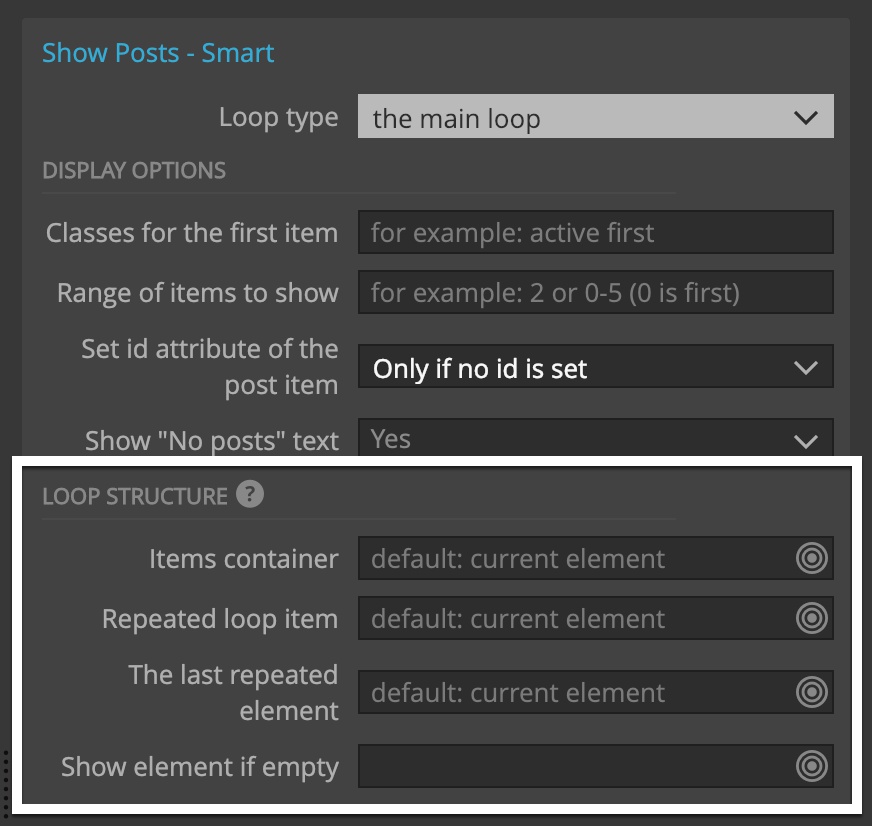
If that’s enough, great, no need to customize the loop structure.
But in many situations we need more flexibility in how posts are displayed.
The first setting is Items container, but we’ll cover it later.
Repeated loop item
Imagine we have the following markup and that in case there are no posts returned, we would like to omit the section altogether:
section
    h2 The latest posts
    article Post 1
    article Post 2
    ...
If we add Show Posts on the first article element (and Don’t export action on the rest of articles), we’re stuck with the section even if no posts are found:
section
    h2 The latest posts
Adding the Show Posts action on the main section element and setting the article element as the repeated item will do the trick:

The last repeated element
In some situations we need to repeat a range of elements for each loop item, not just one element.
That’s often the case on templates that display a single post. There we often have the following markup:
body
    nav.menu
    section.post-header
    section.post-content
    section.post-related
    footer
If we add the Show Posts action on the first section we won’t have access to post information in the other two sections:
We can’t add Show Posts on all three sections because by the time we reach the second section the loop will already be iterated to its end and we would get “No posts found.” displayed for the other two sections.
And adding Show Posts on the body element is a bad idea. What will happen if no posts are found?
The correct solution is to use the Last repeated element setting to specify the range of elements that will be enclosed by the loop.
We place the Show Posts action on the first section element and leave the Repeated loop item setting empty, making the first section element itself the repeated element.
Then we select the last section element as the Last repeated element:
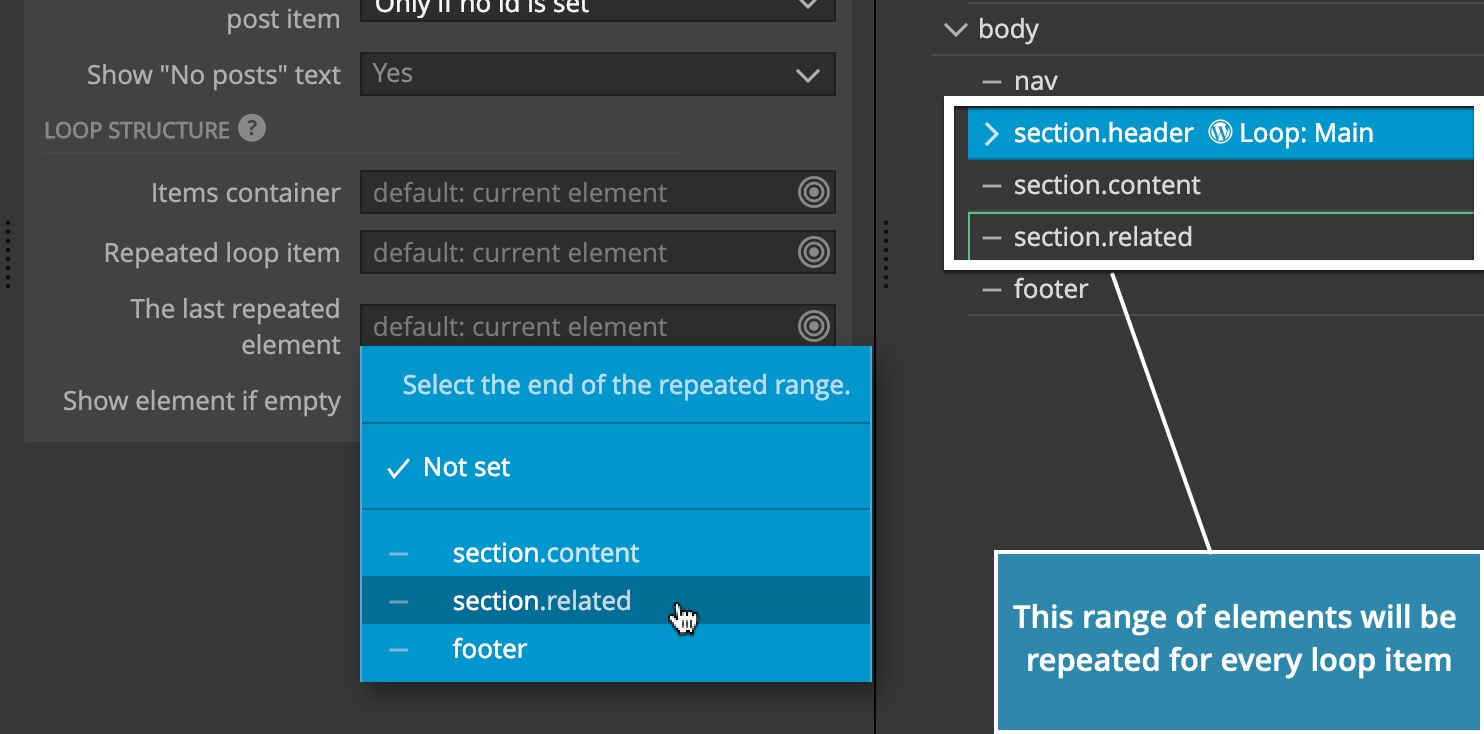
This will create the following loop structure:
body
    nav.menu
    section.post-header    <— Show Posts / repeated item
    section.post-content
    section.post-related   <— Last repeated element
    footer
Exactly what we need.
Items container and Show empty loop element
Now, let’s take a look at the complete loop structure example, with all the bells & whistles included:
section
    h2 Latest posts
    div.items
        p Look at this:
        article Post 1
        article Post 2
        ...
    div.empty-loop
        p No posts were found
Here, we want to:
- always display the section and it’s heading.
- Display div.items only when posts are found.
- Display div.empty-loop is no posts are found.
The way to achieve that is to:
- Add Show Posts to the top section element
- Set div.items as Items container
- Set the first article as the Repeated item
- Add “Don’t export” to the rest of the articles
- Set div.empty-loop Show element if empty.
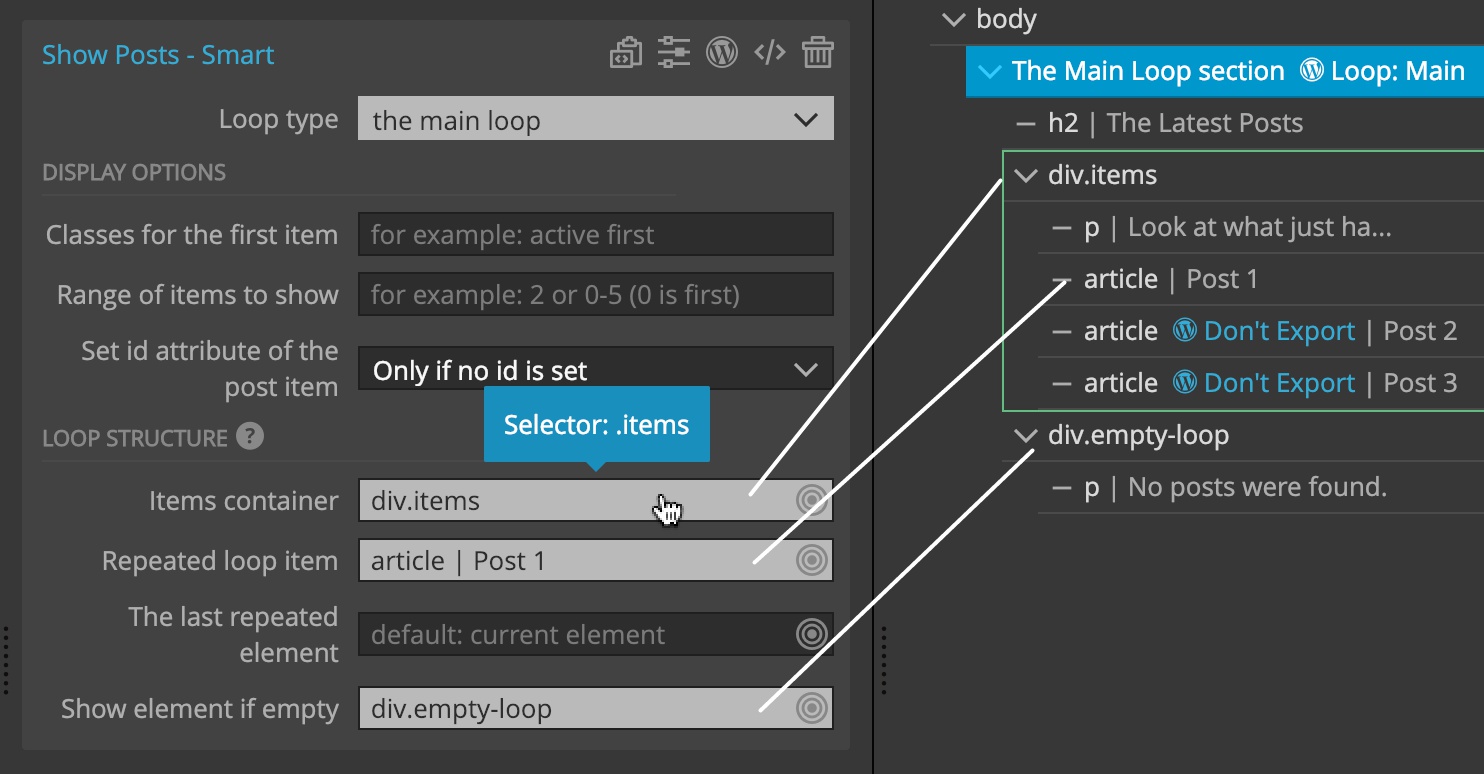
The Show Posts structure will thus be:
section                        <— Show Posts
    h2 Latest posts
    div.items                  <— Items container
        p Look at this:
        article Post 1         <— Repeated item
        article Post 2         <— Don't export
        ...
    div.empty-loop             <— Show element if empty
        p No posts were found
Making the content of “No posts found” element dynamic
The element used for “Show element if empty” does not support having WordPress actions.
A workaround is to add PHP code that displays the template part (or calls a custom PHP function) that displays the dynamic information such as list of default posts.
Here is a quick example of the HTML code with WordPress actions:
<div cms-post="loop" cms-post-show-empty-element=".no-posts-found" cms-post-items-container=".items-container" cms-post-repeat="h1">
    <div class="items-container">
        <h1 cms-post-title>Post title</h1>
    </div>
    <div class="no-posts-found">
        <div>
            <?php get_template_part( 'default-list-posts' ); ?>
        </div>
    </div>
</div>
The template part can be created with the Reusable Template Part action or with code.
Show Posts with Custom queries
In addition to the main loop posts, we often we need to show other groups of posts on the same page. For example, we have related posts listed under the main content of the page.
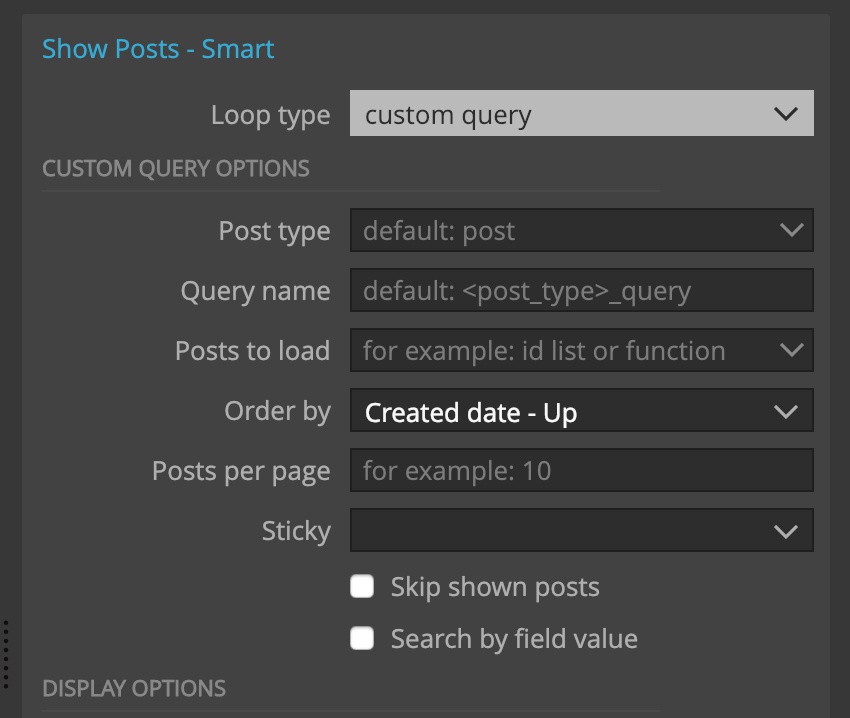
Show Posts with Custom query lets us fetch posts according to custom criteria, for example searching by the post field value.
We have the following Query options at our disposal:
Post type
Here we decide what type of posts to fetch from the database. We can choose among built-in types like post and page, use any if we don’t care about the type, or enter the name of the custom post type.
If we select a custom post type, we also get the chance to Register the custom type.
Registering a particular custom type should happen just one time per theme, not every time we query that custom type.
Checking the Register custom post type checkbox reveals the Post type options section further below.
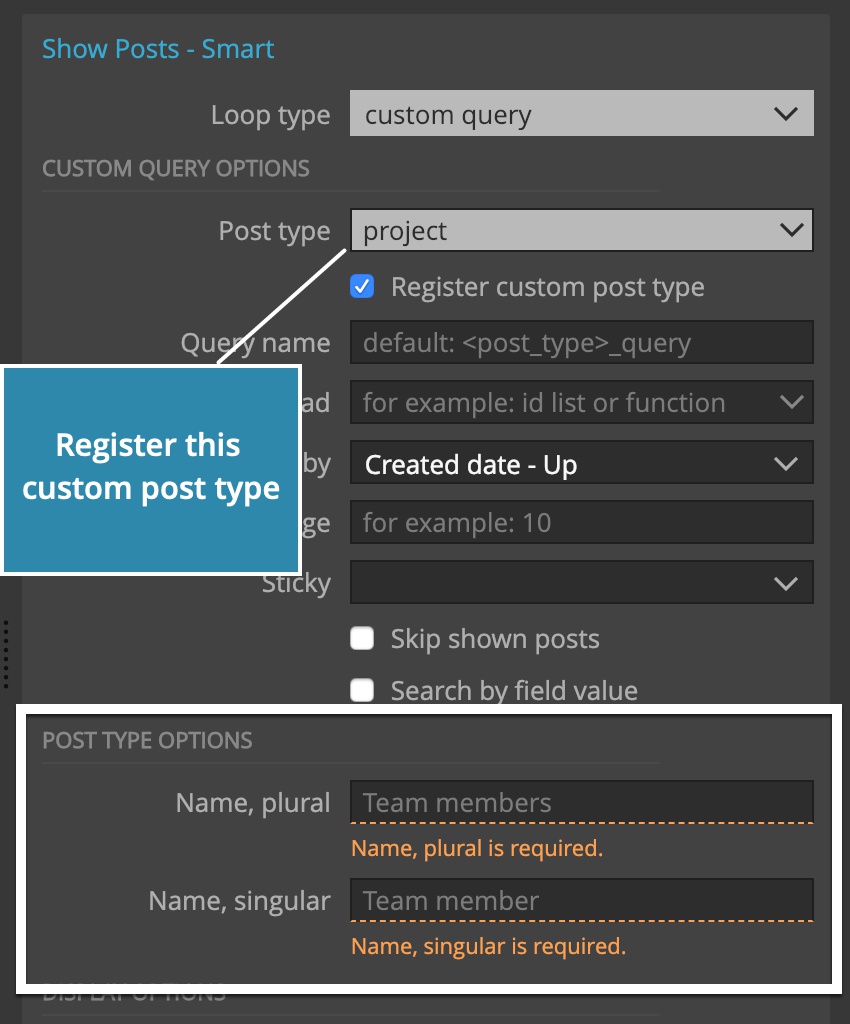
There we enter plural and singular names for the new custom post type, for example Cars and Car.
That’s all we have to do to register a new post type. The post type will appear in the main menu of the WordPress admin panel.
Query name
We can give the custom query a special name. The query name is visible in the PHP source code where it is used as a name of the variable that stores the WP_Query object.
The query can be referenced by this name in Pagination action or in any custom code.
Posts to load
We can use Posts to load to give WordPress a list of ids of posts to load. The setting has some handy presets that let us load the featured image, parent or children of the current post.
For example, we can load the featured image in order to be able to output its information with actions like Post title, Post field and so on.
Order by
Order by setting lets us specify how the returned posts should be ordered.
Posts per page
By default, all posts that matched the query criteria are returned. Here we can page the results and then use Post Pagination action for implementing page navigation. By default, results will be paginated, meaning that the index of the current page will be passed to the custom query.
Set “Paginate results” setting to “No” if you don’t want to paginate the query and instead just want to limit the maximum number of results.
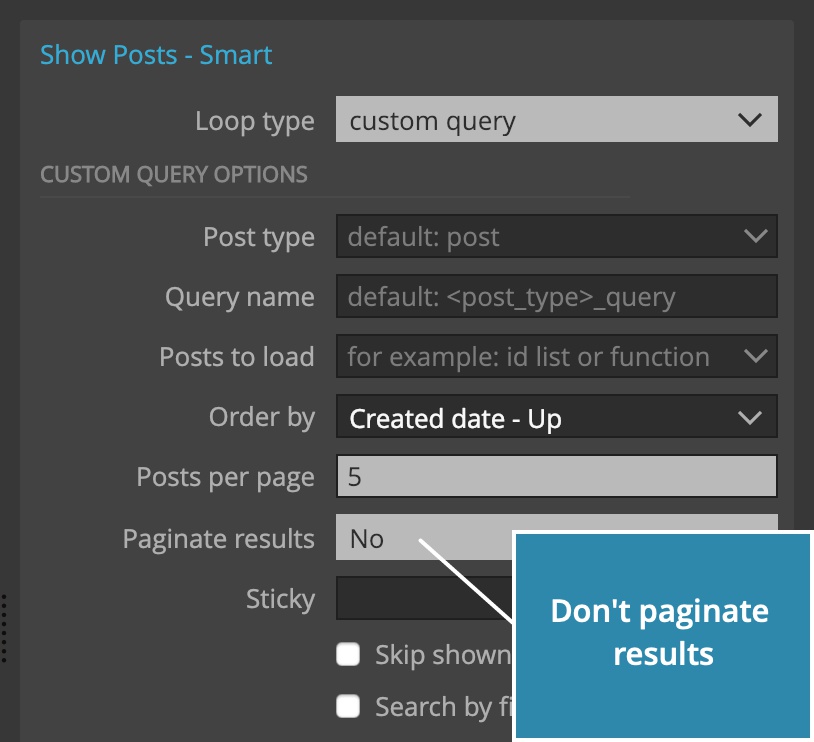
Note that there can be only one paginated Show Posts action on any given template because there is only one current page value being passed in the url of the page.
Sticky
Sticky lets us decide how to deal with sticky posts. By default, sticky posts are returned at the top. We can either choose to return only sticky posts, or to exclude sticky posts from the search.
The later is useful is we already displayed sticky posts elsewhere on the page.
Skip shown posts
Pinegrow adds the code that keeps track of what posts are shown on the page. Selecting this option will exclude all posts that were already shown on the page.
For example, we might show the main loop with the latest articles and then featured articles under that and don’t want to repeat any articles that were already displayed in the main loop.
Search by field value
Selecting this option will display two extra settings that let us choose the field name and field value for the search.
These are custom post fields, either edited as meta fields or through Advanced Custom Fields plugin.
All field names selectors have the “Update field list” option that fetches the list of actual fields available for the displayed post. This option only works if the preview url is correctly set in Page settings and if theme is activated in WordPress.
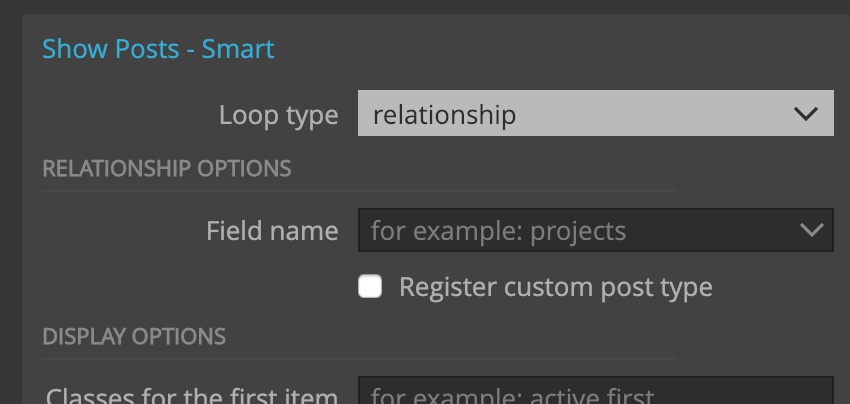
Show Posts with Relationship
Select this type to display a collection of posts that are related to the current post.
Relationships between different post types are essential for building the efficient information architecture for our WordPress site.
For example, Article can have a “related articles and pages” relationship where we list related articles and pages.
Surprisingly, WordPress doesn’t have a built-in support for relationships.
We recommend using the free version of Advanced Custom Fields plugin that has support for relationship fields, among many other types of custom fields.
Related posts are stored in a post field.
When using Show Posts with Relationship, the list of related posts is read from the post field and the posts are fetched from the database.
Field name
In field name we enter the field name of the relationship field.
Register custom post type
We also get the chance to register a new custom post type. The process was already described above when talking about registering new post types for the Custom query.
Relationships are very useful. Learn how to define and use them in our guide to happy relationships.