In this guide we’ll learn how to easily convert HTML websites to WordPress themes – without coding.
We’ll cover WordPress theme structure, using custom post types and fields to create the perfect content model, default & custom loops, menus, template parts and everything else that goes into creating an amazing WordPress theme.
You don’t need any PHP coding skills or experience with WordPress to follow this guide.
The approach described here works with any HTML website design, be it hand coded, created in Pinegrow Web Editor, exported from Webflow or any other website builder.
The conversion method is also not tied to any particular framework. Bootstrap, Foundation, plain HTML, custom frameworks – you are free to use whatever works best for you.
The result will be a clean and performant WordPress theme that won’t require a bunch of bloated plugins to run.
What does it mean to convert HTML to WordPress code?
We can start with a design created in a tool such as Figma, Sketch or Photoshop. The first step is implementing the design into a static HTML/CSS project.
Or we start with an existing HTML website that we would like to manage with WordPress.
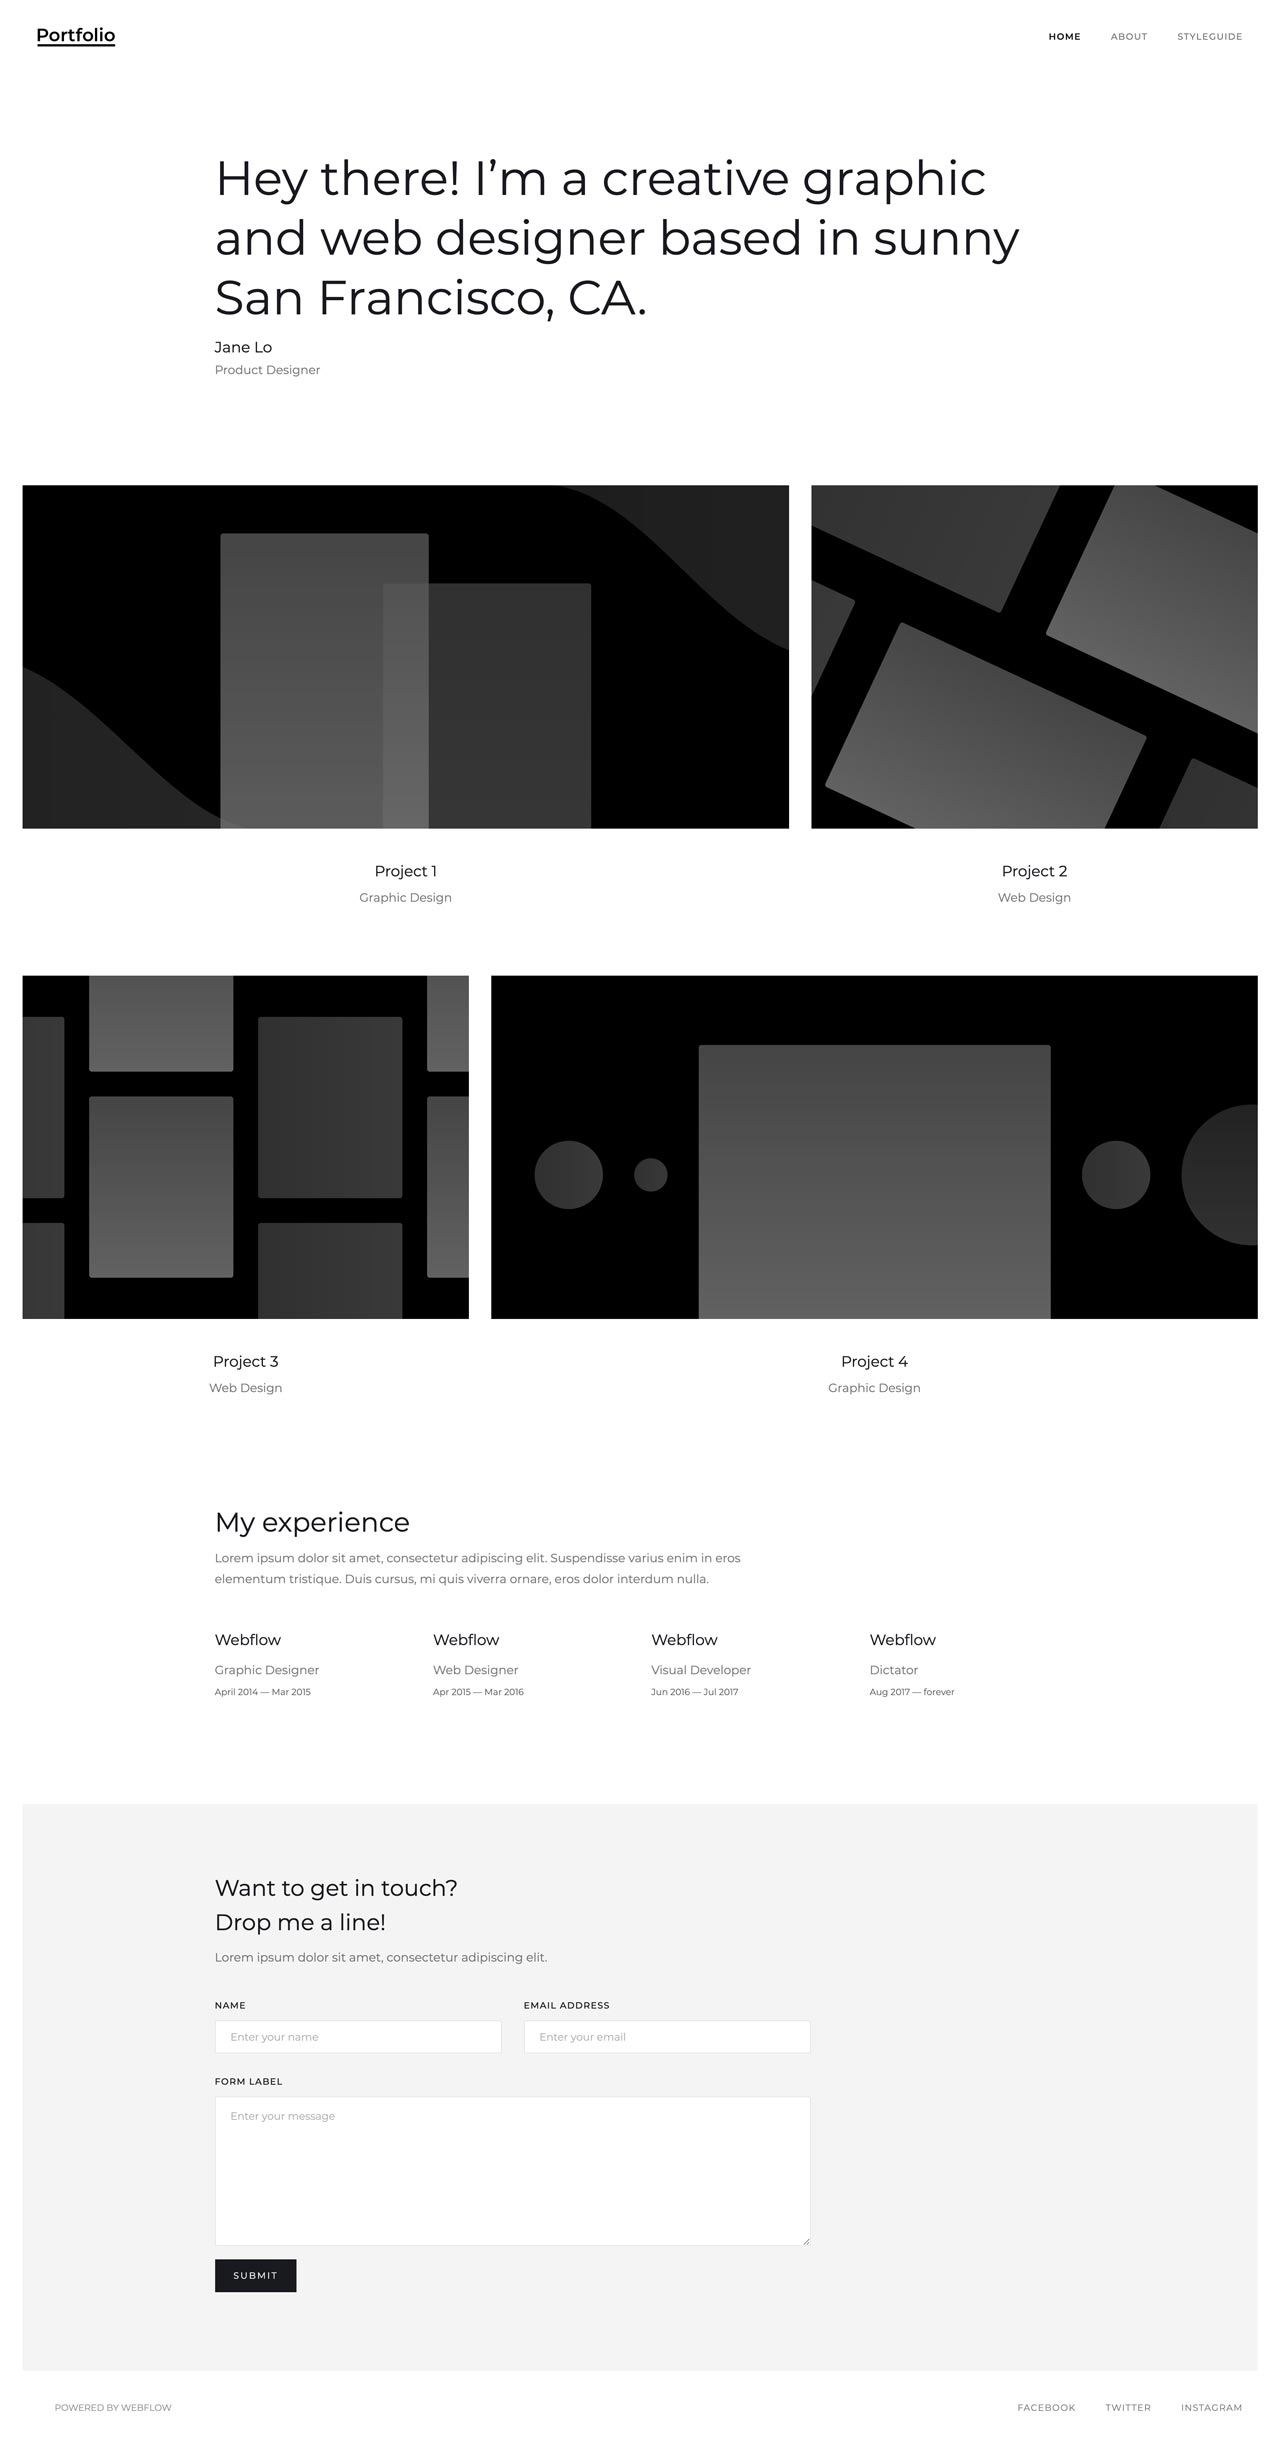
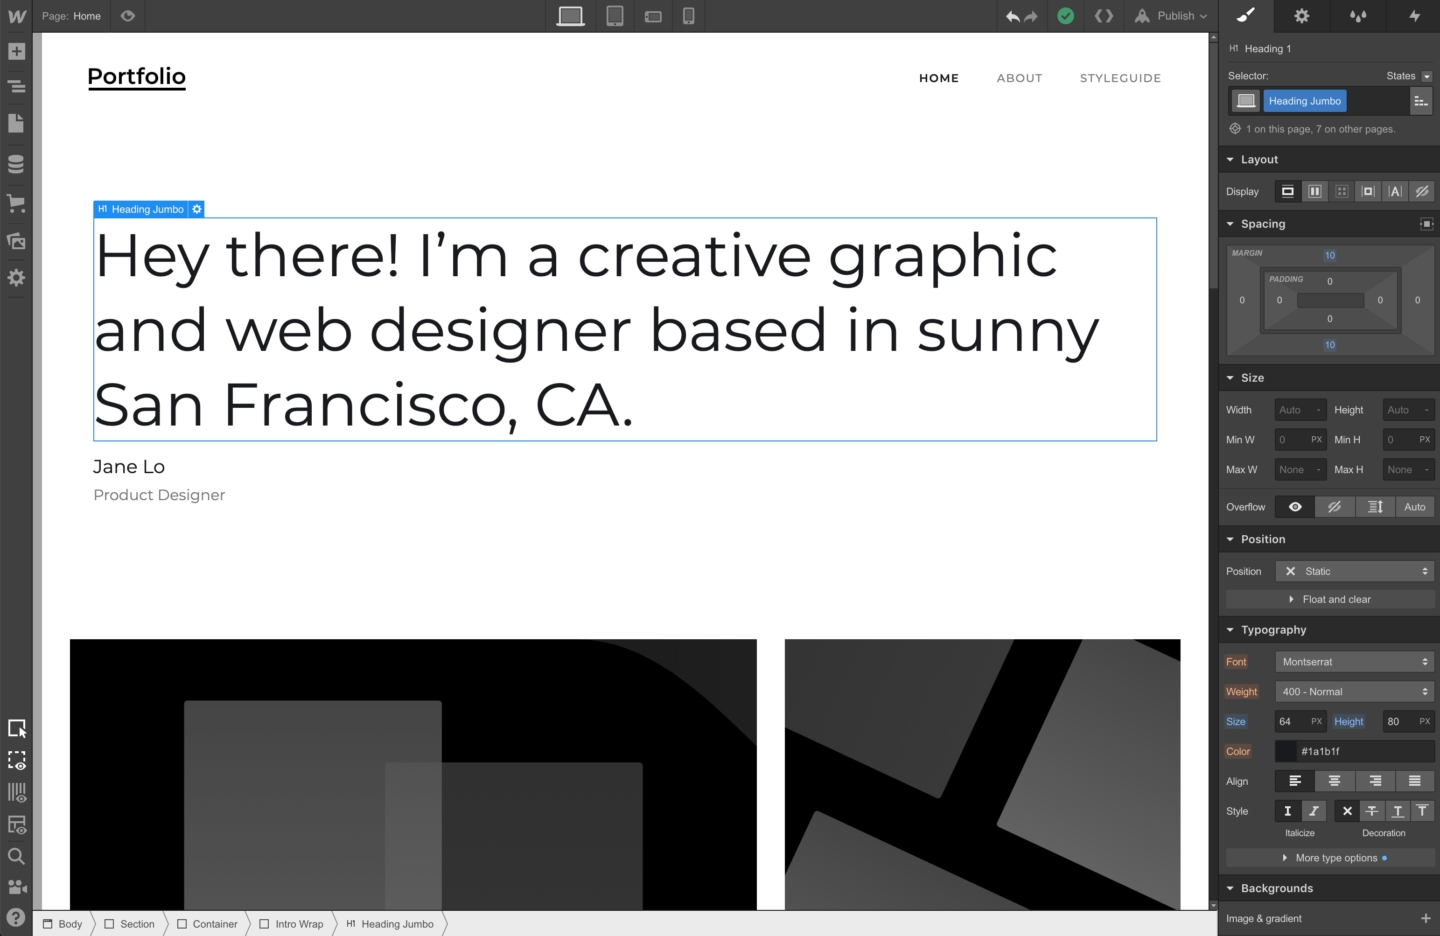
In either case, the WordPress conversion process starts with a HTML page, like this one page portfolio with all information hard-coded into its HTML structure:
And make it into a dynamic WordPress site where all the content (logo, menus, texts, projects, experiences…) can be edited in WordPress dashboard:

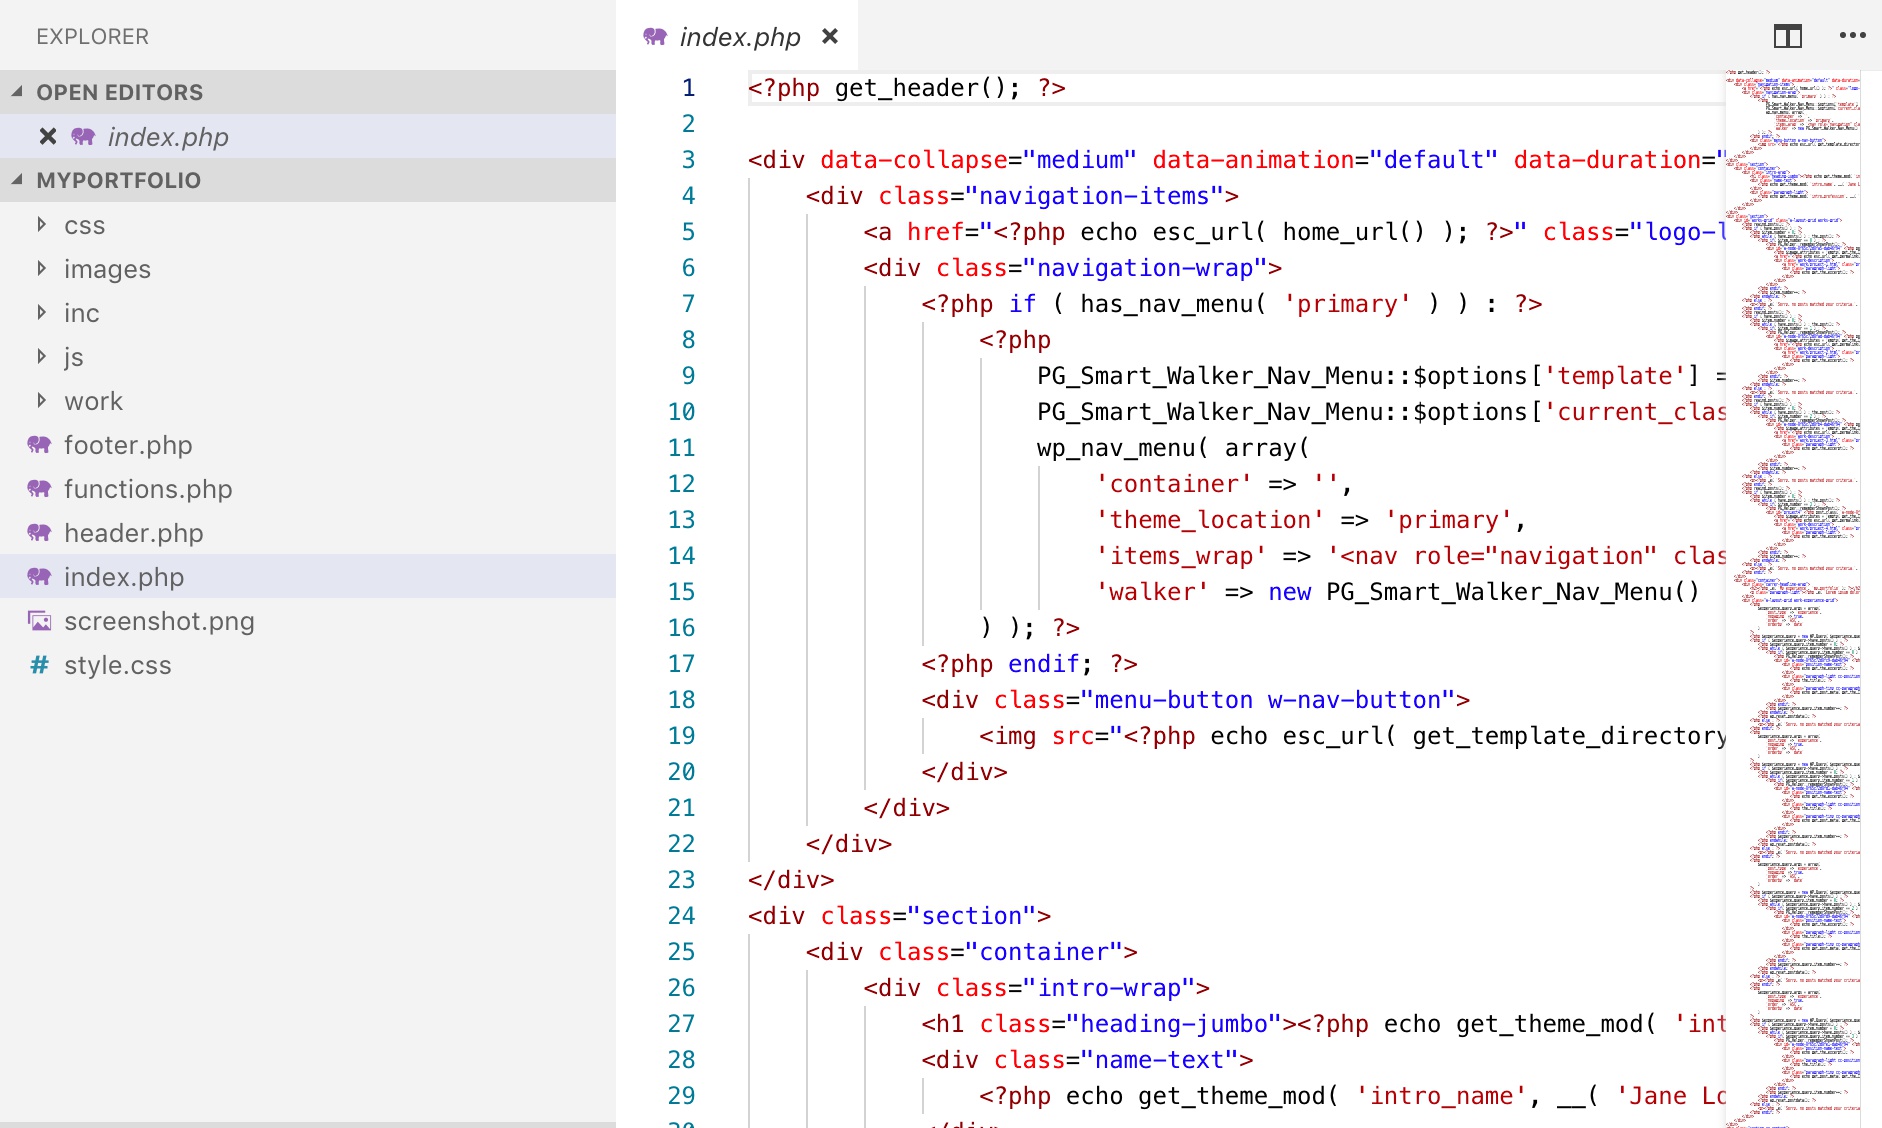
This is done by adding blocks of PHP code that calls WordPress template functions to display dynamic content. For example, the HTML code that represents the title of the post:
<h1>The post title goes here</h1>Becomes the following PHP code:
<h1><?php the_title(); ?></h1>But doing this by hand is no fun at all. It takes hours of repetitive work, that is not only boring, but also prone to errors.
And the worst part of the manual approach is that we have to repeat the whole process every time we change or re-export the source HTML files.
There is a better, smarter way.
We’ll use Pinegrow WordPress Theme Builder to convert HTML code to WordPress theme.
Pinegrow WordPress Theme Builder
Pinegrow Web Editor is a general-purpose HTML and CSS visual editor – it can work with any HTML based project. It is a desktop app for Mac, Windows and Linux that works with projects on our computer – there is no need to upload and download anything.
WordPress Theme Builder is a Pinegrow add-on for converting HTML websites into WordPress themes.
WordPress Theme Builder is also available as a standalone application Pinegrow Theme Converter.
When using Pinegrow for editing and styling the HTML project it is the most efficient to use the integrated WordPress builder. When you’re editing the HTML project with another editor or are exporting the code from a website builder like Webflow, it is best to use the standalone Theme Converter.
How it works?
We open the source HTML project in Pinegrow and then click on page elements and define how they should behave in the WordPress theme.
For example, we select the post heading and then add the Post Title action to it.
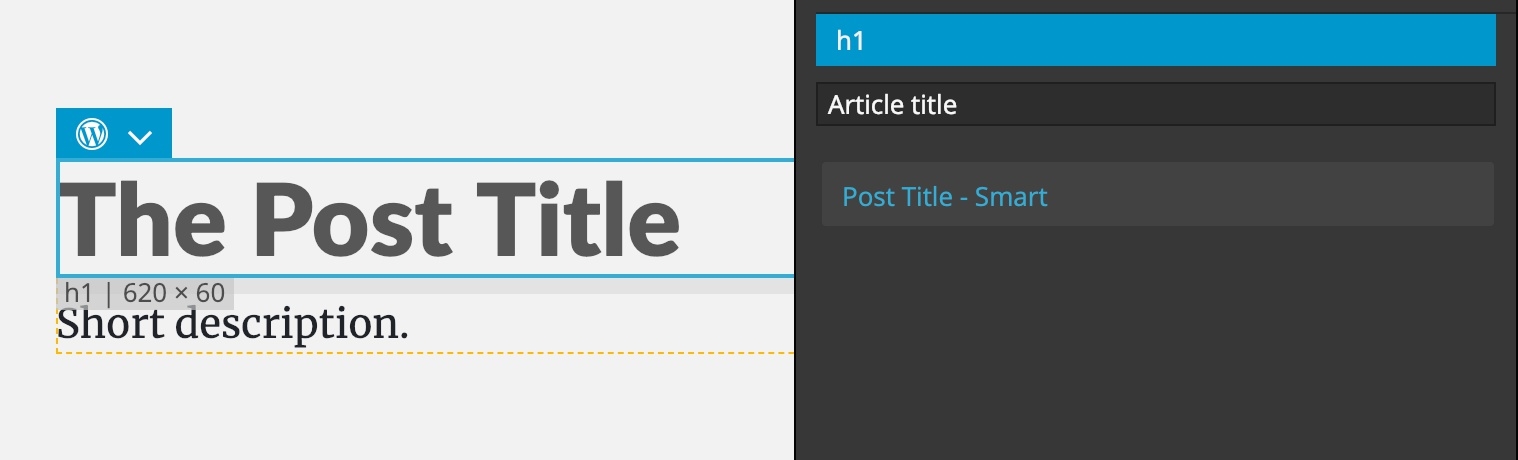
As a result of that, the heading will be exported with a WordPress PHP function the_title() that displays the name of the website.
<h1><?php the_title(); ?></h1>Just like in the example before. But here, we didn’t have to write this PHP code by hand. Pinegrow does that for us.
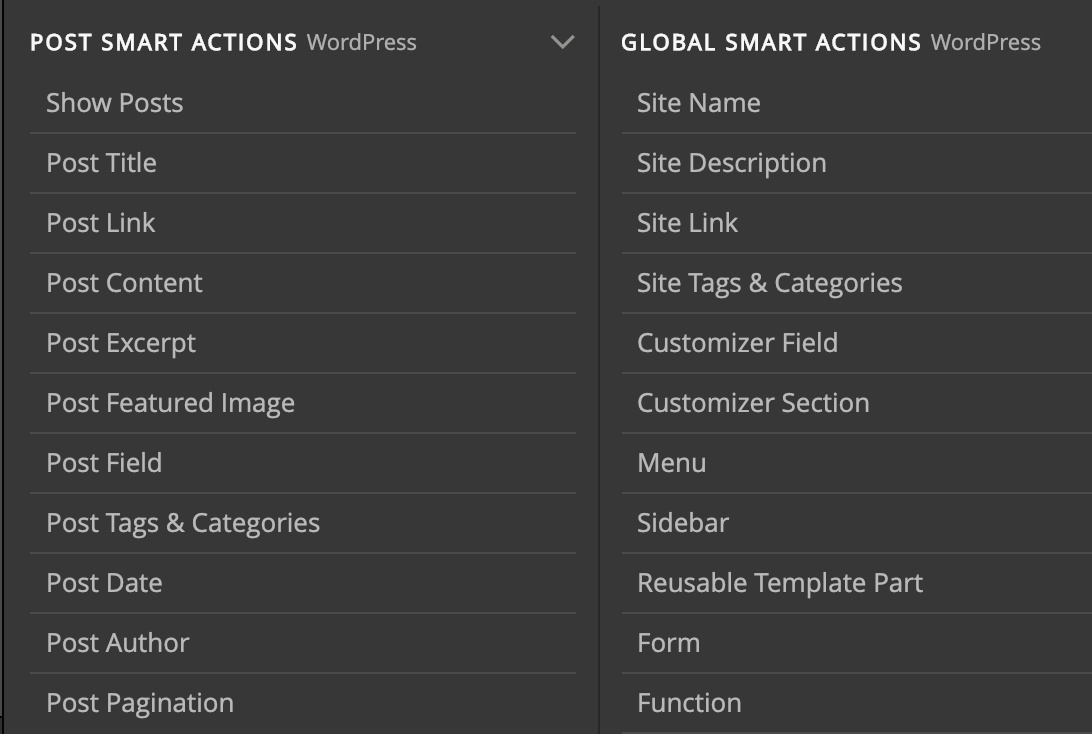
We have two groups of Smart actions at our disposal: actions for displaying posts with their content and global actions for displaying site information, creating customizable controls, navigation, form processing and more.
Smart actions are powerful, yet simple to use with sensible default settings that just work for most cases. They implement a complete set of CMS features, including:
- Custom queries
- Relationships
- Custom post types
- Post fields
- Template parts
- Menus
- Pagination
- Widget areas
- Tags, categories and custom taxonomies
- Customizer fields & sections
- Forms
Another benefit of using smart actions is that they adjust the WordPress output to fit into our custom HTML structure and styling – not the other way around.
What if we need more flexibility?
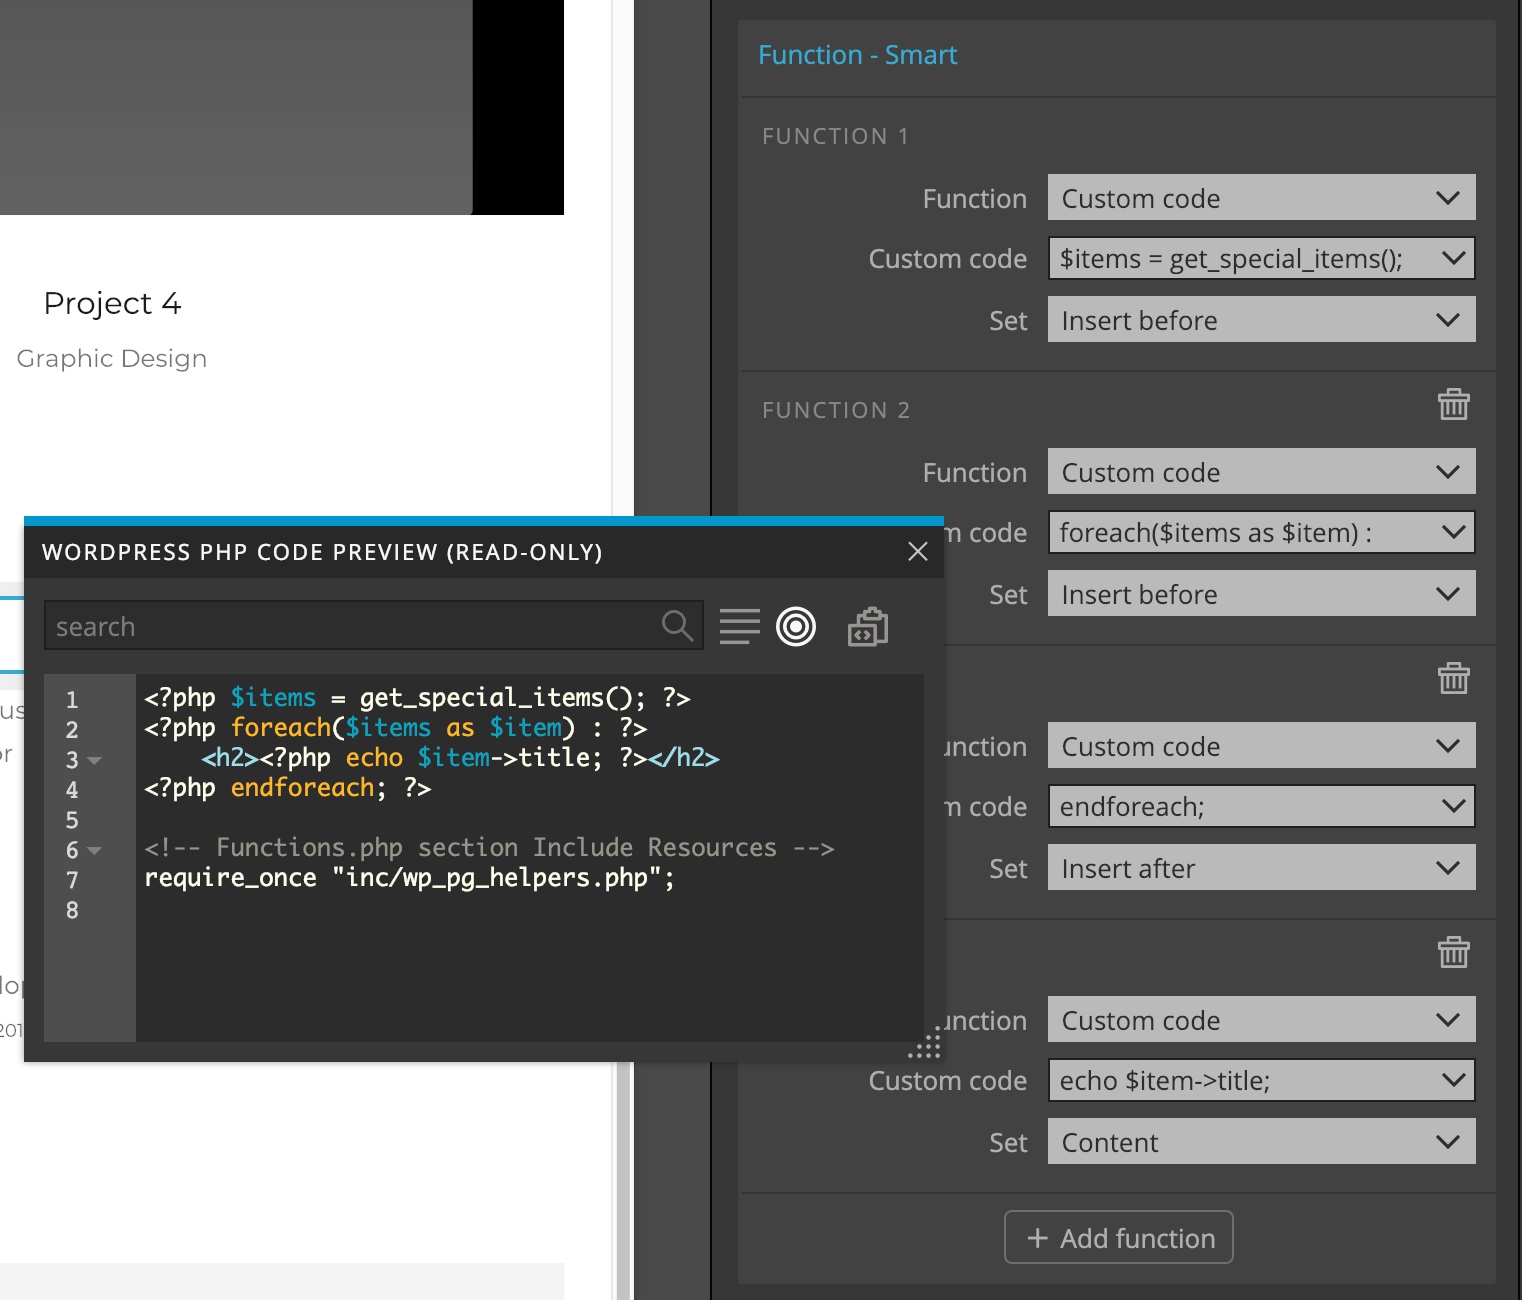
Alongside smart actions, we also have more than 200 regular WordPress actions at our disposal. These actions correspond almost 1:1 to various WordPress template tags. And, if that’s not enough, we can add custom PHP code as well.
No plugins required
Another important point is that Pinegrow Theme Converter is not a theme builder like Elementor, Divi and similar. It’s also not a WordPress plugin. Pinegrow is a standalone tool that creates lean, production-ready totally custom WordPress themes that don’t require any extra WordPress plugins.
The output are standard PHP WordPress template files that look just as if a professional developer would code them by hand. We are free to do whatever we want with these files – use them as they are, and keep using Theme Converter to modify them – or customize the code directly.
Freedom to build whatever we want
By now, you probably noticed that converting HTML projects to WordPress themes is not a one-click magical process.
We get to decide how the theme will work. We get to define the perfect information architecture for our site, including using custom post types, post fields, relationships, queries, taxonomies, customizer fields and more.
You get to do all of that without having to know anything about WordPress functions and PHP code.
You will see – making WordPress themes in this way is easy and fun.
And do you know what’s the best part?
Use your favorite design tools to create WordPress themes
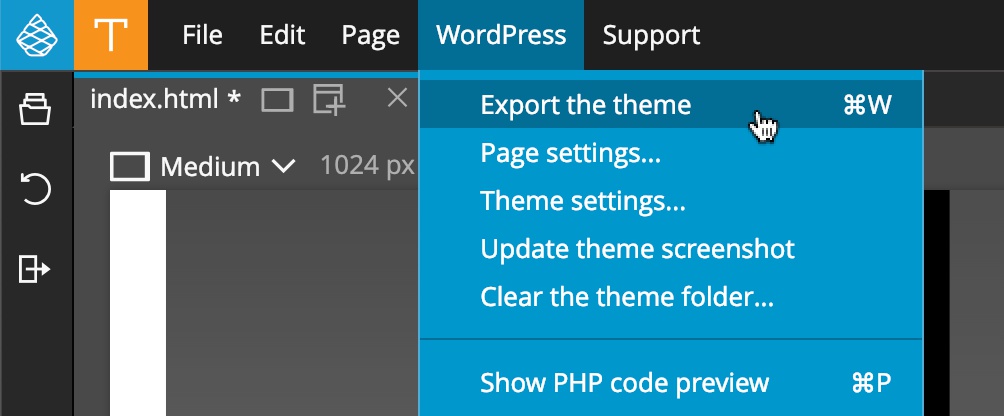
Pinegrow Theme Converter doesn’t add WordPress actions directly into source HTML files, and instead stores them in a special file within the project.
That means that we can continue working on the website with our favorite design tool. After making changes – for example in Webflow – we just export the HTML again, go to Pinegrow Theme Converter, run the Export theme command and our updated WordPress theme is ready.
Let’s take a look at the details of creating a WordPress theme.
Setting up the theme
We start with a HTML source project.
In Theme Settings we decide on the name of the new WordPress theme and its slug.
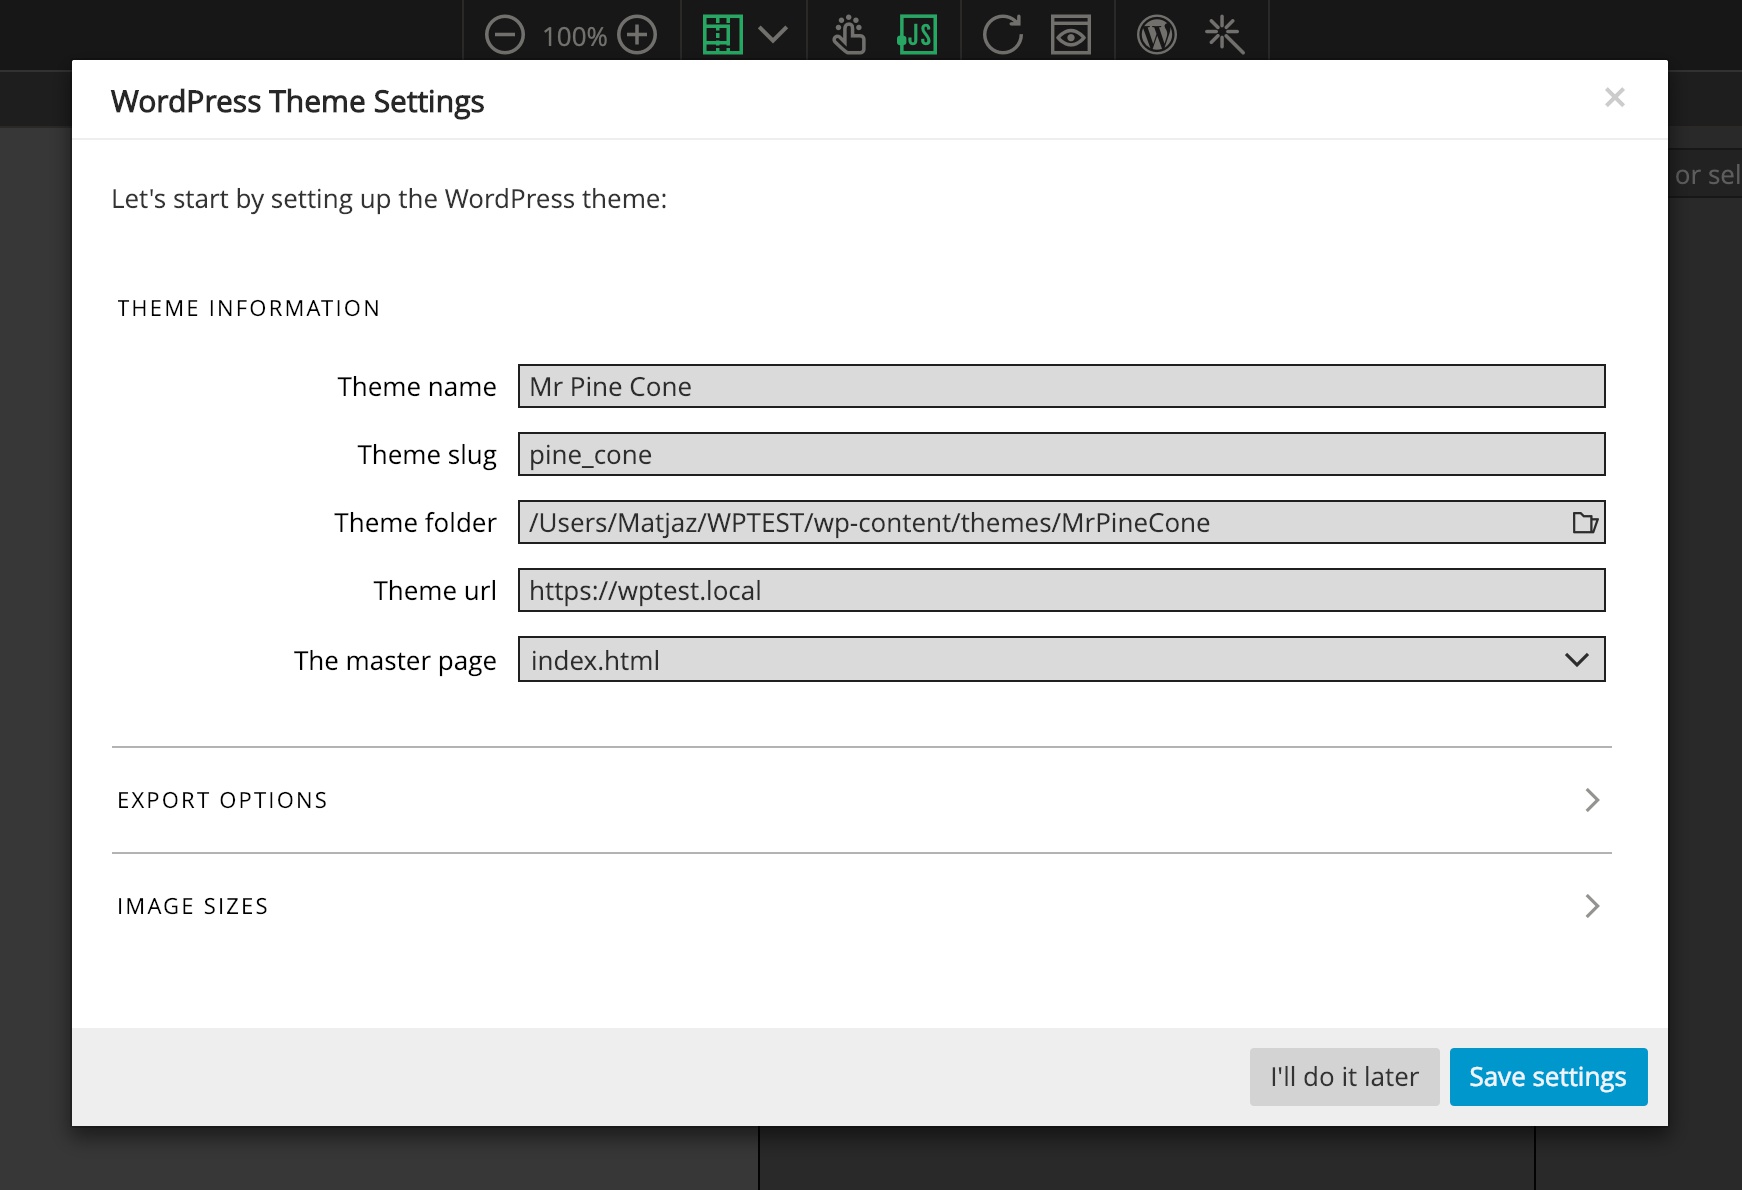
Slug is a WordPress term. It refers to a computer-friendly name that is used internally in WordPress code and consists of a single word that can contain just lowercase letters, numbers and the “_” character.
Theme slug is usually related to the theme name, for example “pine_cone” is the slug of the theme name “Mr. Pine Cone”.
Next we need to decide on the location of the exported theme. That is usually a folder within “wp-content/themes” in our local WordPress installation. Although the local WordPress install is not required, it’s strongly recommended because it lets us easily test the theme and import content back to the source HTML files.
Developing the theme on a local WordPress installation will save a lot of our time. Once we are sure the theme works we upload it to the production server.
That’s why we also enter the URL address of the local WordPress site.
If you don’t have a local copy of WordPress running yet, the easiest way is using Local by Flywheel (easier) or MAMP (more flexible). Both options are free.
Headers and footers
In theme settings we also select the main file of our theme. That is usually index.html that is exported to index.php, header.php and footer.php. By default the content of the body element is saved as index.php, everything before that as header.php and everything that comes after, including the closing body tag as footer.php.
html
    body
--------------------  <— Everything above is header.php
        header
        section
        section       <— main template content
        section
        footer
--------------------  <— Everything below is footer.php
        script
        script
All other template files (unless they are marked as master files) will use the header and footer of the main file.
Note, we can use the Site Content action to slice the page in another way, if needed.
Check out the complete guide on setting up the theme.
WordPress template files
Every HTML page in our source project is exported into a corresponding WordPress template PHP file. Names of these PHP files have special meaning for WordPress.
WordPress decides which template file to use based on what it wants to display. If that file is not present, it looks for the next appropriate file. In the end, if no specialized template files are present in the theme, it uses index.php.
For example, take a look at the list of files that WordPress engine goes through when displaying a single page. If the file exists, it is used to display the page, otherwise WordPress looks for the next file in the line.
- {custom}.php
- page-{id}.php
- page-{slug}.php
- page.php
- singular.php
- index.php
In the end, index.php is used if other template files are not found. That’s why every WordPress theme needs at least the index.php template.
Take a look at the guide to choosing the right template name for details.
Not every HTML page from our source project needs to be exported to the theme. Only pages with active Page settings action are exported.
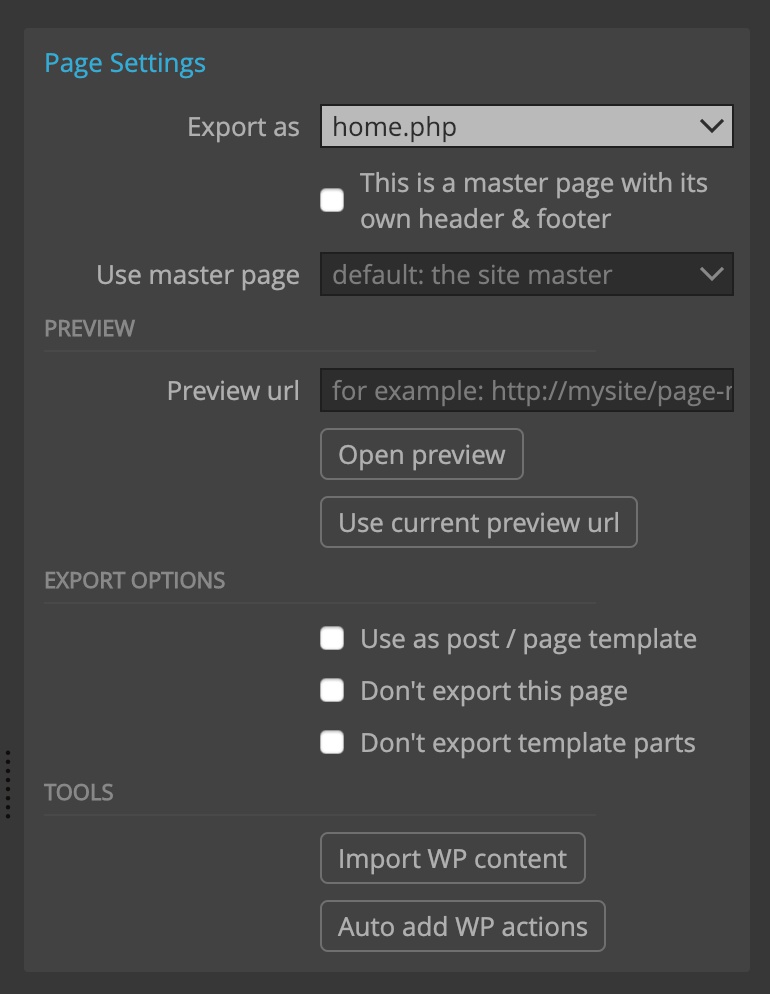
In Page settings we decide to which WordPress template to export the page. There we can also specify the preview URL that points to the local WordPress URL that displays that template.
At this point we can already export our theme.
Exploring the theme structure
If you’re curious, explore the files in the exported theme folder. The basic theme structure is already in place, with index.php, footer.php, header.php, functions.php and so on.
Peeking into index.php reveals that a lot of required WordPress code is already in place – without us having to do anything yet.
Let’s activate the new theme in WordPress admin panel and view the page. It works, but looks just like the HTML page, the WordPress content is not displayed yet.
Showing posts and The Loop
Every WordPress template needs at least one Show Posts action displaying The Main Loop, even if the page displays a single post.
The Loop is a WordPress code construct that iterates through posts and displays them on the page. Array of posts is passed from WordPress engine to the theme. The theme displays the posts with the loop.
Inside the Show Posts loop we display each post’s title, content, images, fields, tags and other information by using the actions from the Post family.
For example, here we use Show Posts to display the list of the latest posts with their featured image, title, excerpt, date and tags:
div.article       <— Show Posts action
    h2 Title      <— Post Title action
    img.featured  <— Post Featured Image
    div.conten    <— Post Content action
    p.excerpt     <— Post Excerpt action
    …
When using Show Posts with the main loop, we have no control over how many and what posts are returned in the loop. That’s WordPress engine’s job. Our theme just displays the posts.
In addition to the main loop posts, we often need to show other groups of posts on the same page. For example, we have related posts listed under the main content of the page.
Custom queries
Show Posts with Custom query lets us fetch posts according to custom criteria, for example searching by the post field value.
In this example we show the list of featured articles, using “featured” post field as search criteria. We use the option to filter out any posts that were already shown higher up the page.
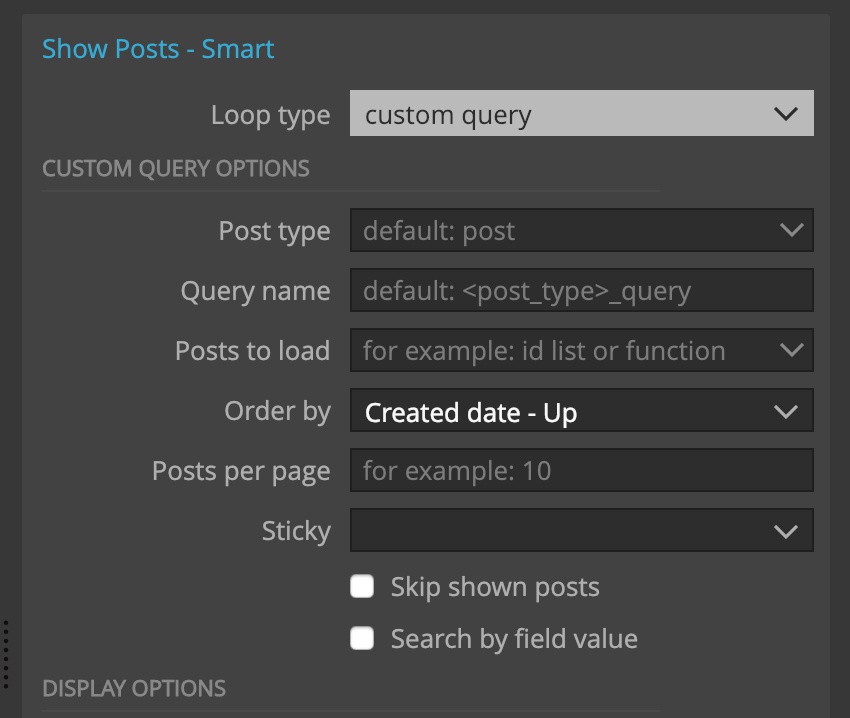
Custom query Show Posts action creates the PHP custom WP_Query code. Take a look at the code and see how much typing Pinegrow saves us – and don’t worry, you don’t have to understand this code:
<?php
    $experience_query_args = array(
        'post_type' => 'experience',
        'nopaging' => true,
        'order' => 'ASC',
        'orderby' => 'date'
    )
?>
<?php $experience_query = new WP_Query( $experience_query_args ); ?>
<?php if ( $experience_query->have_posts() ) : ?>
    <?php $experience_query_item_number = 0; ?>
    <?php while ( $experience_query->have_posts() ) : $experience_query->the_post(); ?>
        <?php if( $experience_query_item_number == 0 ) : ?>
            <?php PG_Helper::rememberShownPost(); ?>
            <div id="w-node-8f65c72d8fc9-dab46f94" <?php post_class( 'work-position-wrap' ); ?>>
                .... Show the post here...
            </div>
        <?php endif; ?>
        <?php $experience_query_item_number++; ?>
    <?php endwhile; ?>
    <?php wp_reset_postdata(); ?>
<?php else : ?>
    <p><?php _e( 'Sorry, no posts matched your criteria.', 'my_portfolio' ); ?></p>
<?php endif; ?>

<!-- Functions.php section Custom Post Types -->

    register_post_type('experience', array(
        'labels' =>
            array(
                'name' => __( 'Experiences', 'my_portfolio' ),
                'singular_name' => __( 'Experience', 'my_portfolio' )
            ),
        'public' => true,
        'supports' => array( 'title', 'editor', 'author', 'thumbnail', 'excerpt', 'custom-fields', 'revisions', 'page-attributes' ),
        'show_in_rest' => true,
        'show_in_menu' => true
    ));
Nested Show Posts actions
Show Posts actions can be nested.
article      <— Show Posts with the Main loop
    h1       <— Post title for the main post
    p Related
    ul
      li     <— Show Posts with custom query
          a  <— Post title and Post link for the related post
For example, the outer Show Posts actions displays the posts in the main loop and the inner Show Posts action displays the list of related articles for each post.
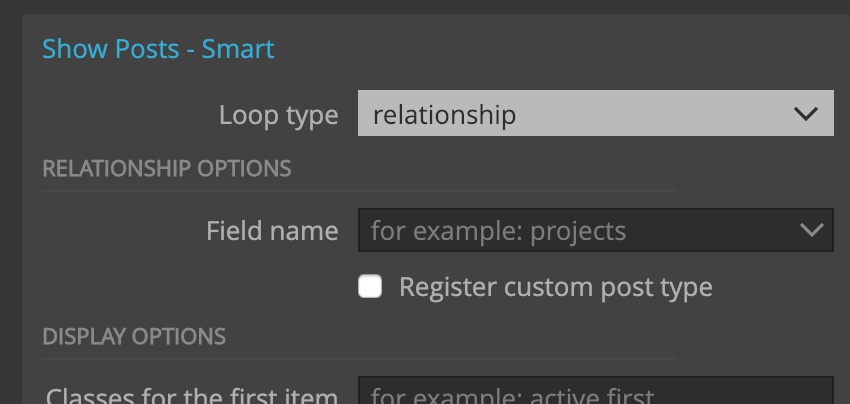
Relationships between content types
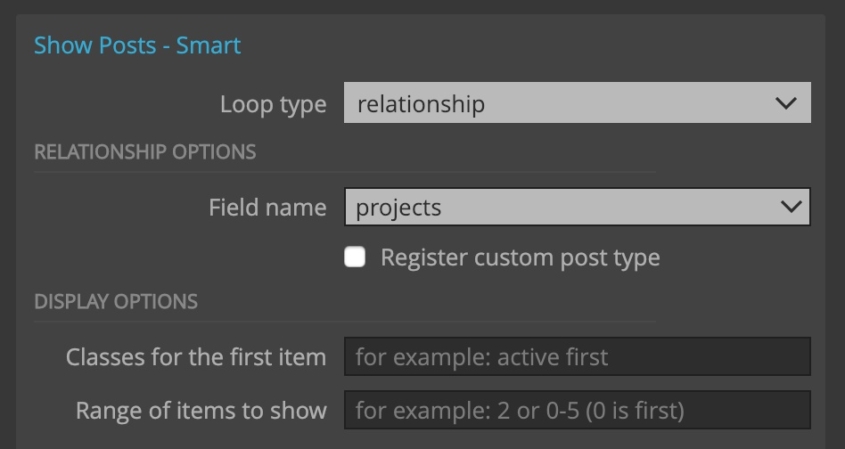
Another powerful method is building and retrieving relationships between posts. For example, let’s imagine we have Projects and Team members in our posts database. We can define the “team_members” relationship on Projects so that it contains the list of team members who worked on the project.
Show Posts with Relationship lets us do that.
Loop structure
Show Posts also lets us define a flexible loop output structure where we can set what range of elements to repeat, what to display if no posts are found, which of returned posts to actually display and so on.
In the following example, we will:
- always display the section and it’s heading.
- Display div.items only when posts are found.
- Display div.empty-loop is no posts are found.
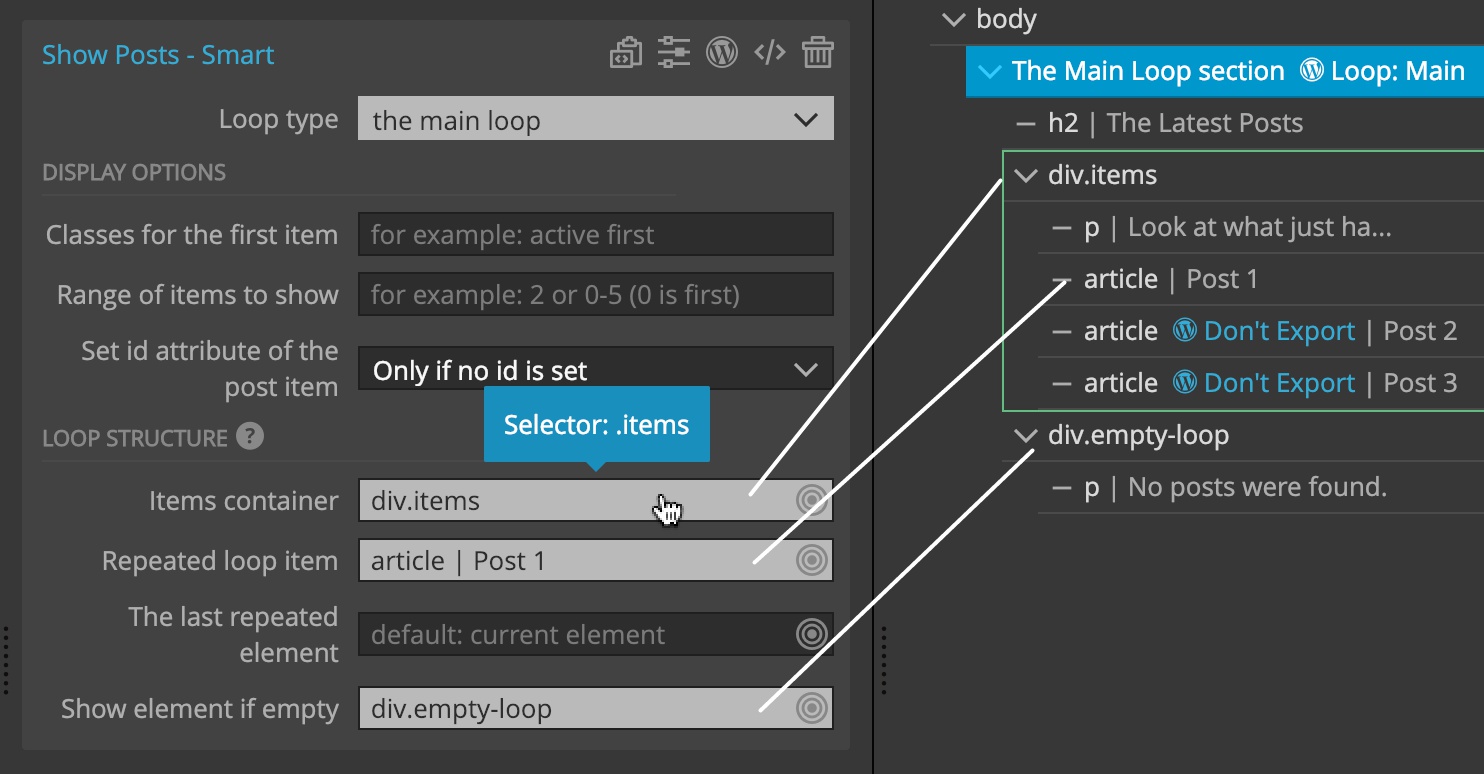
section                        <— Show Posts
    h2 Latest posts
    div.items                  <— Items container
        p Look at this:
        article Post 1         <— Repeated item
        article Post 2         <— Don't export
        ...
    div.empty-loop             <— Show element if empty
        p No posts were found
Take a look at the complete Show Posts documentation for details and examples.
The content model
For all but the most simple projects we need to first take a good look at all the HTML pages and plan how the information will be organized.
That means figuring out what post types we need to represent the information, and custom fields that need to be added to post types and relationships between objects.
It also means identifying static and editable parts of the website. For example, section headings might be fixes, while section description texts
Registering custom post types
Post types represent different types of our content. For example, we might have Projects, Team members, Blog posts and so on.
WordPress comes with a set of built-in post types, the main being posts and pages. We can use posts for chronological content, for example blog posts, events and projects. Pages are useful for structured content that is not dependent on time, for example information about the company, documentation…
There is no need to cram every type of content into posts and pages. WordPress lets us register as many custom post types as we need.
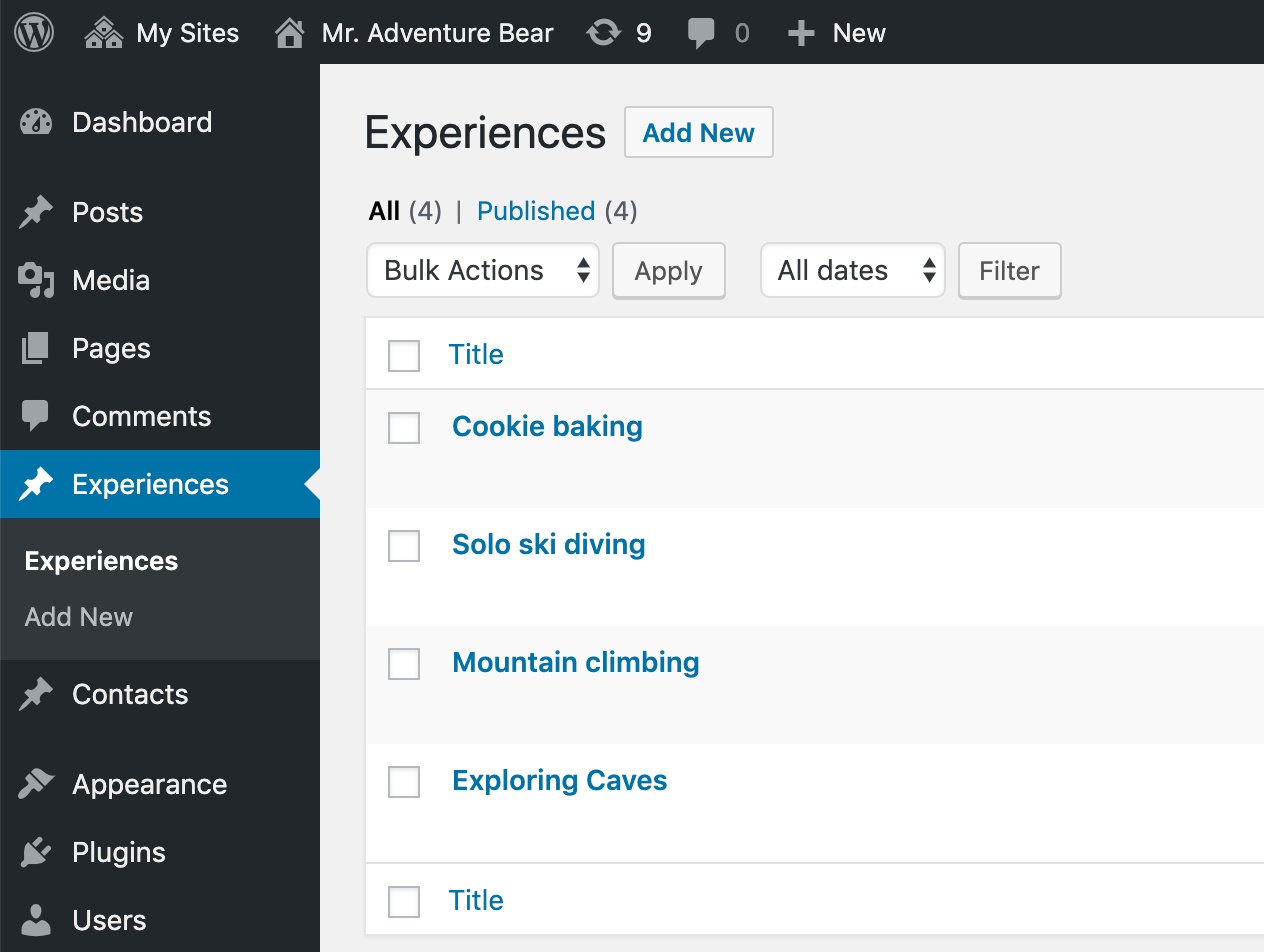
And Pinegrow makes defining and using custom post types easy. One way to register a new custom post type is directly on the Show Posts action that displays posts of that type.
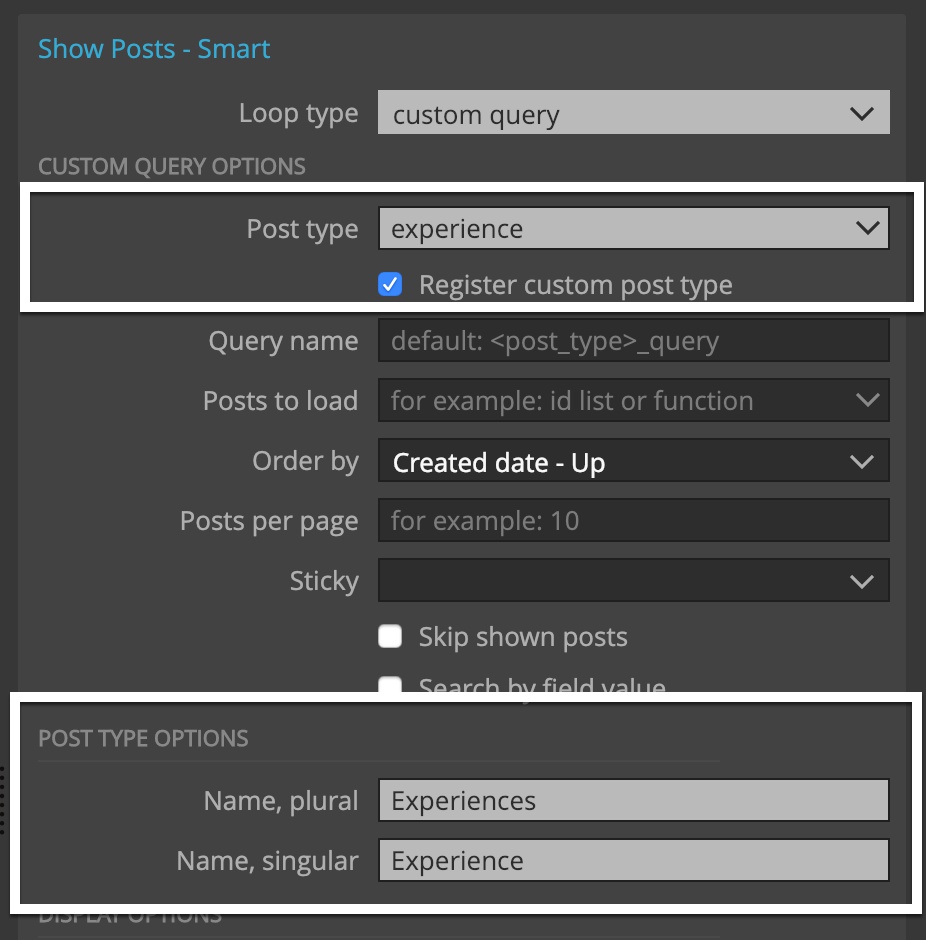
This will add the custom post type “Experiences” to the main menu in WordPress dashboard.
We then use Show Posts action to display such posts, either with the Main loop in templates that target the custom post type (for example, single-{post type}.php), or by using Show Posts with Custom query / Relationship.
Extending posts with custom fields
Some of these post types also need additional fields for storing their information. For example, Projects might need extra fields for their clients and duration.
In classic WordPress editor (the old editor, before Gutenberg / Blocks editor) we could edit custom fields while editing the post.
But in the new WordPress (5.0+) blocks editor, the custom fields are no longer accessible in the editor.
Our recommendation is to use Advanced Custom Fields (ACF) plugin. The free version is powerful enough to handle all use-cases described in this guide. It’s a widely used high-quality plugin that implements powerful and user-friendly UI for custom fields.
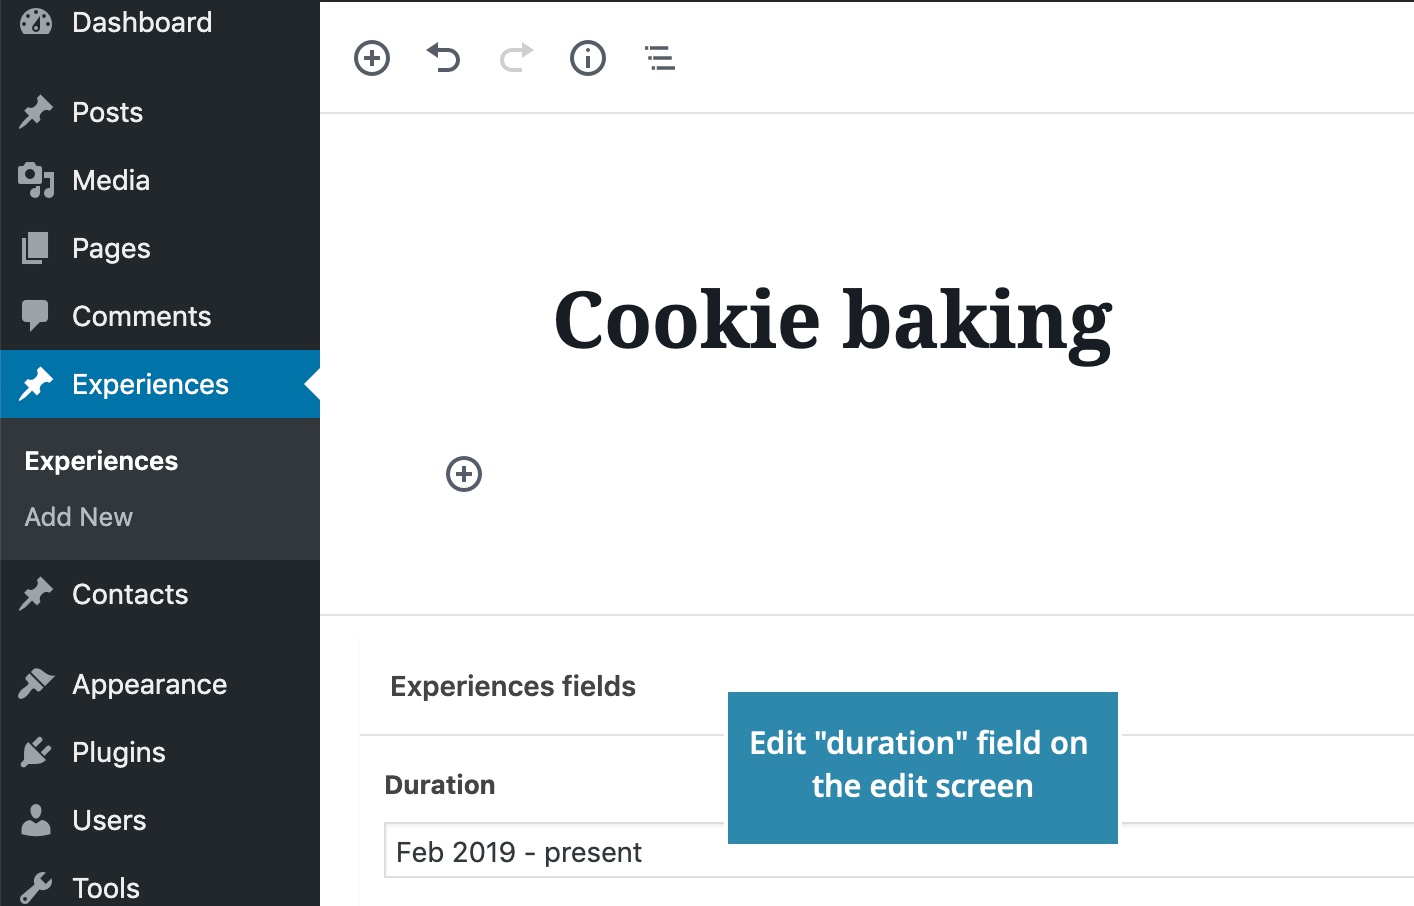
With ACF we define groups of fields and associate them with particular post types.
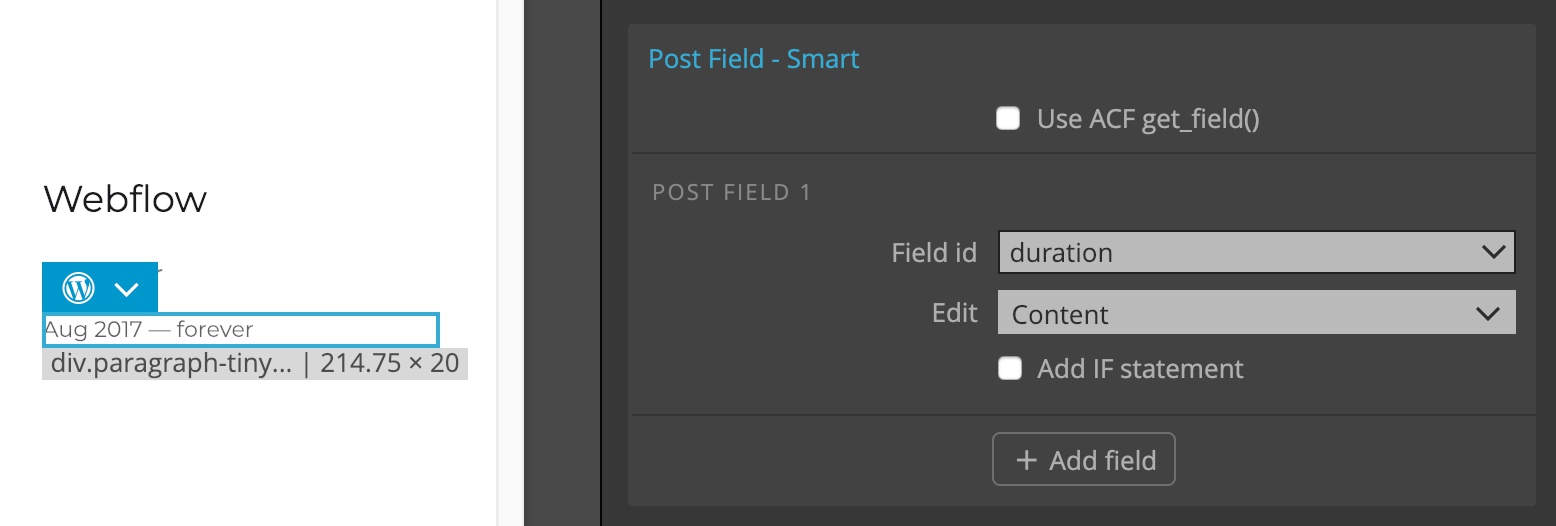
For example, we define field “duration” for post type Experience.
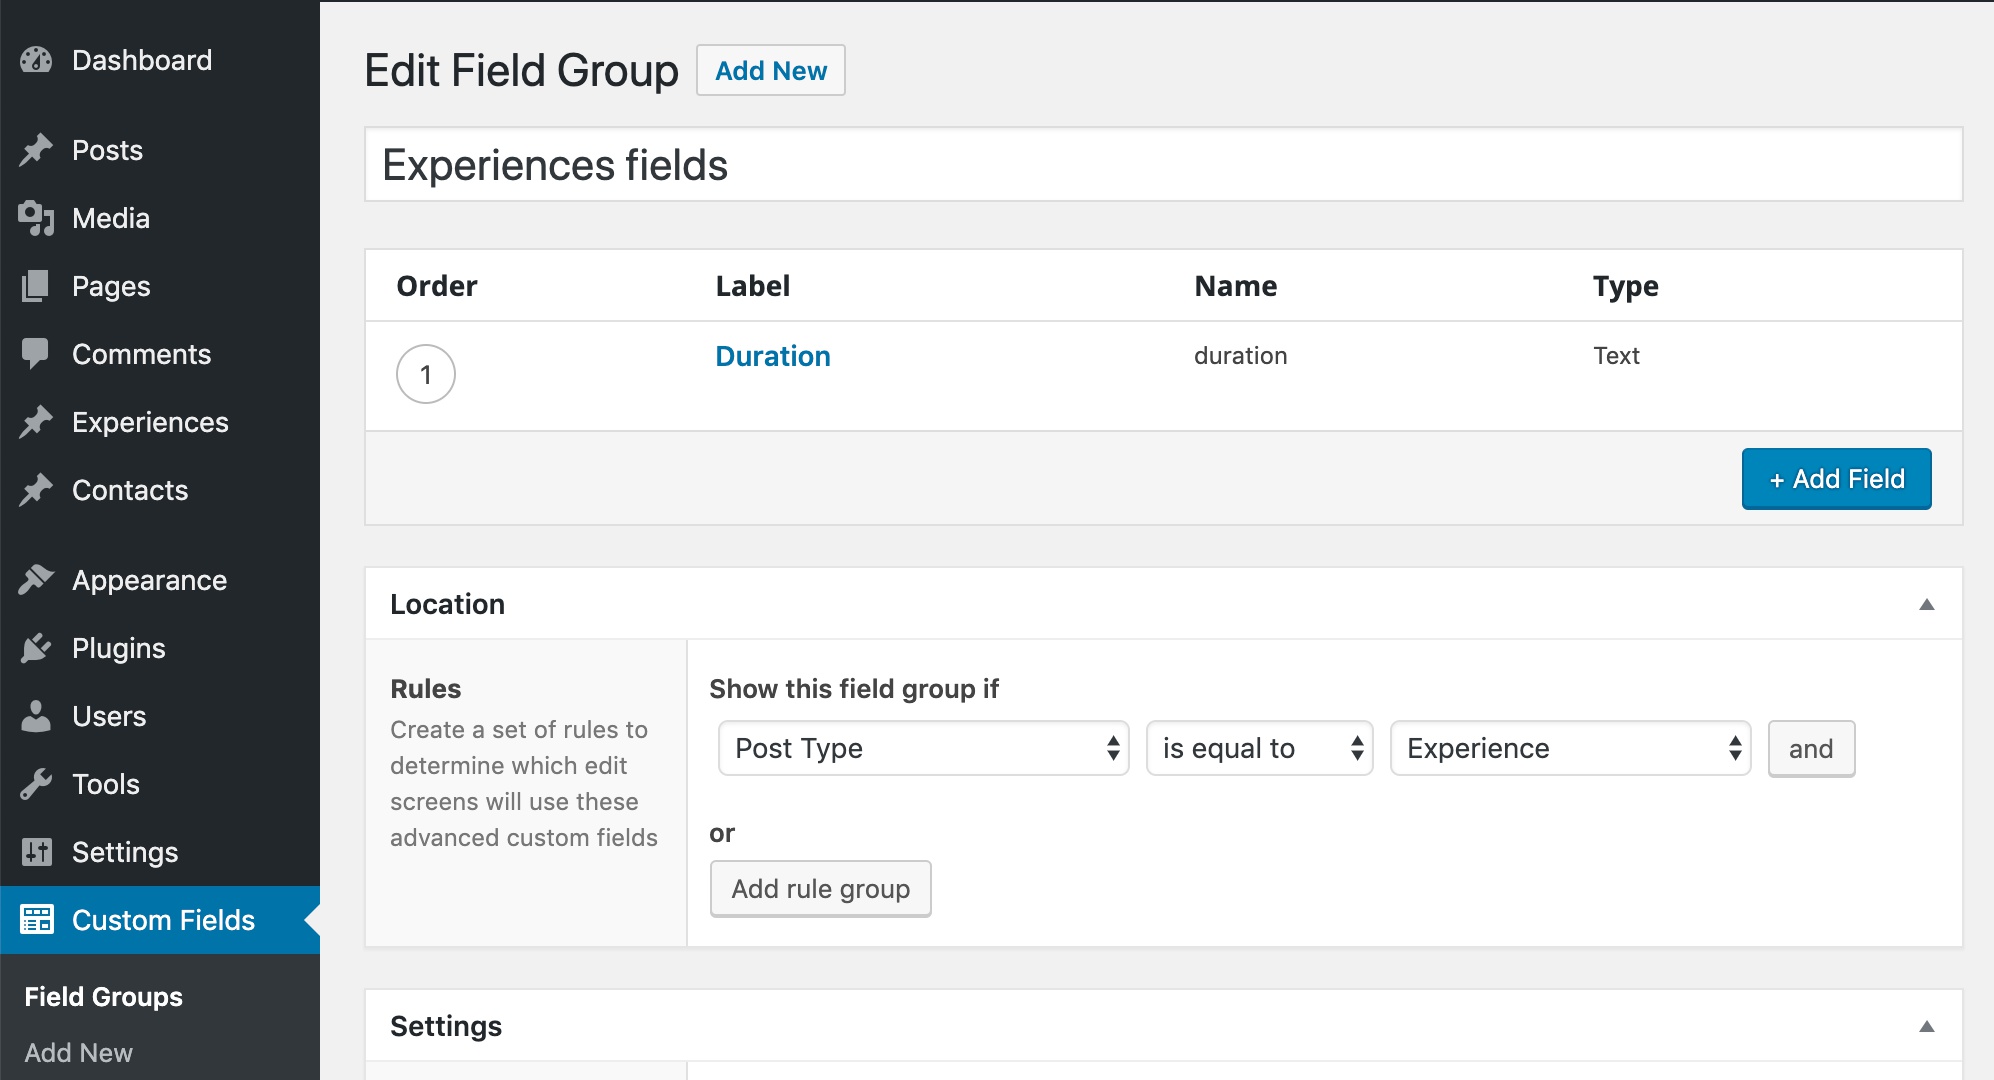
With this, we’re able to edit the field in blocks and classic WordPress editors.
And use Post Field action to display or use field values.
Relationships
Different types of content are usually connected amongst themselves, forming relationships. For example, Projects could be connected with Team members who worked on them.
Surprisingly, WordPress doesn’t come with the support for relationships out-of-the box. We can again use free version of Advanced Custom Fields (ACF) plugin to implement relationships and any custom fields that our post types need.
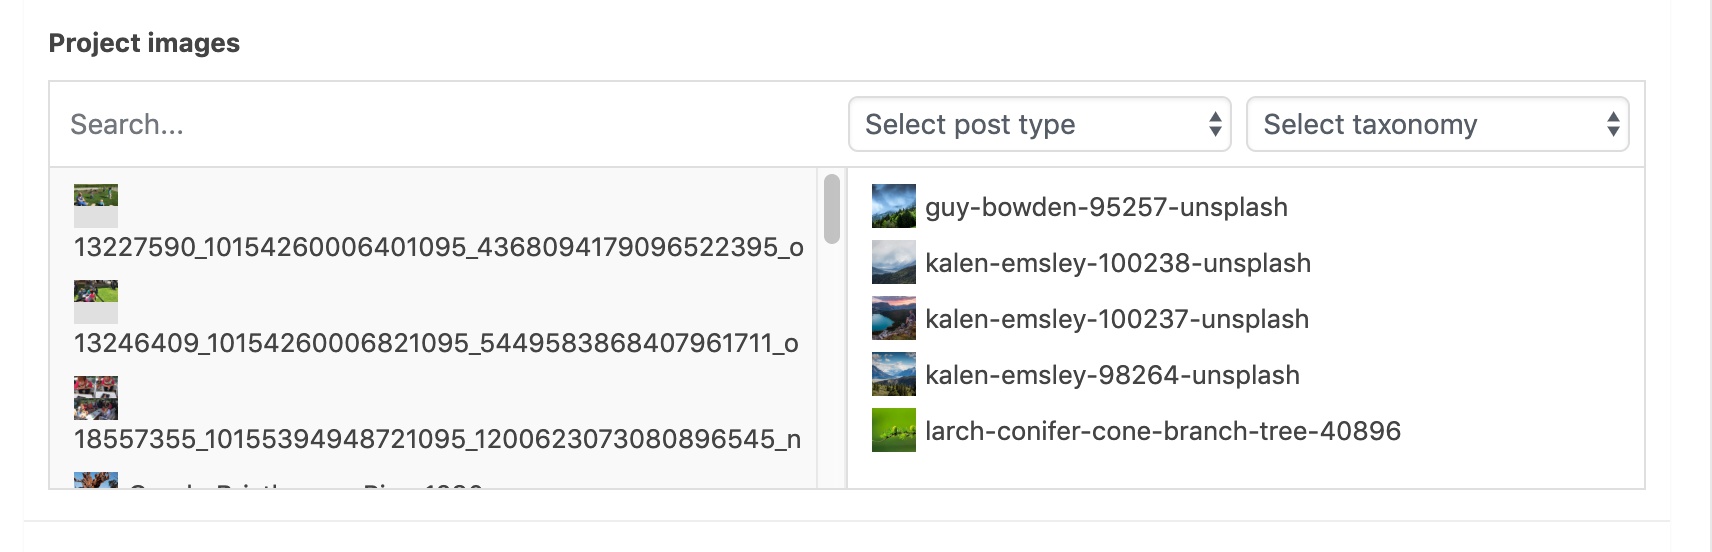
Relationships are just a special kind of custom post fields – a list of connected posts. When defining a relationship in ACF we list the post types that can be added to the list field.
ACF adds a user-friendly UI for managing connected posts:
And we can use Show Posts with Relationship to loop through and display these posts:
Tags, categories & custom taxonomies
Posts can be organized in categories and grouped with tags. In WordPress terminology both categories and tags are taxonomies. We can define additional custom taxonomies, if needed. For example, we might define the Activities taxonomy and assign its terms (mountain climbing, trekking, exploring caves…) to Adventure Trips in order to indicate what activities will happen on trips.
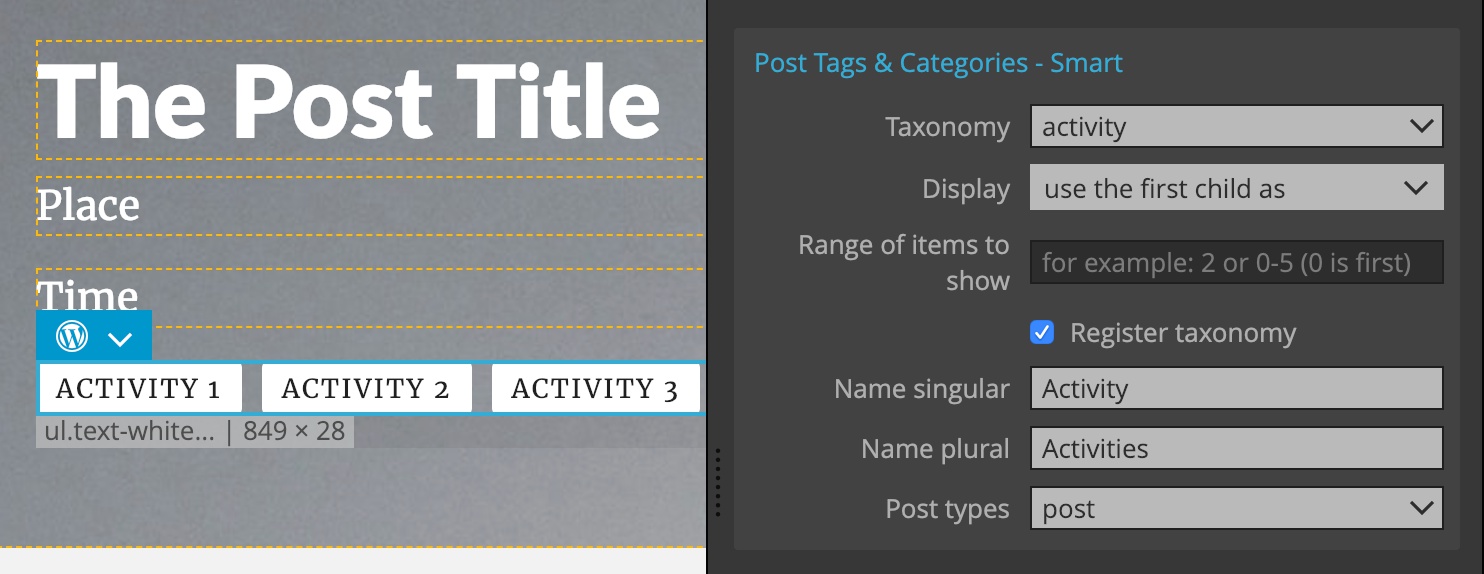
We can then assign the terms from this taxonomy to individual posts:
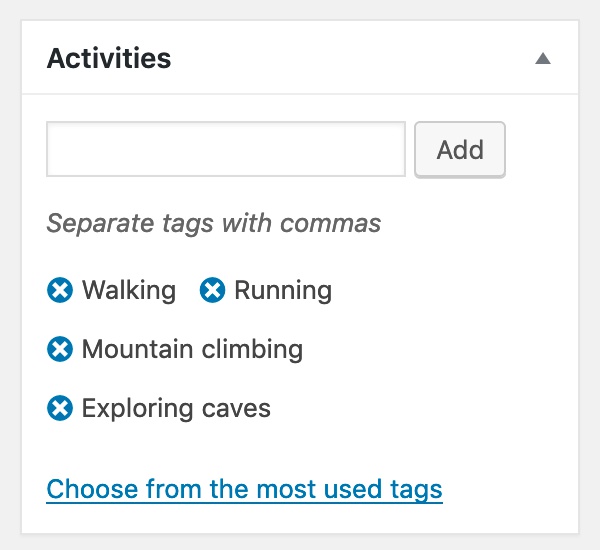
Use Post Tags & Categories action to display terms associated with the current post:
And Site Tags & Categories action to list all terms that are used on the site, optionally accompanied with the count to associated posts:
Pinegrow Theme Converter lets us work with all of these – Post types, fields, relationships and taxonomies – in order to build the perfect content model for our WordPress site.
So far we’ve been mainly talking about working with Posts and their content.
A typical WordPress site can have other dynamic – and editable – parts that are not parts of posts.
Making the theme editable with Customizer
WordPress Customizer lets us easily edit texts, images, links and styles of any website element. When creating the WordPress theme we have to register all these Customizer controls in functions.php and then use appropriate WordPress functions in templates to display the control values.
With Pinegrow Theme Converter that’s just few clicks of work.
We select the element and add Customizer Field action that modifies element’s content, attributes, background image or styles. We can also define global CSS rules that use the customizer values to redefine styling of the site.
For example, here we create a button that has two editable fields: its link and label.
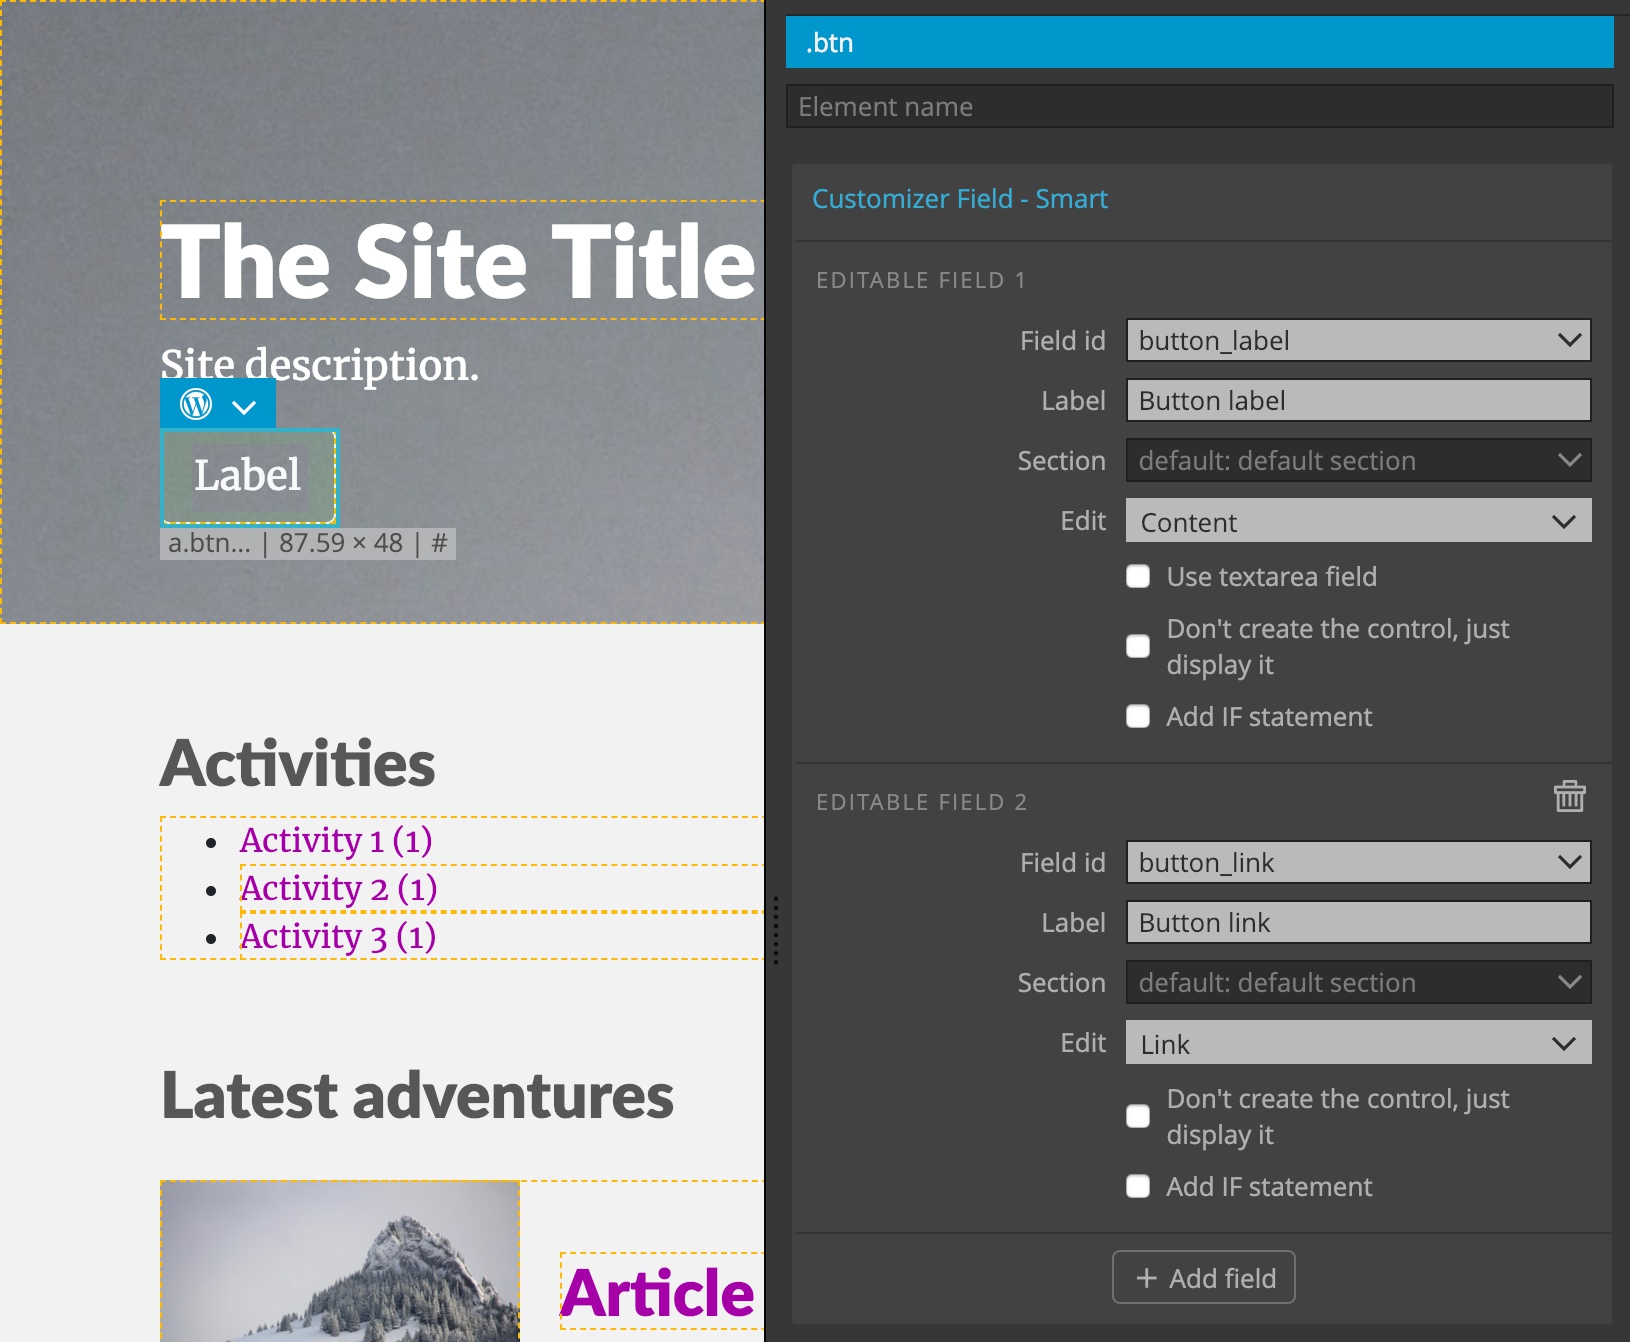
Customizer controls are grouped in Customizer sections. Again, creating those is easy, using the Customizer Section actions.
With this, we’ll be able to edie these fields in WordPress Customizer with live preview:
Customizer Field action can do a lot more, including defining editable CSS rules that control the styling of one or more HTML elements on the page.
See the complete guide to Customizer Field action for details.
Navigation
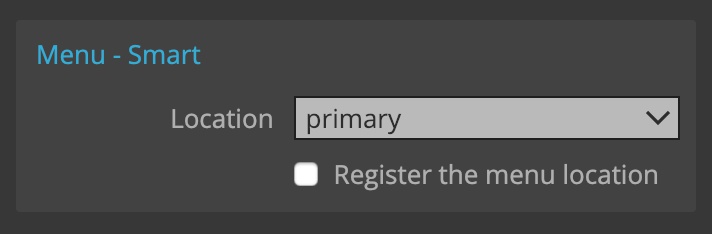
In WordPress we have Menus and Menu locations. Themes define Menu locations – places where menus can be shown. In WordPress dashboard we then create menus and assign them to their Menu locations.
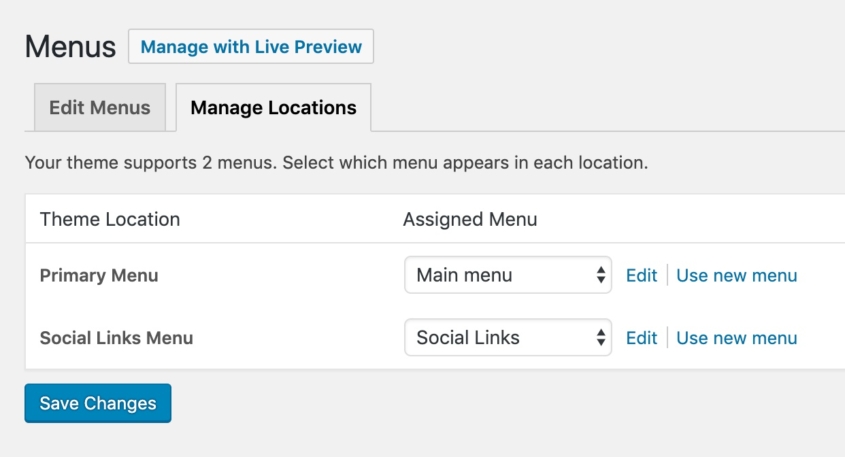
To show a menu for a specific location – and optionally register a new menu location – we simply add the Menu action to the HTML element that represents the navigation.
ul.menu            <— Menu action
    li             <— Repeated menu item
       a Item 1
    li
       a Item 2
    li
       a Item 2
    ...
Pinegrow will automatically figure out the HTML structure of menu items on the page – including the class used to mark the active menu item – and use that to display the WordPress menu.
By default, WordPress forces its own HTML markup structure for navigation output. This creates conflicts with our custom styling and HTML structure. But Menu smart action does the opposite – it adjusts the WordPress output to our existing HTML structure.
Check out the Menu guide for details and examples.
Pagination
Post Pagination smart action works in a similar way like navigation in that the resulting WordPress pagination will adjust to our HTML structure, and not the other way around.
We simply add the Post Pagination action to the pagination element select which element is previous link, which the next and so on.
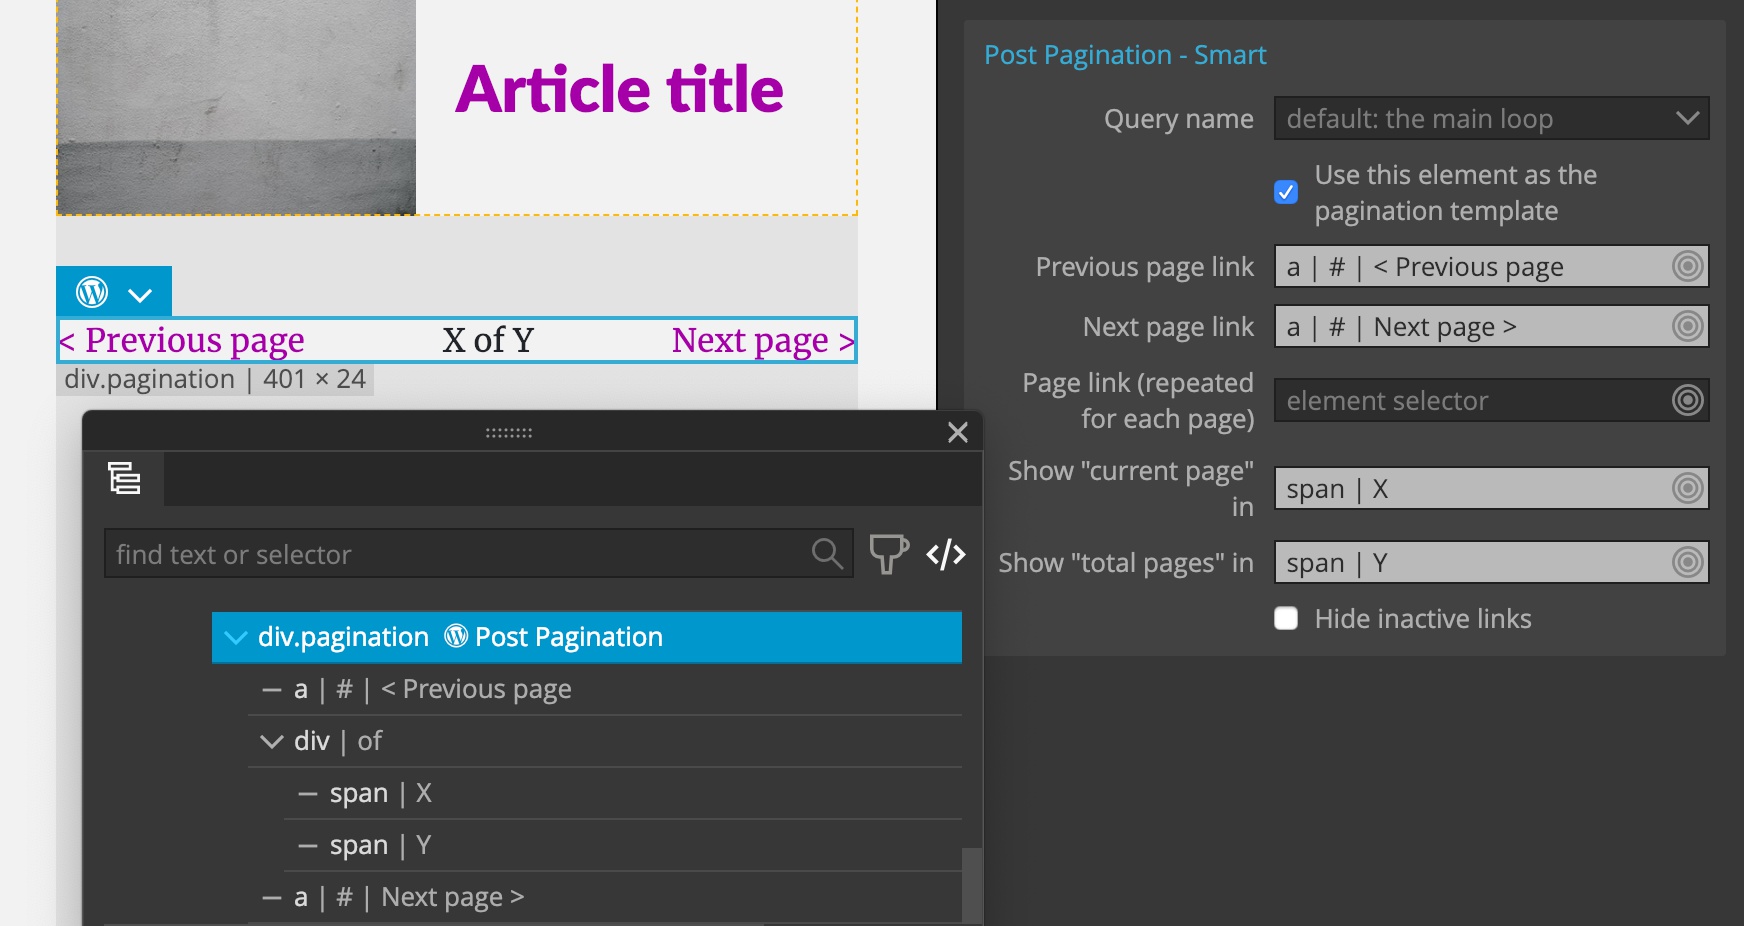
For example, here we implement pagination with next and previous links, and showing “page X of Y”.
div.pagination         <— Post Pagination action
    a Previous page    <— Previous page element
    div
        span X         <— Current page element
        "of"
        span Y         <— Total pages element
    a Next page        <— Next page element
See the Post Pagination documentation for details and examples.
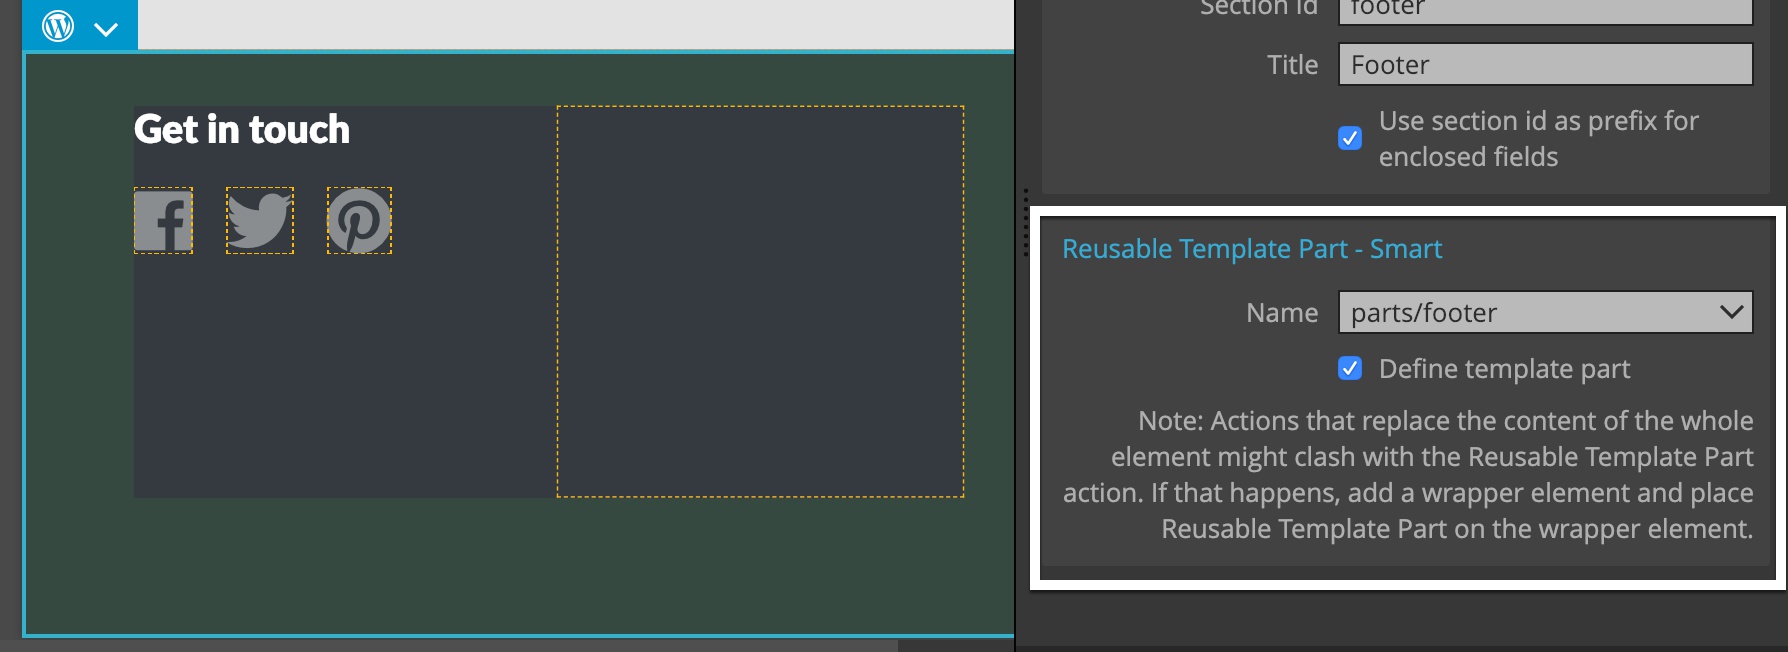
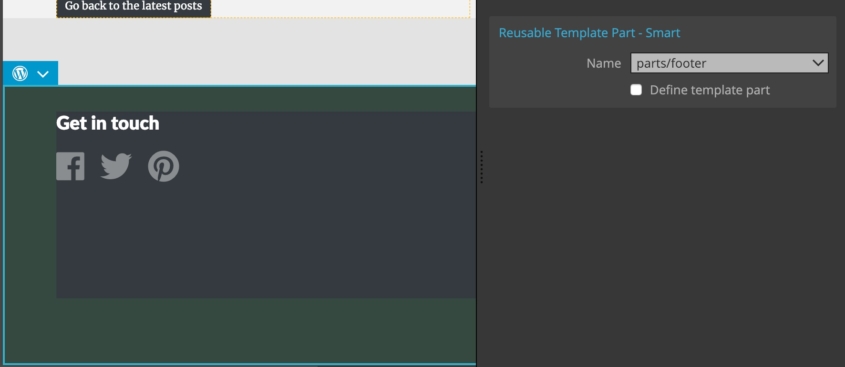
Reusable template parts
What to do with website elements like navigation and footers that are repeated across the pages?
We can define them as Reusable template parts on one page and include them on all other pages.
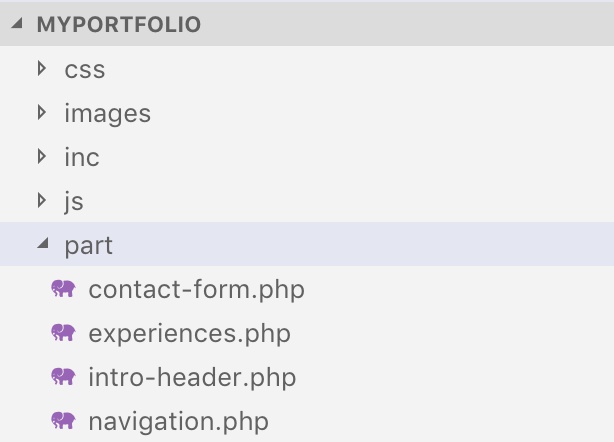
Template parts are stored in individual PHP files that are then included wherever they are used.
We can create Reusable Template Parts for navigation, footer and other elements that are repeated on multiple pages.
For example, here we define the footer template part on the master page:
And then show it on other template pages:
See the Reusable Template Parts documentation to learn more about best practices for using template parts.
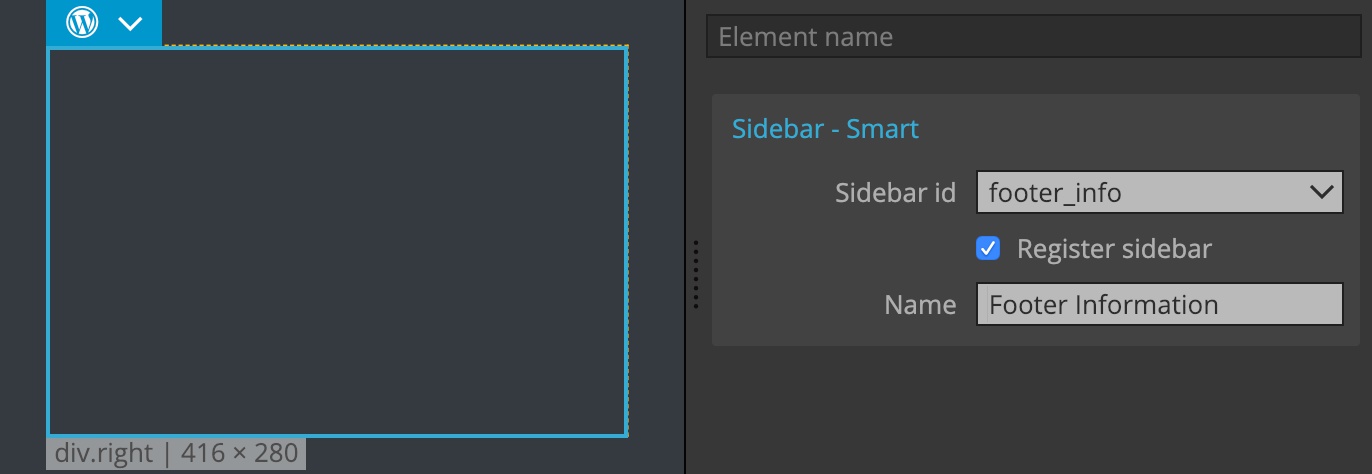
Sidebars and widgets
We can turn areas of our theme into dynamic widget areas, or sidebars.
The content of these sidebars is edited through WordPress admin and the customizer.
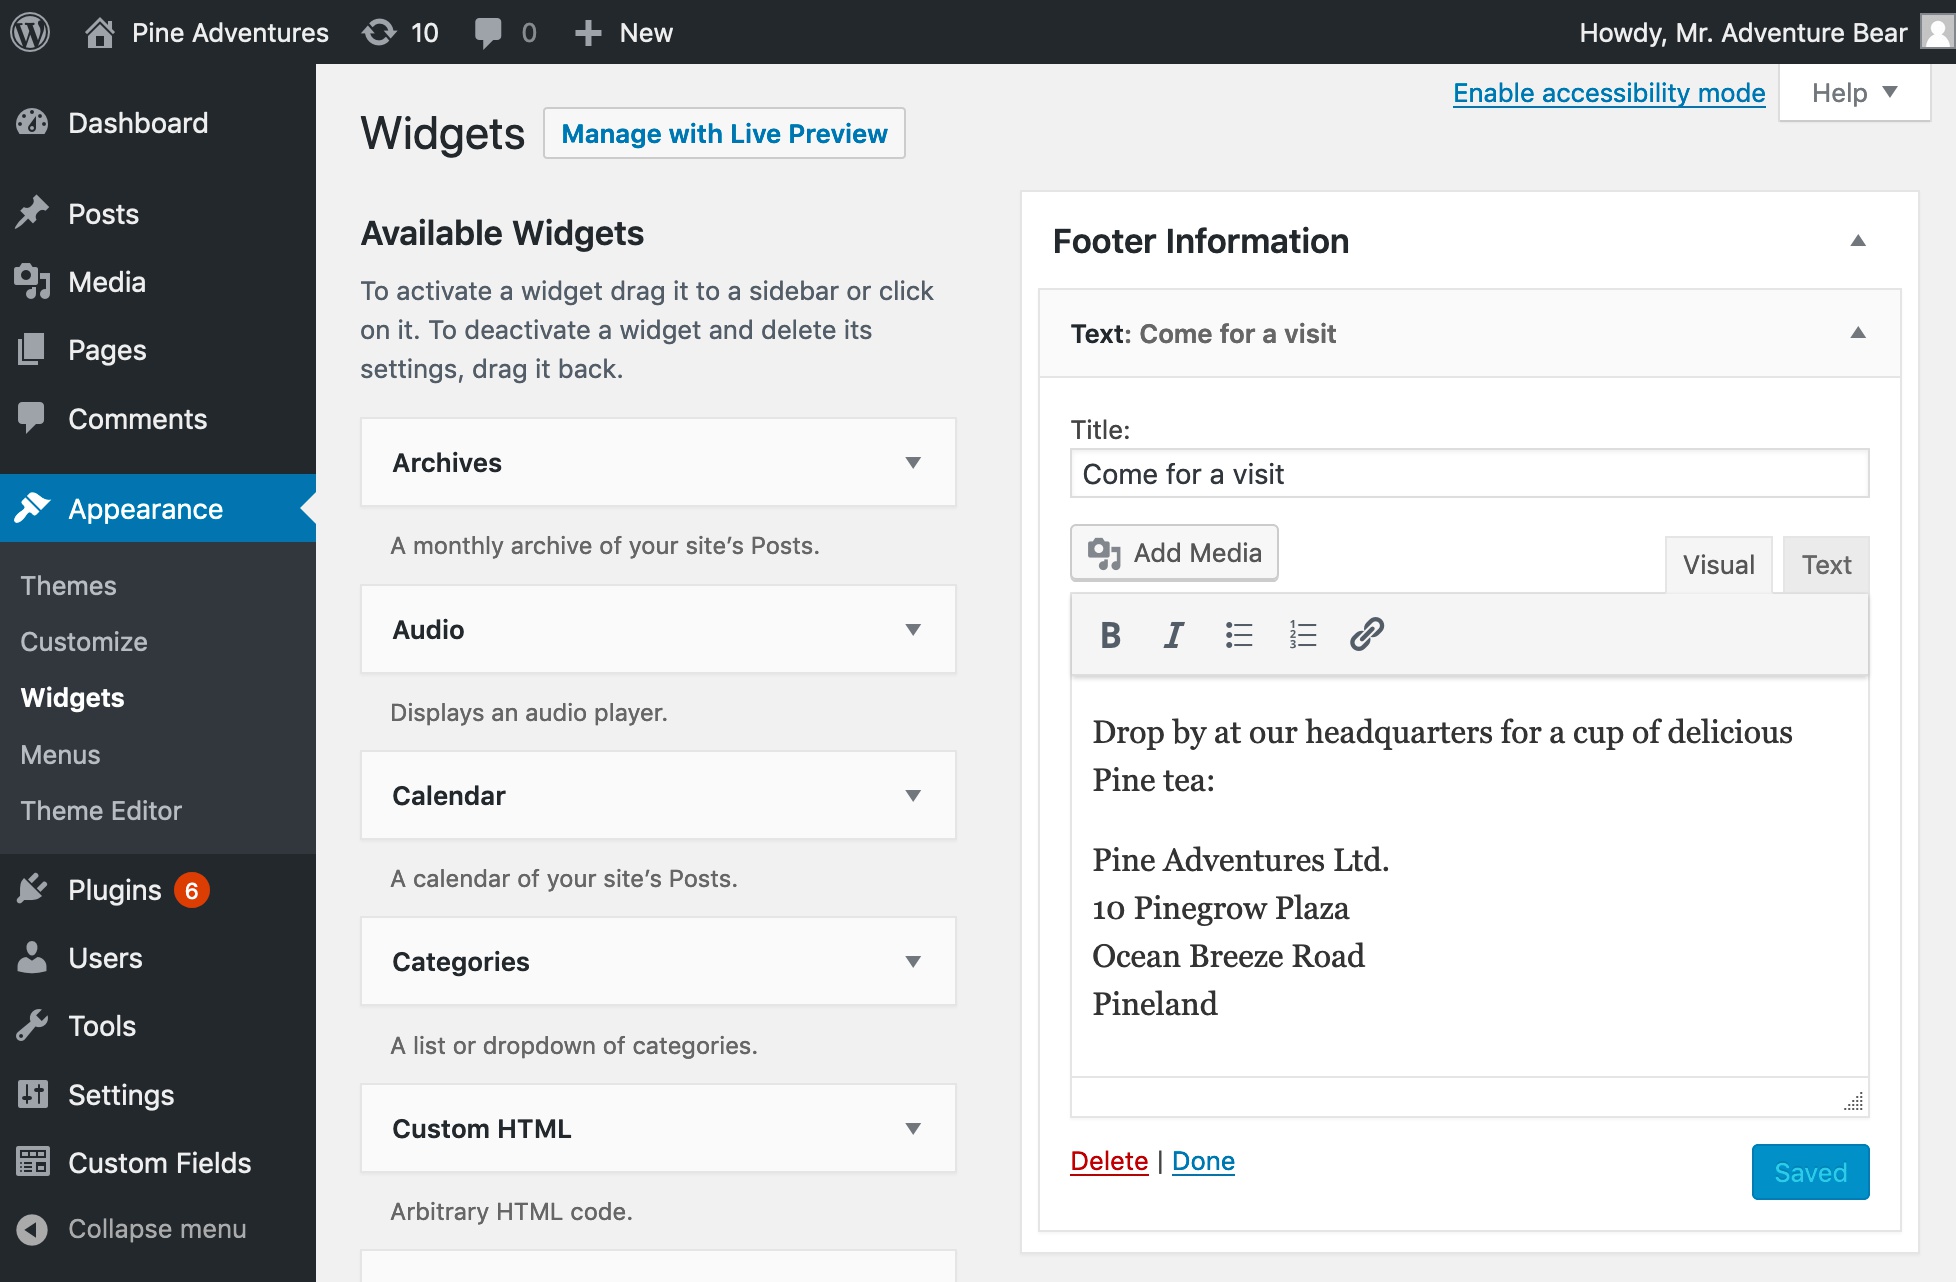
That is a convenient way to include various widgets on the page, either those implemented by WordPress itself or by plugins.
First, we need to register a widget area / sidebar and then we can display it in the theme.
We can do both with the Sidebar action:
Learn more about Sidebars.
Forms
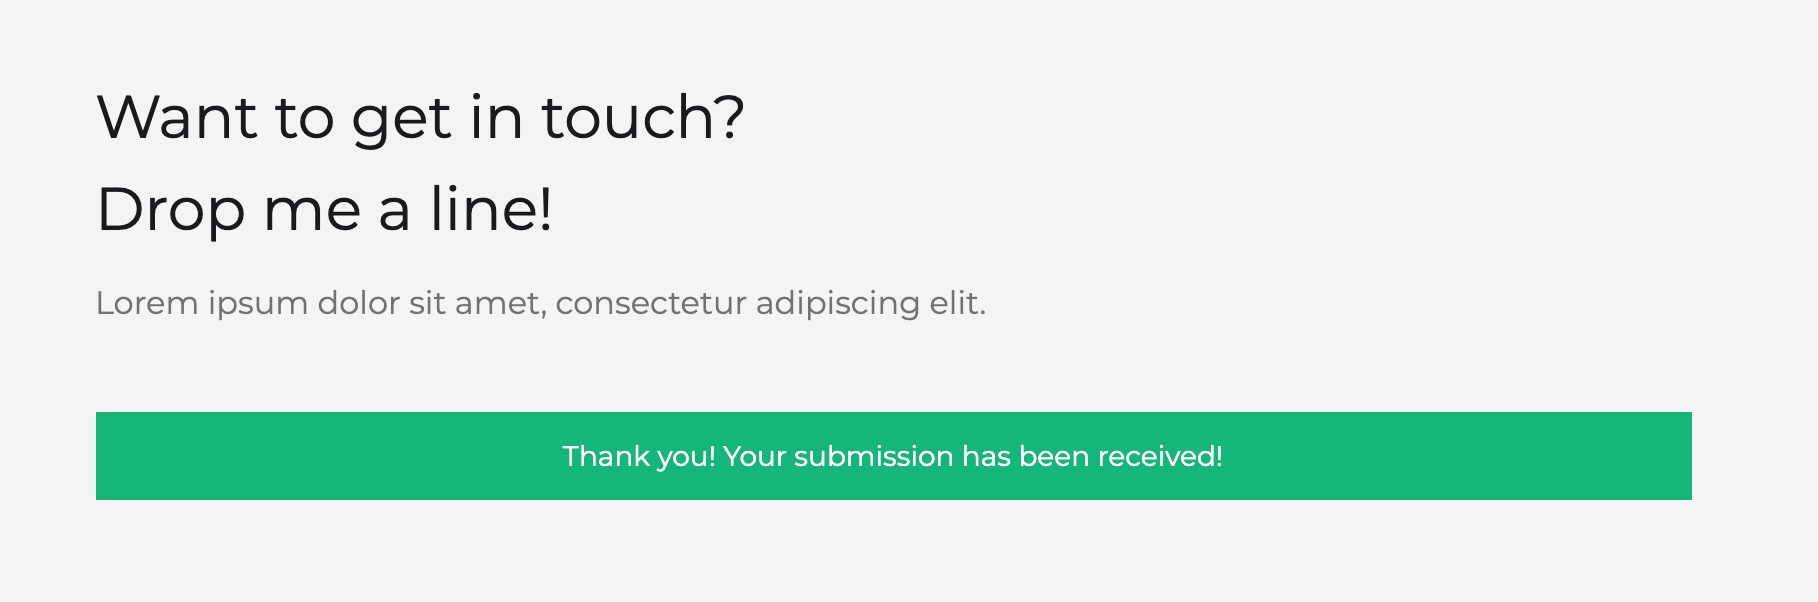
Imagine we have a nicely designed HTML form on our contact page and we want to store and email form submissions through WordPress.
Normally, that would mean going through a bunch of WordPress form plugins and struggling with recreating our form in their form builders. At the end, the result will never match our source HTML form because all these plugins enforce their own styling and HTML structure.
Wouldn’t it be nice to be able to keep our HTML form as it is and just add submission processing?
That’s exactly what the Form smart action does.
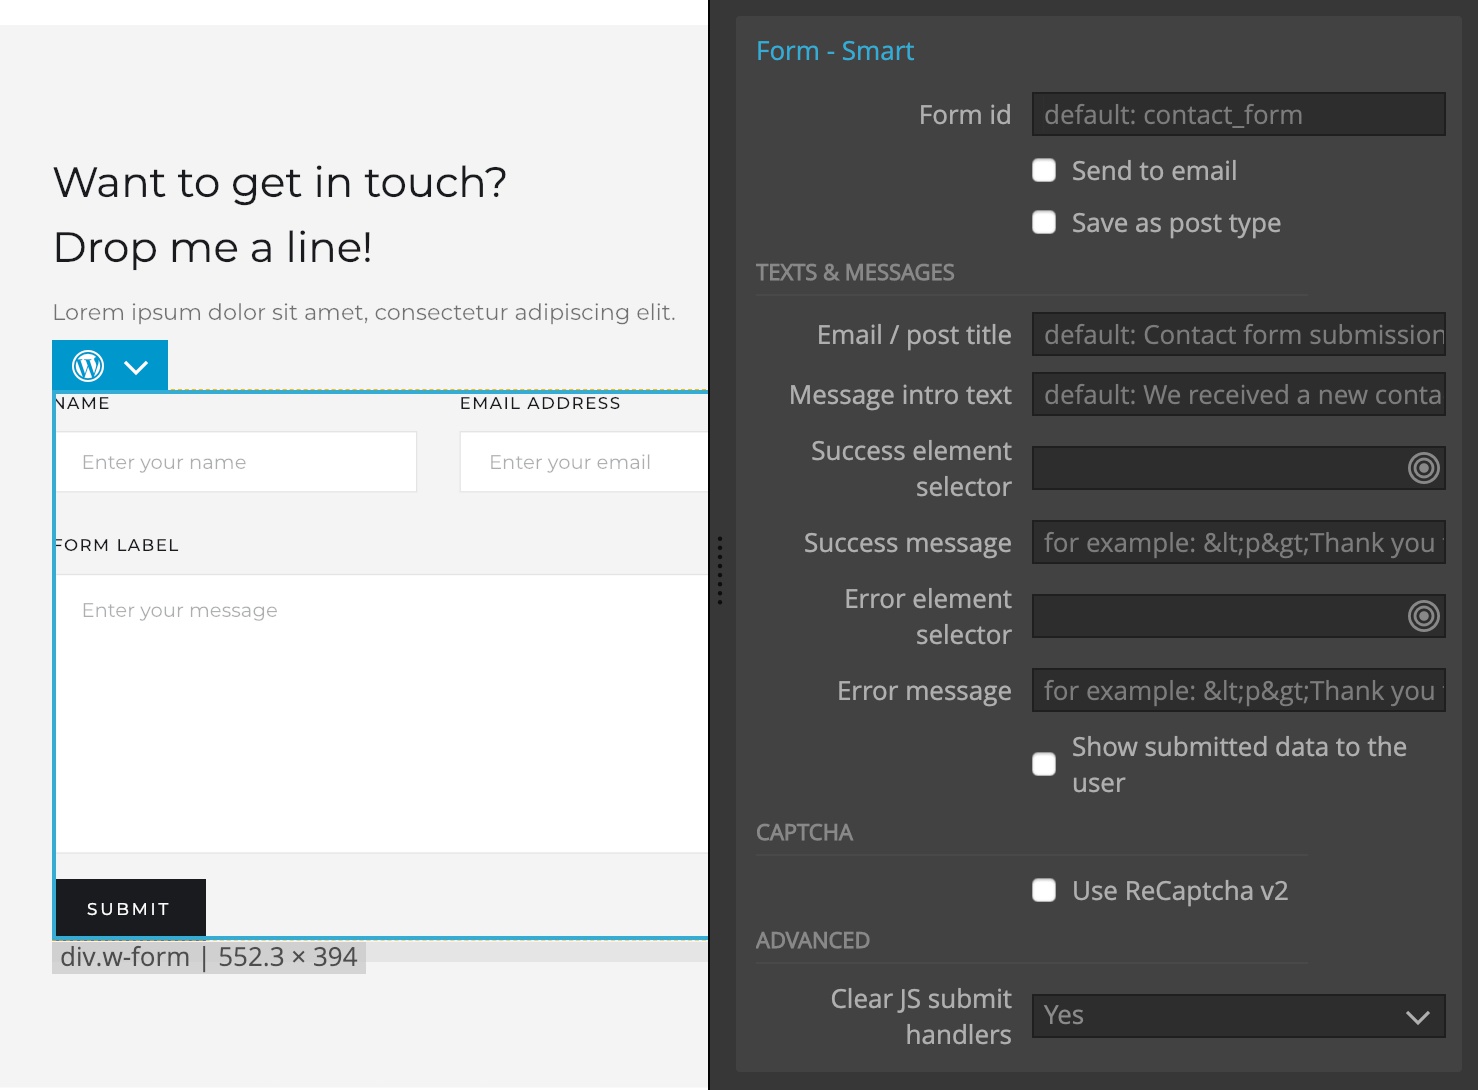
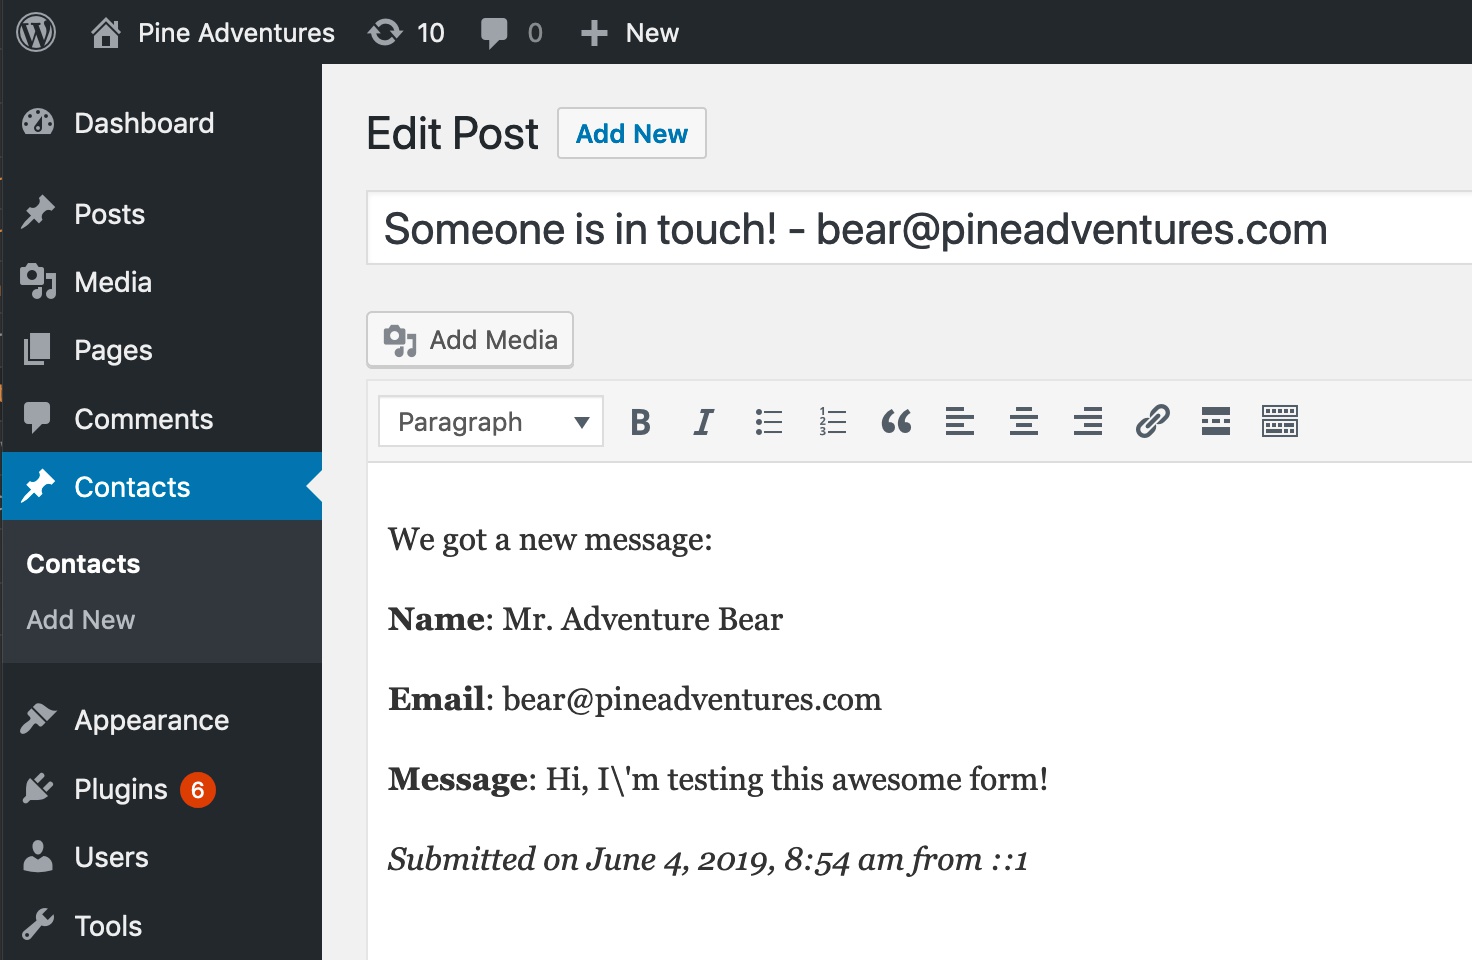
It lets us send submissions with email and also store them as private custom post type posts viewable through the WordPress admin panel.
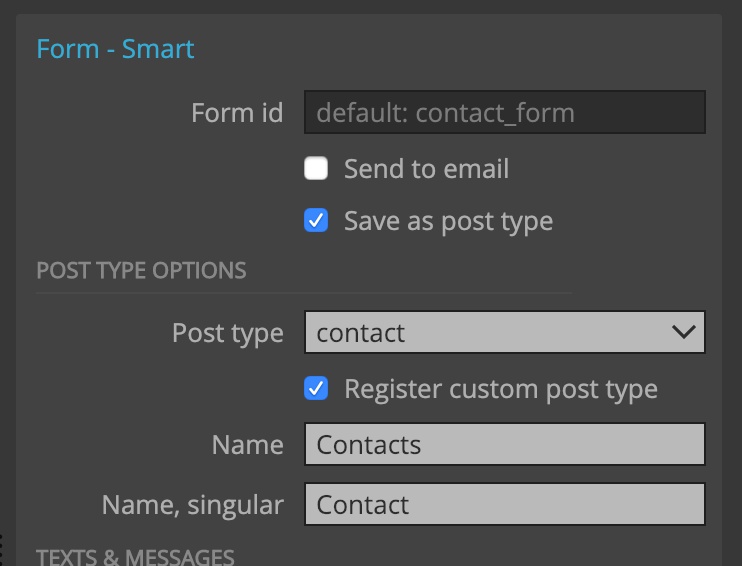
We can then see submissions in the WordPress dashboard:
We can tell it which element to show when the form is successfully submitted and which element to show when it fails.
It does all of this without using any WordPress plugins.
Check out the documentation about the Form action for details and examples.
The result
The result of converting our HTML website to WordPress with Pinegrow Theme Converter is an efficient production-ready WordPress theme that does a lot without using a bunch of bloated WordPress plugins.
And we can do the whole conversion process visually, without writing any PHP code by hand.
Imagine coding the custom queries, customizer controls, navigation and forms by hand! Each of these would require a long tutorial with copy pasting and editing a bunch of PHP code.
Once we have the exported WordPress theme we can do whatever we want with it – either taking it as a base for further customization directly in the PHP code – or keeping the workflow in Pinegrow Theme Converter alongside our favorite design tools.
Using the Pinegrow Theme Converter doesn’t force us into one way of doing things. It gives us a well rounded set of powerful time saving tools and leaves our creative freedom intact.
Next steps
This was an overview of creating a WordPress theme.
The best way to learn more about WordPress themes is to create a bunch of them for fun. Go through tutorials and read our how-to guides on the way.