Use Block Smart action to turn any HTML element into a WordPress visual editor block.
Blocks are used for building the content in the new WordPress block (Gutenberg) editor. Themes and plugins can register custom blocks that are then available to the user in the visual block editor.
Pinegrow Web Editor 6.2 and above work with native WordPress blocks as well as with ACF Pro blocks. In this guide we will take a look at working with ACF PRO blocks.
Requirements
ACF PRO blocks require Advanced Custom Fields (ACF) PRO plugin.
Note, we have no affiliation with ACF authors and receive no compensation for recommending their product.
ACF PRO Blocks lets us create Editor Blocks with familiar PHP-based template code. That means that our blocks can use all available WordPress actions – including displaying post attributes, customizer fields and ACF fields. ACF does all the work in the background so that these blocks integrate fully into WordPress Block Editor.
Creating a block
Let’s say we have the following HTML element:
div
h2 Title
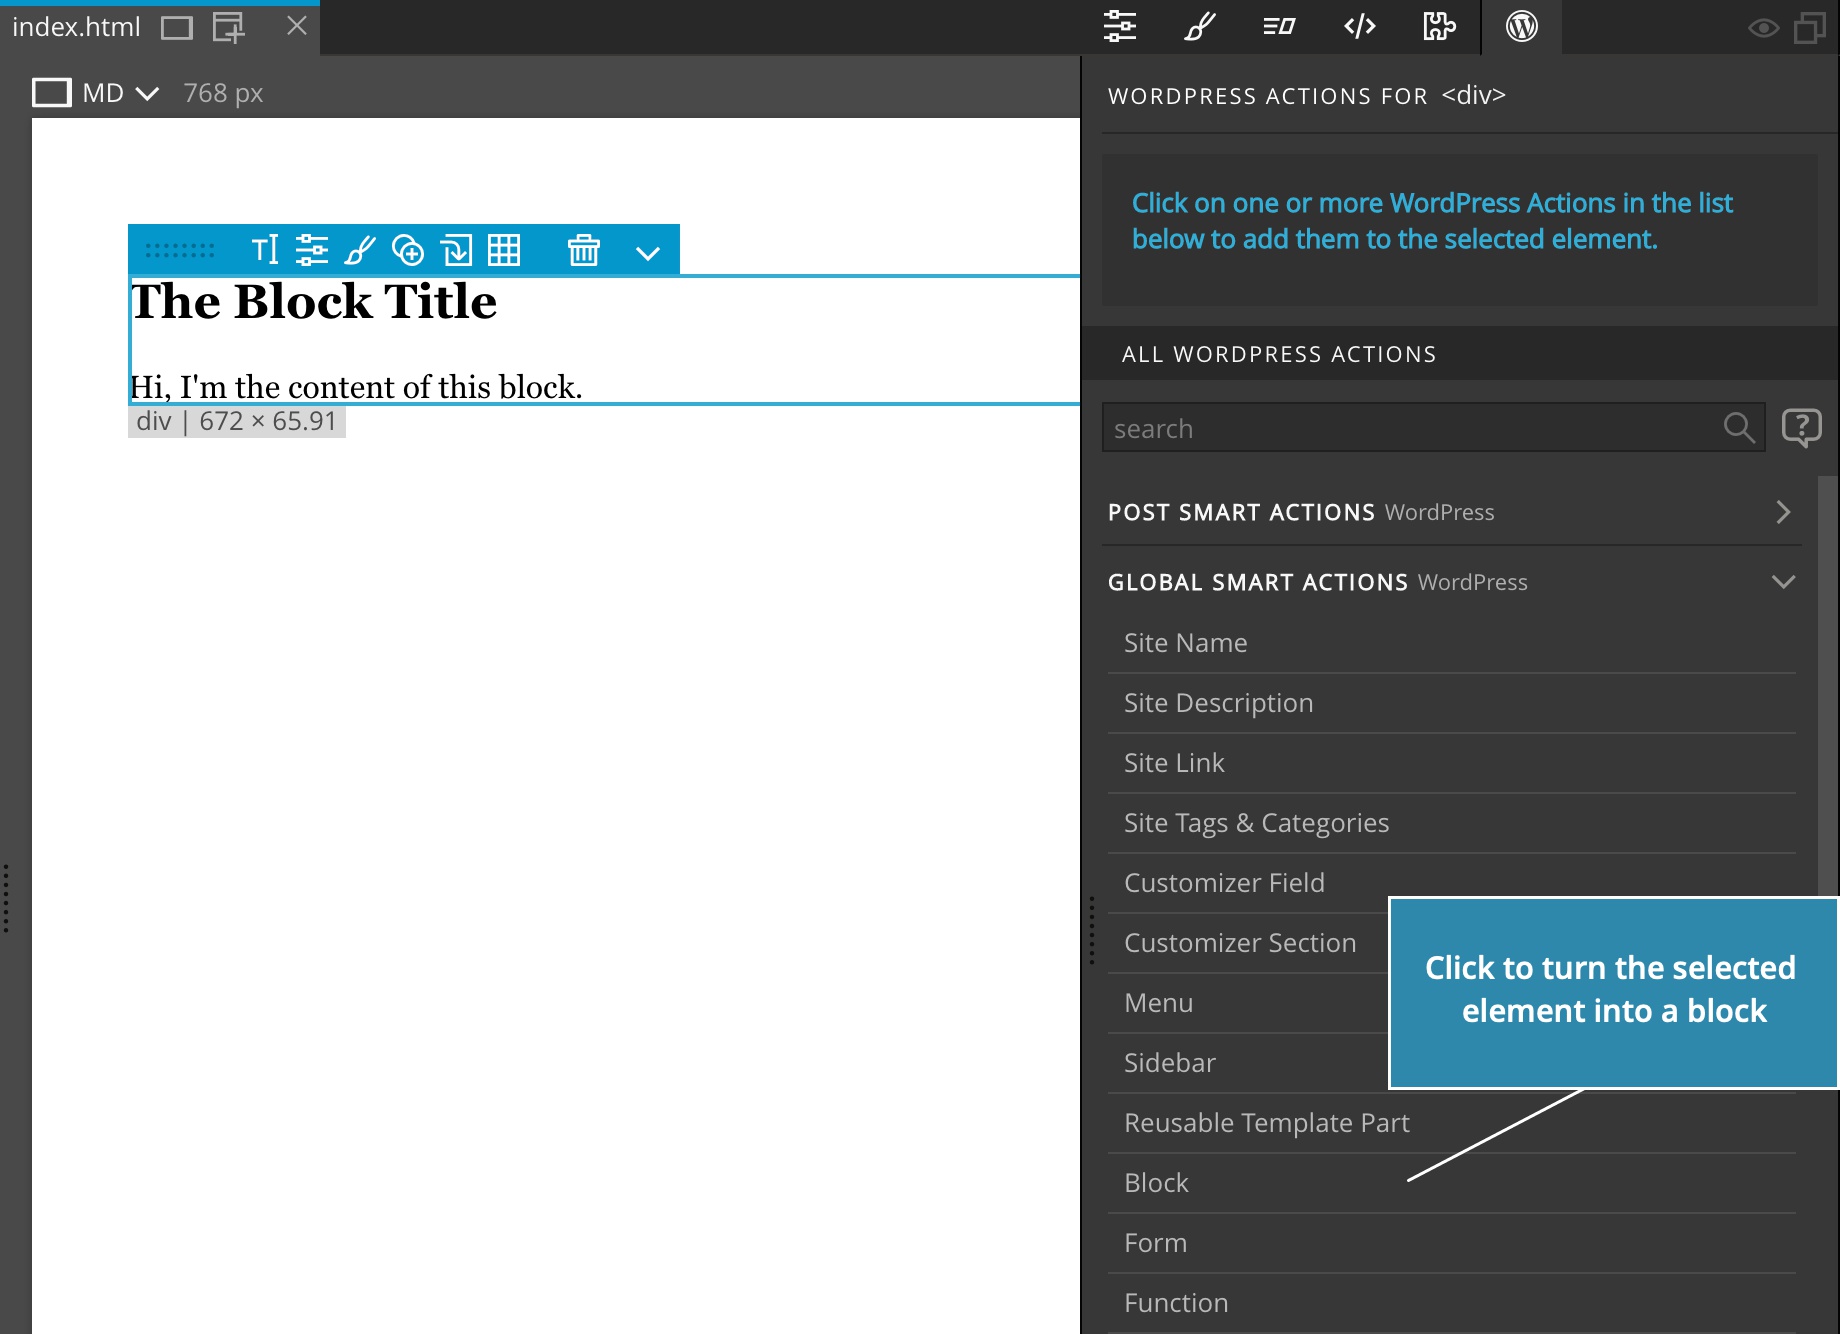
p I'm the contentTo create a new Editor Block we select the HTML element and add Block action from the Global smart action section of the WordPress panel.
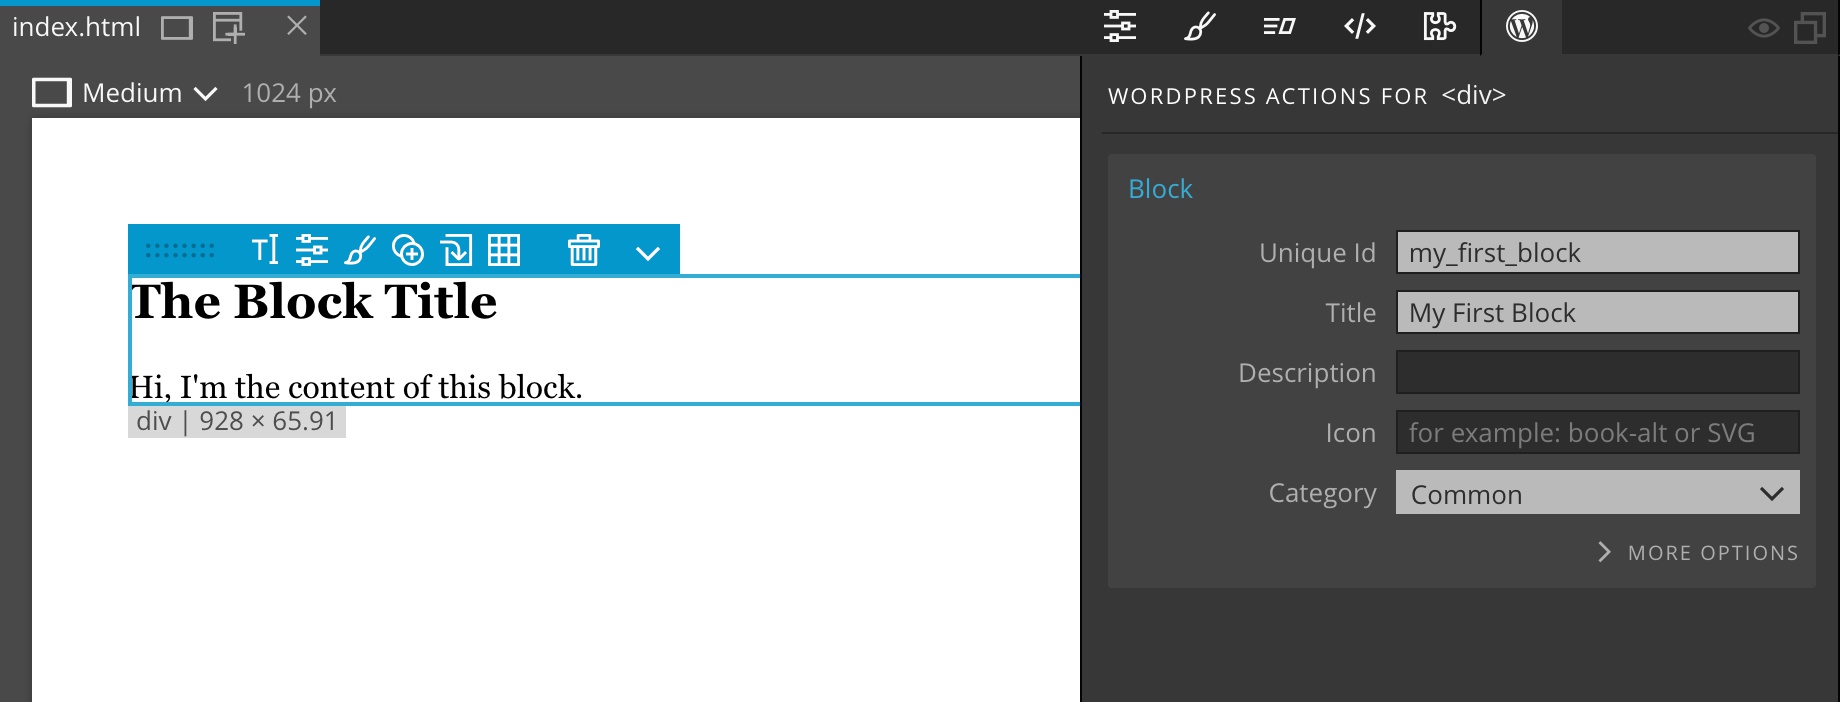
Next, we give the block an id, title and description. We also need to select the category in which the block will be listed.
Export the whole theme and… that’s it!
Note, make sure that ACF PRO plugin is activated.
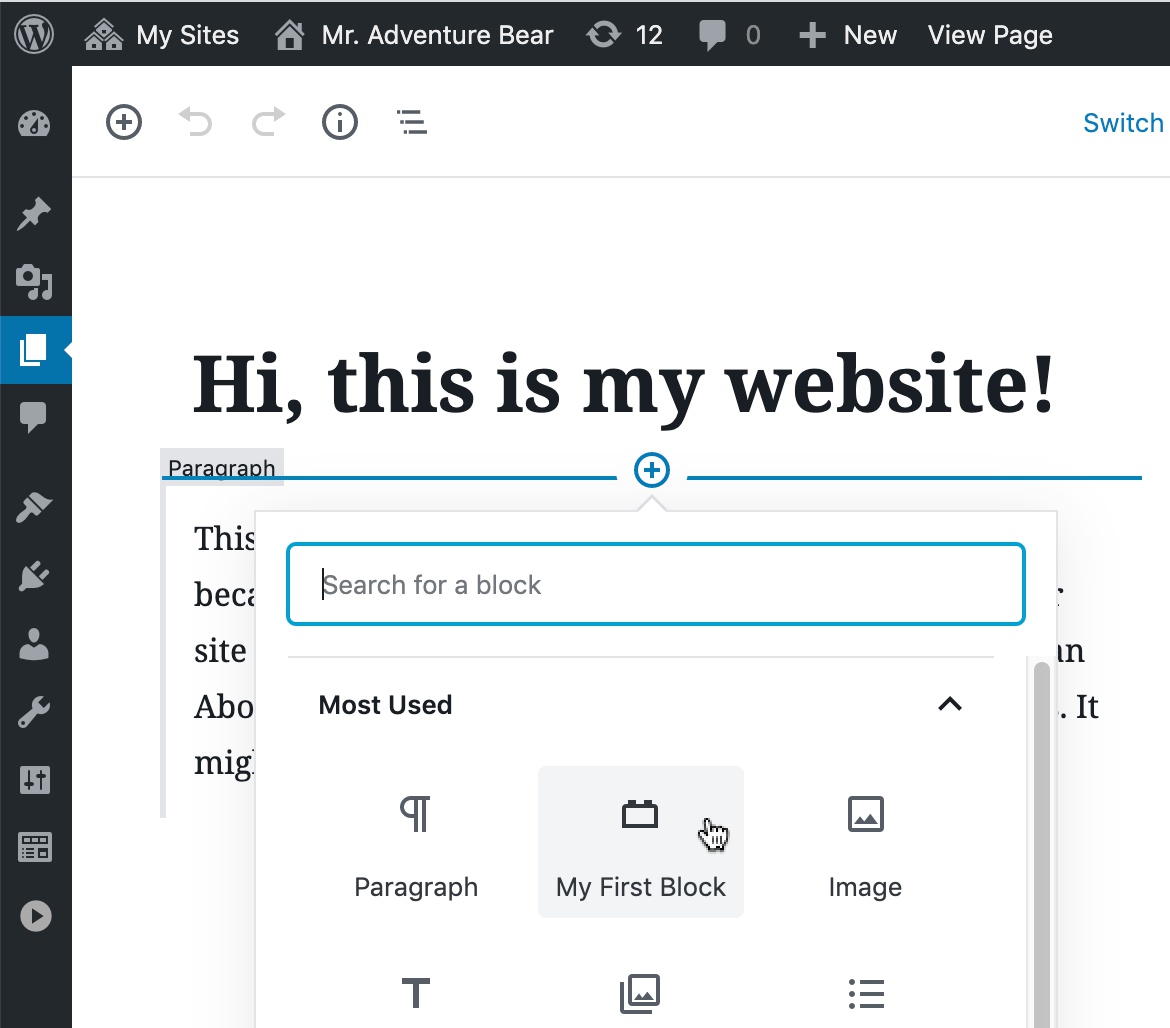
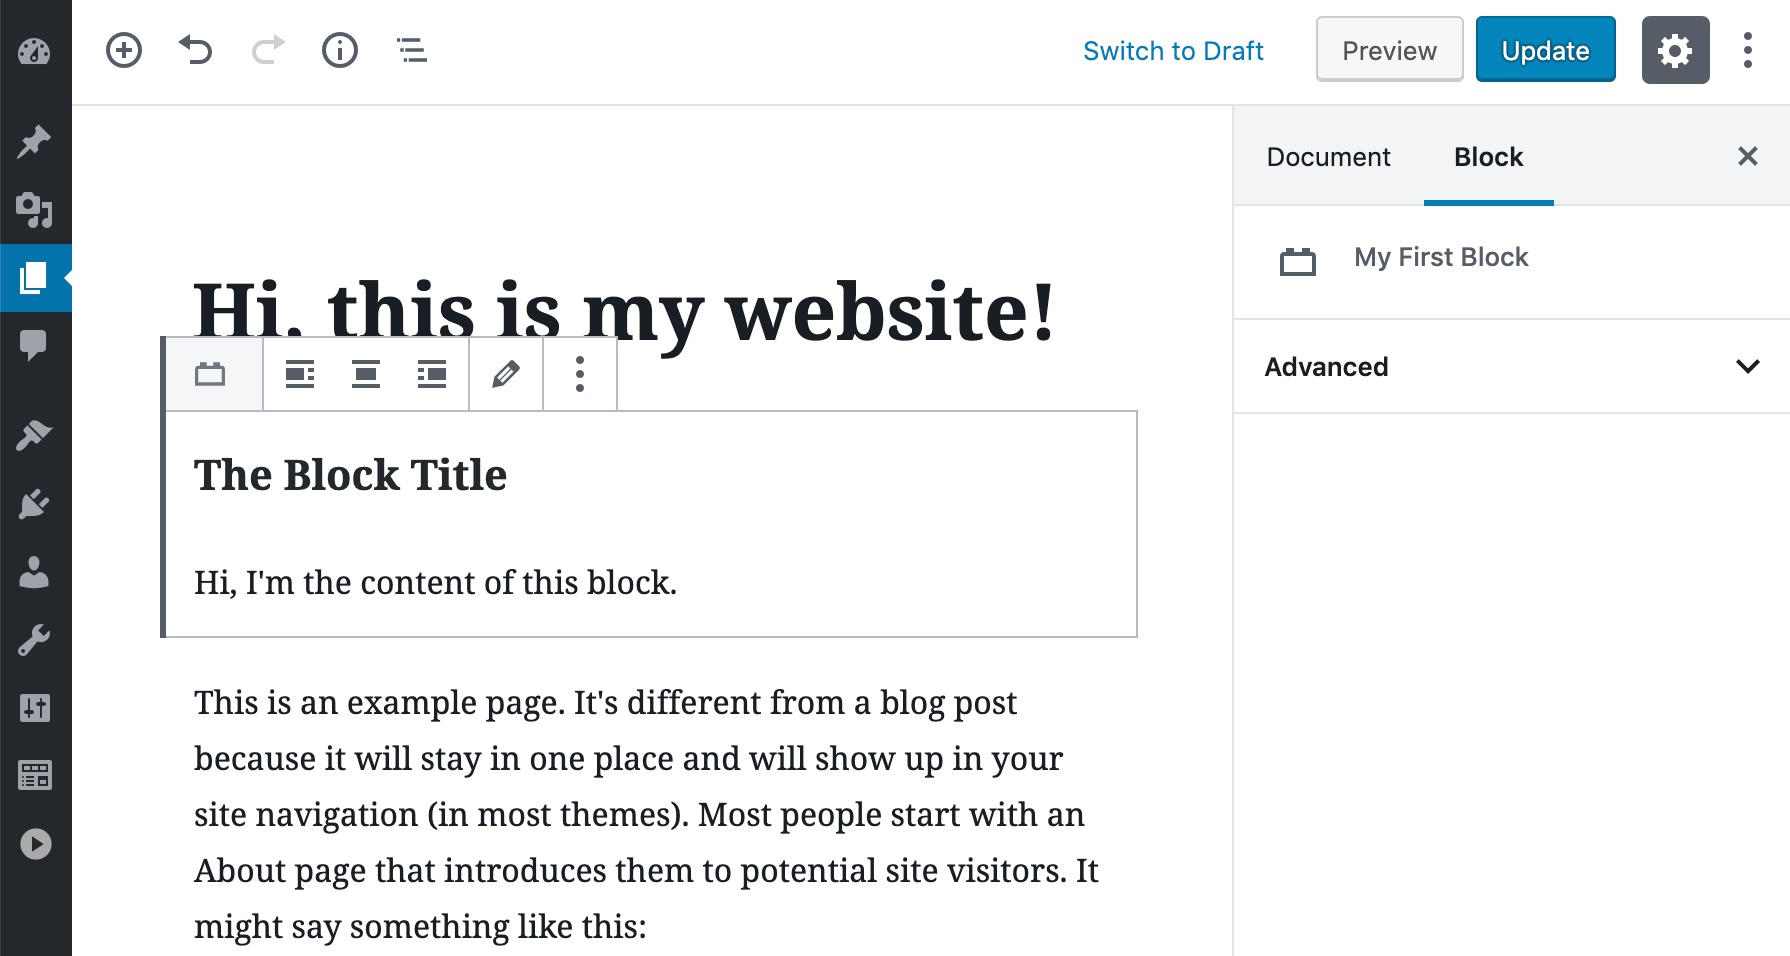
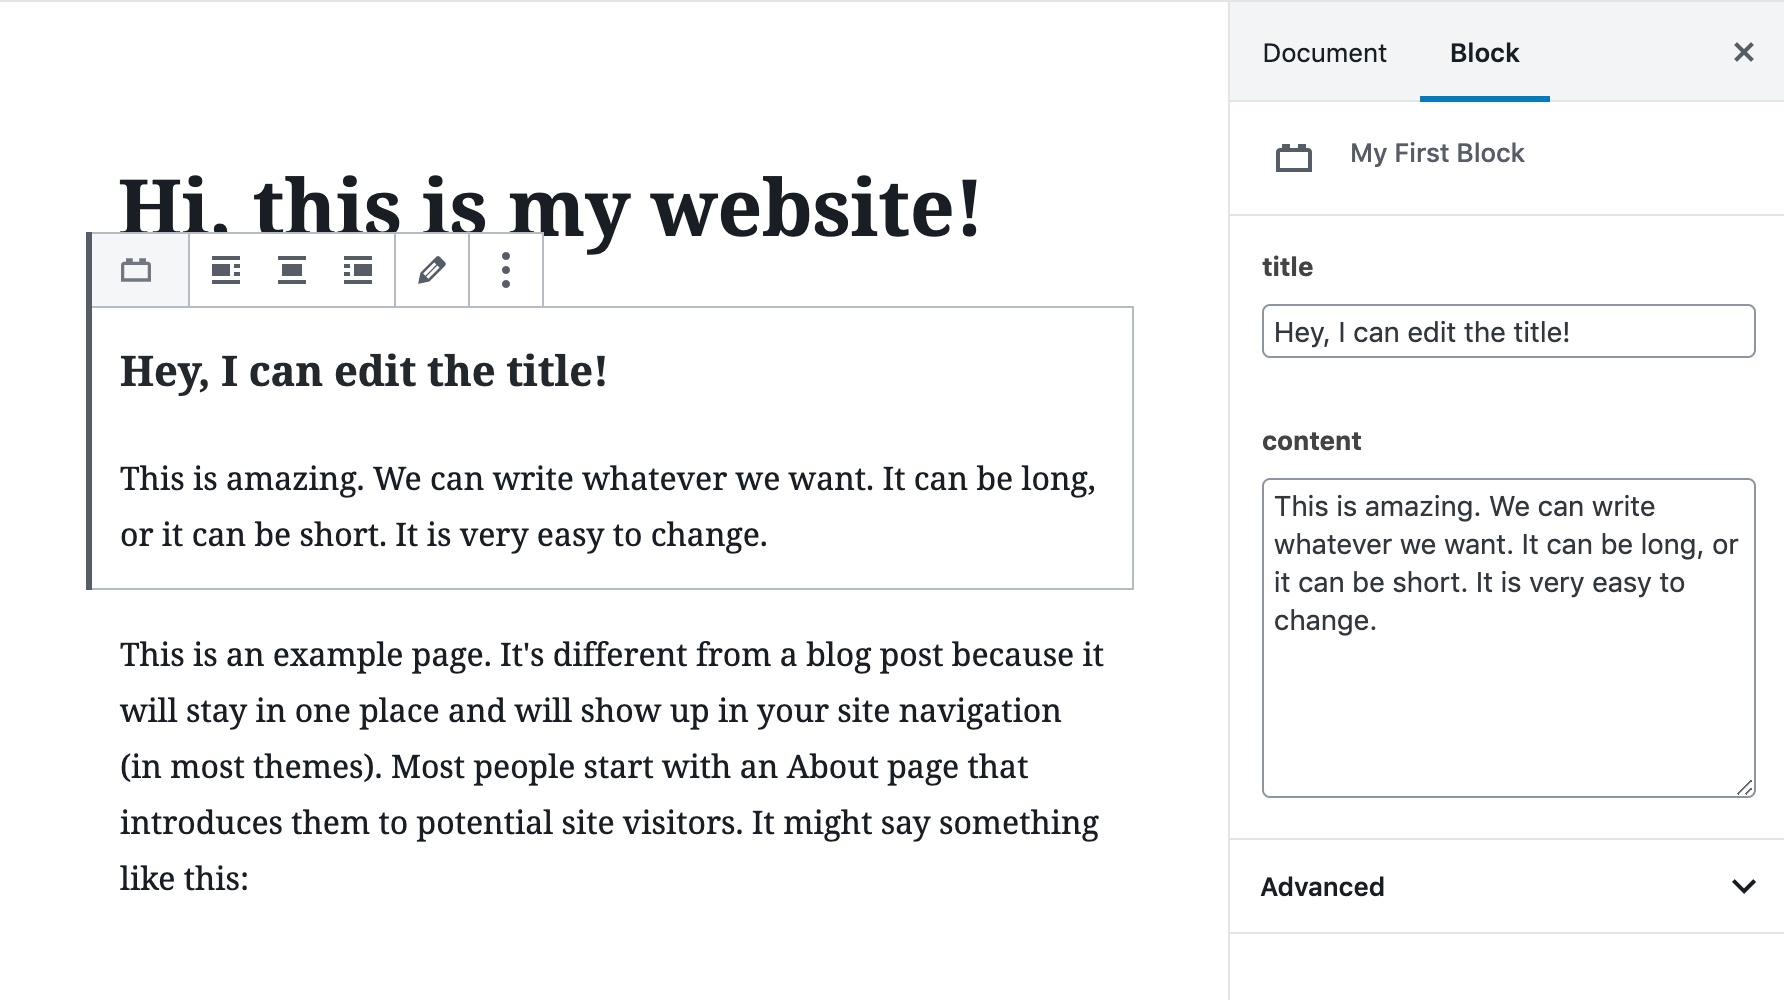
Our block is ready to be used in the Block Editor.
But, so far, we can’t edit the content of the block – it’s just a static piece of HTML code.
Adding editable fields
Let’s go back to Pinegrow. We can use Post Field action to make parts of the block editable.
Note, Post Field and other Post actions are normally used in combination with the Show Posts action. But we can also use them in Blocks.
To make the title editable, select the H2 and add Post Field action to it.
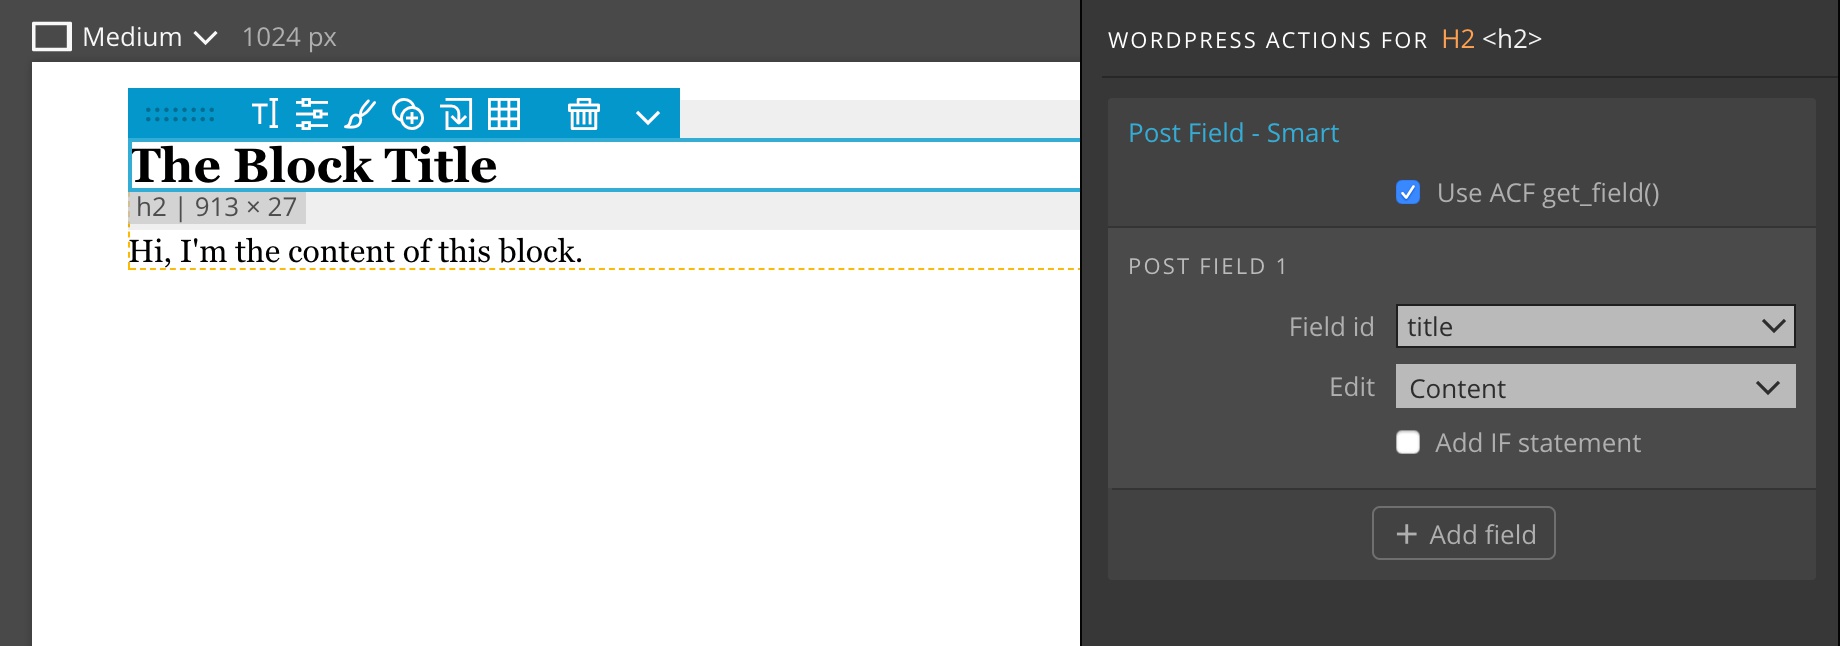
Note that we have to check the Use ACF get_field() setting because block fields work with ACF fields, not with post meta fields.
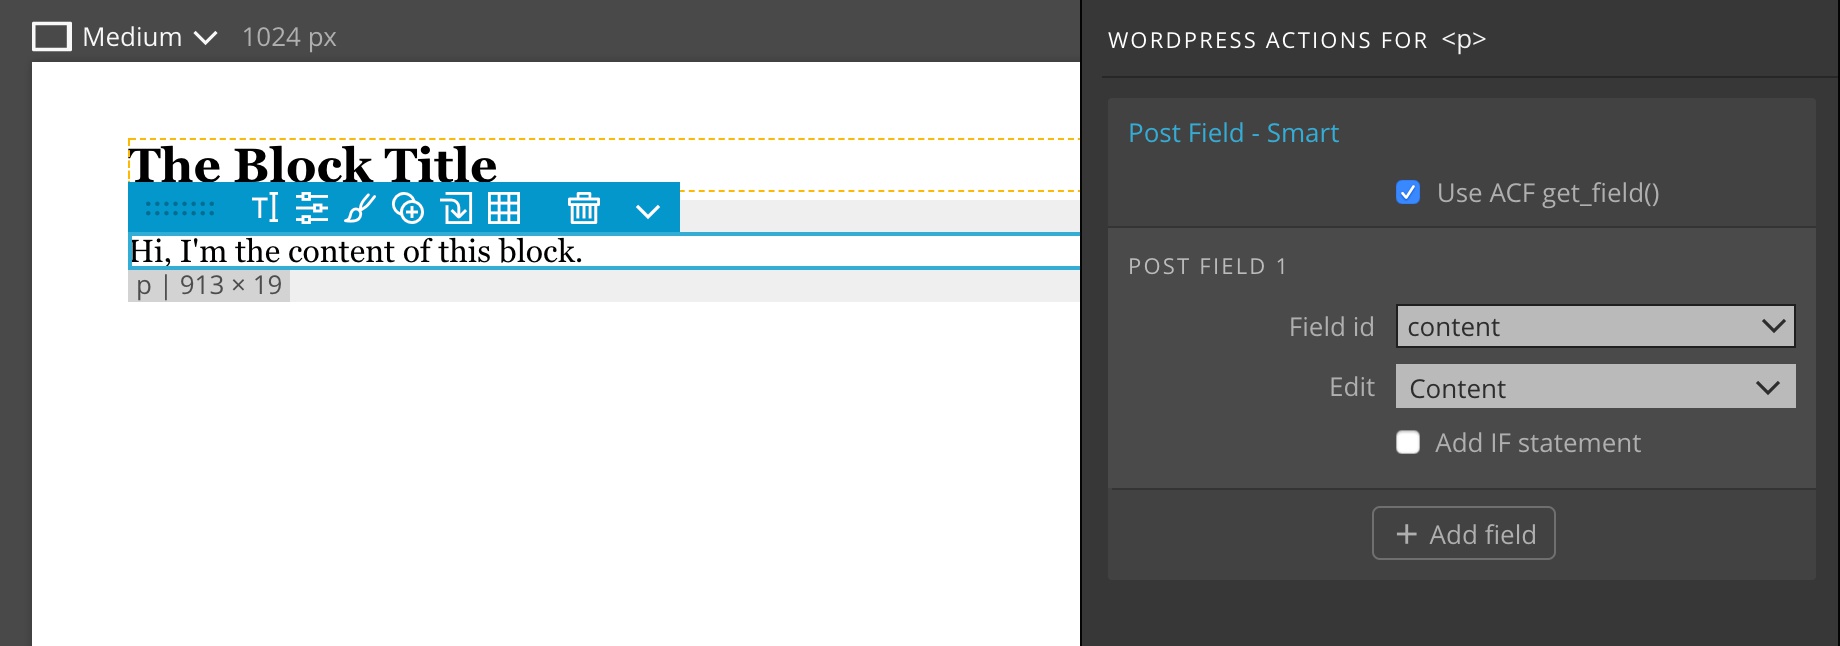
Next, let’s make the content of the paragraph editable as well by adding Post Field action to the paragraph:
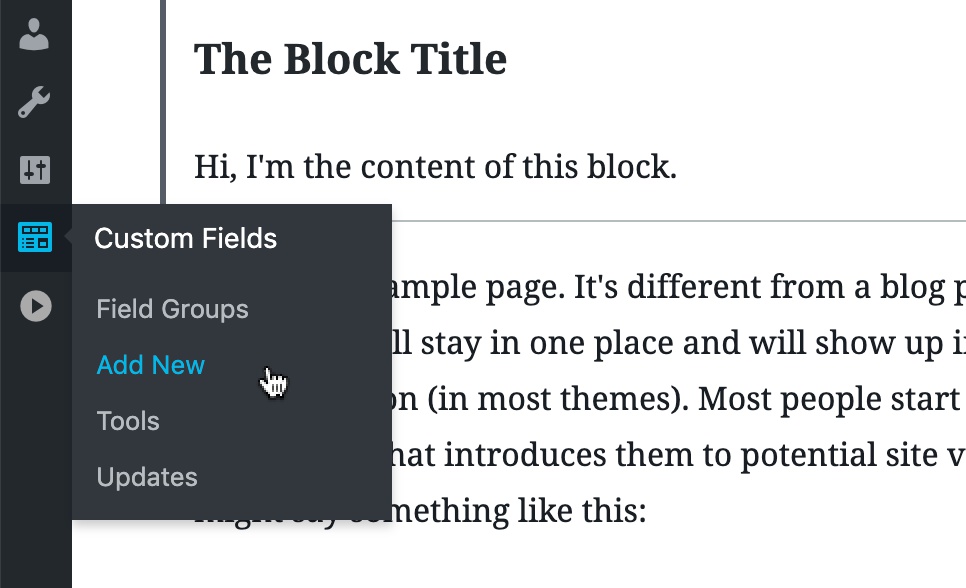
Defining fields in the WordPress dashboard
Before we can use the fields, we have to define them in the Custom Fields section of the WordPress admin panel.
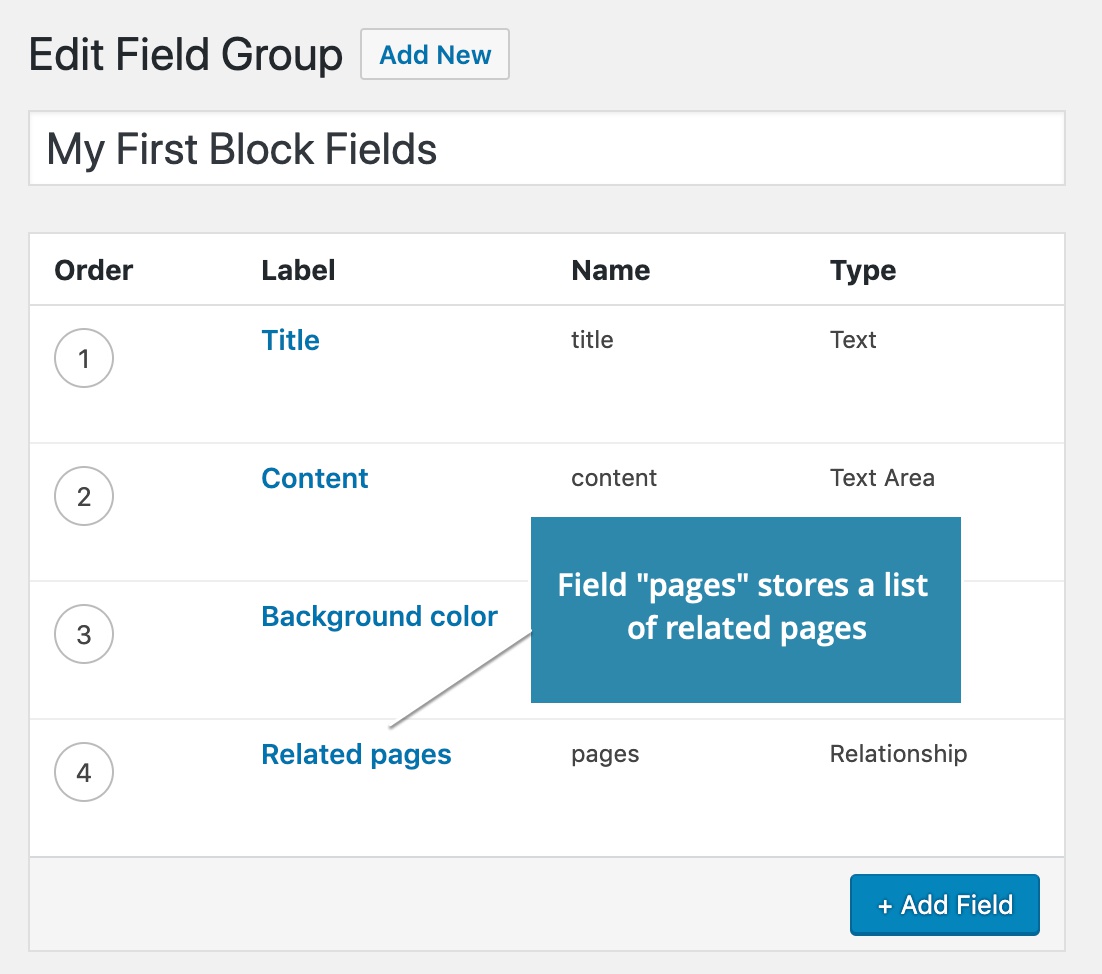
We create a new fields group, define both fields and set that the fields are shown for our block:
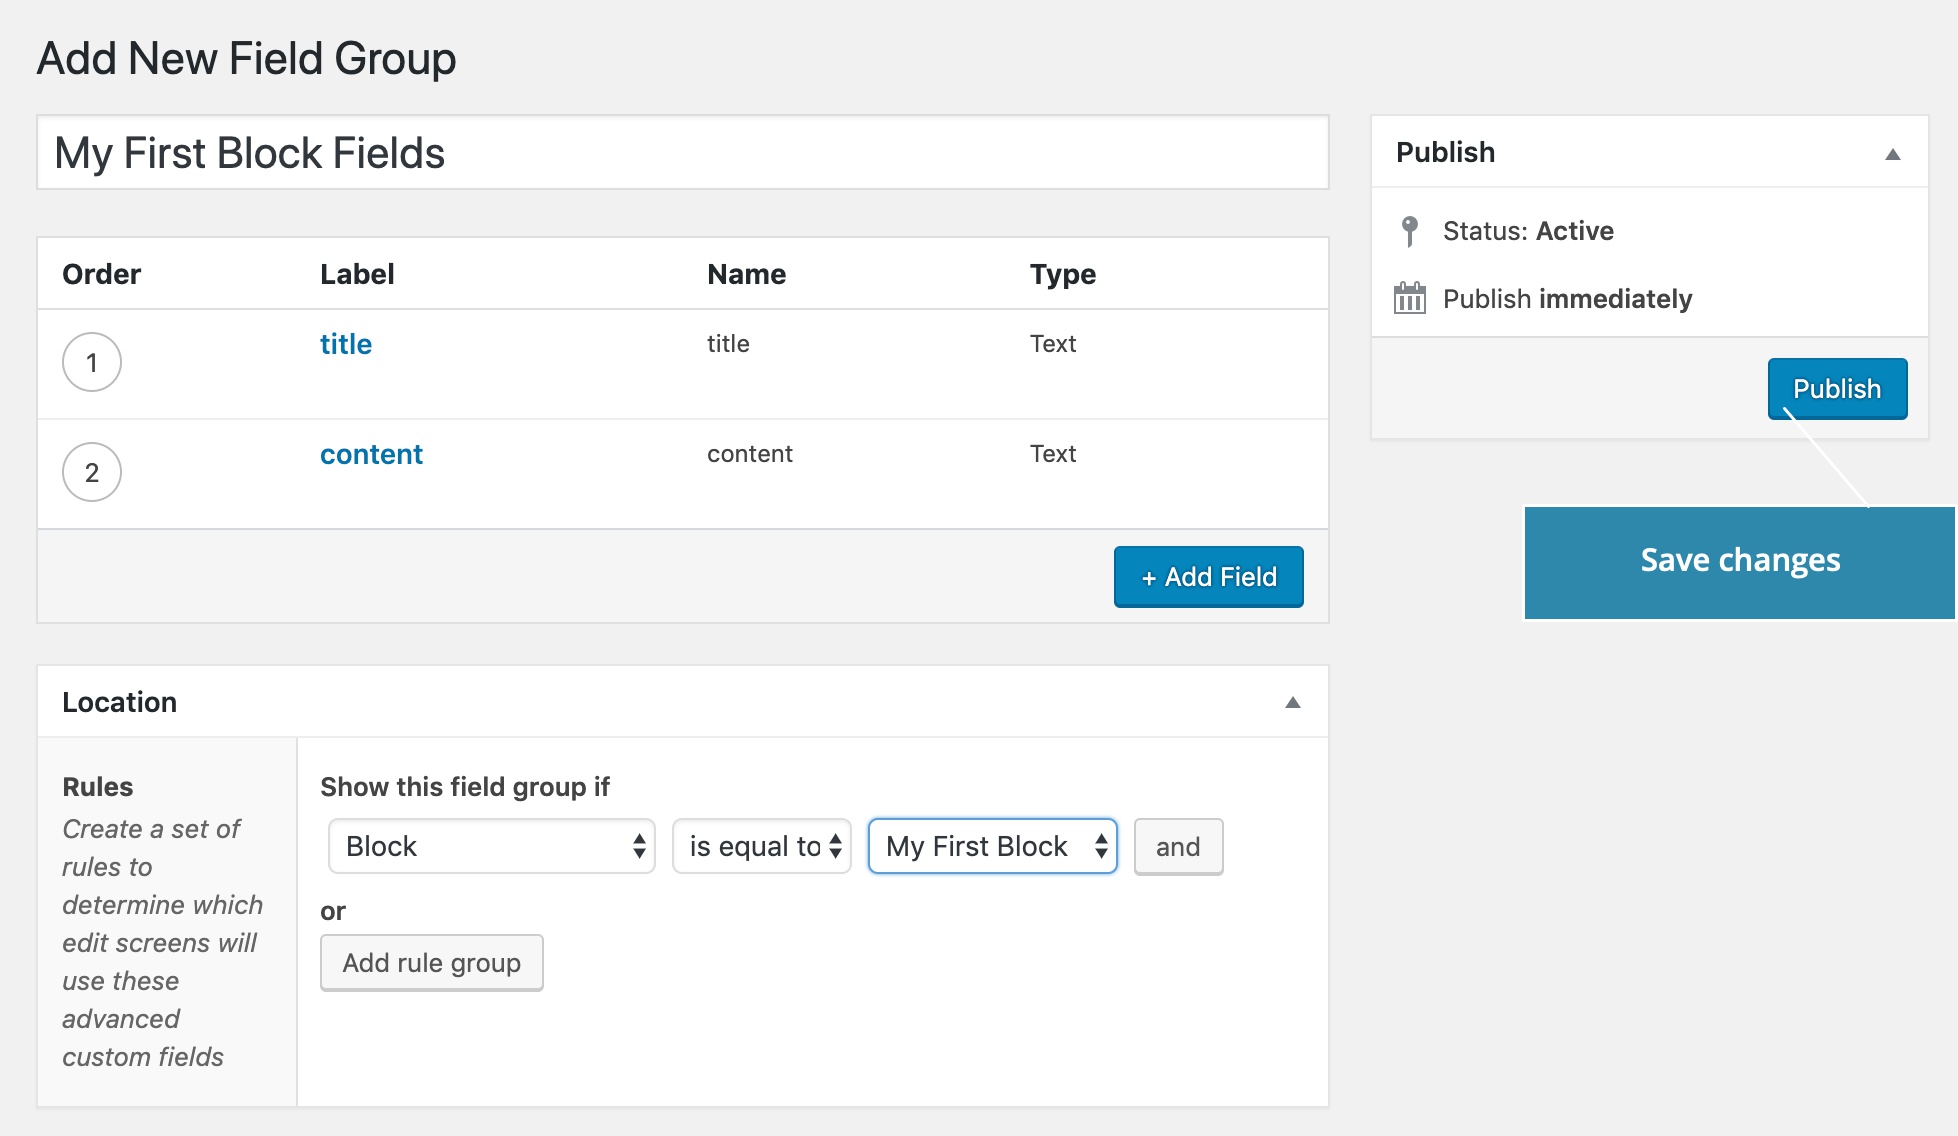
Don’t forget to publish the changes.
After we export the theme and reload the post in the WordPress editor, we are able to set the content of both fields:
Where to define our blocks?
In the above example, we just created a block straight in the index.html page. That’s not a good way to organize our project.
The best approach is to use separate HTML pages (that can also be located in dedicated subfolders) and define our blocks there.
So, let’s duplicate the page and save it as blocks.html.
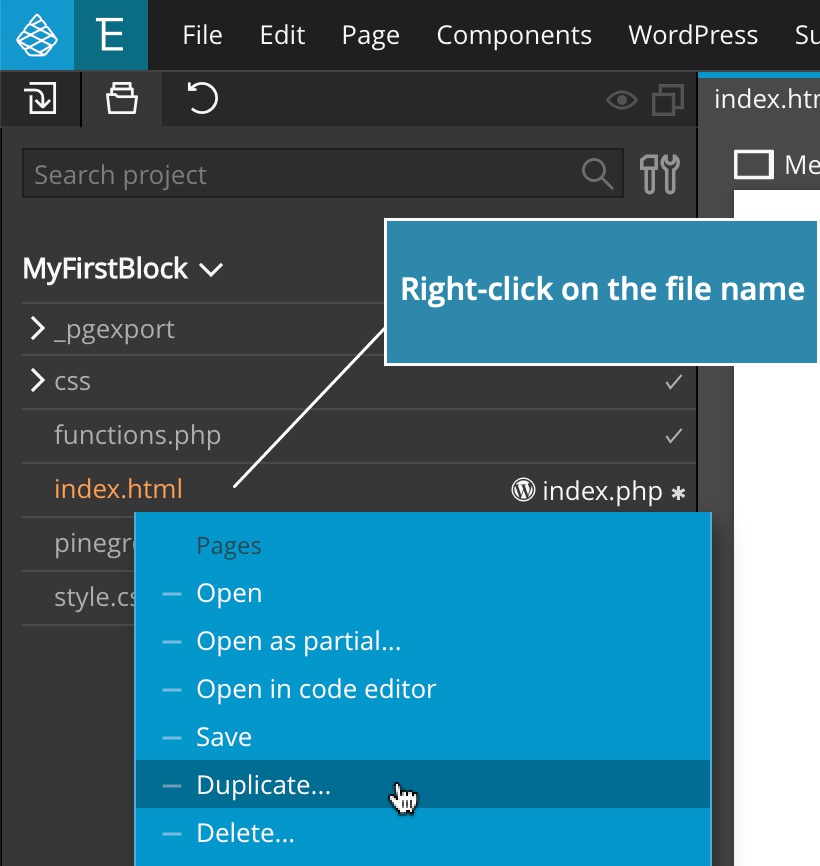
Now we can safely delete the old block element on index.html. Otherwise we would get a conflict between two block definitions using the same block id.
Because we just use blocks.html as a home for our blocks, we don’t need to export them as WordPress templates. Therefore we use the “Don’t export this page” setting in Page settings:
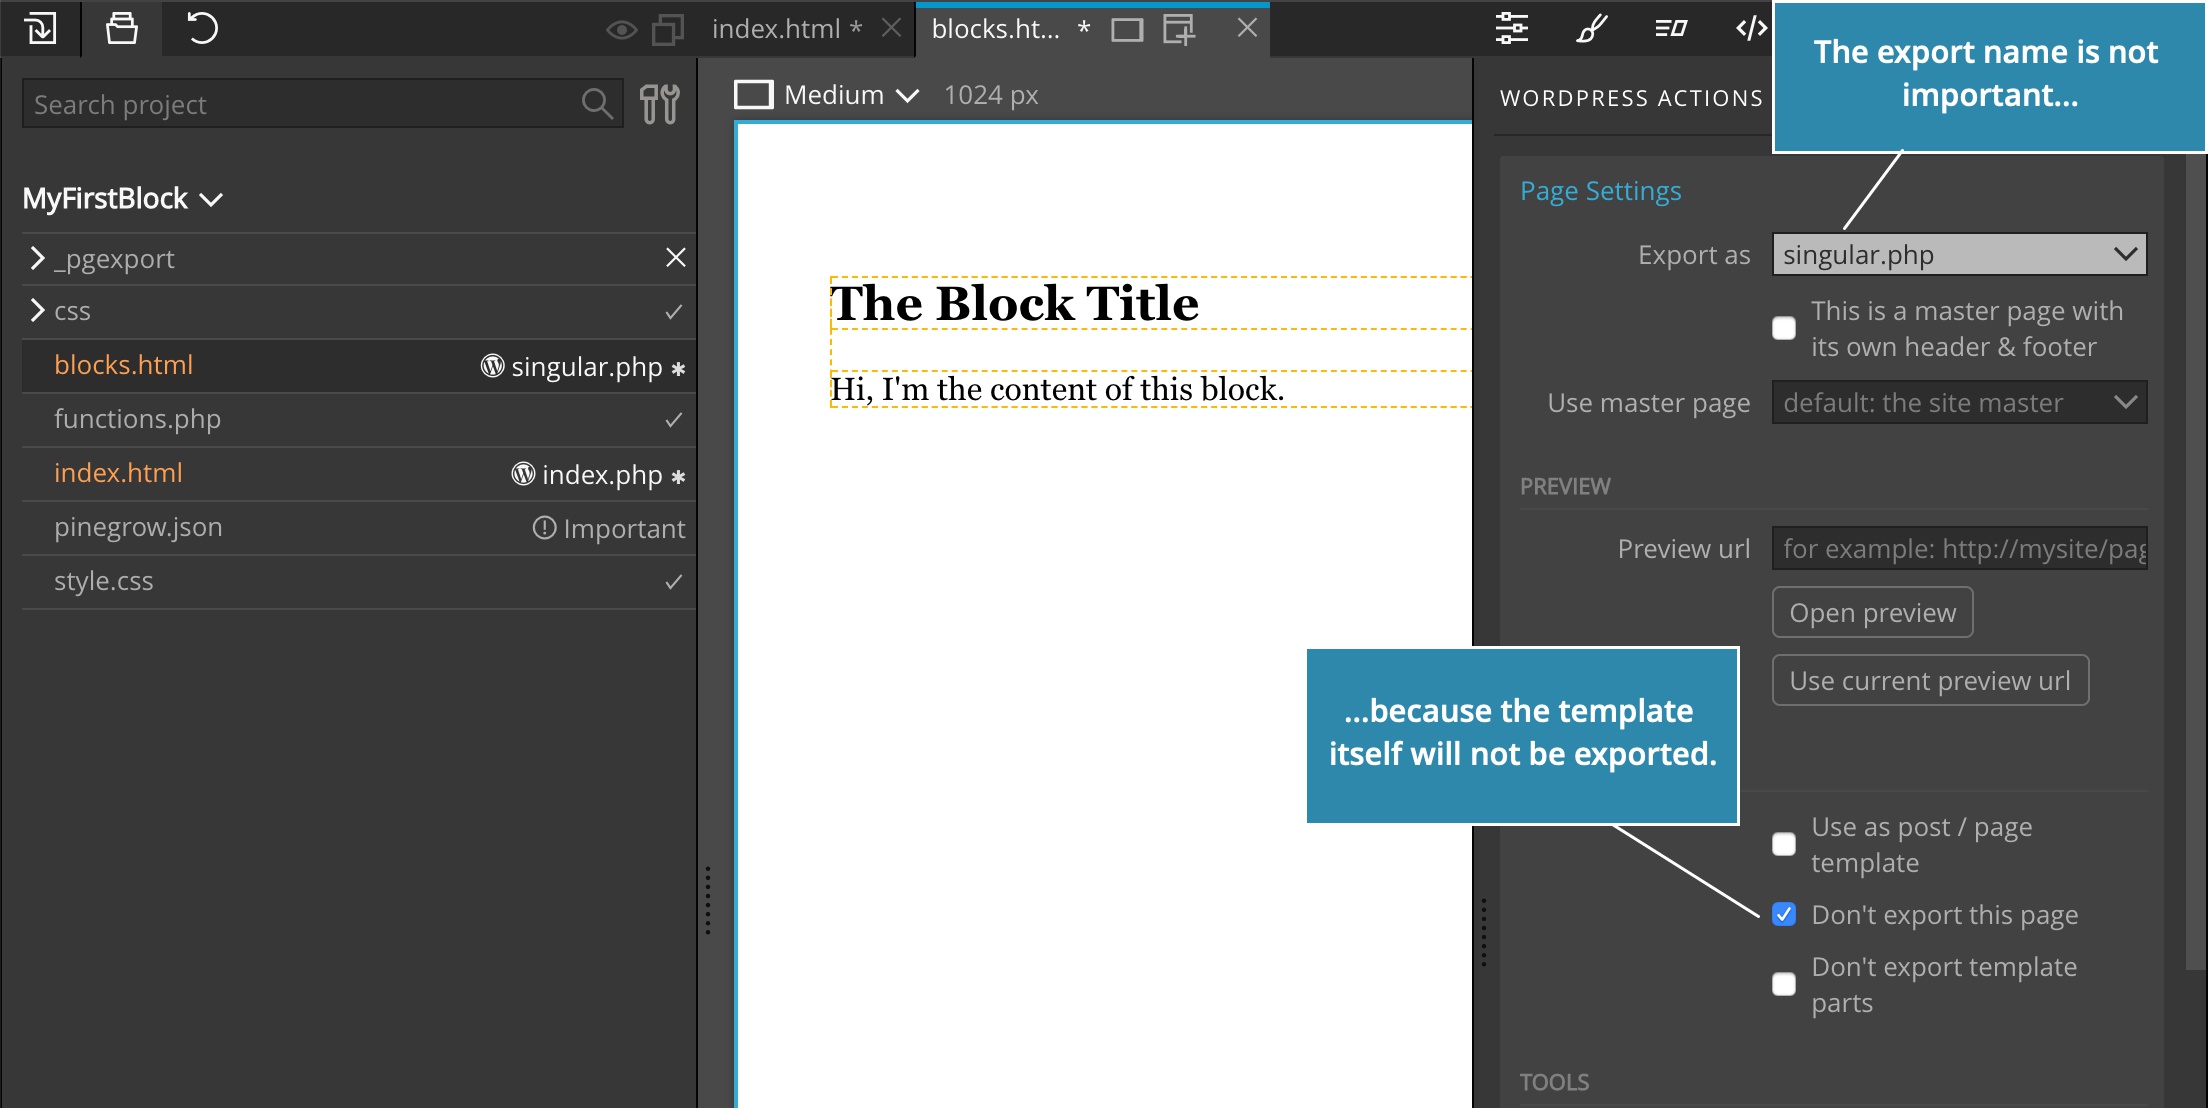
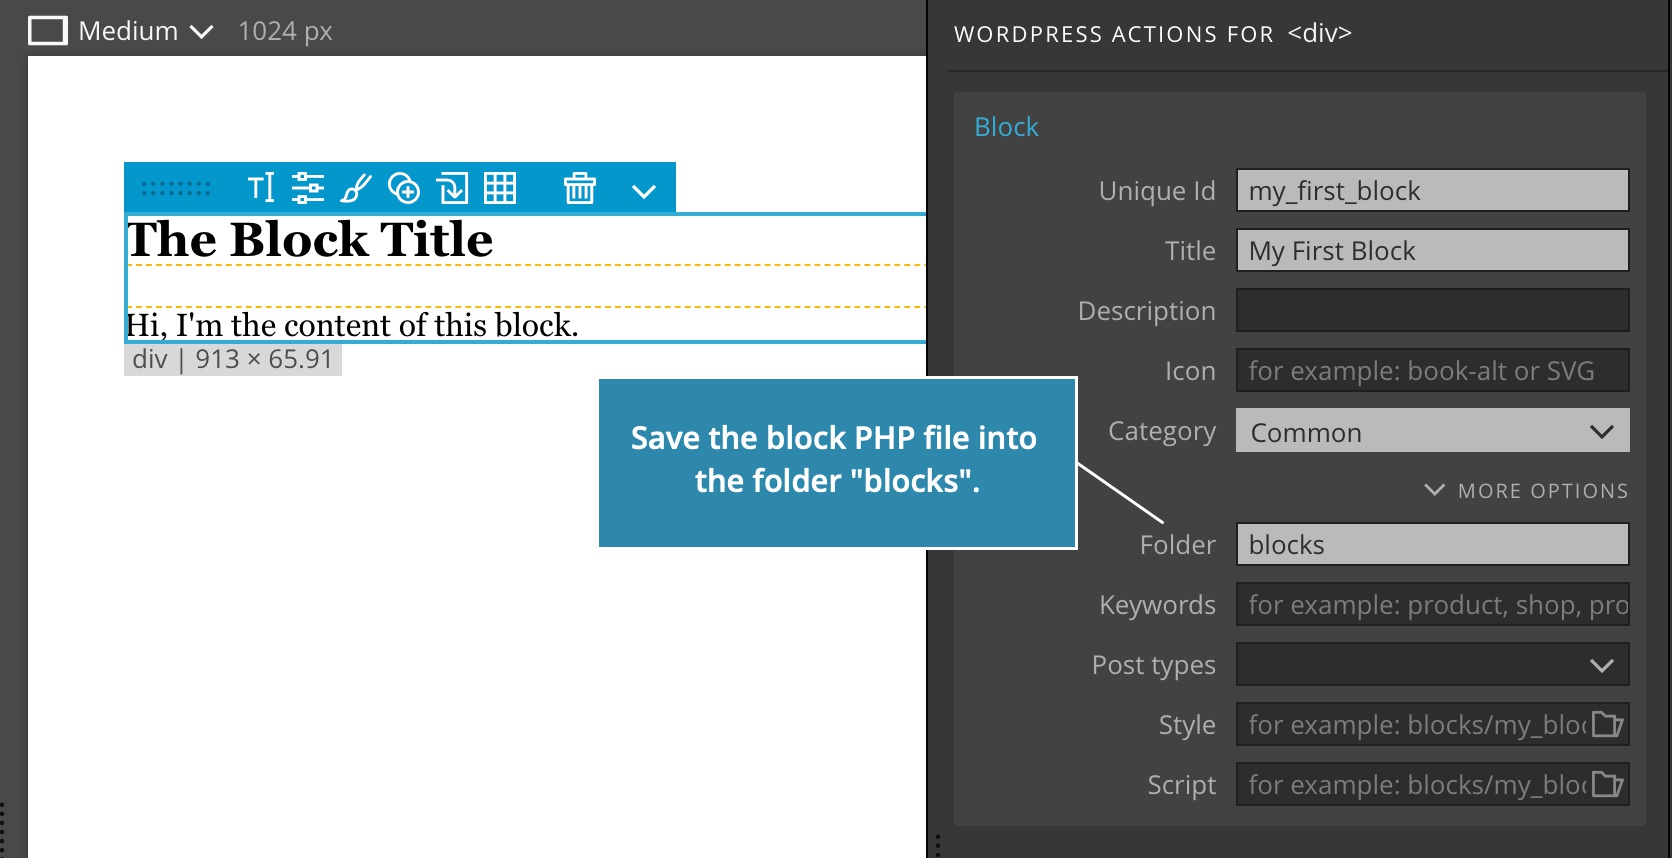
By default, blocks will be exported to the same subfolder where their home page is located.
For example, if our block my_block is defined on blocks/products/blocks.html, the block will be saved in blocks/products/my_block.php.
We can change the output location with the Folder setting on the Block action.
Note, click on the More options to reveal all Block action settings.
Styling the block
Blocks are styled with CSS rules, just like other elements. We have two options when it comes to where these CSS rules are stored:
In a global stylesheet
Using a global stylesheet that is included in our theme, for example in the main style.css. Although such stylesheet is probably already included when the website is displayed, it is not included in the WordPress dashboard. So, the block will not be styles when we edit in Block editor.
To solve this issue, we can add Enqueue Style action on the stylesheet and set Location to “Website & Admin”. This will include the stylesheet both on the website and in the admin panel. This can work fine for simple projects, but on more complex projects it can lead to CSS conflicts between dashboard and website styling.
In a dedicated blocks stylesheet
In a dedicated stylesheet that contains only the styling for one block, or group of blocks. This is the preferred approach, because such stylesheets are generally smaller and contain only CSS styles that affect our blocks. The potential for any CSS conflicts is smaller.
In that case we need to tell Pinegrow to include this stylesheet when the block is edited or displayed. We do that by selecting the stylesheet in the Style setting on the Block action.
These two approaches are also used with Javascript scripts.
A styling example
Let’s create a block field that will control the background color of our block.
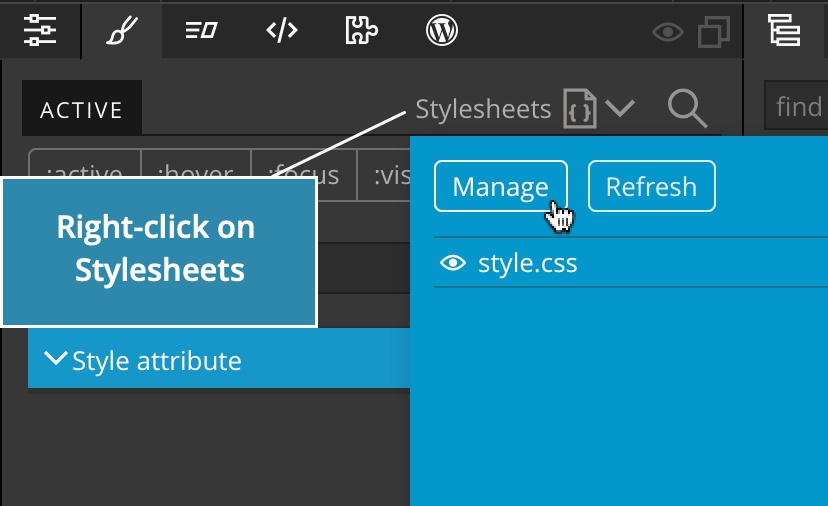
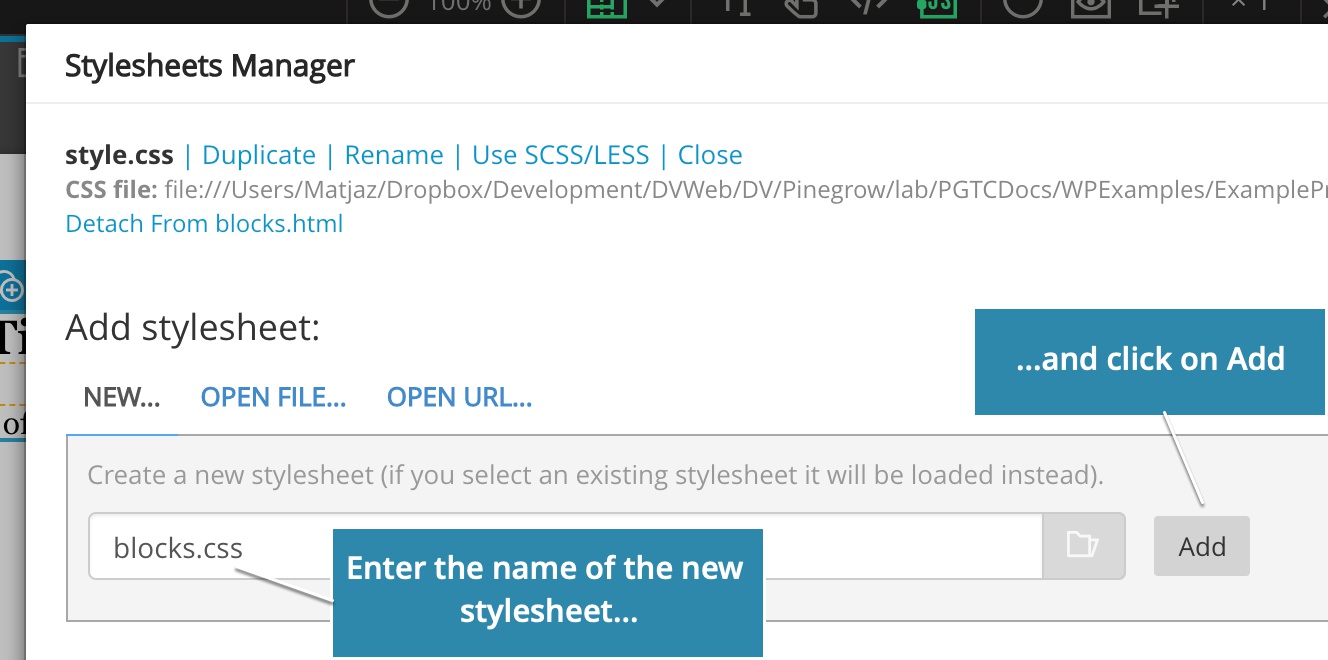
First, we’ll create a dedicated stylesheet blocks.css in the Stylesheet manager:
Enter the name of the new stylesheet and click on Add:
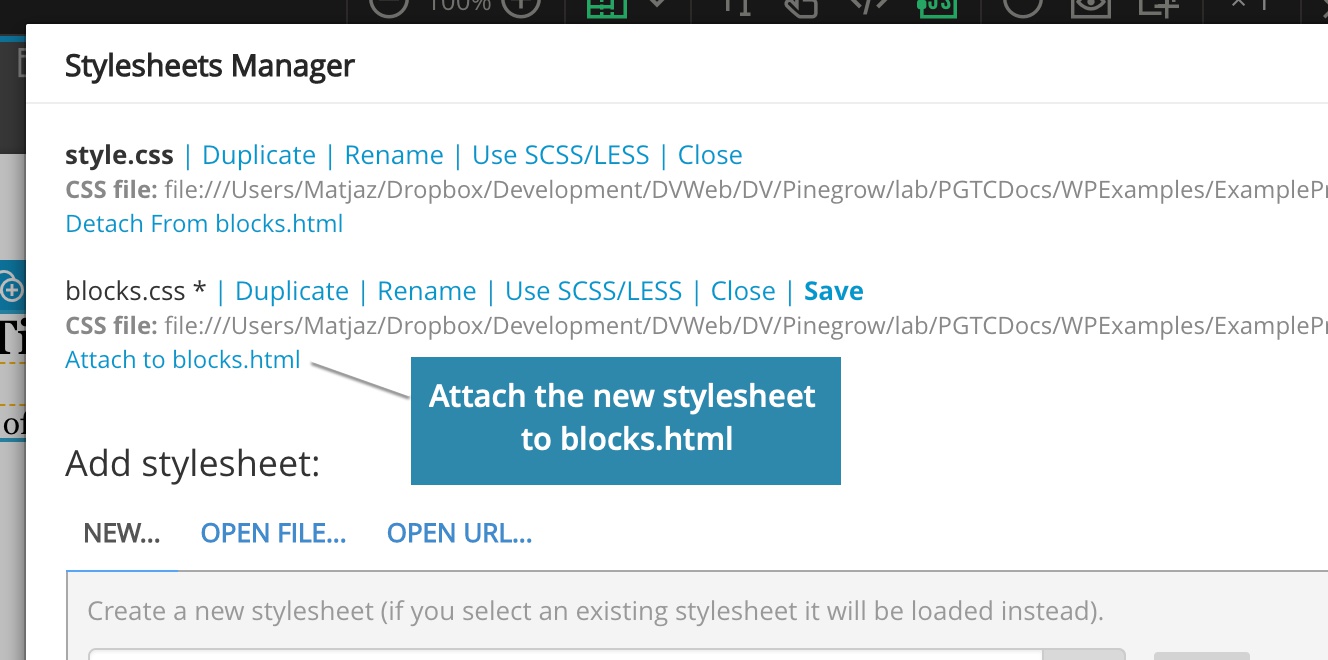
We also need to attach the stylesheet to the page:
Each block should have a unique class that we can then use to style the block and its content.
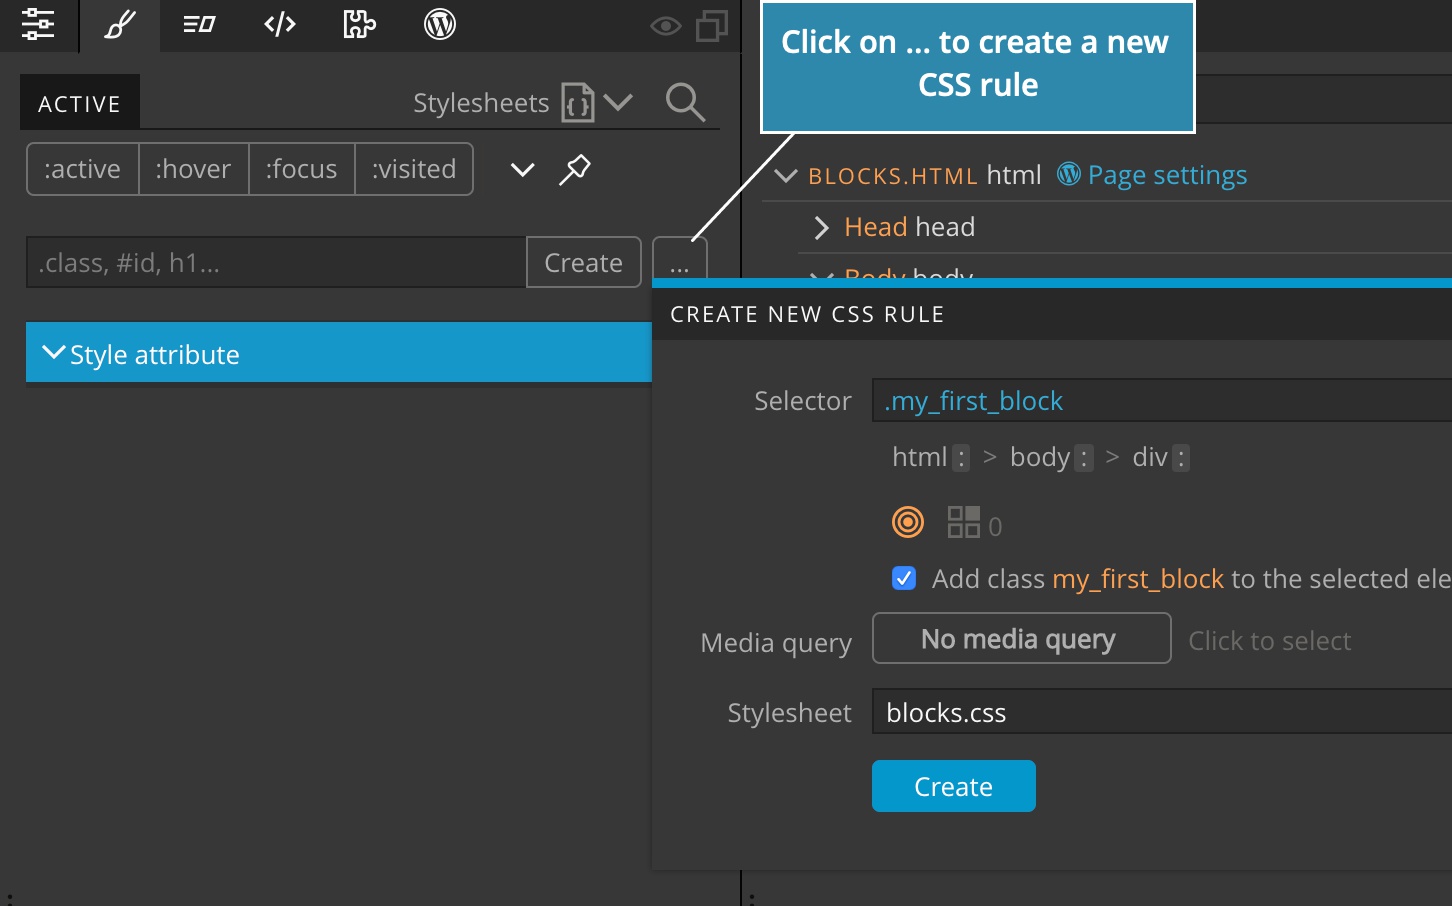
For example, we can assign the class my_first_block to our block and use the Style panel to create CSS rules that target this class.
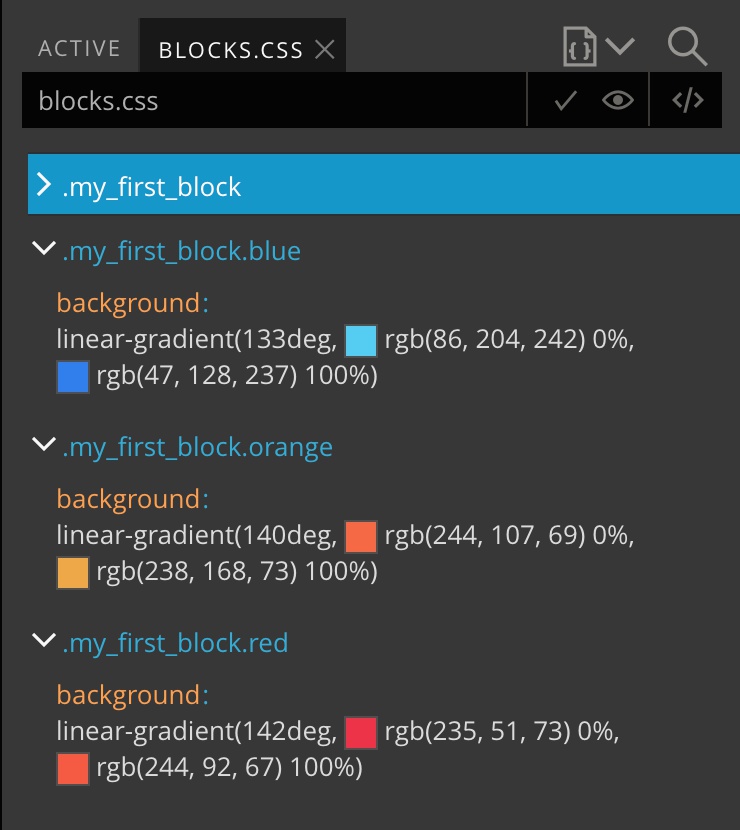
We create design for the block and save it as .my_first_block CSS rule in blocks.css.
Select blocks.css in the Style field on the Block action. This will cause the blocks.css stylesheet to be included both in the admin panel and on the website.

Next, we define CSS rules .my_first_block.blue, .my_first_block.orange and .my_first_block.red that implement different background colors (we’re using CSS gradients here).
Next, we select the main block element and add Post Field that will set the class stored in the color field:
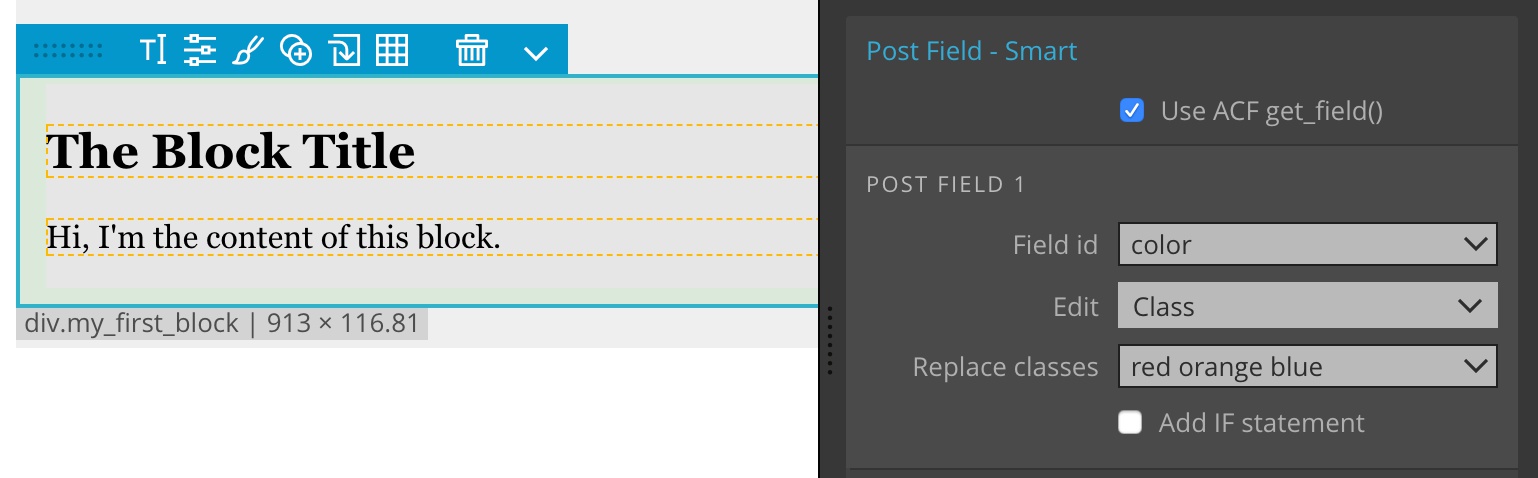
Make sure to remove classes blue, orange and red from the block element before we export it to the theme. Otherwise, one or more of these classes would get hard-coded to the block. Alternatively, we can use “Remove Classes” setting on the Post Field to make sure all such classes are removed during export, as shown on the image above.
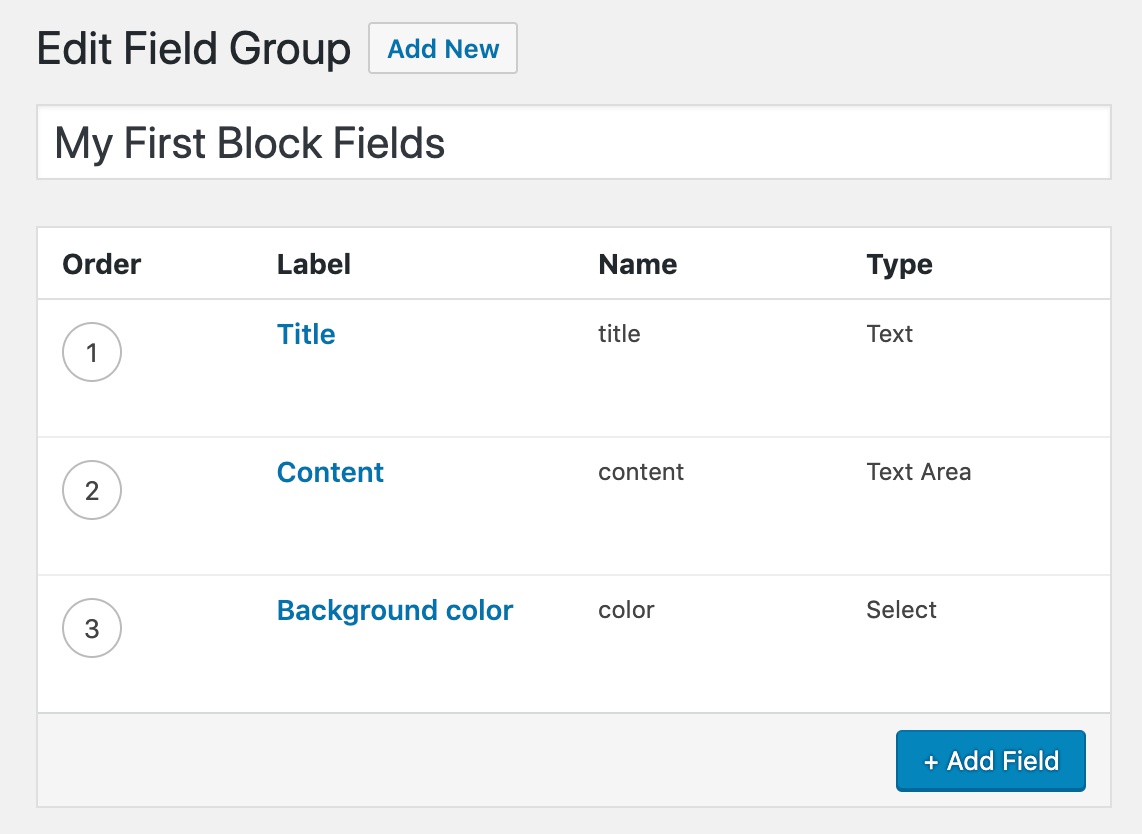
Of course, we also need to define the field color in the Field group for our block:
Export the theme.
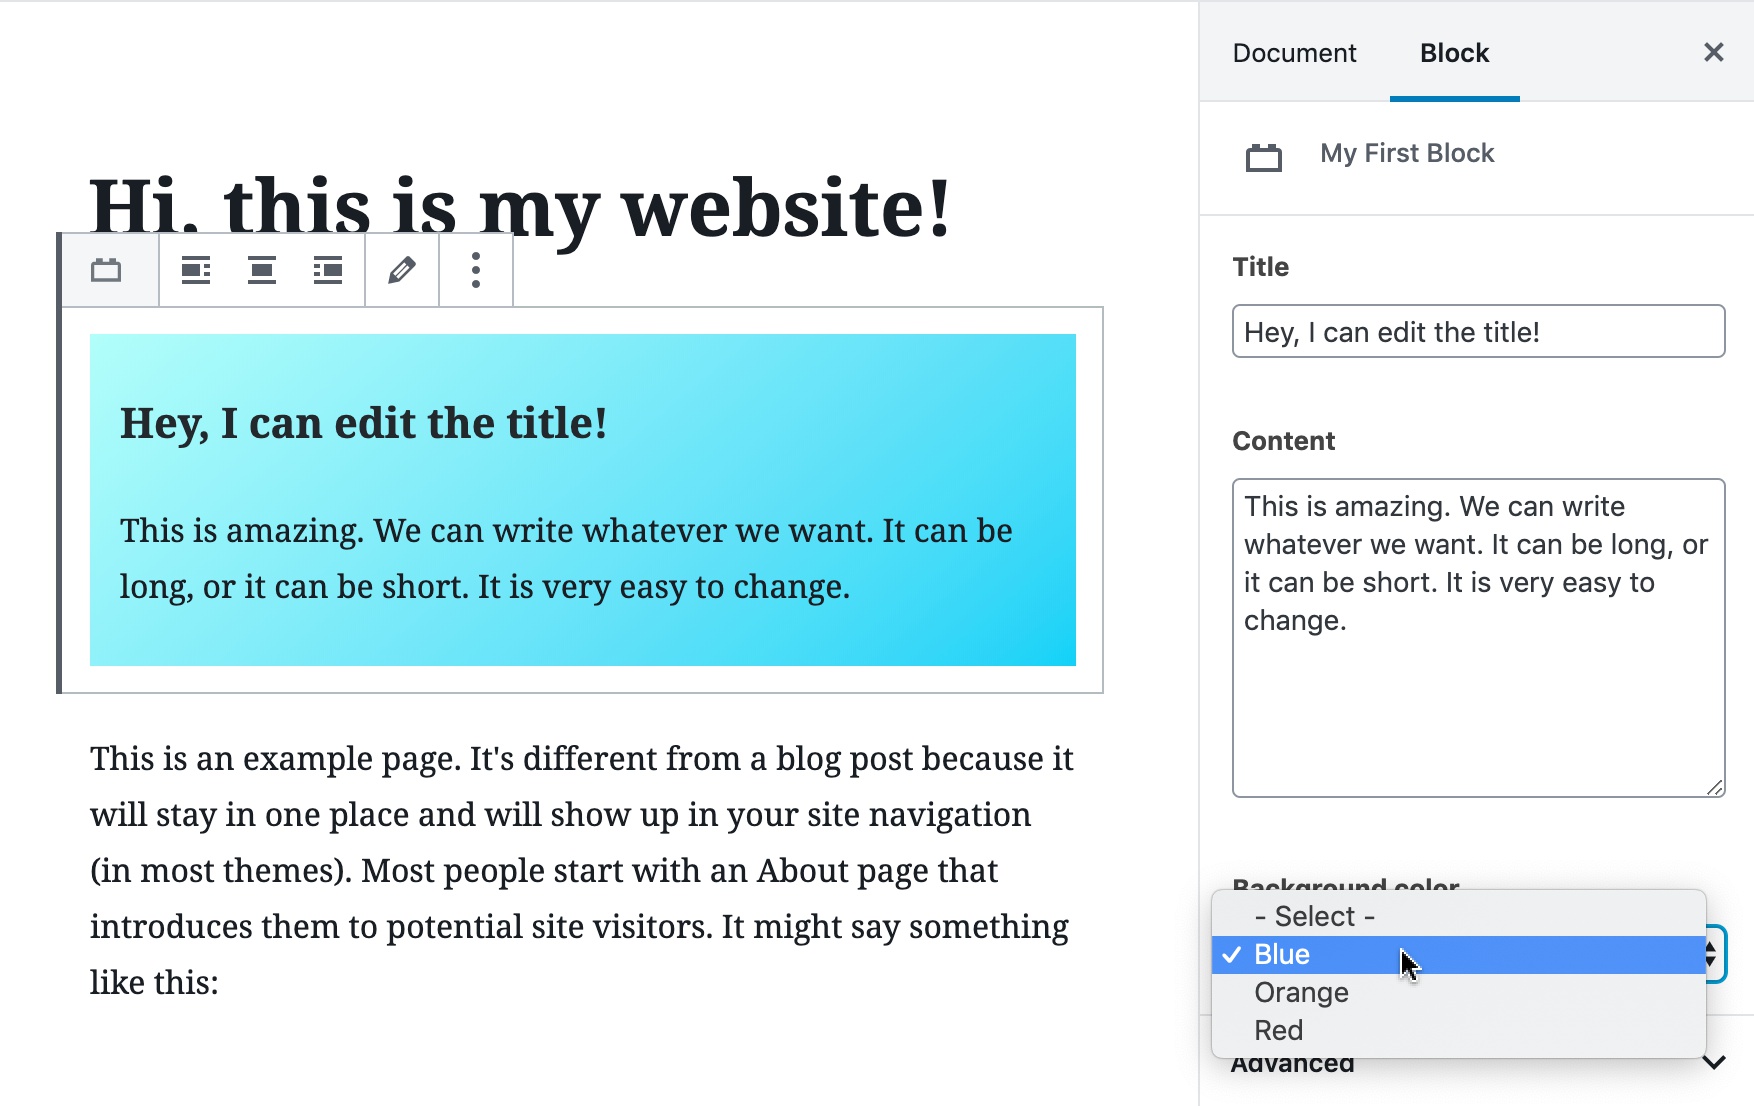
Now, we can control the background color of the block directly in the Block Editor:
Using WordPress actions in blocks
One powerful advantage of using PHP-based blocks is the ability to use WordPress actions.
For example, we can Show Posts with Relationship to dynamically display items from the WordPress database.
First, we’ll add a new relationship field to our Field group. The field pages will contain a list of pages that are relevant to the content of our block.
In Pinegrow, we add a list to our block and use Show Posts action with Relationship to loop through pages stored in the pages field.
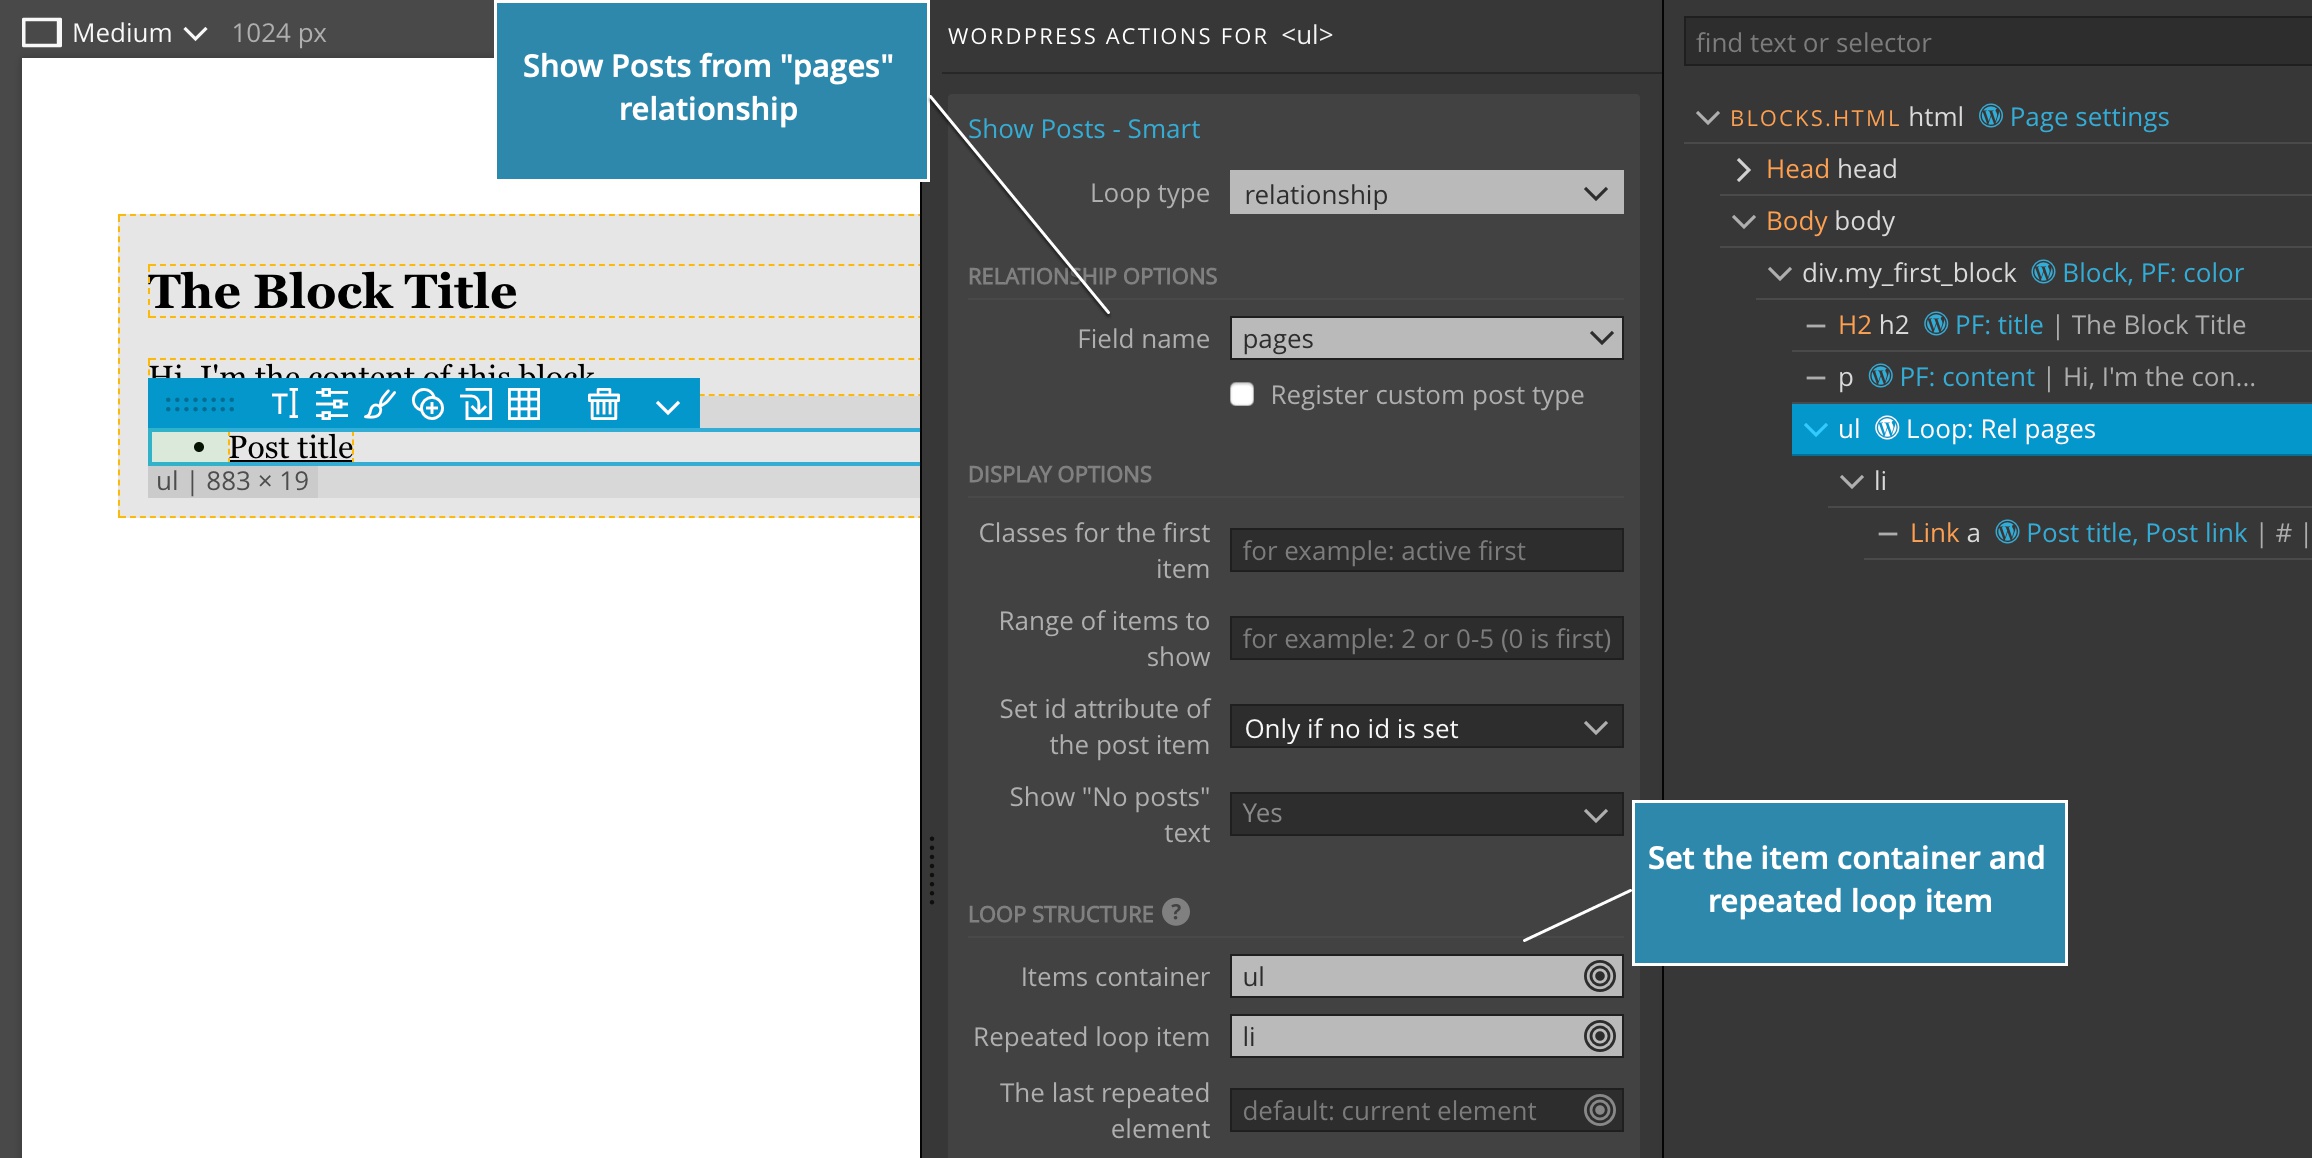
We use links in list items to display page titles and links.
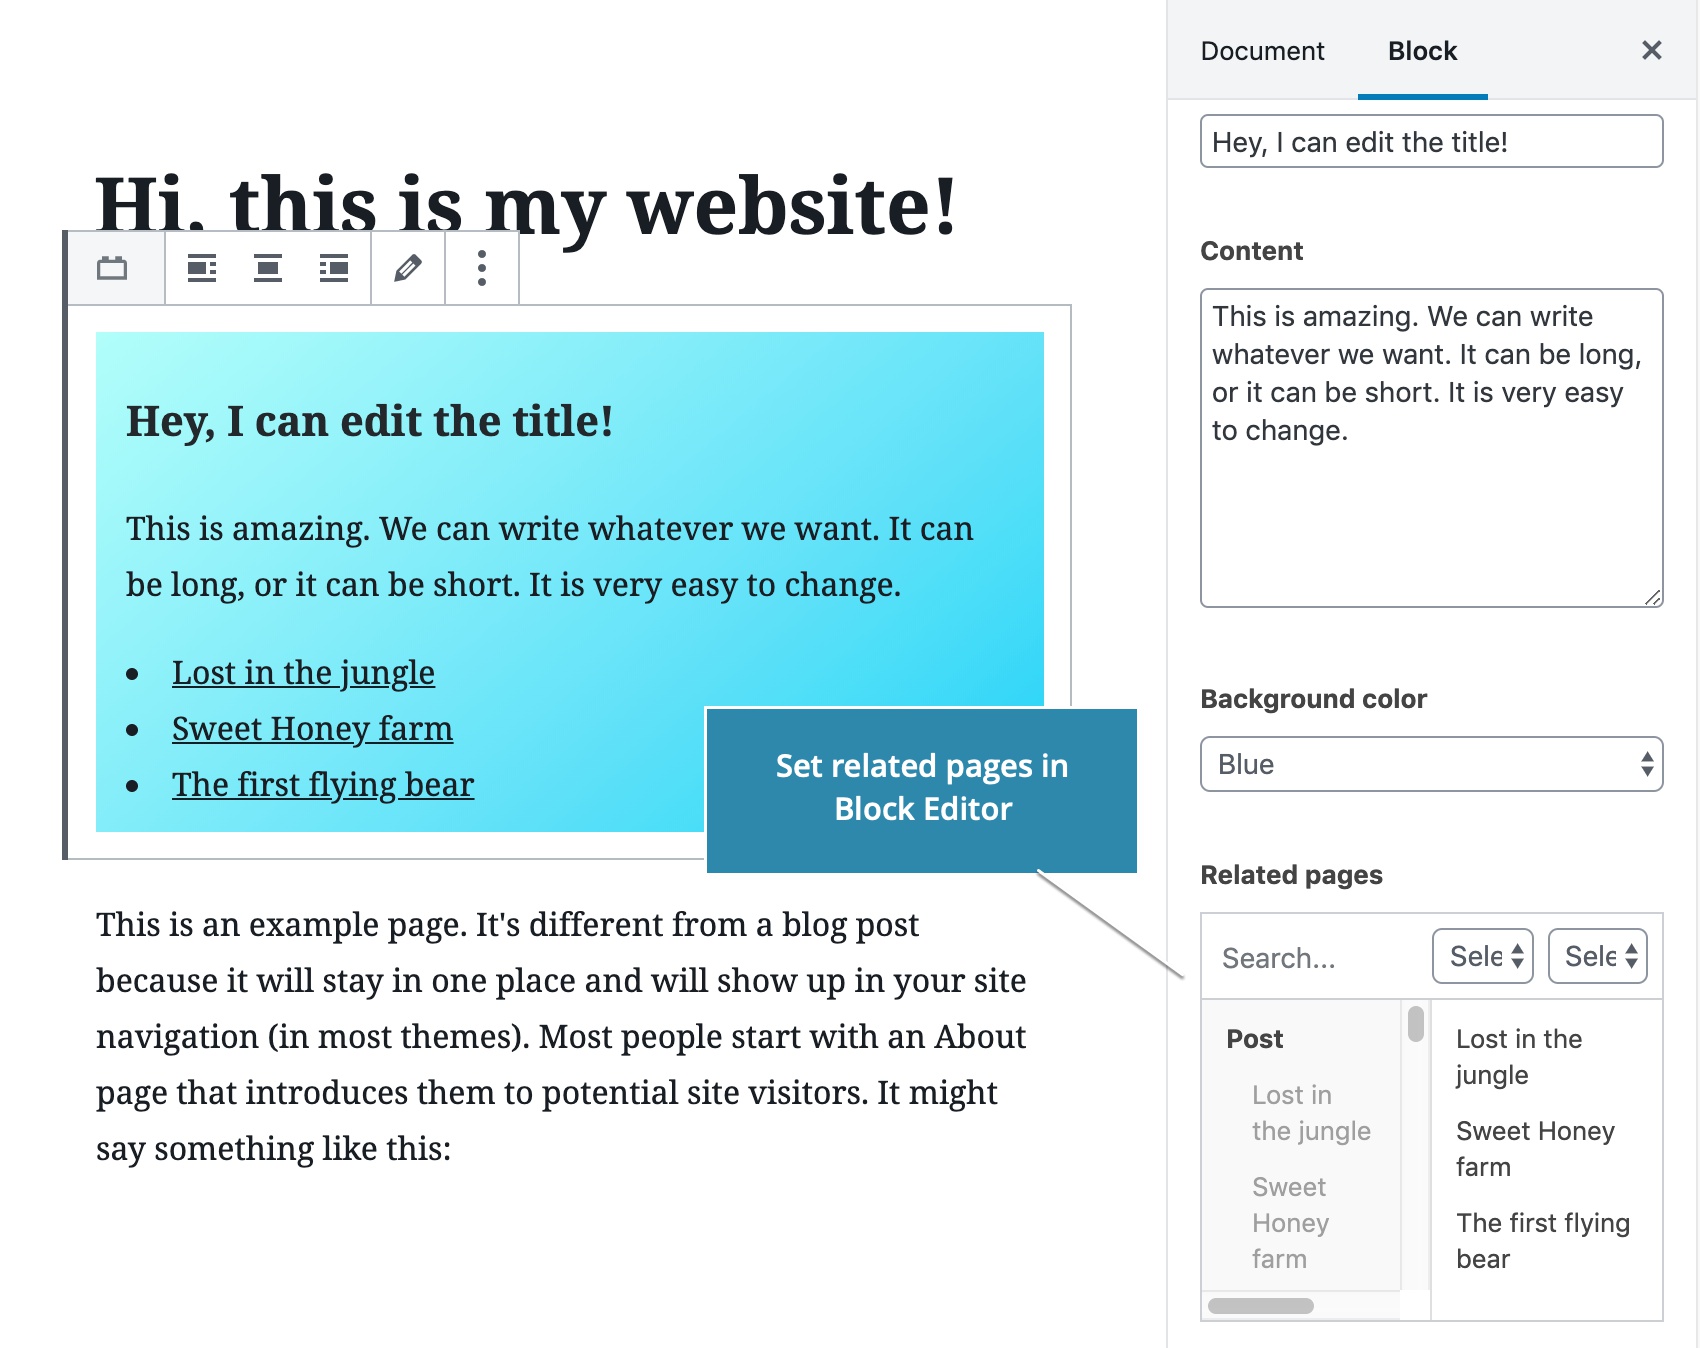
After we export the theme, we can select relevant pages for each instance of our block in Block properties:
Powerful, right?
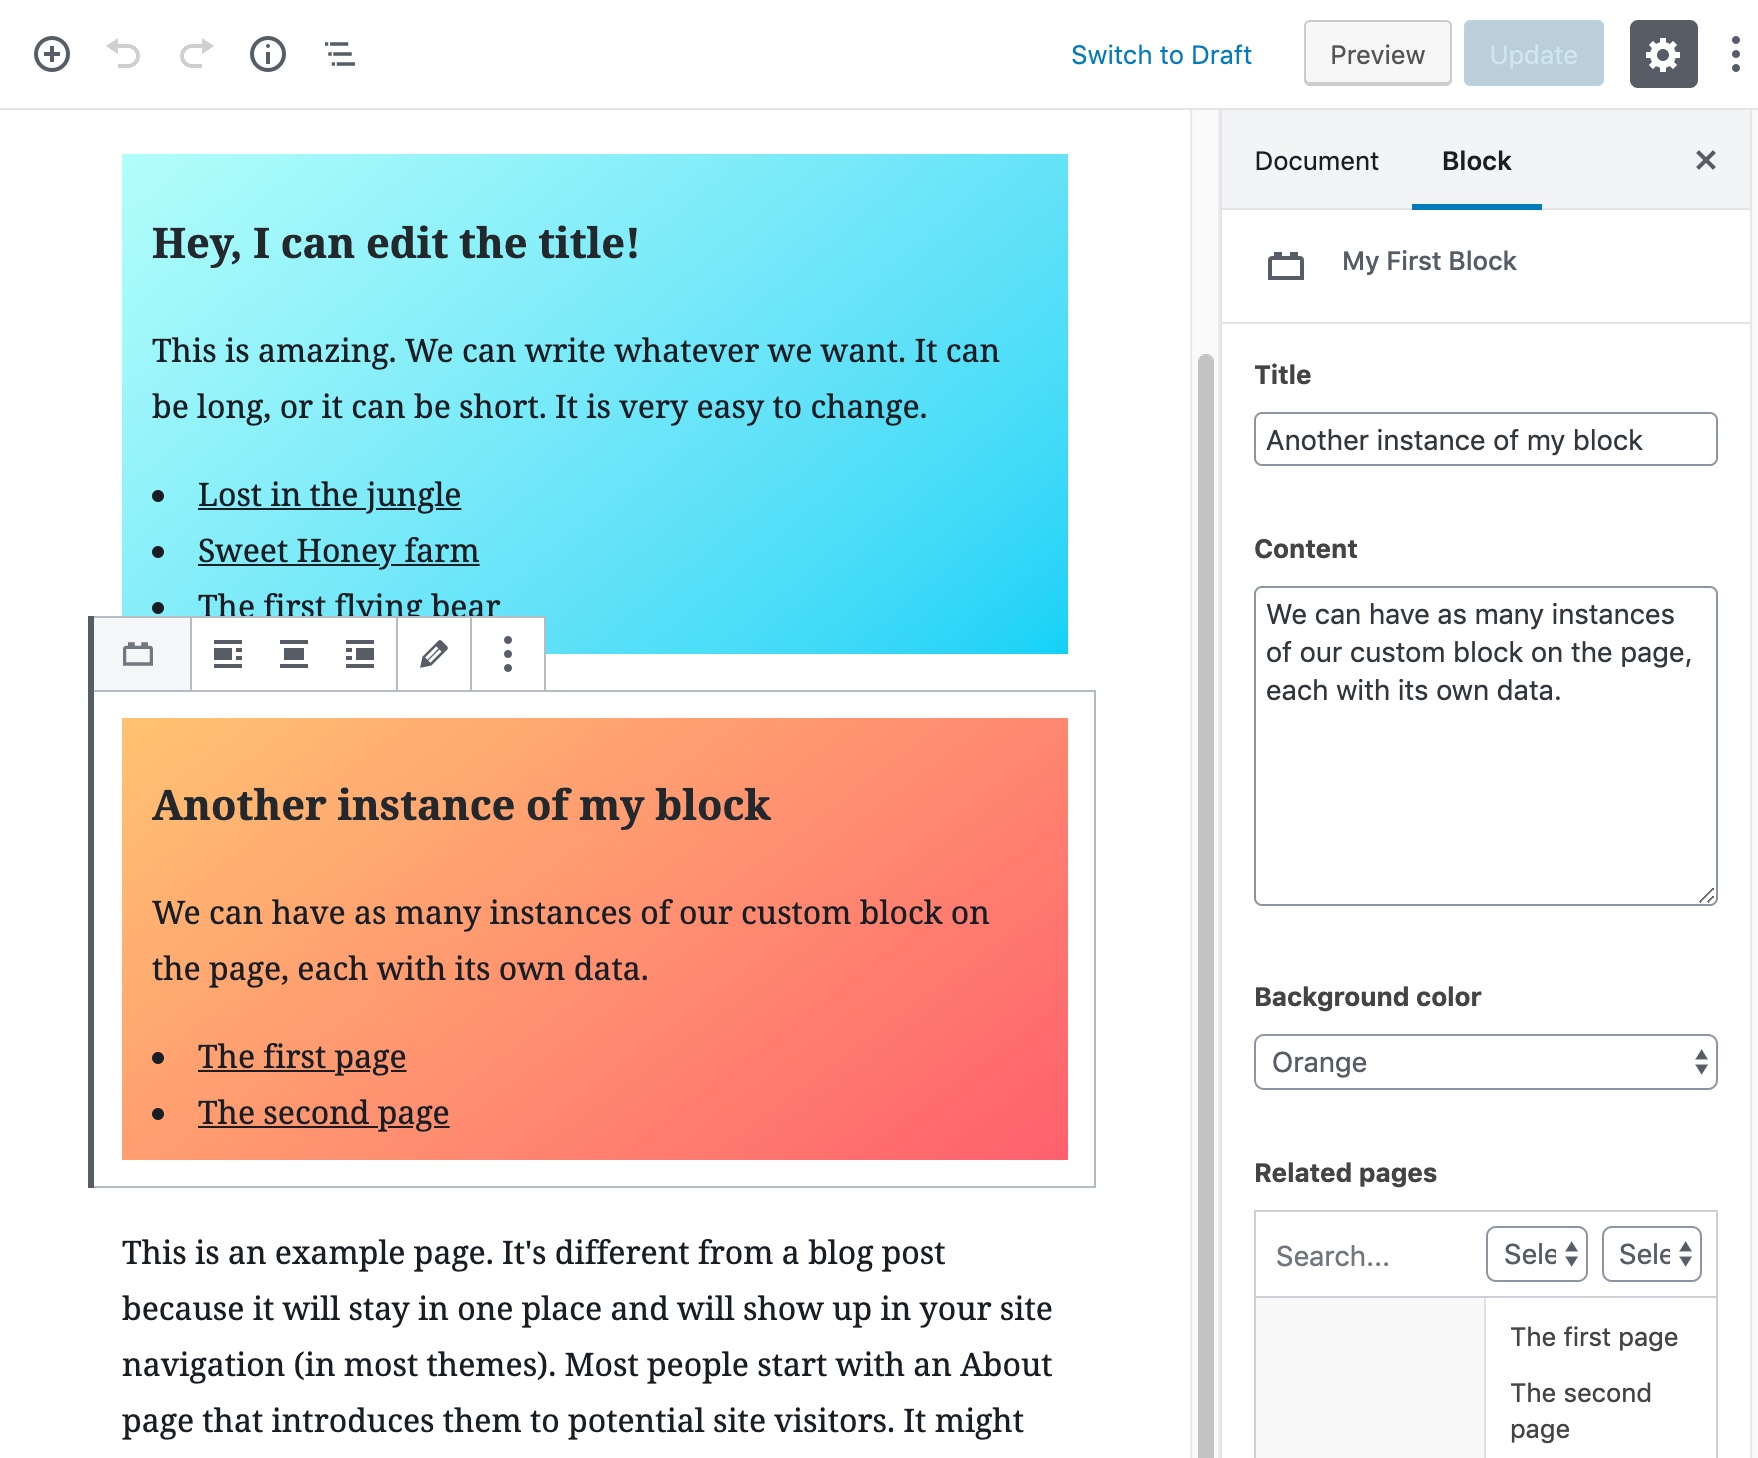
We can add as many block instances on the page and even create reusable blocks if we need to display it in different places on our site.
Keep reading to learn more about how to use Block action.
Block action reference
Block smart action has the following fields:
Unique Id
Unique slug/id that identifies the block. The best practice is to add the class with the same name to the block and use it for styling.
Folder
By default, block php template is exported in the same subfolder structure as the page where the block is defined. Use the folder setting to select a different export subfolder, for example “blocks/product”.
Title
Title is a human readable name of the block.
Description
Describe the block.
Icon
Icon can be one of the predefined WordPress icons or SVG code.
When using the WordPress dashicons, don’t use the
dashicons-prefix but just the icon name instead.

Keywords
Keywords are comma separated list of terms that help user locate the block in the Block editor.
Post types
Use post types field to limit the availability of the block to selected post types.
Style
Select a CSS stylesheet that implements block design.
Script
Include a script file that runs the dynamic Javascript code for the block. Use the block classname to target the block(s) on the page.
Category
Select the category in which the block will be listed in Block editor. Use “custom” to use a custom value.
Custom category Id
Enter the id of the custom category.
Register category
Register a custom category. Each category should be registered only once per theme.
Category name
A human readable name of the custom category.
Category icon
One of the predefined WordPress icons.