See how you can use Pinegrow to customize your Bootstrap 4 theme by modifying Bootstrap SASS variables and adding CSS rules.
As of Pinegrow 6 you can customize many aspects of your Bootstrap theme using the Design Panel, including colors and fonts. See the documentation here. Other customizations will need to be performed as outlined below.
Customizing Bootstrap is normally a bit complicated because it requires setting up the SASS compilation environment, installing Bootstrap SASS sources and creating a file structure for your custom theme.
But with Pinegrow it’s very simple.
Pinegrow takes care of all these tasks. All we have to do is the actual customization.
Don’t have experience with SASS and variables? Just keep reading and you’ll learn on the way.
If you want you can use this article as a practical tutorial, just open Pinegrow (download the trial version, if you don’t have it yet) and follow along.
This article is also available as a YouTube video if you prefer to watch the action:
Let’s get started!
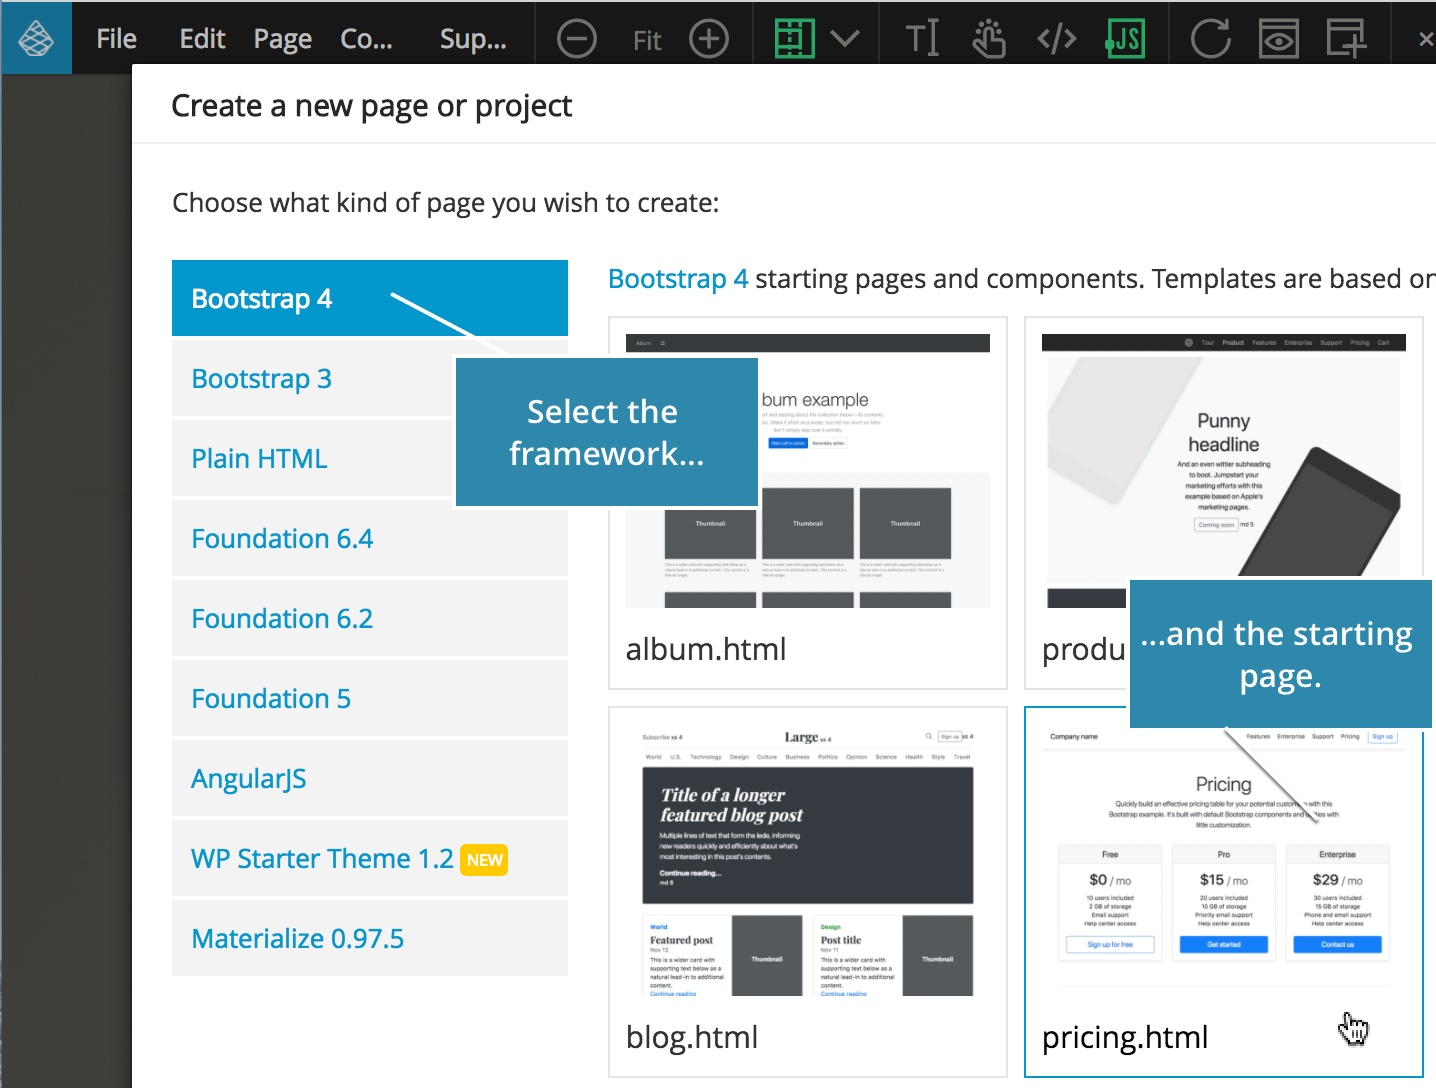
Create or open a project
First, create a new Bootstrap 4 project with “File -> New page”, or open an existing Bootstrap 4 project with “File -> Open project”.
Note, in order to customize an existing project, bootstrap.css (or bootstrap.min.css) needs to be included in the page locally, not remotely from CDN.
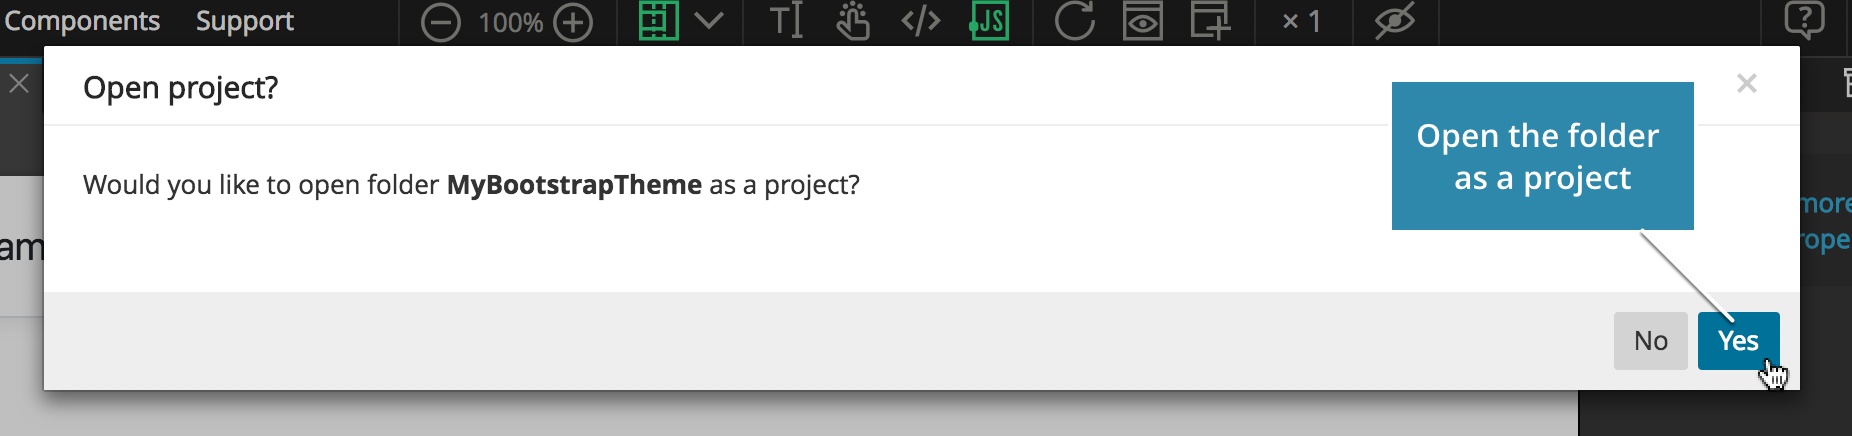
If we created a new page, we save it first and then open the folder as a project:
Let Pinegrow setup the SASS structure for the theme
Note, this command works with projects and thus requires Pinegrow PRO edition.
Open a page from your project and select “Page -> Customize Bootstrap theme.”
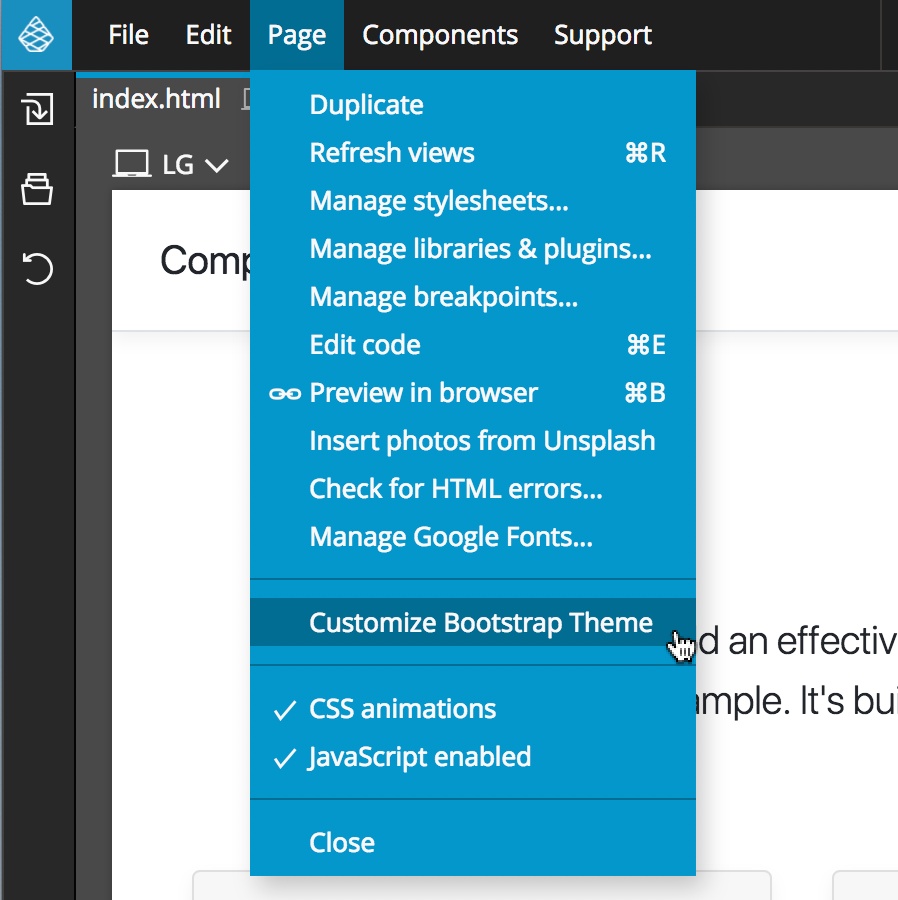
A notice will pop-up, asking if we want to add Bootstrap SASS sources to the project in order to do the customization.
We confirm and Pinegrow will do all the preparatory work for us. Another notice will explain what was done:
- A folder bootstrap_theme was created in our project.
- Bootstrap source SASS files were copied into bootstrap_theme/bootstrap.
- Our new main theme file, custom.scss, was created in bootstrap_theme folder. All our custom variables and CSS rules will go into custom.scss that in turn includes the original Bootstrap SASS files.
This structure is set up in accordance with official Bootstrap guidelines for customization.
When it comes to customizing Bootstrap it is important to never change the actual Bootstrap source files. Why? Because all our changes would be overwritten if we update Bootstrap files in the future.
With this structure we keep our modifications in custom.scss and simply overwrite bootstrap_theme/bootstrap with new Bootstrap source files when we want to update the Bootstrap version used in the project.
Bootstrap SASS variables
Let’s take a look at Bootstrap variables that are available to us.
In Style panel, open the Stylesheets menu. Here we see the structure of our custom Bootstrap theme:
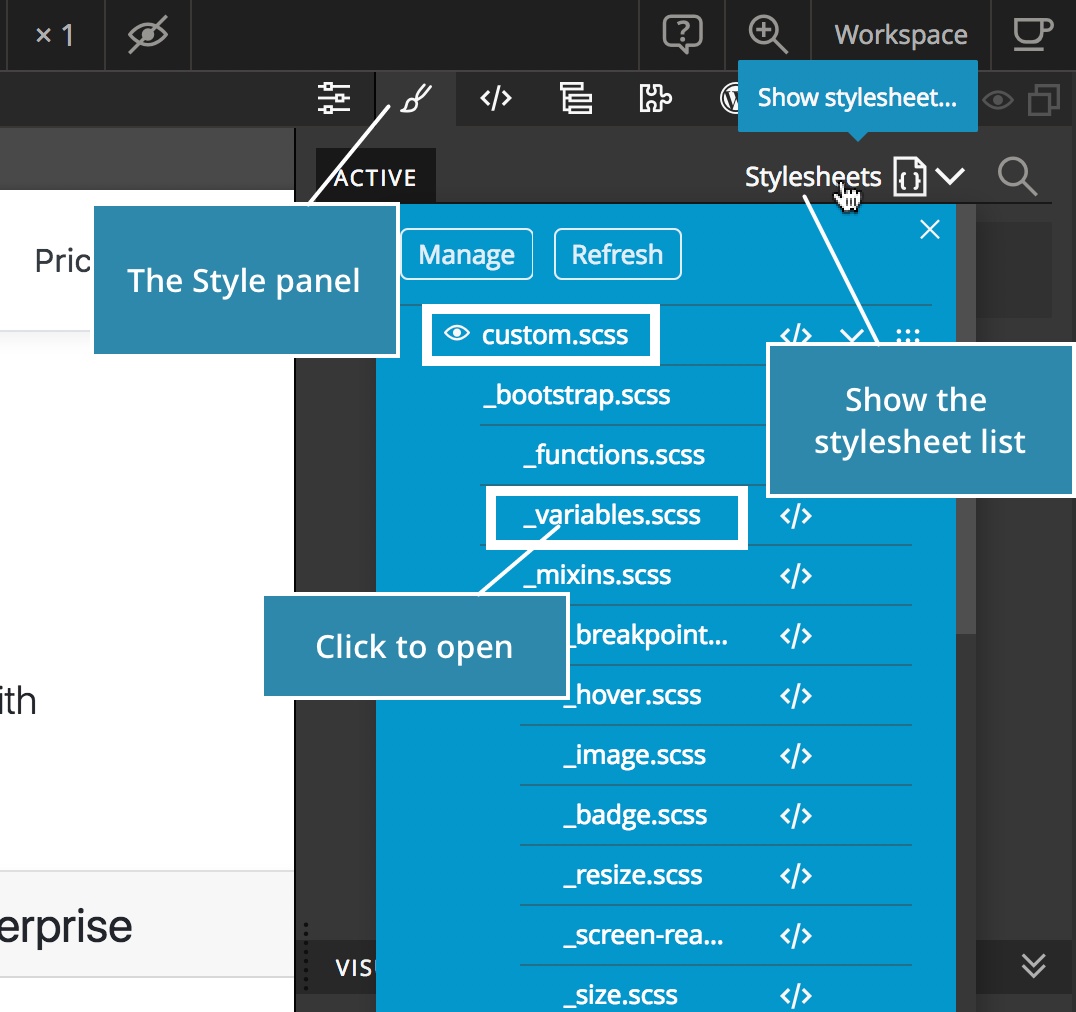
Don’t worry if it looks a bit scary. We’re only interested in two files:
- _variables.scss with all Bootstrap variables conveniently gathered in one place, and
- custom.scss, the top file in this structure where all our modifications will go.
Click on the _variables.scss to open it in a separate tab within the Style panel.
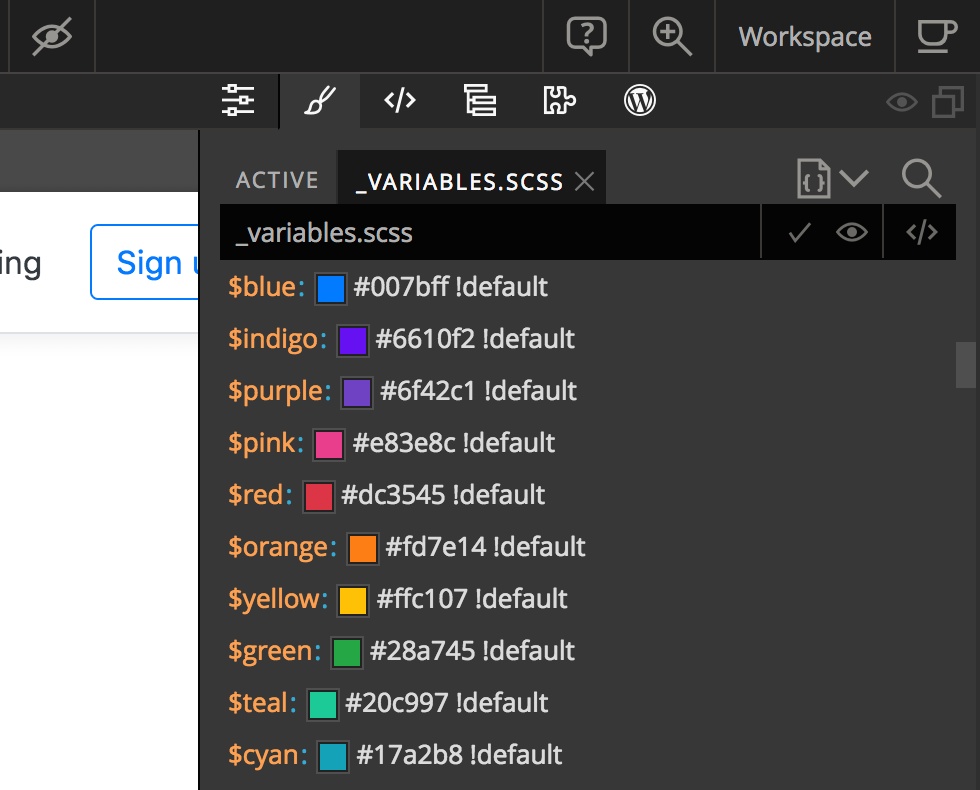
In SASS, variables are prefixed by the $ character. When SASS is compiled into CSS, the compiler will replace variables with their values.
Pinegrow has a SASS compiler bundled in, so there’s no need to install anything else. The unique feature of SASS in Pinegrow is that all changes to SASS files are immediately compiled and shown on the page – no need to save changes first.
Changing the primary color
To start, let’s change the primary color of the theme.
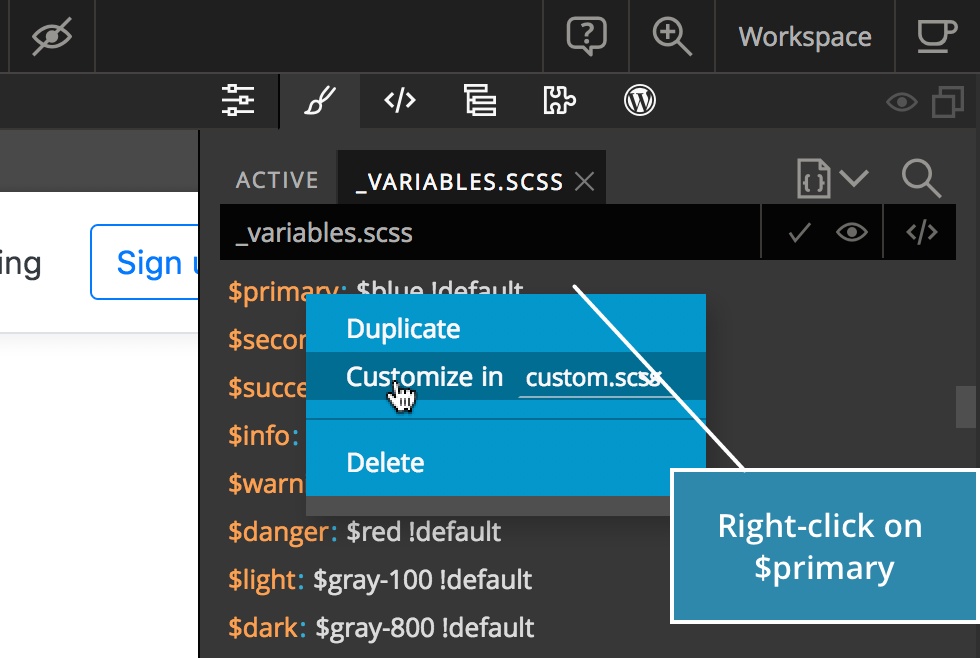
The $primary variable is responsible for that. It’s default value is $blue, another variable that is defined in the beginning of the _variables.scss.
We could just start changing the $primary variable in _variables.scss, but remember – that’s a bad idea. Doing that would make it impossible to easily update Bootstrap version without loosing our edits.
Note, we’re working on the feature that would lock certain stylesheets so that any such accidental edits can be prevented. For now, we have to be mindful of that.
To customize $primary, we right-click on it and select “Customize in custom.scss”. If custom.scss is not yet selected, we select it from the dropdown list.
Pinegrow creates a copy of $primary in custom.scss and displays custom.scss in its own Style panel tab.
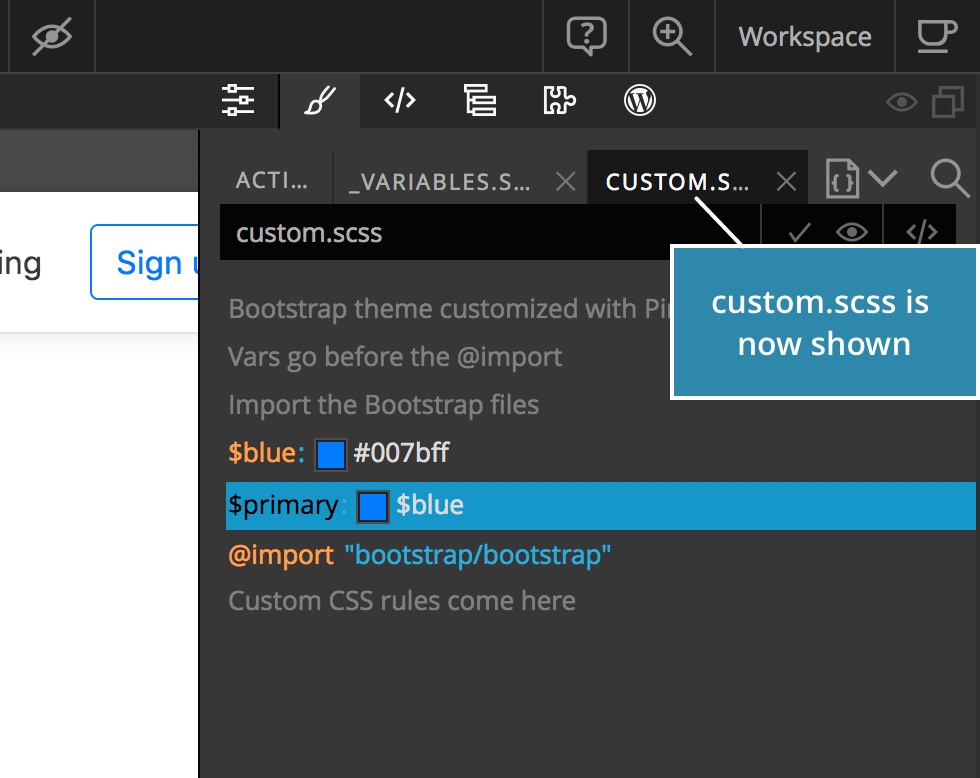
Not only that, Pinegrow also copied the variable $blue because it is used in the value of $primary. Without doing that our theme could not compile because the SASS compiler would have no idea about what $blue means in the definition of $primary.
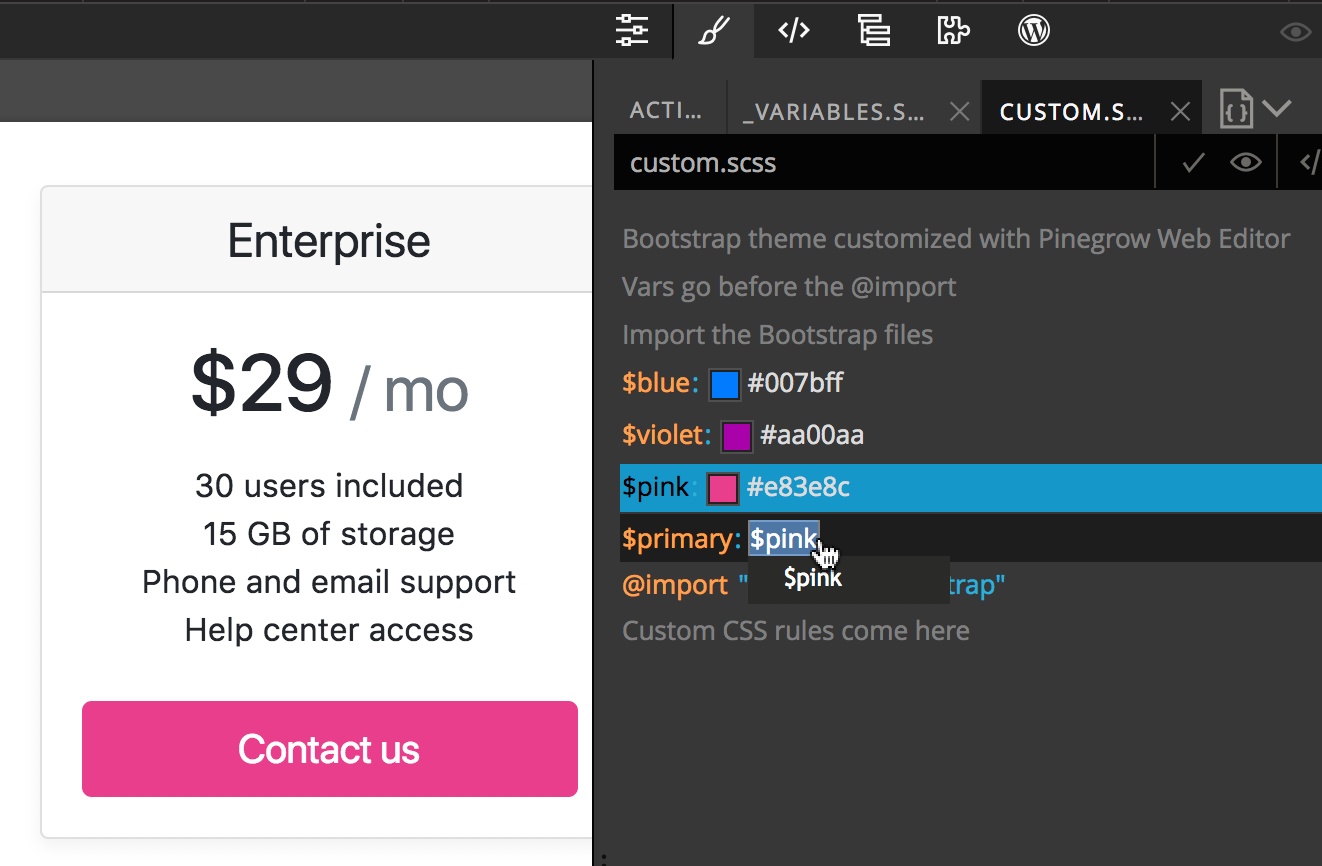
Now we can go ahead and change the value of $primary in the custom.scss tab.
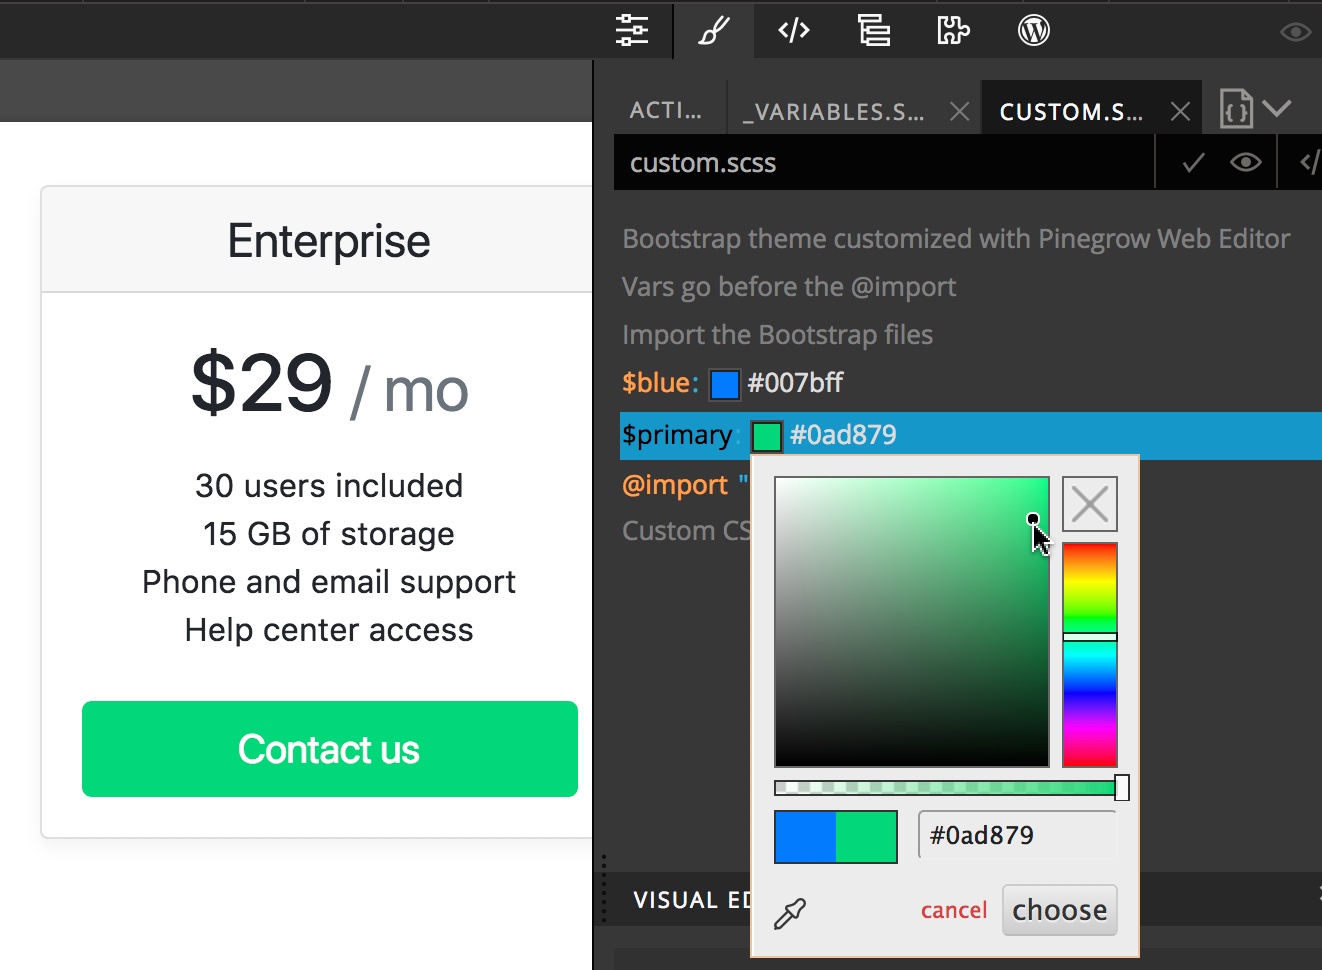
The colors on the page change immediately.
We can enter a direct color value or we can create a new variable, for example $violet and use that.
Create a new variable
To create a new variable click on the insertion lines that appear after hovering between two items:
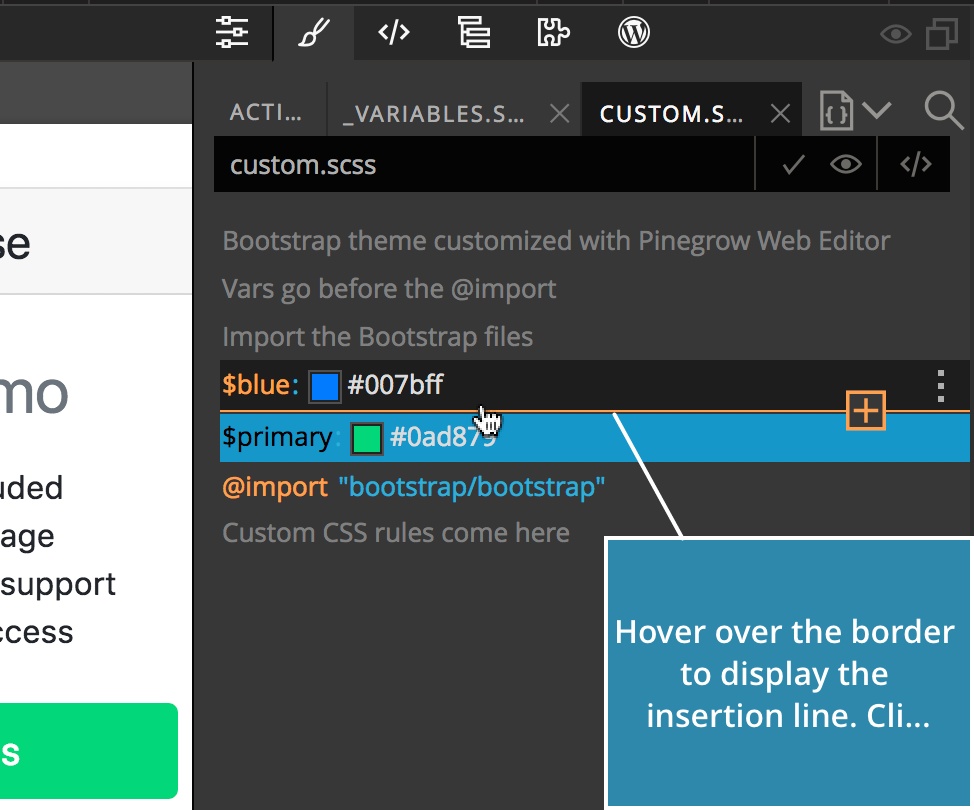
Then type: $violet [TAB] #aa00aa [ENTER].
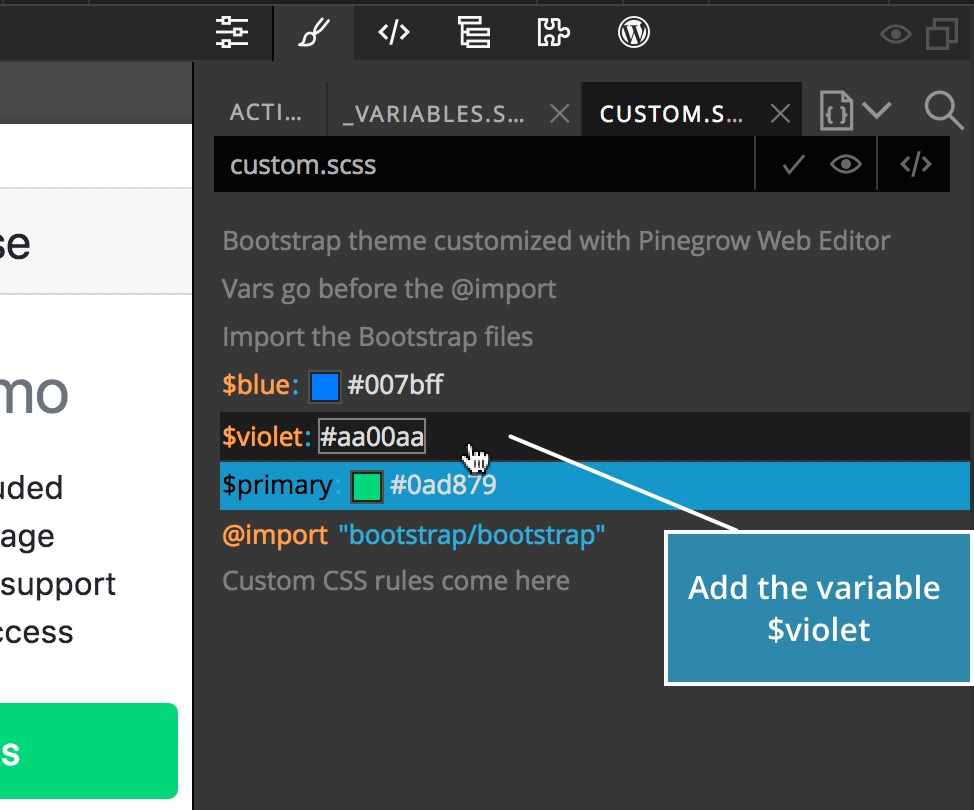
It makes sense to define a new color as a variable so that we can easily reuse it in other places.
Because we want to use $violet in $primary we need to place the definition of $violet before $primary.
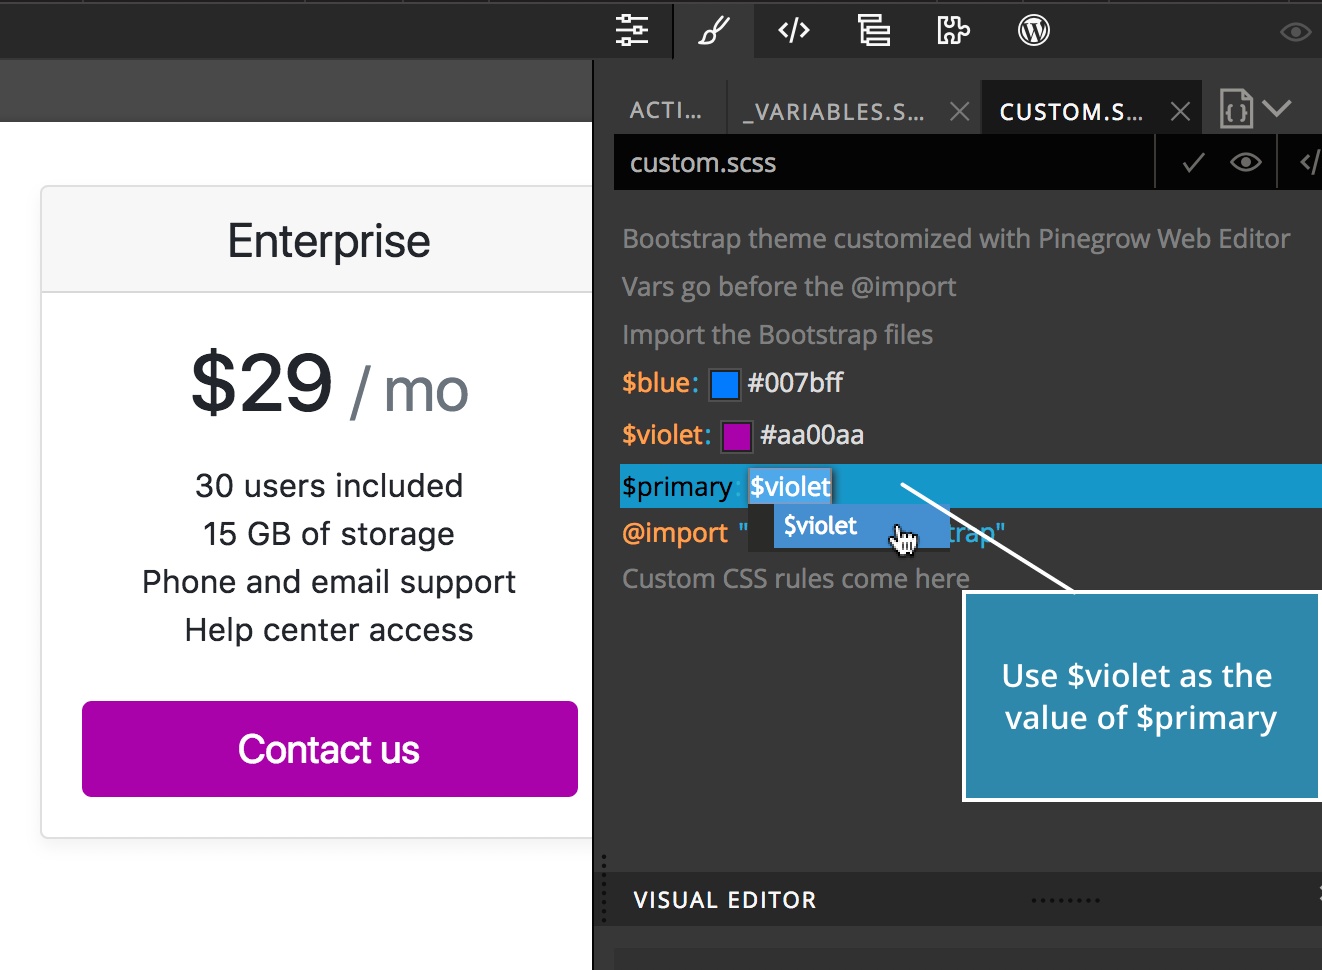
Now, we can use $violet as a value of $primary.
Using Bootstrap variables in custom values
How about if we want $primary to use an existing variable that is defined in _variables.scss?
First we have to bring that variable to custom.scss by going to _variables.scss tab, right-clicking on $pink and choosing “Customize in custom.scss”. Pinegrow will copy the variable to custom.scss.
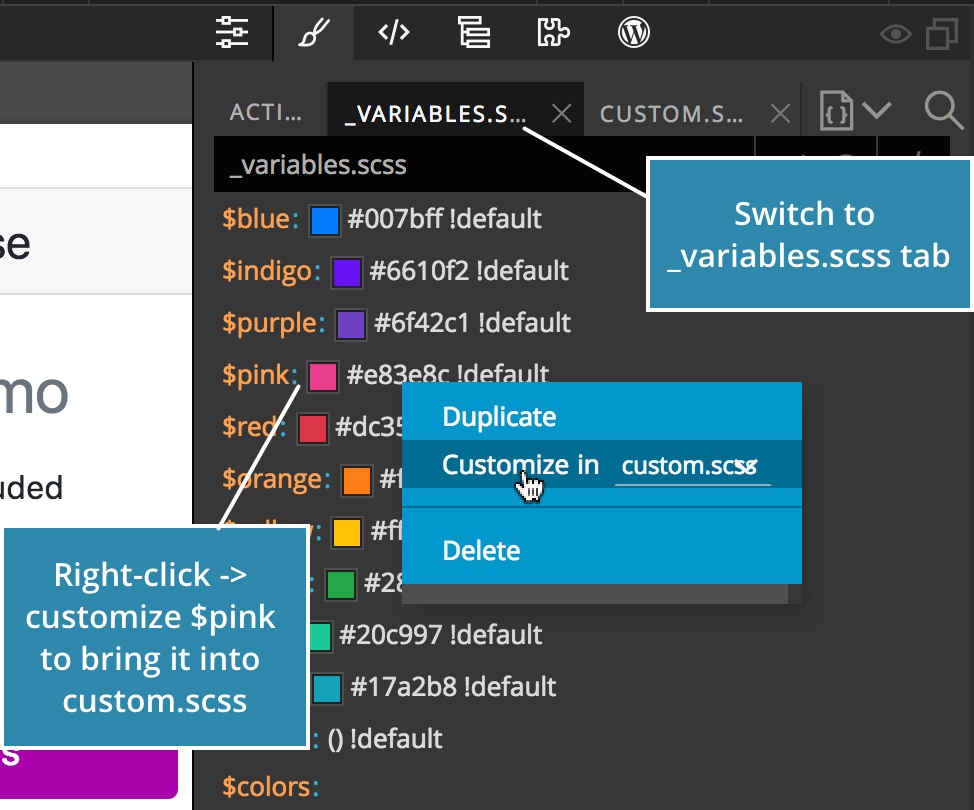
Remember, the order of variables that reference each other is important. Pinegrow tries to automatically keep the correct order of variables when we do “Customize in…”. In this case, $pink was inserted before $primary because that’s how it is positioned in _variables.scss.
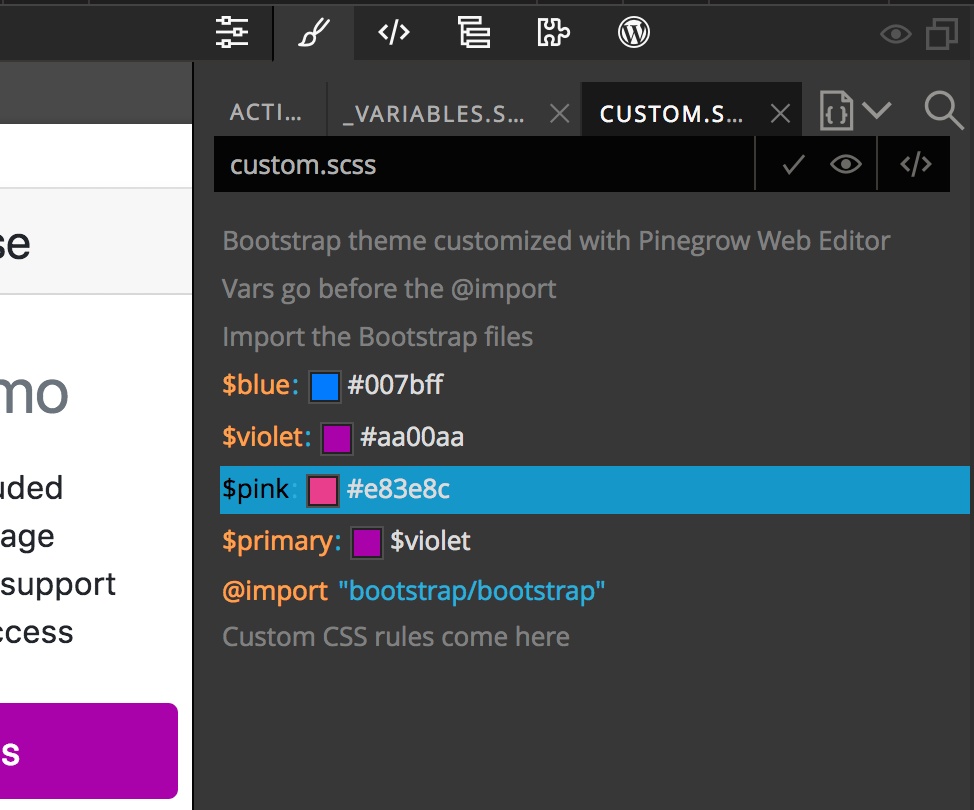
And that’s precisely what we want so that we can use $pink as the value of $primary.
Saving the CSS theme file
Whenever we save the page, the compiled bootstrap.css (or bootstrap.min.css, if that was used on the page) is saved as well.
Note, at the moment, Pinegrow doesn’t actually minify the css file if the name bootstrap.min.css is used.
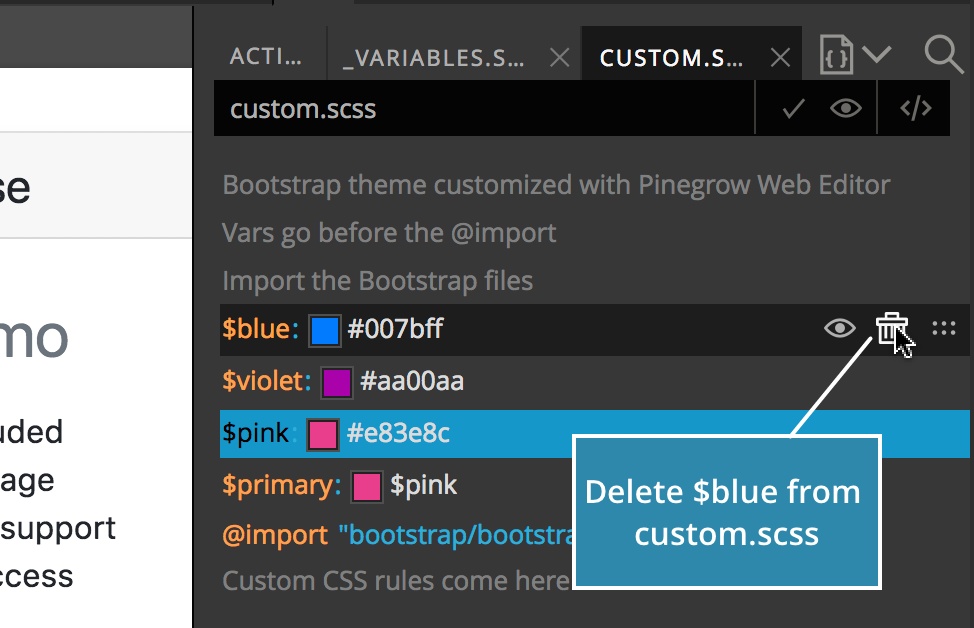
Deleting unused variables
We can delete variables that are not used anymore. For example, $blue is not used in $primary anymore, so we can safely delete it from custom.scss by clicking on the Trash bin icon next to it. This will only delete $blue from custom.scss – it will still remain in _variables.scss.
Searching for variables
Let’s change fonts now.
Scrolling down through all the variables in _variables.scss, we discover that there are lots of them. We can use the search function of the Style panel to help us find the right variables.
Click on the Search icon to show the search bar and then enter the search term “font”. Now, in all tabs of the Style panel, we only see CSS rules and variables that contain the term “font”.
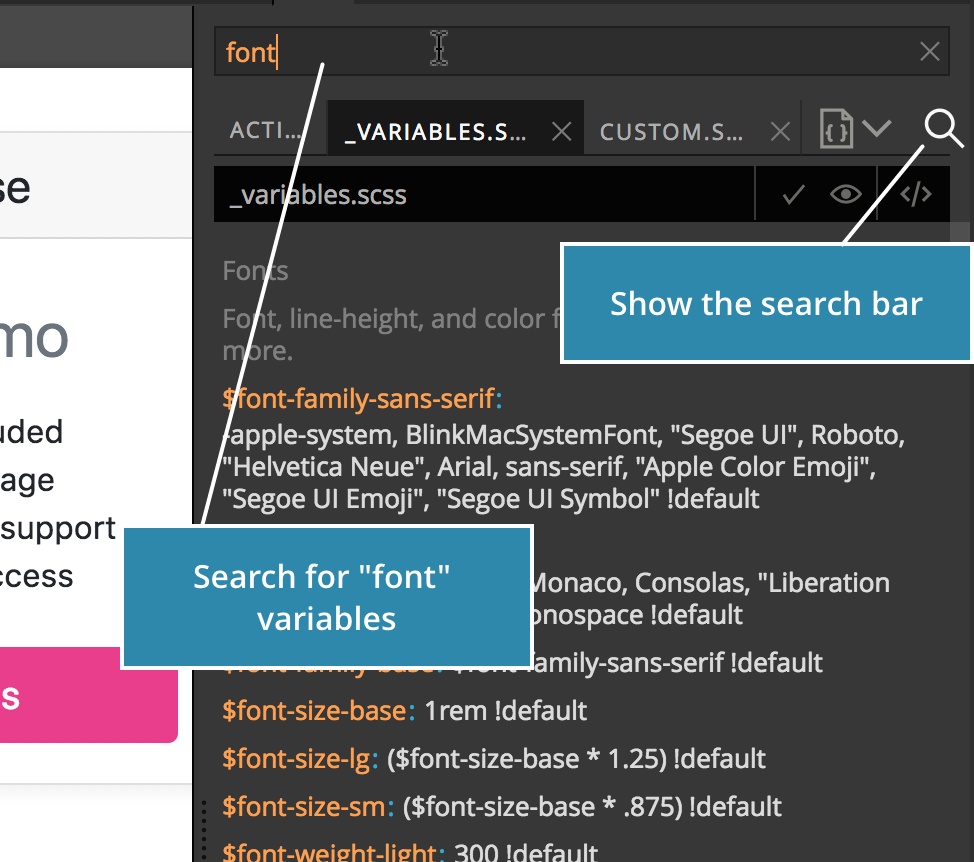
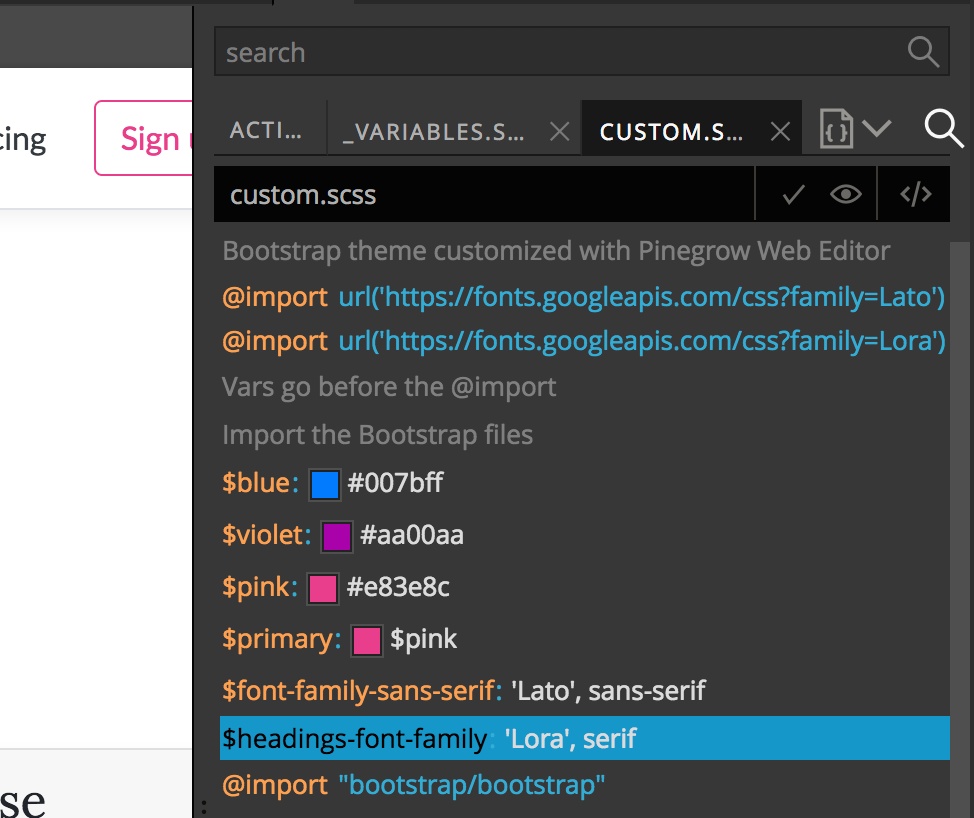
And here is our variable: $font-family-sans-serif.
Again, we right-click on it and select “Customize in custom.scss”.
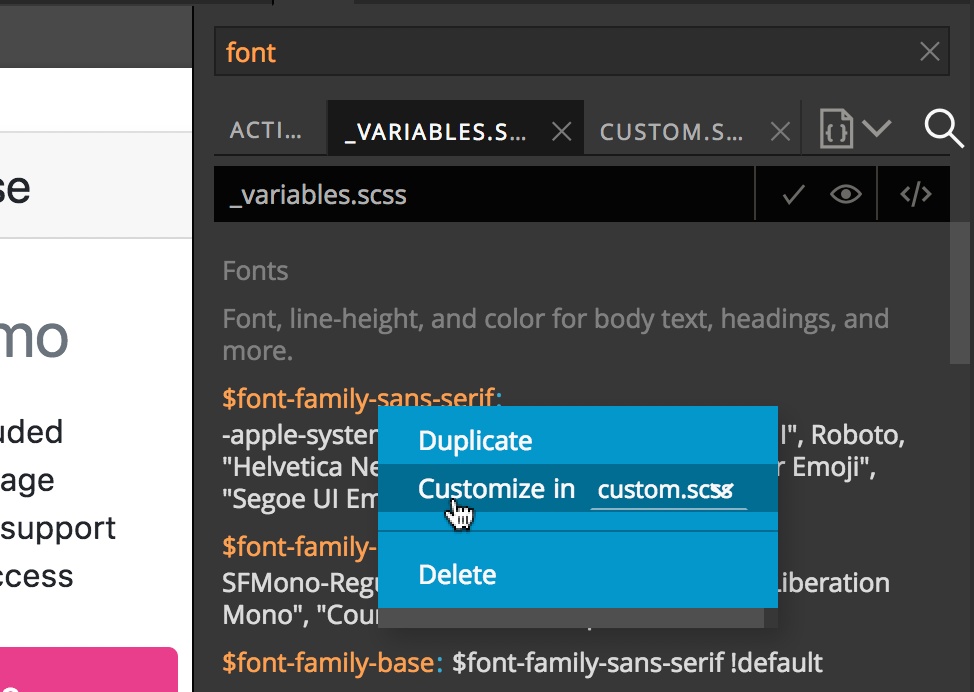
In custom.scss tab (note, the active search term also affects what’s displayed there) we change the variable so that it uses Georgia, a beautiful serif system font.
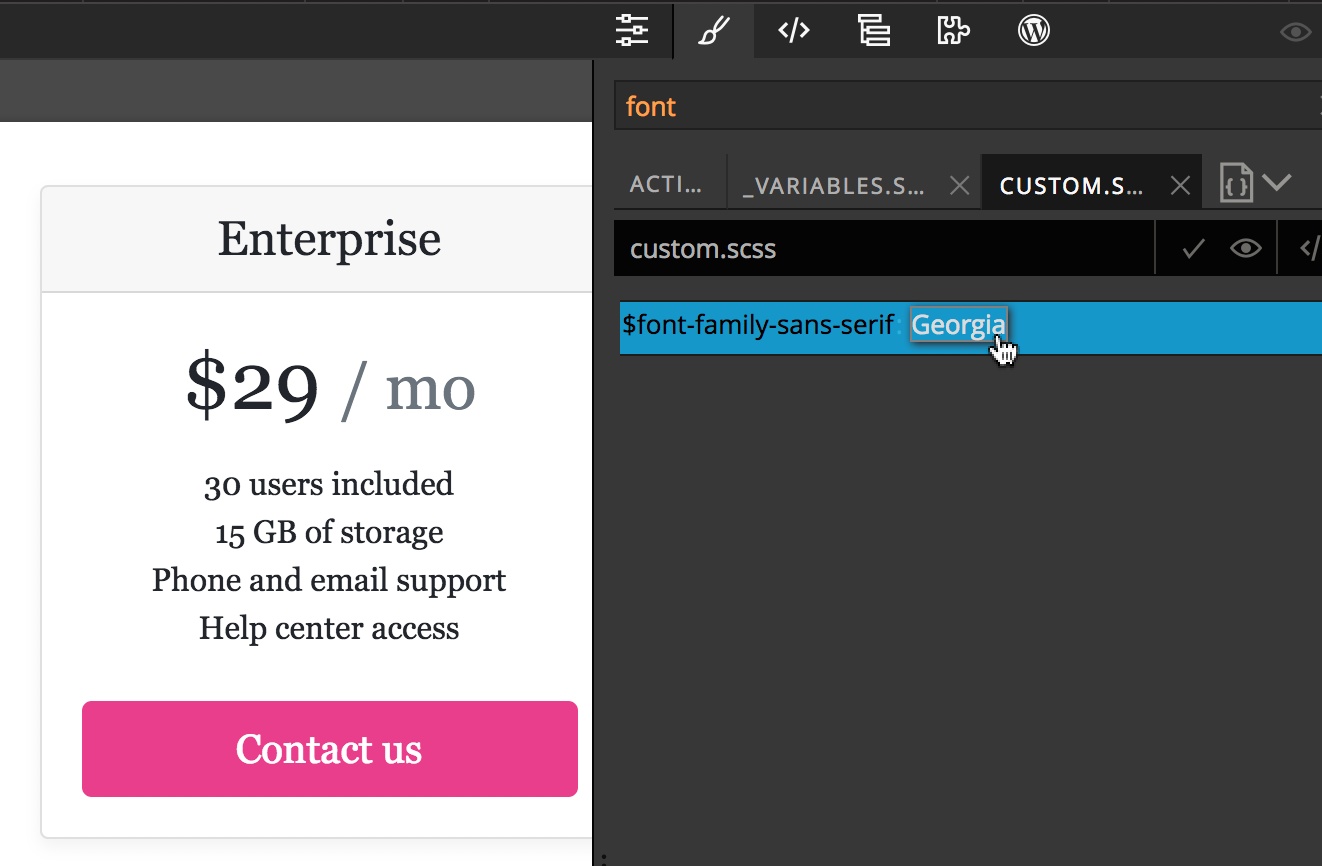
Nice!
Using custom fonts
But how about using custom fonts, for example Google Fonts?
Easy as well. Although Pinegrow has “Page -> Manage Google fonts” tool, it’s easier for this task to include fonts manually.
Let’s go to Google Fonts and find a font, for example Lato.
Click on “Select this font” and choose the @import option for embedding the font.
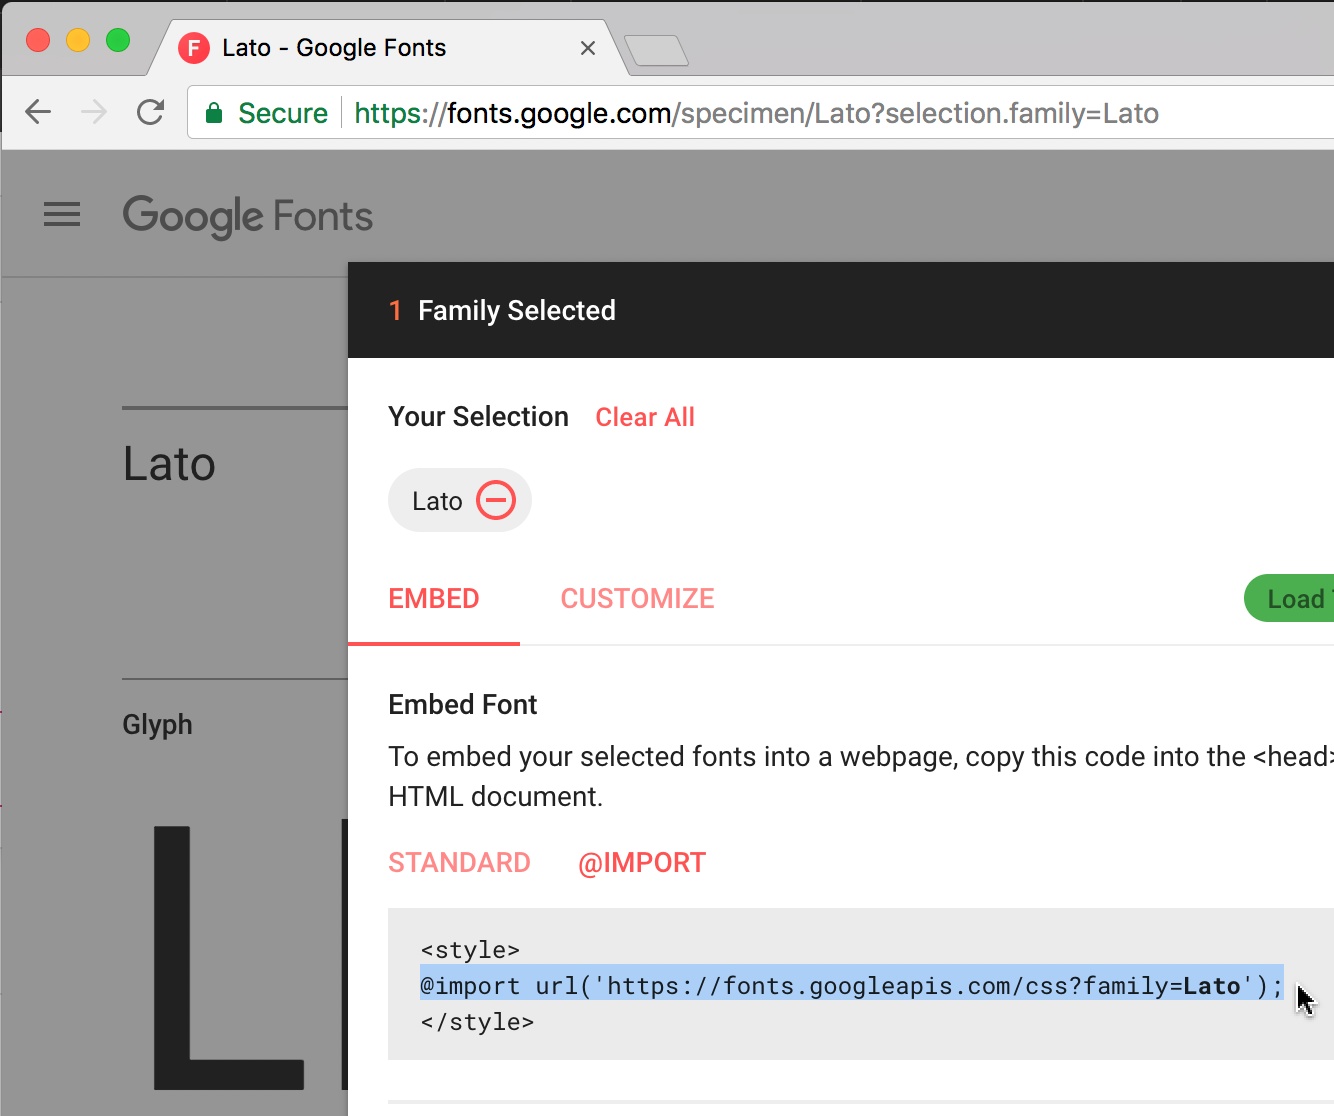
We just copy the @import statement without <style> tags, click on the insertion line at the very beginning of custom.scss:
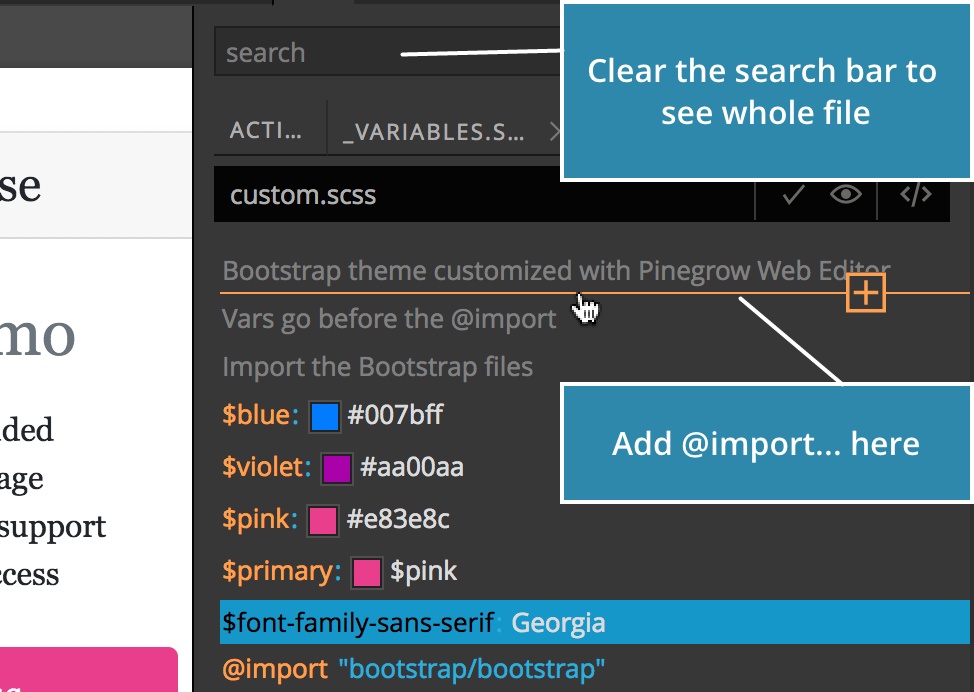
And paste the @import statement there.
We add it at the very beginning because according to CSS specification any @import statements must come before the first CSS rule.
Now we can use “Lato” in the $font-family-sans-serif variable.
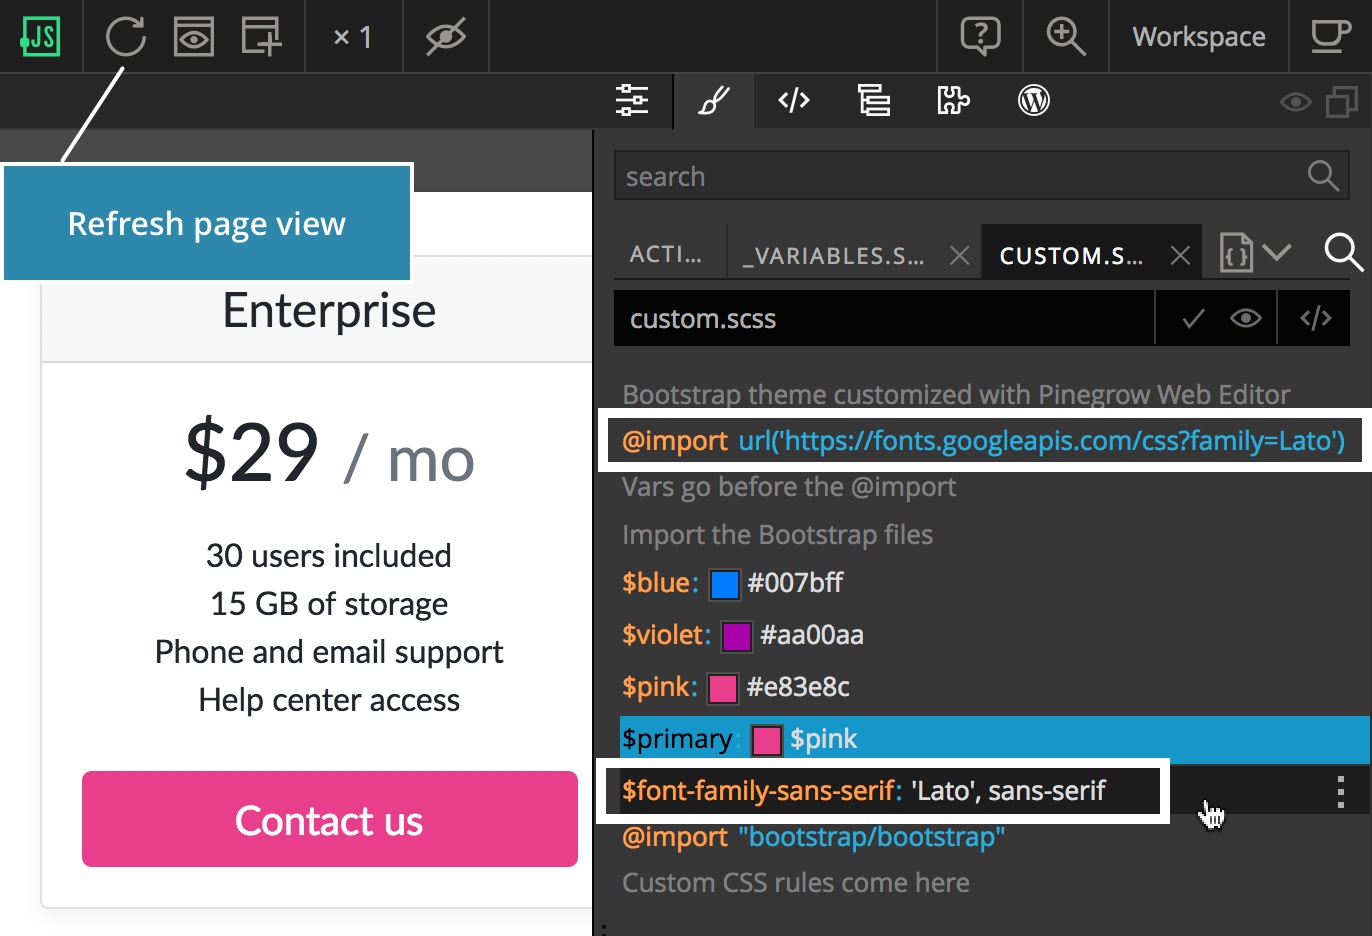
But – nothing happened on the page! We don’t see Lato there!
The reason is that changes to @import statements are not picked up by the browser during the live editing. Let’s use “Page -> Refresh page” to force the stylesheet reload on the page. We have to do that whenever we change @import statements.
Using the Active tab to discover variables
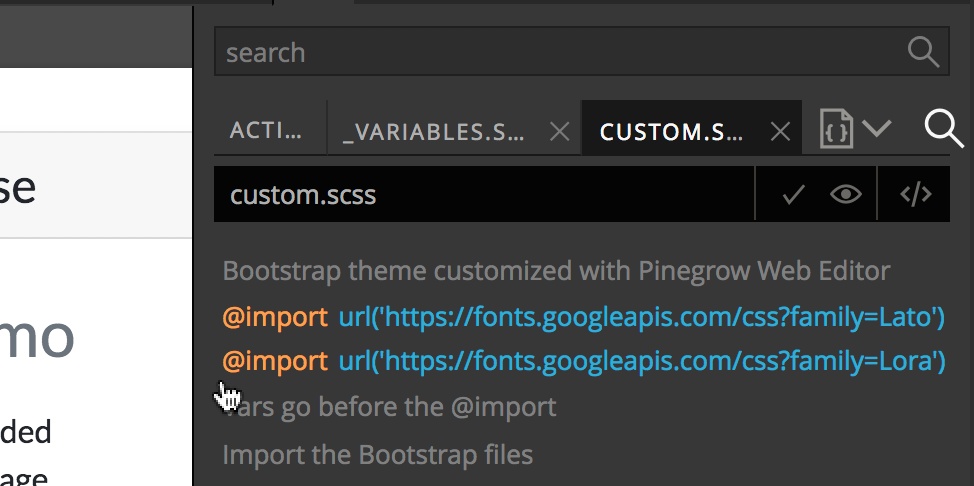
How about using a different font for headings?
Lora is a nice combination for Lato.

Again we paste its @import statement at the start of custom.scss and Refresh the page.
In order to use it we have to first figure out which Bootstrap variable controls the heading fonts.
While we could scroll through variables in _variables.scss, let’s choose a smarter way using the Active tab of the Style panel.
The Active style tab is very powerful. It doesn’t only display the active CSS rules for the selected element, it also understands the source SASS code.
Let’s go to the Active tab and select the heading on the page. Clear any term from the search bar, if it is active.
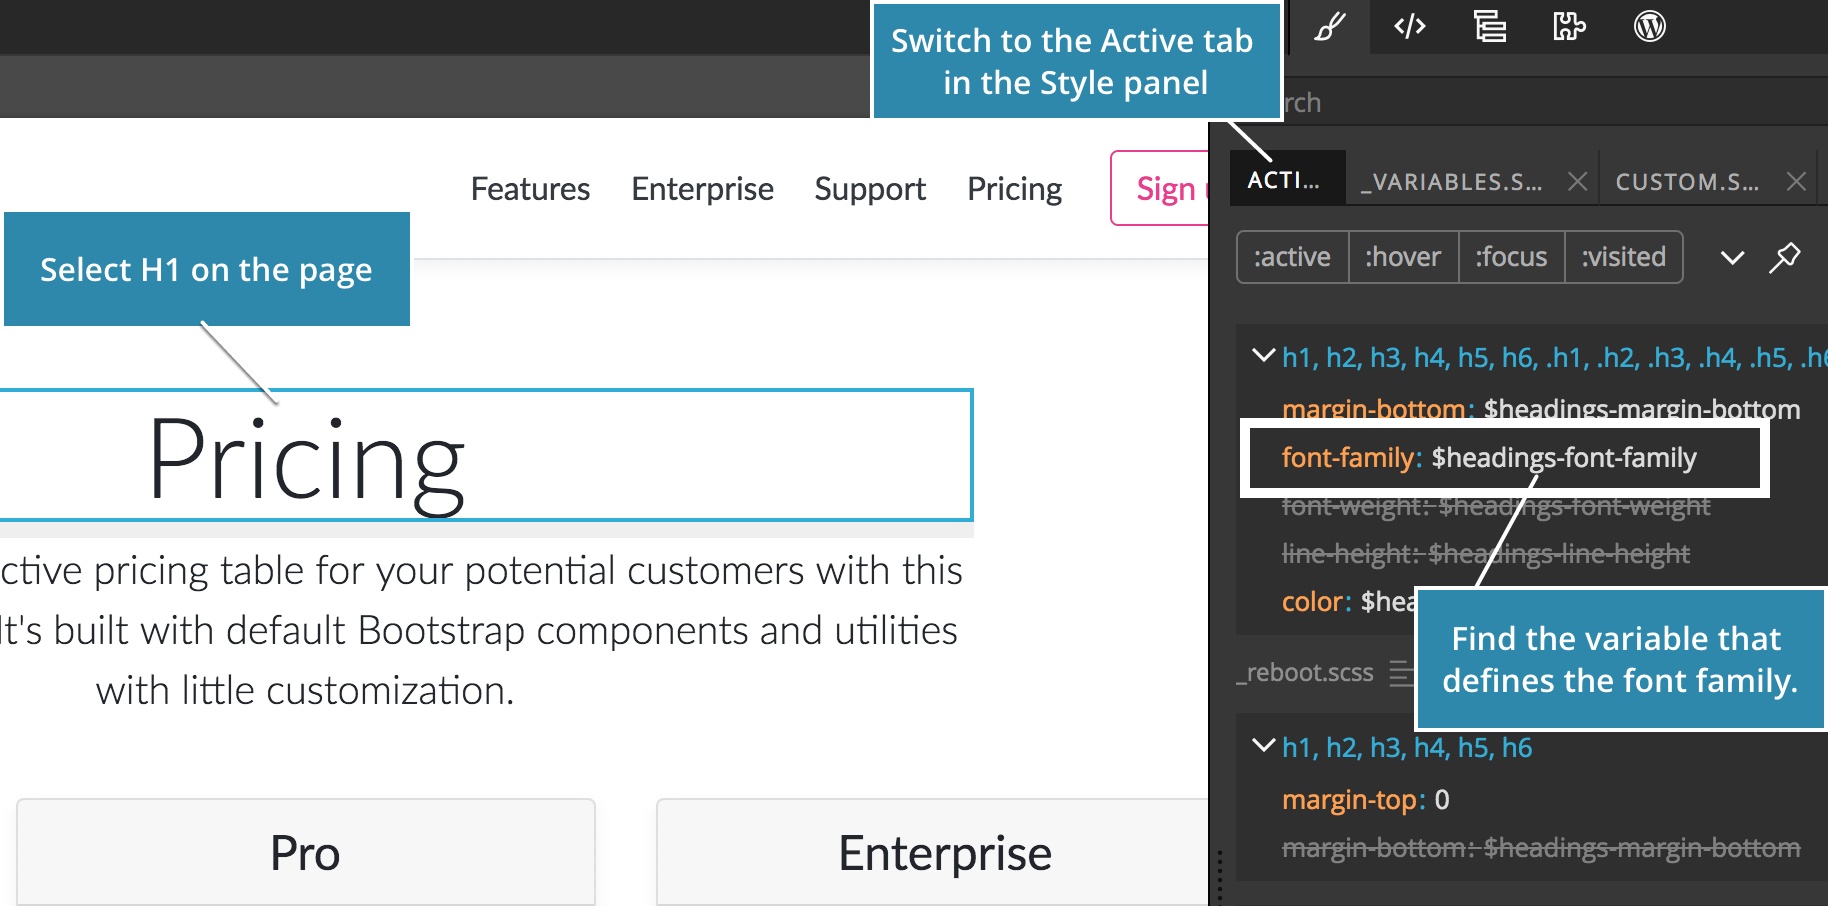
Looking at the listed SASS rules we can easily spot that the font-family property for headings is controlled with $headings-font-family.
Let’s copy the variable name, switch to _variables.scss tab and paste the variable name into the search bar.
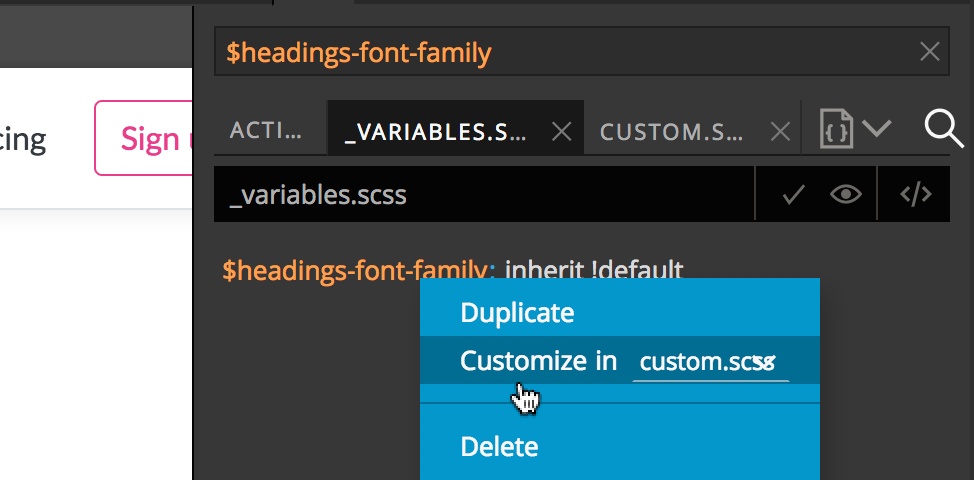
There it is. Again, we right-click on it and say “Customize in custom.scss”. Back in custom.scss tab we change the value to family name as given by Google Fonts: Lora, serif.
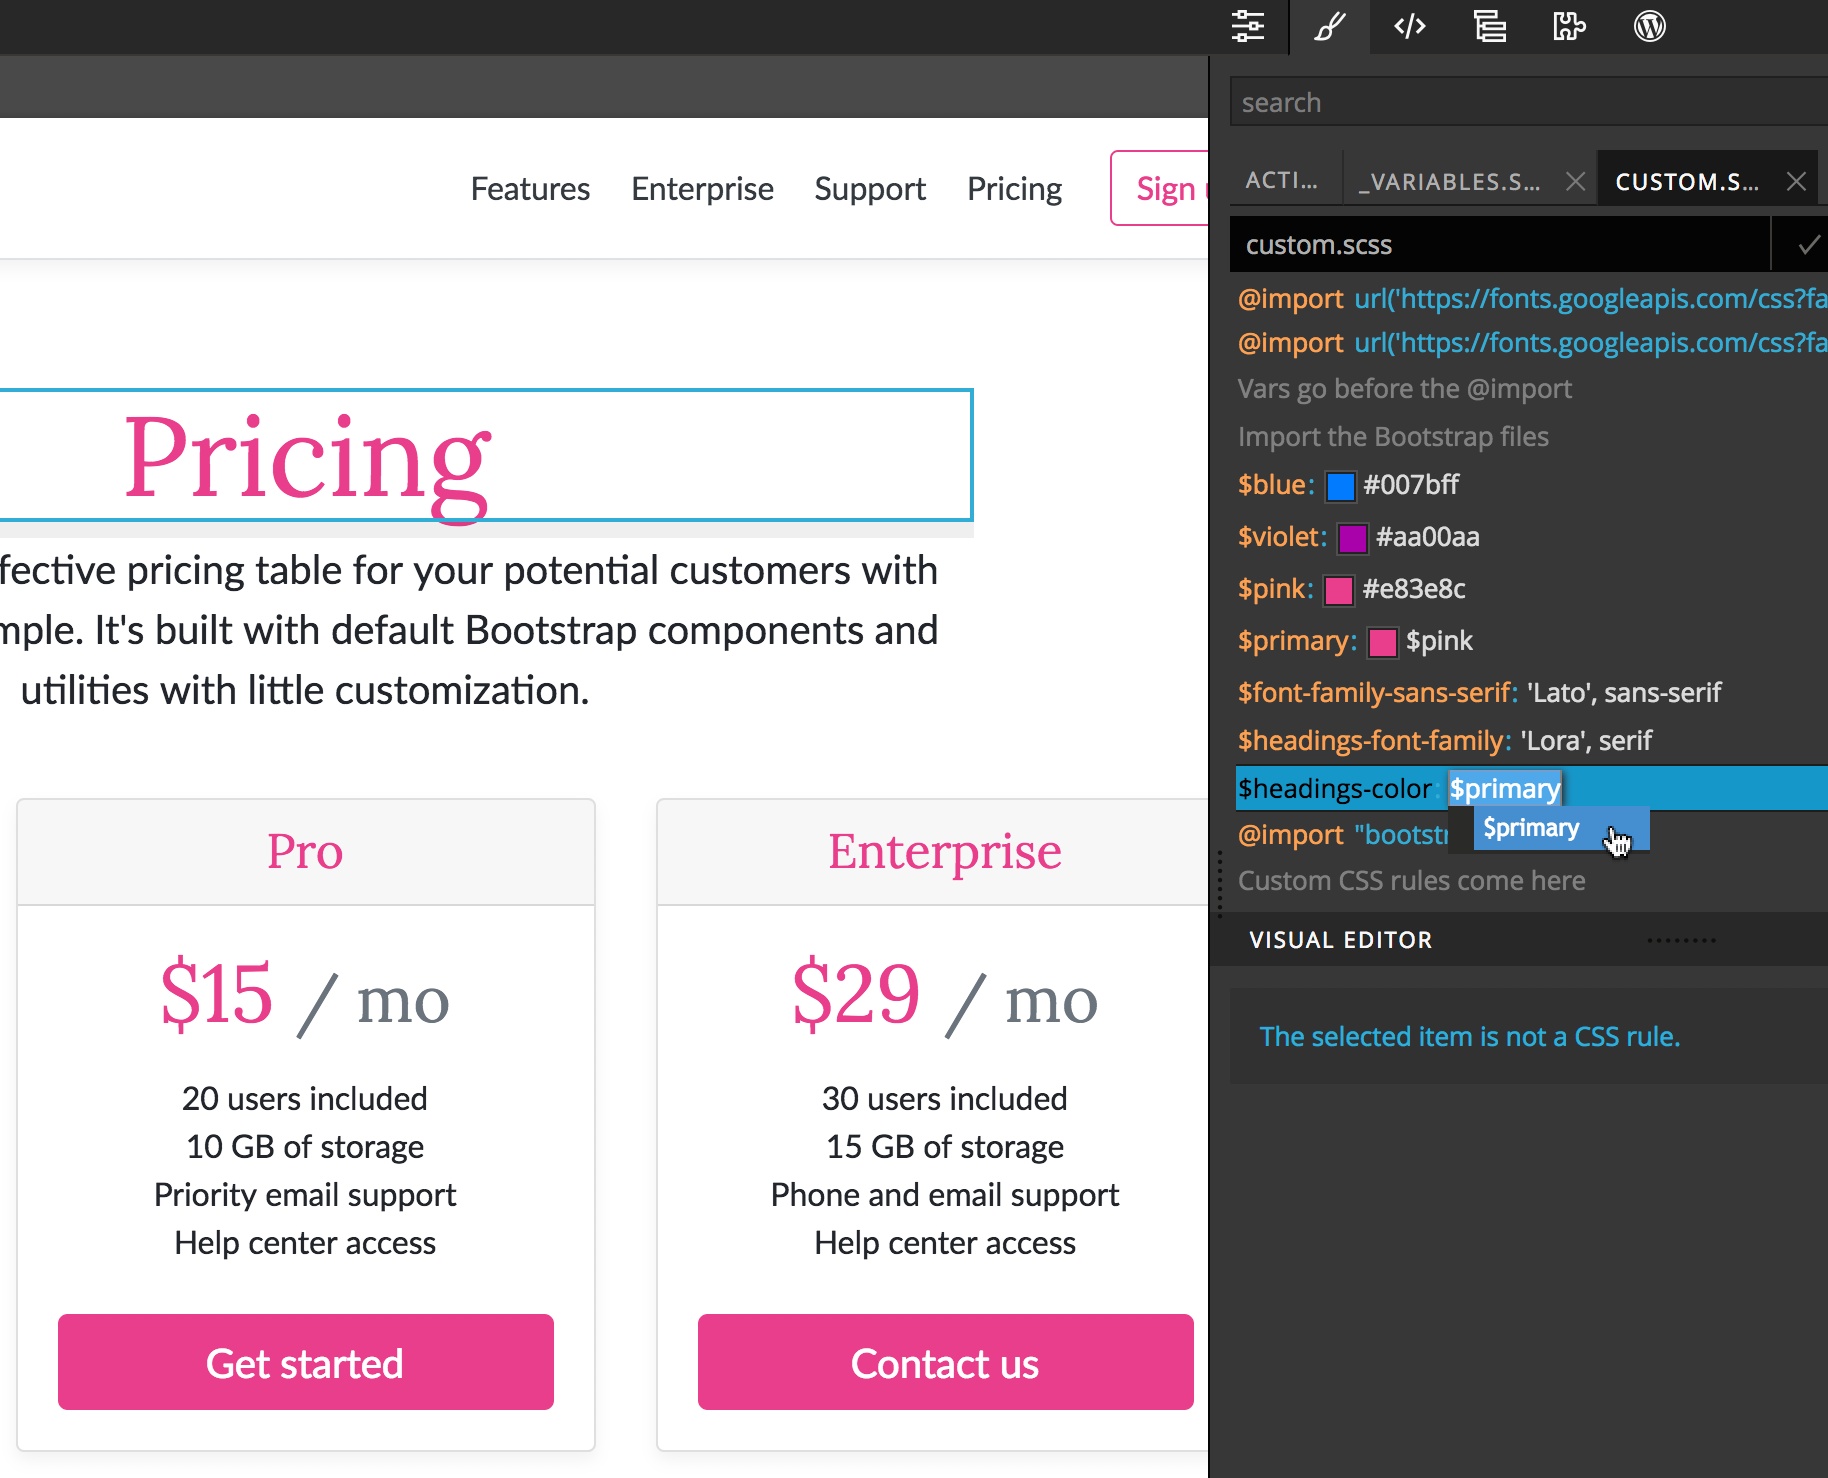
We can also change the headings color by customizing the $headings-color (type “headings” in search) variable and setting its value to $primary.
Adding custom CSS rules
What to do if there’s no Bootstrap variable to achieve what we need?
For example, let’s say we want to add a slight text shadow to H1 headings?
There’s no Bootstrap variable that controls that. But we can simply create a new CSS rule for that.
Let’s select the heading on the page and in Active style tab click on the Create button.
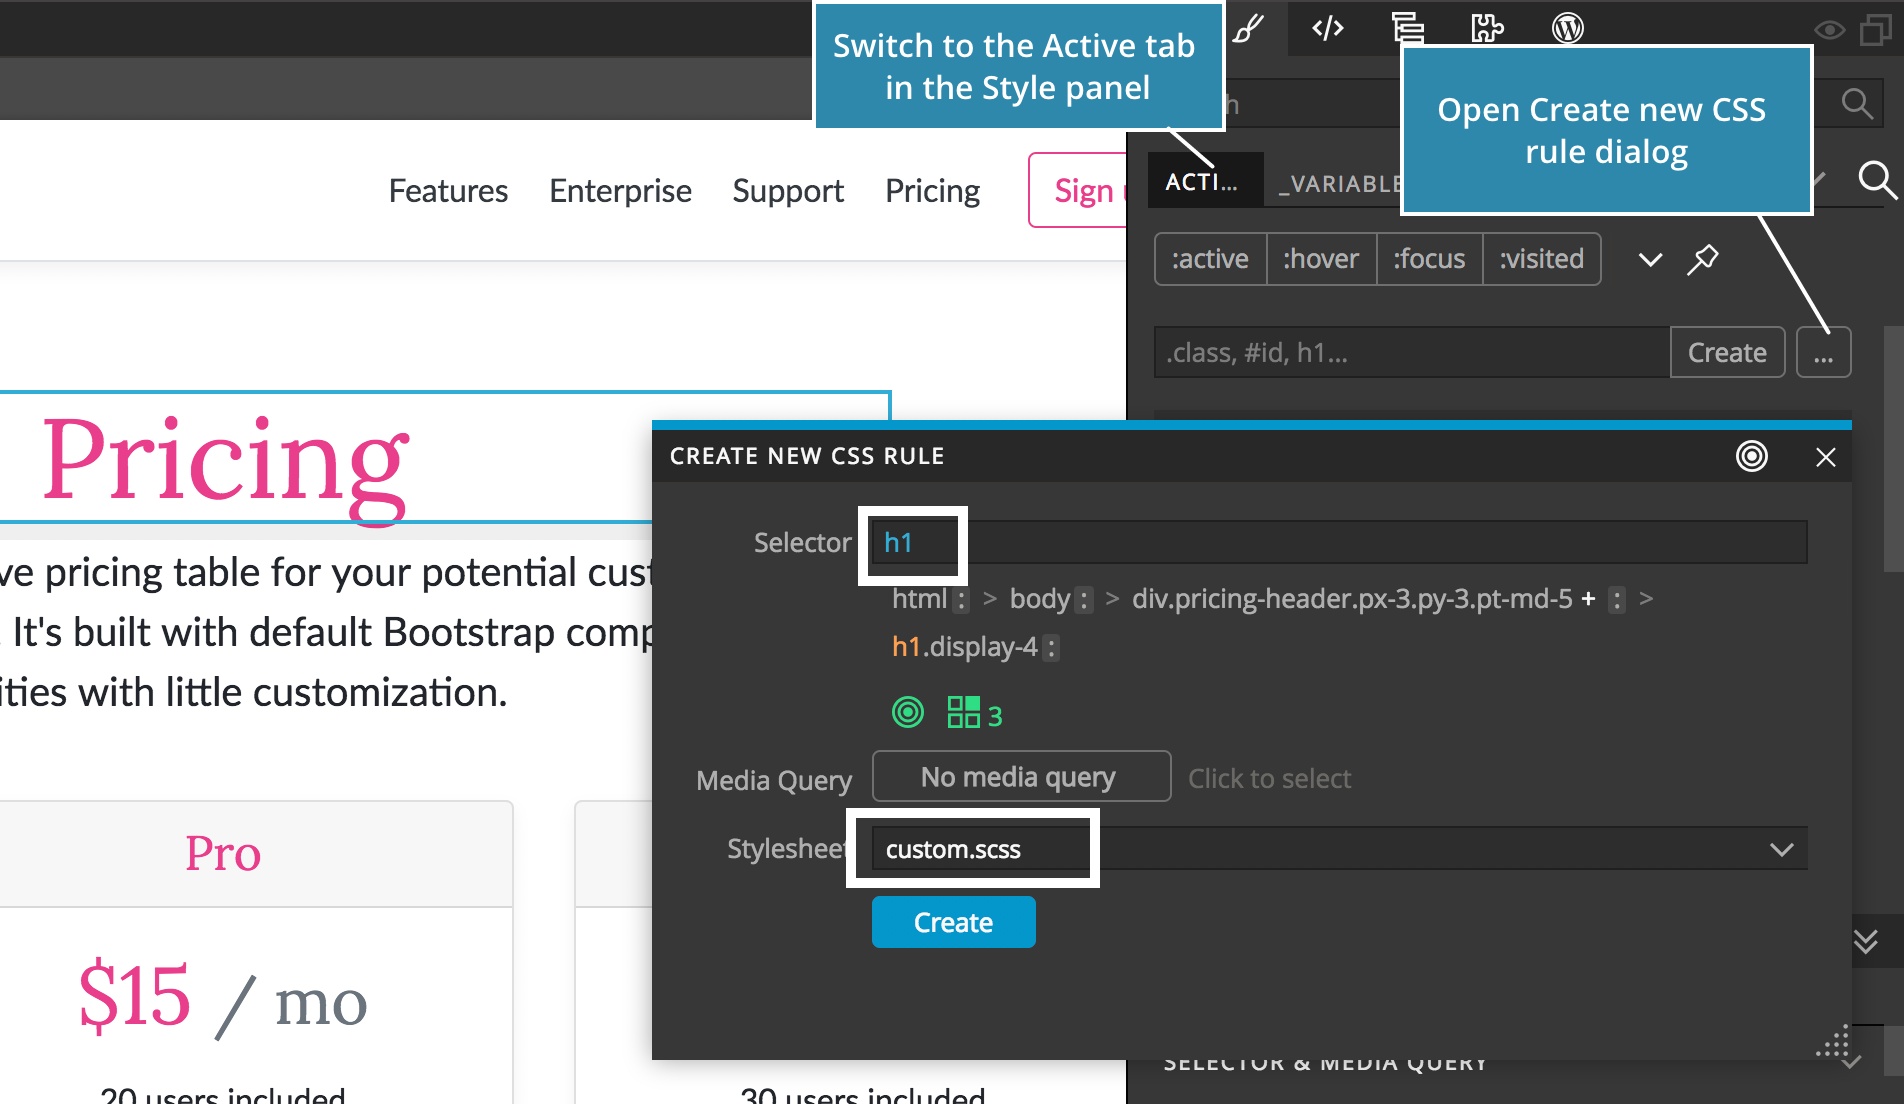
In the Selector maker we click on h1 and choose custom.scss as the destination stylesheet for the new CSS rule.
We click Create and then go down to Shadows in the Visual CSS editor to set up our text shadow.
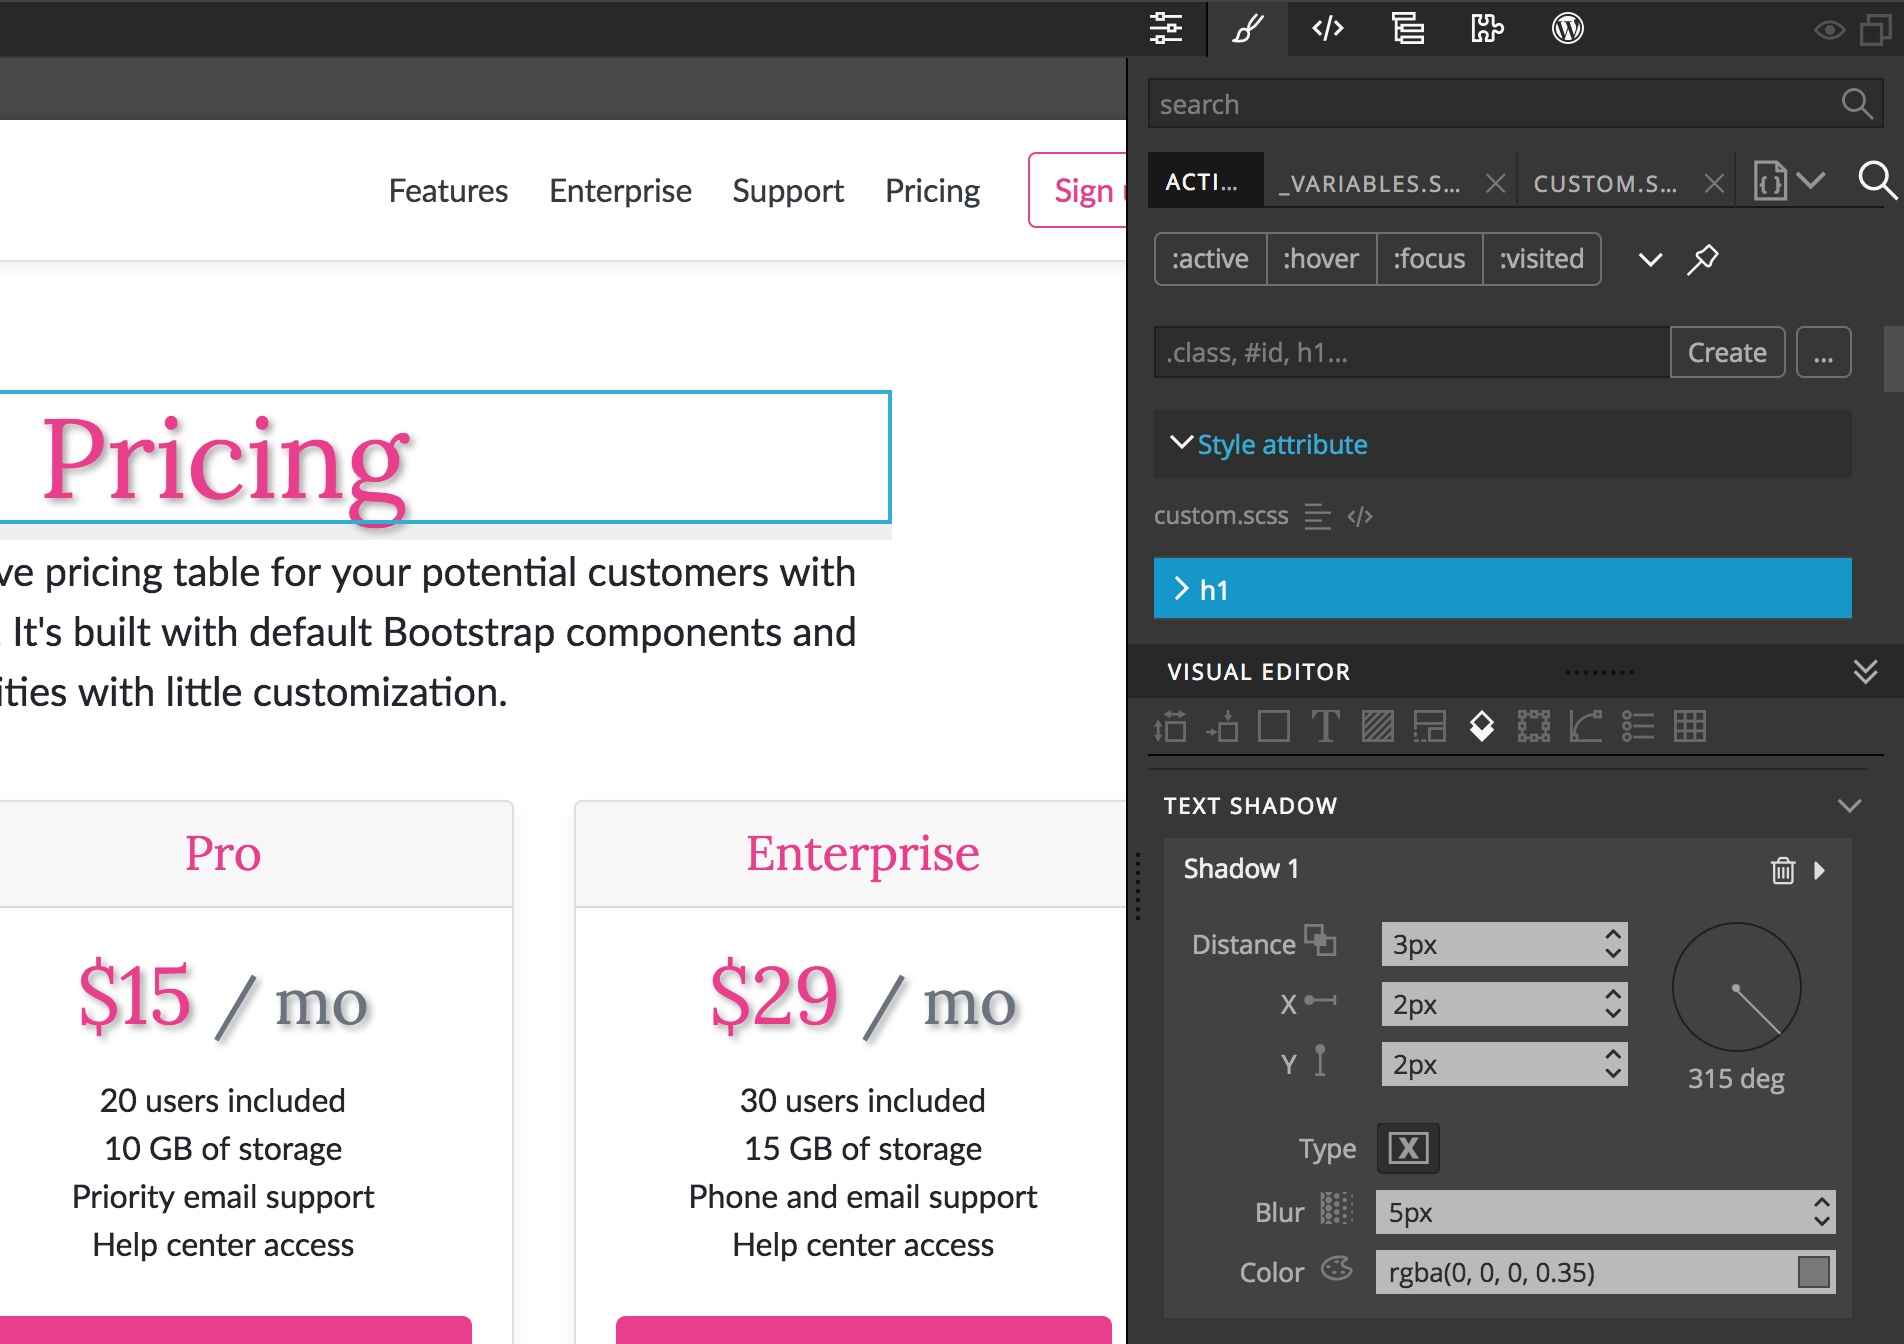
And there it is on the page.
In this was we can create unique Bootstrap-based designs by customizing Bootstrap variables and by adding our own CSS rules.
Working with existing SASS themes
One more situation to cover:
In this guide we were customizing the SASS source files that were created with Page -> Customize Bootstrap Theme feature.
What if we already have our custom SASS structure in place?
No problem. In that case, we don’t use “Page -> Customize Bootstrap Theme”. Instead we just tell Pinegrow where it can find SASS sources for bootstrap.css (or any other CSS stylesheet that is used on the page).
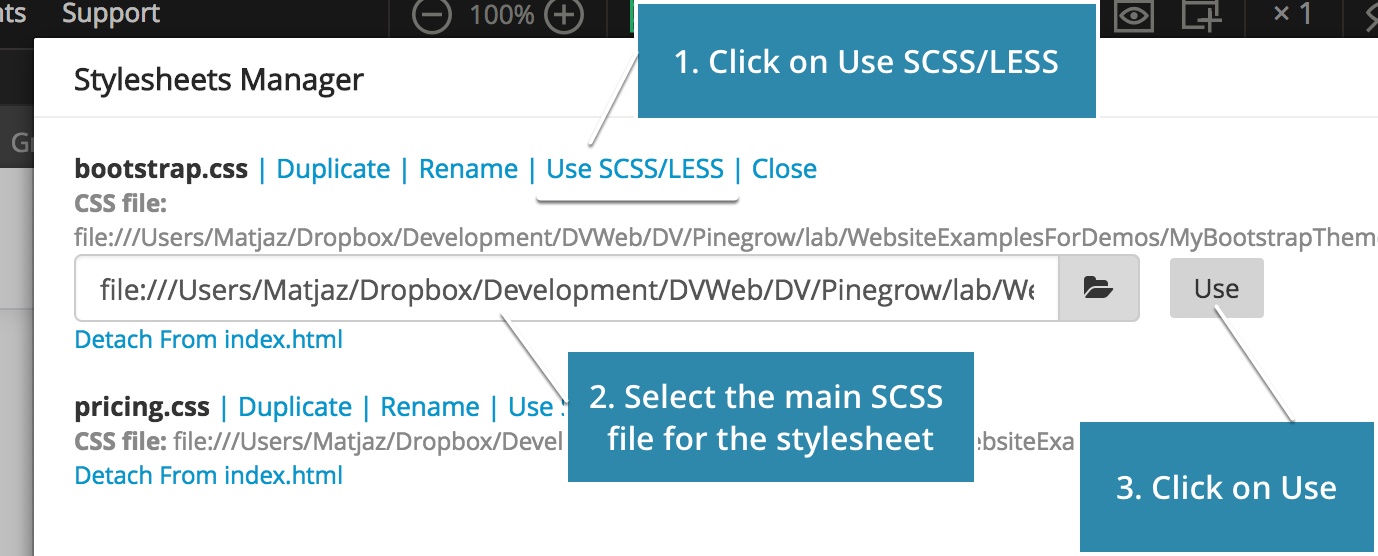
We do that by opening the “Page -> Manage Stylesheets”:

There we click on “Use SCSS link” next to the stylesheet. Then we select the main SASS file. Pinegrow will load all the SASS files and we can start editing it just as we described it above.
This approach works with any SASS-based project, not just with Bootstrap. We can use the same features to customize variables and SASS rules there as well.
That’s it.
Hope you enjoyed this short tutorial. We’re working on making Bootstrap customization – and other web creation features – even smarter. So stay in touch.