If you want to create your own WordPress theme with Pinegrow PRO/WP but you do not yet have all the necessary knowledge OR if you simply want to optimize your process and start from a solid foundation and focus on the essentials, using the ST2 is the best opportunity to get started quickly and efficiently.
This documentation is also available on the Github project page here: https://github.com/Pinegrow/PGWPBootstrap4StarterTheme/wiki
The demonstration site is available at the following address: https://st2demo.pinegrow.com/
The WooCommerce 4.2.2 demonstration shop is visible at the following address: https://st2demo.pinegrow.com/shop/
Preliminaries
The WordPress Starter Theme 2 (ST2) is a foundation/framework for quickly developing your own custom themes.
The ST2 is based on Bootstrap 4.x, with a complete set of WordPress common templates and support for Jetpack & WooCommerce.
- The WordPress Starter Theme 2 is not an update of the previous version (1.2) but a totally new version.
- The WordPress Starter Theme 2 requires Pinegrow PRO with WordPress builder, it will not work without it.
If this is the very first time you try Pinegrow WordPress Theme builder, we advise you to watch our video course Pine Adventures – Creating a WordPress Theme Without PHP Coding as well as read our document Ten Points for Productive WordPress Development with Pinegrow.
Introduction
If you want to create your own WordPress theme with Pinegrow PRO/WP but you do not yet have all the necessary knowledge OR if you simply want to optimize your process and start from a solid foundation and focus on the essentials, using the ST2 is the best opportunity to get started quickly and efficiently.
Although we recommend that you start with the default settings before embarking on more complex developments, the use of the ST2 is absolutely not fixed to its basic layout and WordPress actions which are integrated by default.
We invite you to transform the layout of the default templates, add new ones, add or modify WordPress action settings, customize CSS styles, add or remove snippets from custom.php files and more in order to create a theme that perfectly matches your needs & expectations.
Table of Content
- Pinegrow WordPress Starter Theme 2 Basics
- Discover the ST2 templates
- How-to use SASS to customize Bootstrap 4 within the ST2
- How to add CSS styles to customize the ST2?
- How-to Easily Hide Widget Title with the ST2
- How-to add code snippets to the ST2 functions.php?
- WooCommerce integration details
- Contact Form 7 integration details
- Why and How-To customize the Theme Text Domain?
- Editing WordPress template parts
- How-To translate the ST2?
- FAQ
- More to come soon.
Editing Pinegrow WordPress Starter Theme 2 Basics
Preliminaries
If this is the very first time you try Pinegrow WordPress Theme builder, we advise you to watch our video course Pine Adventures – Creating a WordPress Theme Without PHP Coding as well as read our document Ten Points for Productive WordPress Development with Pinegrow.
We strongly advise you to watch the following video tutorial.
JULY 2020 UPDATE: We prepared a directly usable version of Starter Theme 2, in the form of a 100% pre-configured site archive (packed with structure, content, examples and more…) to be used immediately on your computer through the use of the free and multi-platform (mac/win/linux) Local.app Lightning application.
Read more about it: https://pinegrow.com/tutorials/learn-wordpress-development-with-the-pinegrow-starter-theme-2/
If this is the first time you try the ST2, before taking any further action, we advise you to read the following instructions below:
- Setup a clean local WordPress instance on your computer.
- Import the WordPress theme unit content.
- Clone the theme test data file themeunittestdata.wordpress.xml from the GitHub repository https://github.com/WPTRT/theme-unit-test Or Download a copy from https://raw.githubusercontent.com/WPTRT/theme-unit-test/master/themeunittestdata.wordpress.xml
- Import test data into your WordPress install by going to Tools => Import => WordPress
Select the XML file from your computer - Click on “Upload file and import”.
- Under “Import Attachments,” check the “Download and import file attachments” box and click submit.
- Settings -> General: set the Site Title to something fairly long, and set the Tagline to something even longer. These settings will facilitate testing how the Theme handles these values.
- Settings -> Reading: set “Blog pages show at most” to 5. This setting will ensure that index/archive pagination is triggered.
- Settings -> Discussion: enable Threaded Comments, at least 3 levels deep. This setting will facilitate testing of Theme comment list styling.
- Settings -> Discussion: enable Break comments into pages, and set 5 comments per page. This setting will facilitate testing of Theme paginating link markup/styling.
- Settings -> Permalinks: ensure that a non-default permalink setting is selected, e.g. “Month and name”. This setting will facilitate stepping through the Theme Unit Tests.
- Install & configure the WooCommerce plugin (Plugins>Add New>) + import the dummy content.
WooCommerce is a free eCommerce plugin that allows you to sell anything, beautifully. Built to integrate seamlessly with WordPress, WooCommerce is the world’s favorite eCommerce solution that gives both store owners and developers complete control. - Install the Widget Logic plugin.(Plugins>Add New>)
This plugin gives every widget an extra control field called “Widget logic” that lets you control the pages that the widget will appear on. The text field lets you use WP’s conditional Tags, or any general PHP code. - Install the Contact Form 7 plugin .(Plugins>Add New>)
Contact Form 7 can manage multiple contact forms, plus you can customize the form and the mail contents flexibly with simple markup. The form supports Ajax-powered submitting, CAPTCHA, Akismet spam filtering and so on.
Download, Setup and first Export the ST2
Now that your local WordPress instance is installed and properly configured, it’s time to take a look at the ST2.
- Download or Fork the project from Github.
- Open the project in Pinegrow PRO/WP.
- From the project view, you can already open the different HTML templates to take a look at the content. You will learn a LOT by studying the content of the templates.
- From the project view, load index.html.
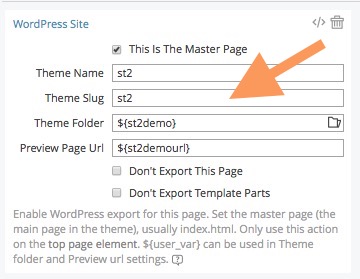
- From the WordPress site action (available from the top node of the document) change the Theme folder and the Preview Page Url to fit your own settings.(you can even define user variables from Pinegrow settings).
IMPORTANT Don’t change the theme name and theme slug yet. This part will be evocated later.
- Save the document, Pinegrow will ask you to export the theme to your theme folder, just proceed.(WordPress menu > Export Theme)
Configure and test the ST2
It is now time to configure and test the ST2 to fully understand the default behavior.
Note: This behavior may of course be modified or altered by you in the future.
- From the Dashboard of the local WordPress instance, activate the ST2. (Appearance>Themes>Activate button)
- Click on the Customize button so you can start to play with some cool settings:
- ST2 Theme Settings: Select if you want a sidebar on the right or the left (not both currently)
- ST2 Header Settings: Select if you want to activate the display of the global Jumbotron (+ select the background color/image, Text color …)
- ST2 Footer Settings: Enter the content of the footer (Entering HTML tags like links is allowed)
- Site Identity: Choose a logo, enter your website name, tagline and site icon.
- Colors: Set a background color for the whole website.
- Background image: Set a background image for the whole website.
- Menu: Create or Select a primary menu for your website.
- Widgets: Populate your sidebars with widgets.
- Hero Slider: Place two or more widgets here and they will slide! (using Bootstrap and other custom HTML markup through the Custom HTML widget is a good solution)
- Hero Canvas: Full size canvas hero area. (using Bootstrap and other custom HTML markup through the Custom HTML widget is a good solution)
- Top Full: Full top widget with dynamic grid.
- Right Sidebar: Right Sidebar widget area.
- Left Sidebar: Left Sidebar widget area.
- Bottom Full: Full bottom widget with dynamic grid.
- Homepage Settings: Choose what’s displayed on the homepage of your site. (leave the default settings for the moment)
- WooCommerce: Misc WooCommerce settings. (Read WooCommerce documentation)
- Additional CSS: You can add your own CSS code here to customize the appearance and layout of your site. Of course, the best solution is to define all the rules from Pinegrow, directly in your theme files.
Discover the ST2 templates
Standard WordPress templates
Click on the links to check the role & official WordPress documentation of the following templates.
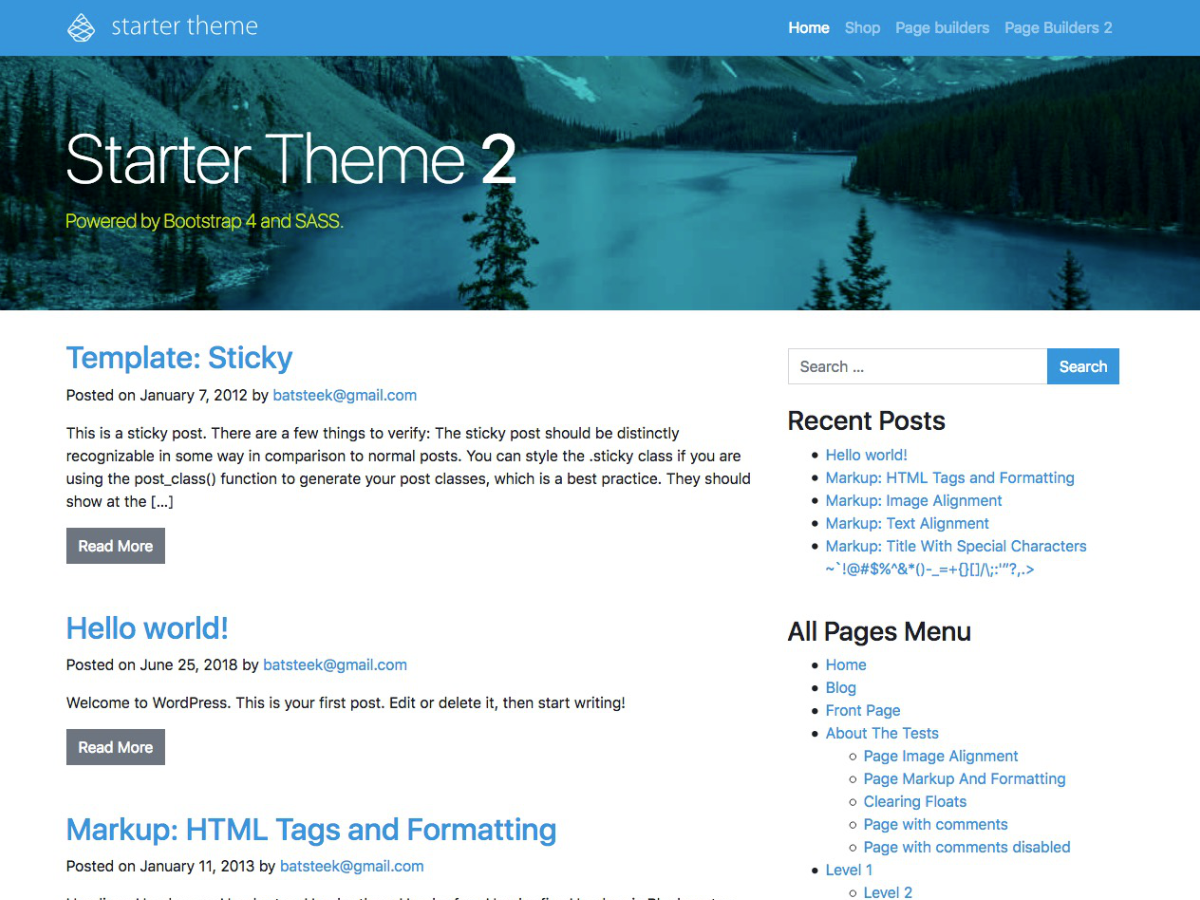
- index.html > Exported to index.php. (See the demo: https://st2demo.pinegrow.com/)
- single.html > Exported to single.php. (See the demo: https://st2demo.pinegrow.com/hello-world/)
- page.html > Exported to page.php. (See the demo: https://st2demo.pinegrow.com/sample-page/)
- 404.html > Exported to 404.php. (See the demo: https://st2demo.pinegrow.com/404)
- archive.html > Exported to archive.php. (See the demo: https://st2demo.pinegrow.com/2013/01/)
- search.html > Exported to search.php. (See the demo: https://st2demo.pinegrow.com/?s=world&submit=Search)
WooCommerce related template
- woocommerce.html > Exported to woocommerce.php. (See the demo: https://st2demo.pinegrow.com/shop/)
Custom page templates
- ST2 Page Without Sidebars: A specific page template that you can use if you don’t want sidebars on a particular page.
(See the demo: https://st2demo.pinegrow.com/page-without-sidebar/) - ST2 Page Builders Full Width: A page template that you can use with your page builder plugin (Elementor, Beaver builder …). The ST2 header and footer are visible.
(See the demo: https://st2demo.pinegrow.com/elementor-page-builder-full-width/) - ST2 Page Builders Canvas: Another page template that you can use with your page builder plugin (Elementor, Beaver builder …). The ST2 header and footer are not visible anymore and you can use the page builder plugin to build these parts.
(See the demo: https://st2demo.pinegrow.com/elementor-page-builder-full-canvas/) - ST2 Page WooCommerce: A specific page template that you can use on WooCommerce pages, if you don’t want sidebars on a particular page or if you want a specific design.
(See the demo: https://st2demo.pinegrow.com/cart/)
See also: Editing Template Parts
PHP templates
These templates are directly forked from the UnderStrap project.
- comments.php
- searchform.php > The template for displaying search forms.
- sidebar.php > Sidebar.php is required by WordPress core since version 3.0.0
Useful documentation
Discover the WordPress Template Hierarchy
How to use SASS to customize Bootstrap 4 within the ST2
The Pinegrow WordPress Starter Theme 2 (ST2) come with the Bootstrap 4 default design and layout but it can be fully customized to fit your needs and likings.
Theme Customizing Bootstrap is normally a bit complicated because it requires setting up the SASS compilation environment, installing Bootstrap SASS sources and creating a file structure for your custom theme.
But thanks to Pinegrow unique feature, it’s very simple and the ST2 is already pre-configured for Bootstrap 4 customization. (custom.scss is already included)
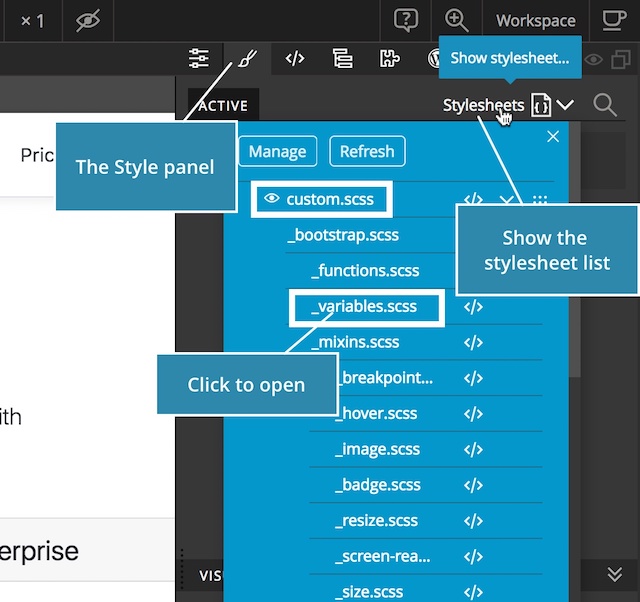
Please follow our documentation to learn more about the process: https://pinegrow.com/docs/bootstrap-visual-editor/customize-bootstrap-4-themes/
This documentation is also available as a Youtube video if you prefer to watch the action.
How to add CSS styles to customize the ST2
Beyond the customization of Bootstrap 4 components, you can also add new theme or WordPress CSS rules (non-Bootstrap related) directly into the theme.scss file.
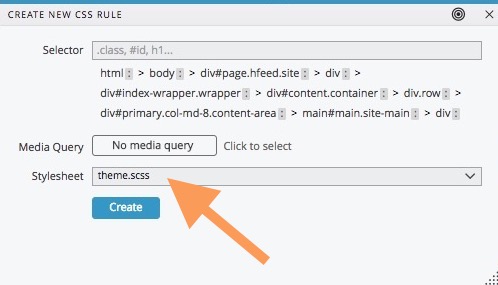
See Pinegrow documentation about How-To add or remove classes from elements
How to Easily Hide Widget Title with the ST2
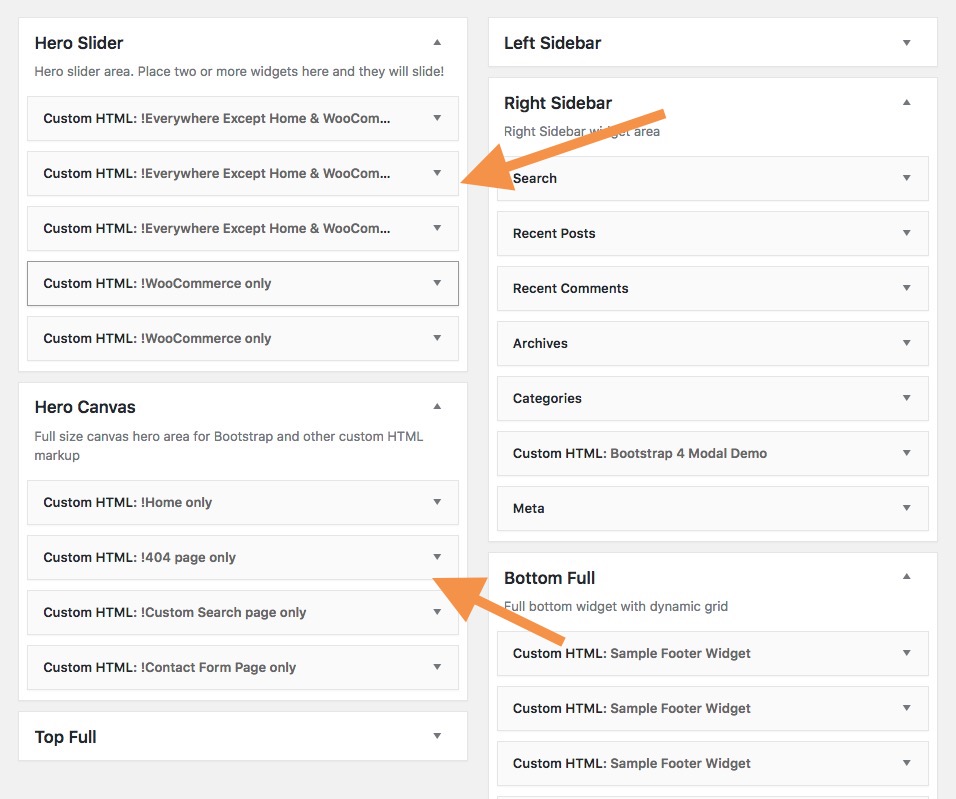
Hiding Widget titles can be useful if you plan to use more than one Custom HTML widgets on the same sidebar and set conditional display with the Widget Logic plugin.
Instead of viewing only “Custom HTML”, you can set specific titles which will remain invisible on the front-end.
Just enter the title with a ! before the title and it’s done.
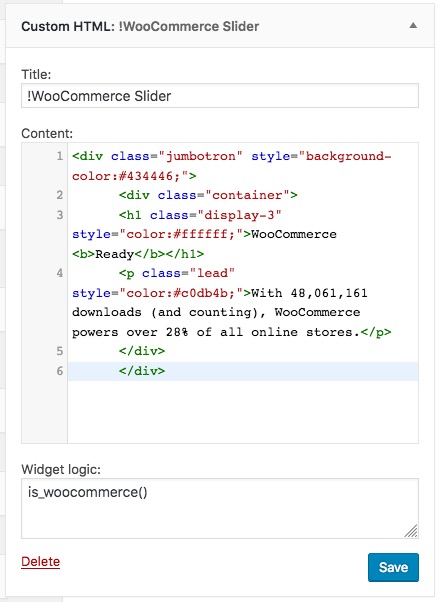
For example, if you plan to use the Hero slider at different location with different content, for example only on WooCommerce pages, you can add titles like:
!WooCommerce Slider 1, !WooCommerce Slider 2 and so on to your widgets.
Here is a screenshot of the current Widget settings on the Starter Theme 2 demo site:
How to add code snippets to the ST2 functions.php?
A standard process for adding custom features or functions to a WordPress theme is to add code snippets to functions.php.
With the ST2, in order to ease the maintenance and prevent errors with the PHP code auto-generated by Pinegrow during the theme export process, custom code snippets are added to the file inc>custom.php
To proceed, just open custom.php with Pinegrow or with your favorite editor, add your code snippets “et voila!”
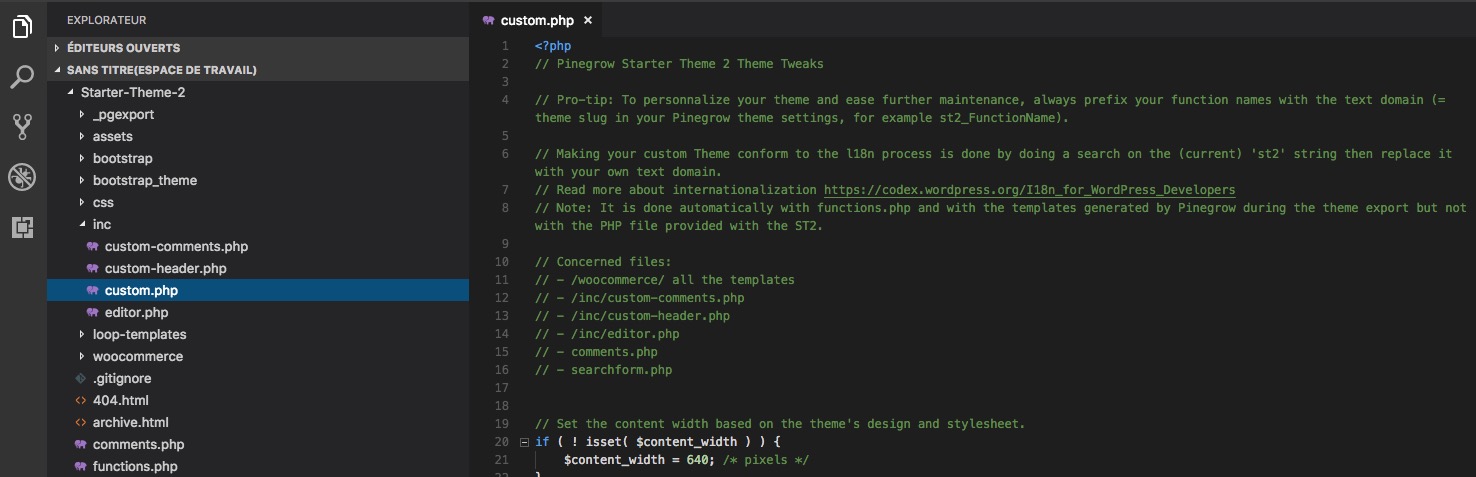
Note: You can analyze the current content of custom.php and you will find plenty of useful (and commented) functions!
WooCommerce Integration details
WooCommerce integration is based on the official WooCommerce documentation.
The ST2 make use of the woocommerce_content() inside a dedicated woocommerce.html template (which is exported as woocommerce.php) and a customized version of the WooCommerce templates parts (that uses bootstrap 4 styles) directly forked from the Understrap project.
IMPORTANT: While an easy catch-all solution, it does have a drawback in that this template is used for all WooCommerce taxonomies (product categories, etc.) and post types (product archives, single product pages) and using Hooks is high in the ST2 roadmap.
How-to tweak WooCommerce?
The specific (and Bootstrap customized) WooCommerce templates parts are available from the woocommerce folder.
IMPORTANT: There is currently no specific helper nor visual feature related to WooCommerce included within Pinegrow or in the ST2 so reading the official WooCommerce Documentation + hand coding is the only way to go if you want to really customize the look and feel of the different template parts.
This folder is a complete fork of the WooCommerce integration from the Understrap theme.
How-to customize WooCommerce General styles?
WooCommerce general styles are available from the woocommerce.scss file that you can edit/modify from Pinegrow.
Contact Form 7 integration details
Contact Form 7 plugin can manage multiple contact forms, plus you can customize the form and the mail contents flexibly with simple markup. The form supports Ajax-powered submitting, CAPTCHA, Akismet spam filtering and so on.
The ST2 make use of a specific SASS stylesheet in order to use existing Bootstrap 4 classes and variables to extend – override Contact Form 7 style.
You can edit the styles from bootstrap_theme>theme>_contact-form7.scss
This feature is directly forked from the UnderStrap project.
Contact Form 7 download and documentation is available HERE
Why and How to customize the Theme Text Domain
The theme TEXT DOMAIN is a very important part of the successful localization of your theme and Pinegrow handle most of the job when you export your theme.
IMPORTANT: the theme TEXT DOMAIN = the slug you have chosen for your theme from the WordPress Site settings
Because the ST2 also contain extra PHP templates, you will have to manually tweak a few files to make your theme fully conform and guidelines compliant.
This is done from your favorite code editor by doing a search on the ‘st2’ string (this is the current slug of the ST2) then replace it with your own Text Domain.(the slug you have chosen for your theme from the WordPress Site settings)
Example: A search on the string ‘st2’ in product-searchform.php from WooCommerce:
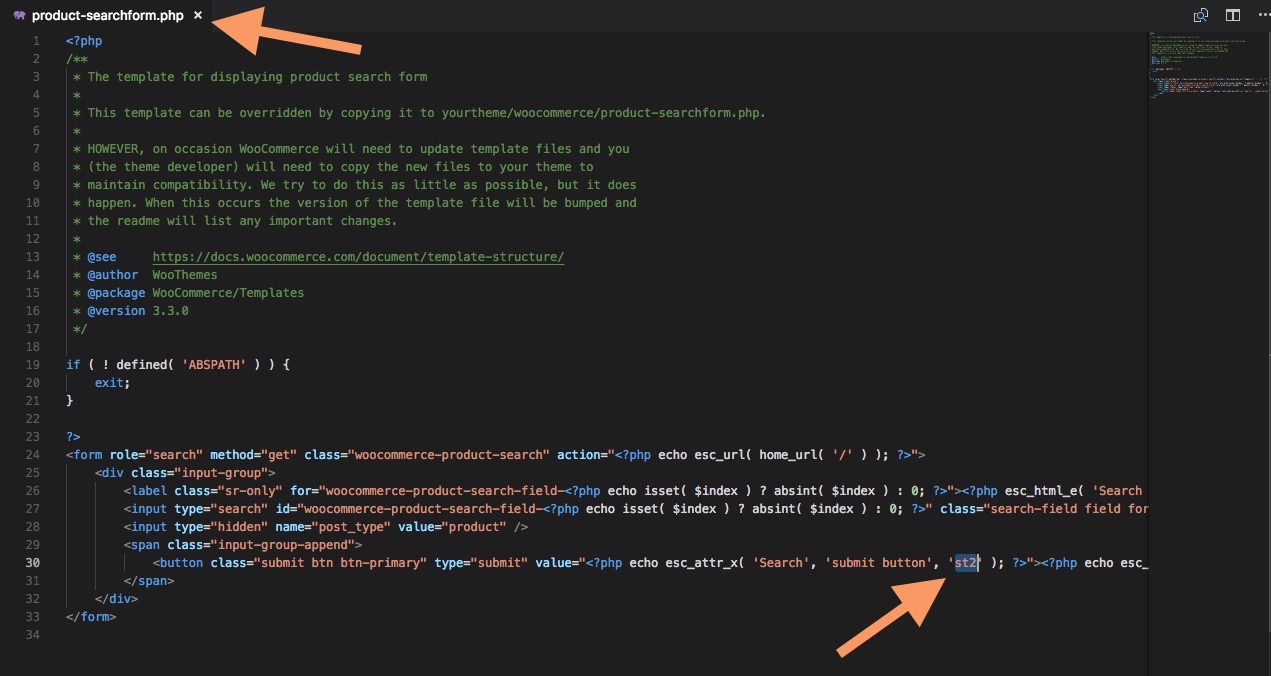
Concerned files:
- /woocommerce/ all the templates
- /inc/custom-comments.php
- /inc/custom-header.php
- /inc/editor.php
- comments.php
- searchform.php
IMPORTANT: Not all st2 strings are related to the TEXT DOMAIN and Function names are ALSO prefixed with the st2 TEXT DOMAIN (for example st2_FunctionName). It’s not mandatory (but it’s more professional) and it’s up to you to customize also the function names.
Read more about WordPress internationalization.
Editing WordPress template parts
In a WordPress theme, not all template files generate the entire content that will be rendered by the browser and some template files are pulled in by other template files such as comments.php, header.php, footer.php, sidebar.php and content-{$slug}.php.
Partials templates are a very convenient solution to optimize your theme development and reuse parts of your code in more than one common template.
The ST2 contain 7 partial templates that you can edit/tweak and each one is defined from an standard template.(then, exported as a separate file when the theme is EXPORTED to the local theme folder.)
- content-archive > archive.html
- content-page-builders > page-builder-canvas.html
- content-page-woocommerce > page-woocommerce.html
- content-page > page.html
- content-single > single.html
- content-woocommerce > woocommerce.html
- content-php > index.html
IMPORTANT: Because it was the source of many misunderstanding, we have not associated the Smart components feature to WordPress template parts like in the version 1.x of the Starter Theme.
Still, you are absolutely free to create your own library by following this documentation. (The document is created with Pinegrow 2.x but the process is EXACTLY the same with Pinegrow 4).
Read More about WordPress partial templates.
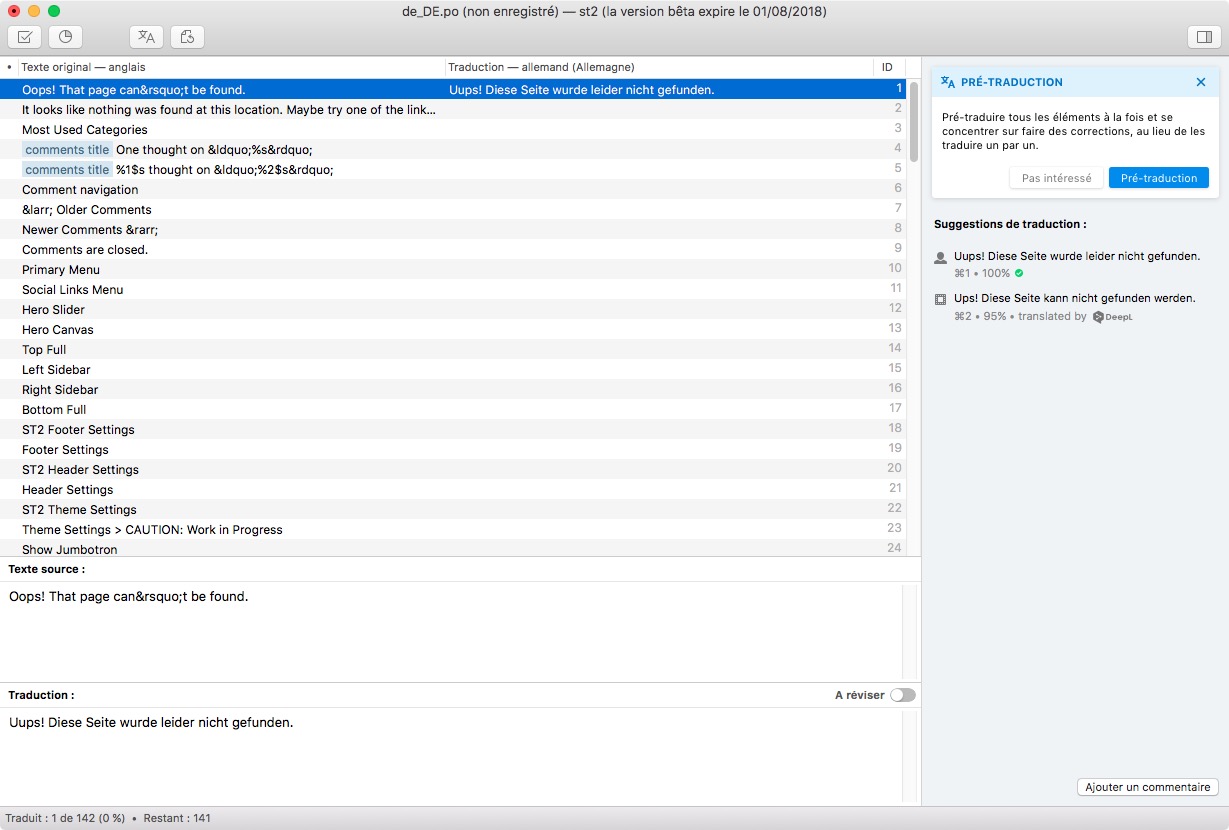
How to translate the ST2?
Like any theme created with Pinegrow, the ST2 is translation-ready and compliant with the WordPress localization guidelines.
IMPORTANT: Please read carefully our documentation: Why and How-to customize the Theme Text Domain before starting any translation job.
If you need to create a translation in your language, we highly recommend the use of Poedit Pro which includes a terrific WordPress translation feature and is known as “The fastest and most convenient way to translate apps & sites with gettext”.
Note: The application is available for Windows and Mac.
FAQ
Is it possible to upgrade a Starter Theme 1.x project to the Starter Theme 2 version?
No. The WordPress Starter Theme 2 is not an update of the previous version (1.2) but a totally new version.
By essence, if you work with our Starter Themes (version 1 or 2), any customized project is a totally unique project by itself and the result is not really the Starter Theme anymore:
- Default templates can be highly modified
- New templates can be added
- And a lot more tweaks can be done to fit your needs and likings
So proceeding to an upgrade would kill most of your changes.
However, for parts that are not meant to be customized when you design a new theme (like the Bootstrap source files), it is still possible to proceed to a selective fork of some very specific elements – when they are updated on the main project -.
What is the typical workflow if I decide to use the ST2?
- From Github, grab a copy of the last version of the project
- Start the customization
- Export your theme and check the results
- Iterate
- And that’s it.
Pro-Tip: It is a good idea to use a Git to keep tracks of all your changes
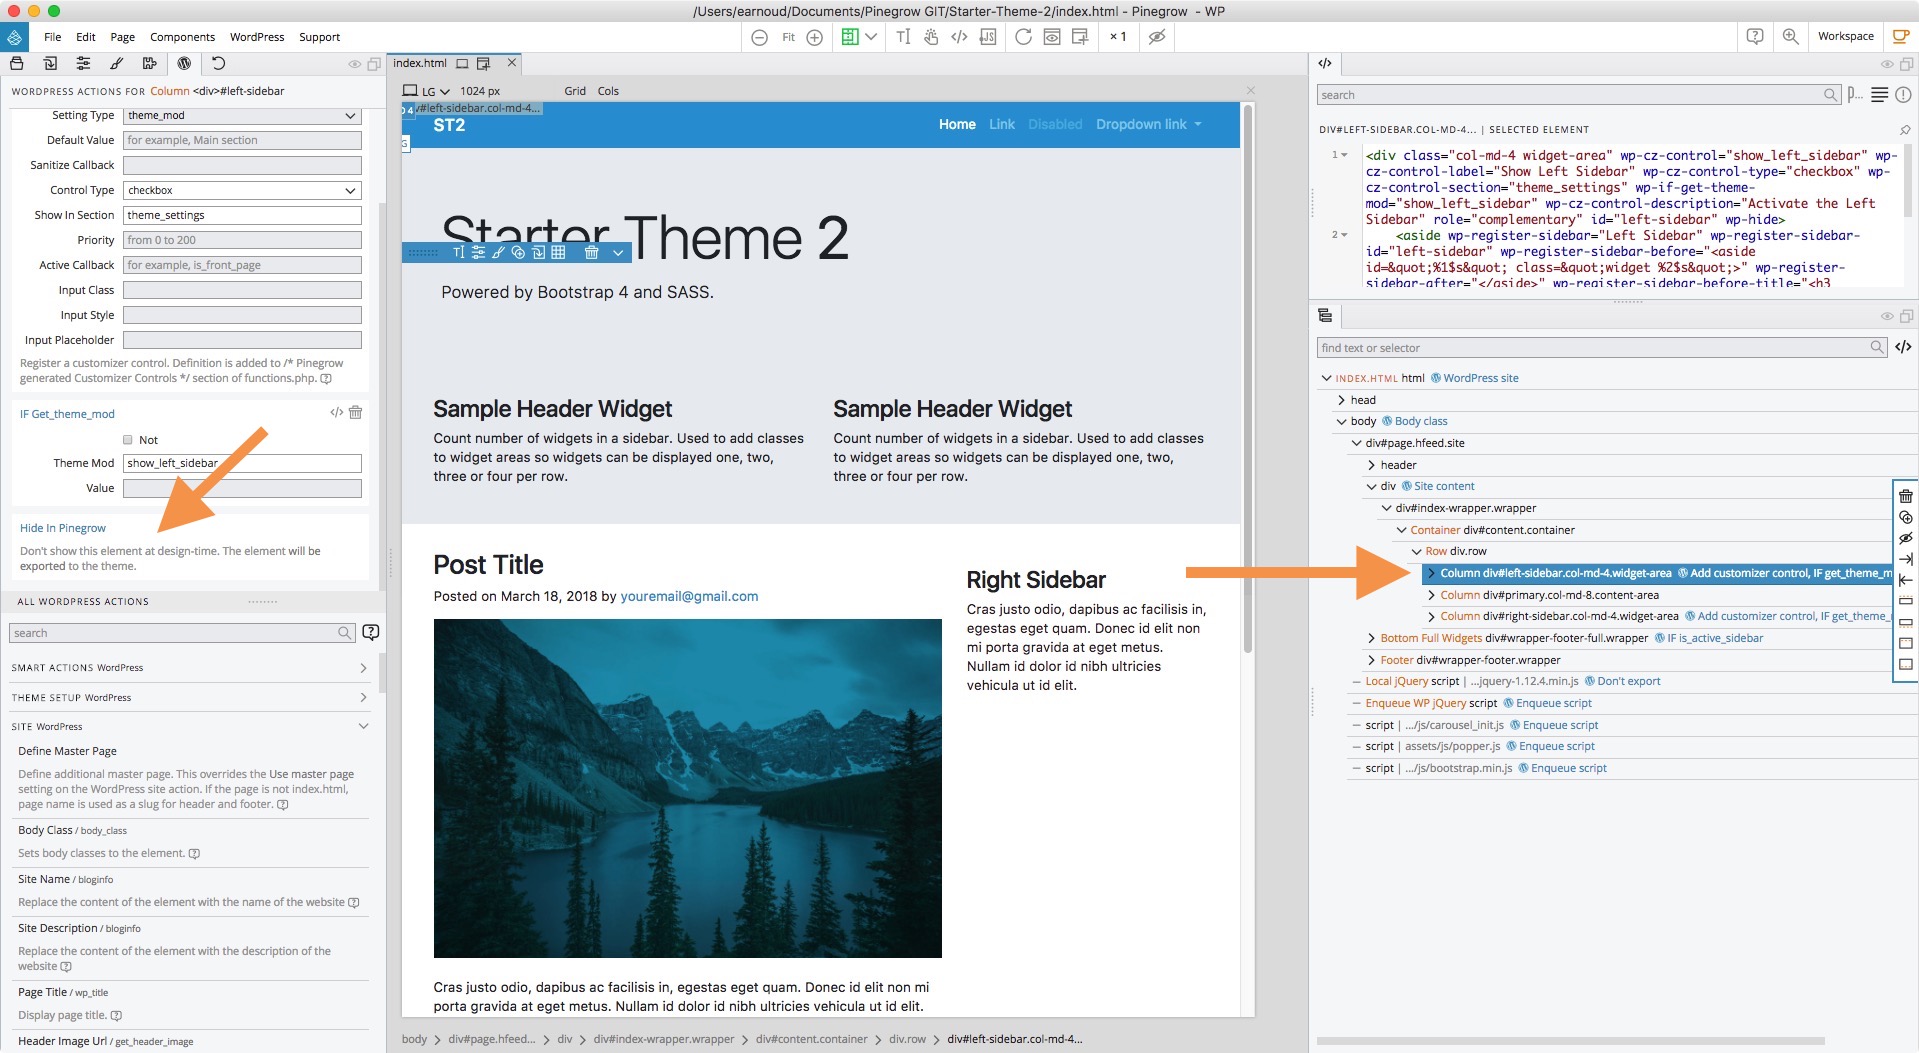
In Pinegrow, some important parts of the ST2 are not visible (hidden)! Why?
This is mainly for “design” reasons.
Because you design templates for the WordPress CMS, quite often, what’s on screen will depend on the user choice but still, you have to take care of all the cases. For example, if you offer the choice to display or not a specific element through the use of the WordPress customizer, you have to take care of both situations. (visible or not).
Because Pinegrow is a visual design tool, to prevent the chaos in your HTML templates, the Hide in Pinegrow action is very useful so you can display the most common case and hide the optional choices.
In the following screenshot, the left sidebar is not visible because the status Hide in Pinegrow is set.
What is the theme-settings.html template?
While Pinegrow WP offers a really convenient way to setup all the WordPress actions directly from your HTML templates, there comes times when a web developer needs a bit of organization in his workflow, not only because such an approach is cleaner, but also for maintenance and evolution purposes. It’s always a good idea to consider solutions that can definitely ease your job.
The theme-settings.html page is a configuration file that is not part of the theme but that serve to setup all the features that are not related to one specific template but to the whole theme like:
- Customizer sections
- Custom Post types
- And more ….
During the theme export, these settings end up in the functions.php file.
You can decide of any presentation you want, the settings page is not public and will not be viewed in a browser. It is just meant to provide you with a way to set and maintain your global theme settings from Pinegrow.
You can read our documentation about the Theme Settings page. (note: the documentation is created with Pinegrow 2.x but the process is EXACTLY the same with Pinegrow 4).
WordPress comes with jQuery, do I still have to enqueue the jQuery file manually from the master page template?
Please see the following screenshot:
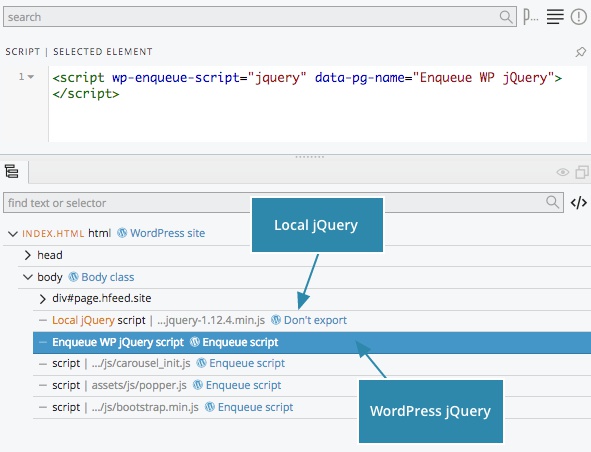
- For the “local” view of the HTML files, a local version of jQuery is loaded so you can see the result of your custom scripts BUT it is set to Don’t export so it’s not exported.
- For the export – because WordPress already includes a copy of jQuery – we use the smart and intended way so the WordPress jQuery is loaded.
Where did Body Class action go?
Since Pinegrow 4.6, Body class action is no longer required. Pinegrow auto-adds get_body_class on the body element.
From the WordPress customizer, all widgets are visible even if I use the Widget Logic plugin to define specific display conditions. Why?
From the WordPress customizer, all widgets are visible but the ones that should be hidden (per custom logic) are semi-transparent. This is done this way to better understand what widgets are in-use.
See Widget Logic support forum.
Can I sell a theme created with the ST2?
The WordPress Starter Theme 2 is distributed under the terms of the GNU GPL version 2 so the answer is a big YES, as long as you follow the GNU GPL version 2 license terms.
Do you offer some kind of support?
The ST2 being a free software, we’re unable to provide extensive support or step by step / custom instructions / guides about HTML and CSS, Bootstrap & and extended custom functionalities related to WordPress.
However, we take good note of all the questions/use case we receive at our Support Email and depending on the frequency of similar requests, we may publish specific tutorials on the project Wiki in the near future.
The ST2 being an open-source project, can I contribute to the code and provide fixes and/or features?
Absolutely!! See our Contribution Guidelines, Code of conduct and Issue Template.