Pinegrow Web Editor with WordPress theme builder lets you visually create and edit WordPress themes.
Introduction
WordPress theme builder is an add-on for Pinegrow Web Editor.
Pinegrow WP lets you convert static HTML pages into WordPress themes. You can convert existing HTML pages or build new ones from scratch.
How does it work?
Here’s a video of how WordPress theme can be developed from scratch in 20 minutes:
Pinegrow V2.xx is used in the following video. While the process is very similar with V2, V3 and V4, an updated version of this document presenting Pinegrow version 4 in action will be released shortly.(no ETA)
In short, the process is:
- Open or create the HTML version of the theme in Pinegrow.
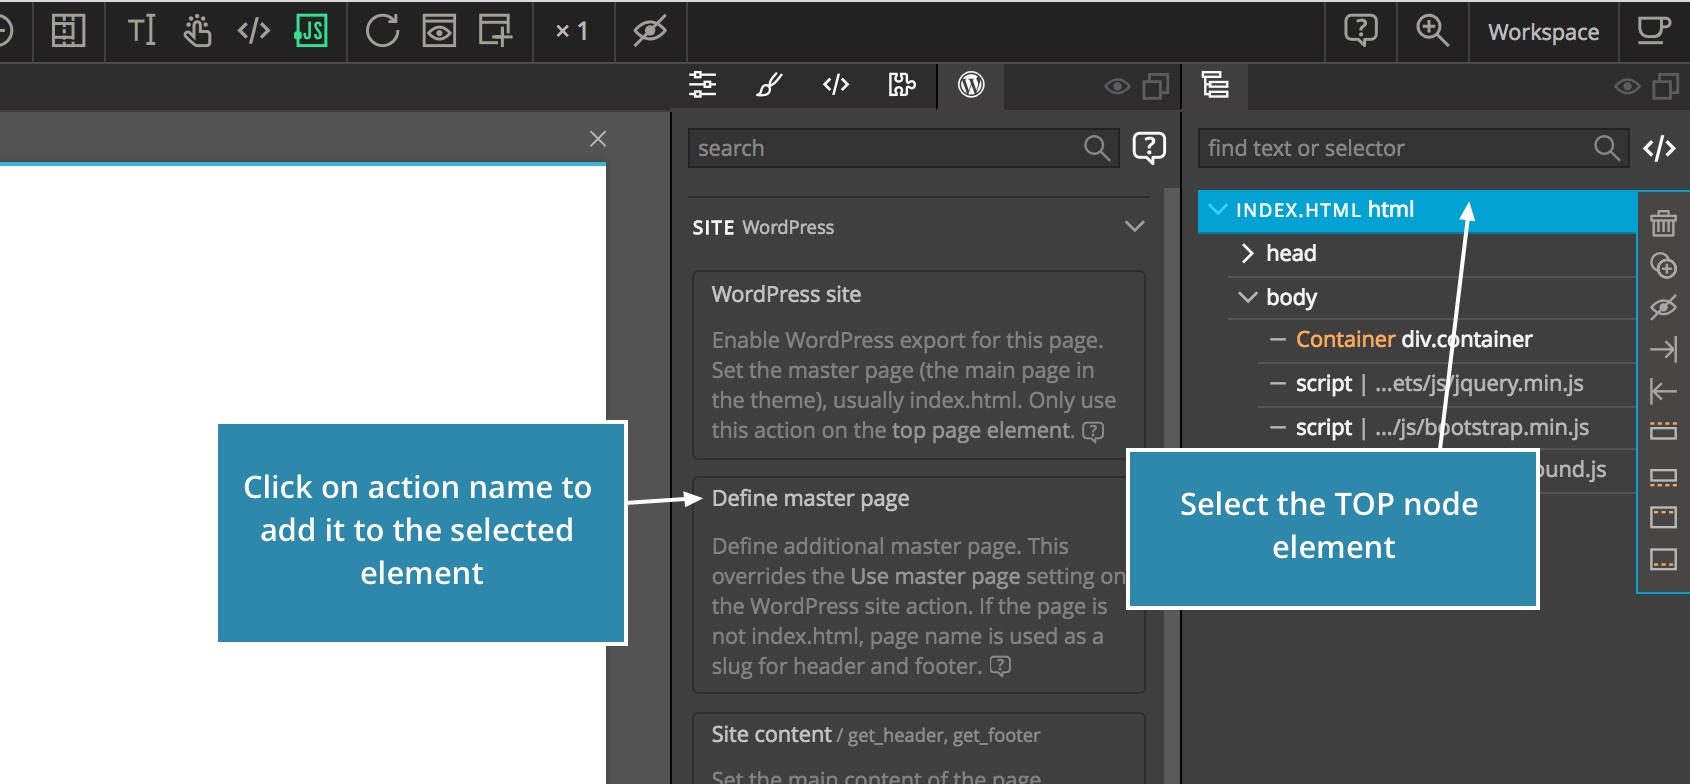
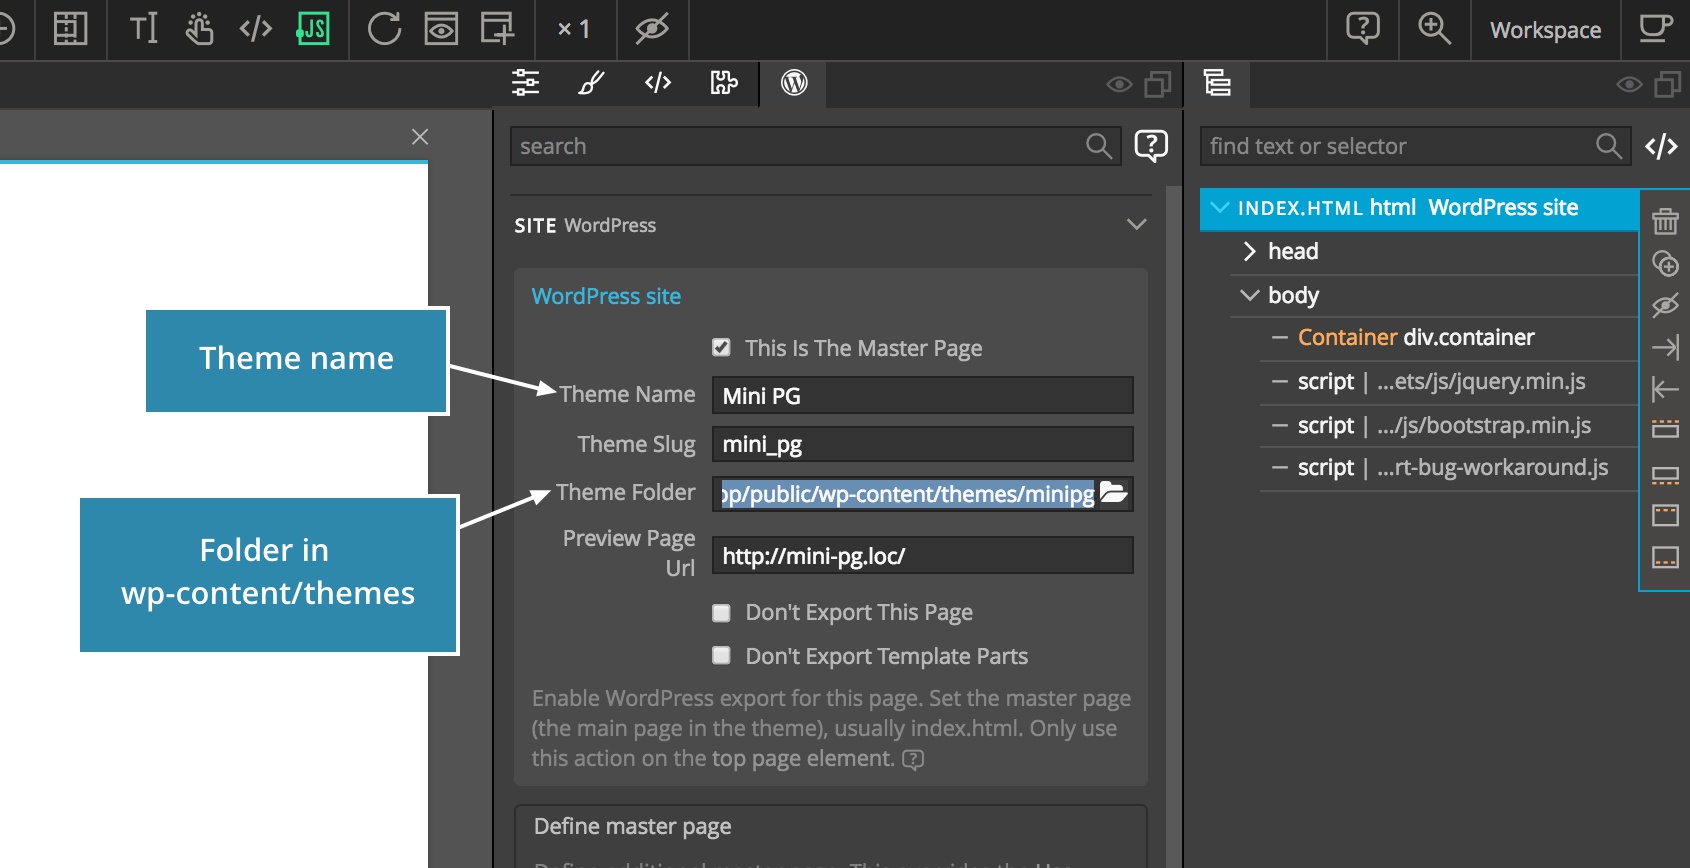
- Assign WordPress actions (tags) to HTML elements and set their parameters. This is done in WP panel. Actions and their parameters are encoded into wp-* attributes on HTML elements.
- Export the WordPress theme. Pinegrow generates PHP code and splits the page into various files like index.php, header.php, footer.php and template parts. Pinegrow also generates functions.php and style.css. These files are saved directly into theme’s folder in wp-content/themes. Source HTML files are saved as regular HTML files.
Most of WordPress template tags (more than 170) are implemented in Pinegrow. And you can also use WordPress plugins and custom PHP code.
Pinegrow WP can be used with or without frameworks. It is not tied to Bootstrap, Foundation or any other framework.
IMPORTANT: HTML file needs to be located in a folder. On Export Pinegrow copies all files in the folder where HTML file is located to the theme folder. This could cause problems if index.html file was located on Desktop or any other folder with lots of files and subfolders.
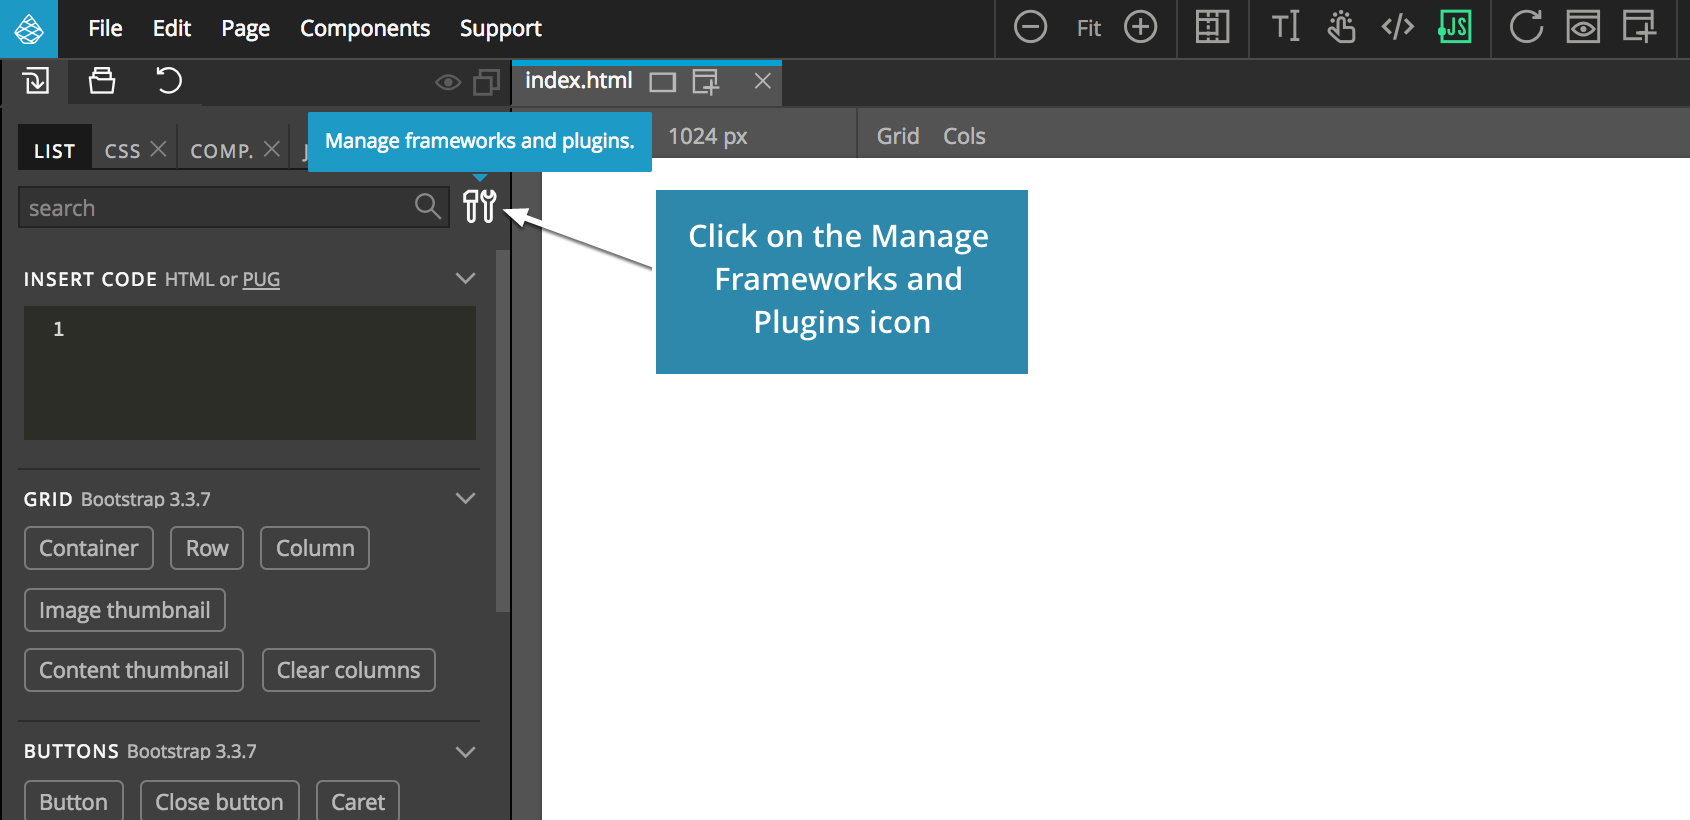
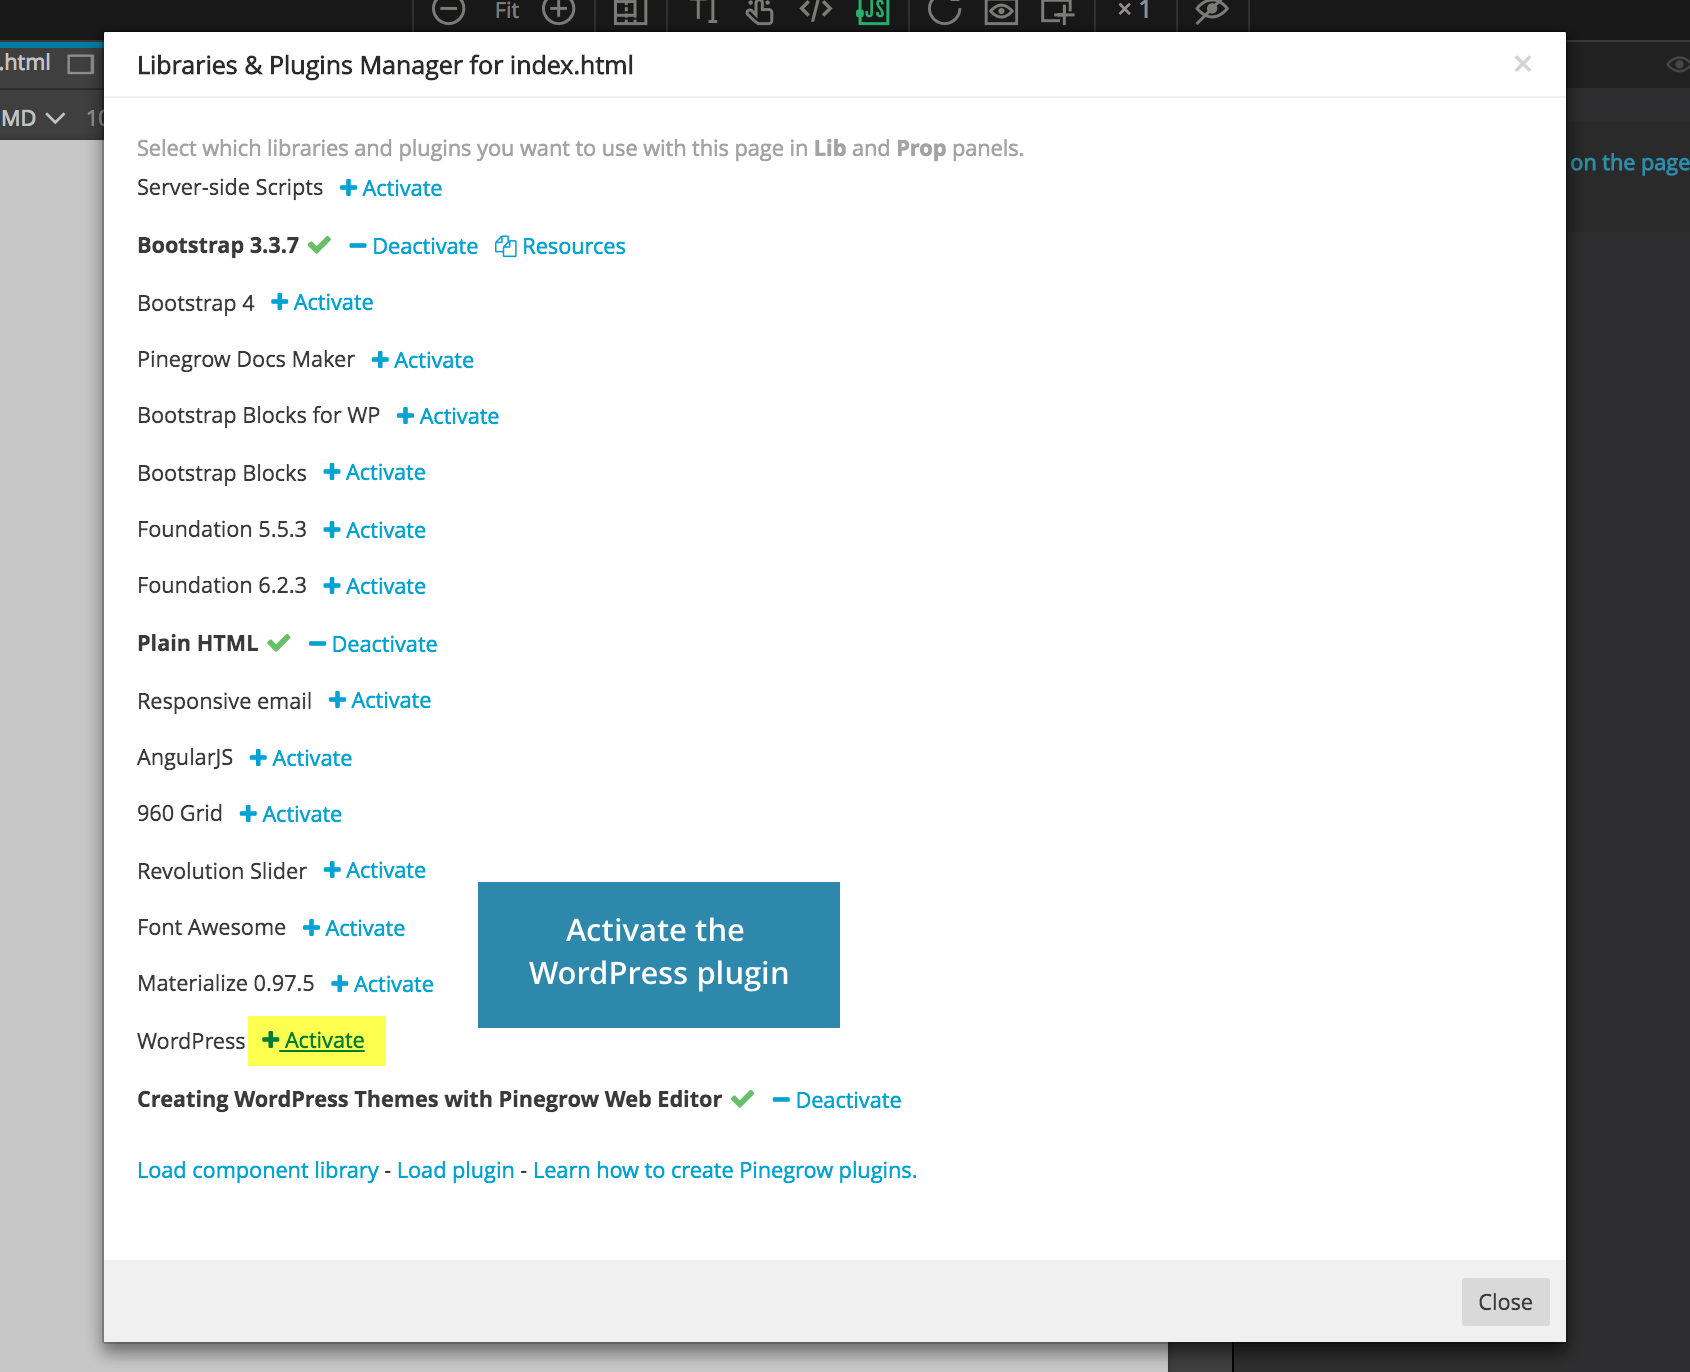
Activate the WordPress plugin for the page
File names
Names of source HTML files are mapped to exported PHP files. The content part of index.html will be exported as index.php, single.html as single.php and so on.
<file name>.html will be exported to <file name>.php.
Choosing the right name is important as templates name is the key to the proper functioning of your WordPress theme.
The WordPress template hierarchy is one of the most influential things in the life of theme developers. Users may need to understand it, plugins may need to interact with it, but generally it is theming that’s all about the template hierarchy.
That’s because it is the WordPress template hierarchy that determines which of the files in a theme is used at a given time. That is: the template hierarchy is the foundation upon which WordPress themers make their art.
Read more about templates name: https://wphierarchy.com/
The WP panel
Most of WordPress goodies are located in the WP panel. Select any element on the page to see the list of various WordPress actions that can be added to the selected element. Most actions are directly related to various WordPress template tags. Actions are grouped into sections.

Click on the action name to assign or remove it from the selected element:
Actions have parameters, some optional some required.
Assigned actions shows all actions of the selected element in one place so that you don’t have to navigate through action categories all the time.

Most actions have a Replace parameter for choosing what part of the element will be replaced by the generated PHP code. Choices are:
- Element – the whole element will be replaced by the PHP template tag
- Content – the content of the element will be replaced
- Href – href attribute of the element will be set
- Attribute – custom attribute will be set
The last two choices are only available on actions that output a URL.
Go ahead. Change the Replace parameter and see how that affects the generated PHP code.
Open the read-only PHP preview window with Actions -> Preview PHP code (CMD / CTRL + P) on the selected element.

The power of the Right click
Right-click on any action name in WP panel to insert ready-made WordPress elements into the selected element.
That’s the quickest way to build a WordPress theme from scratch.
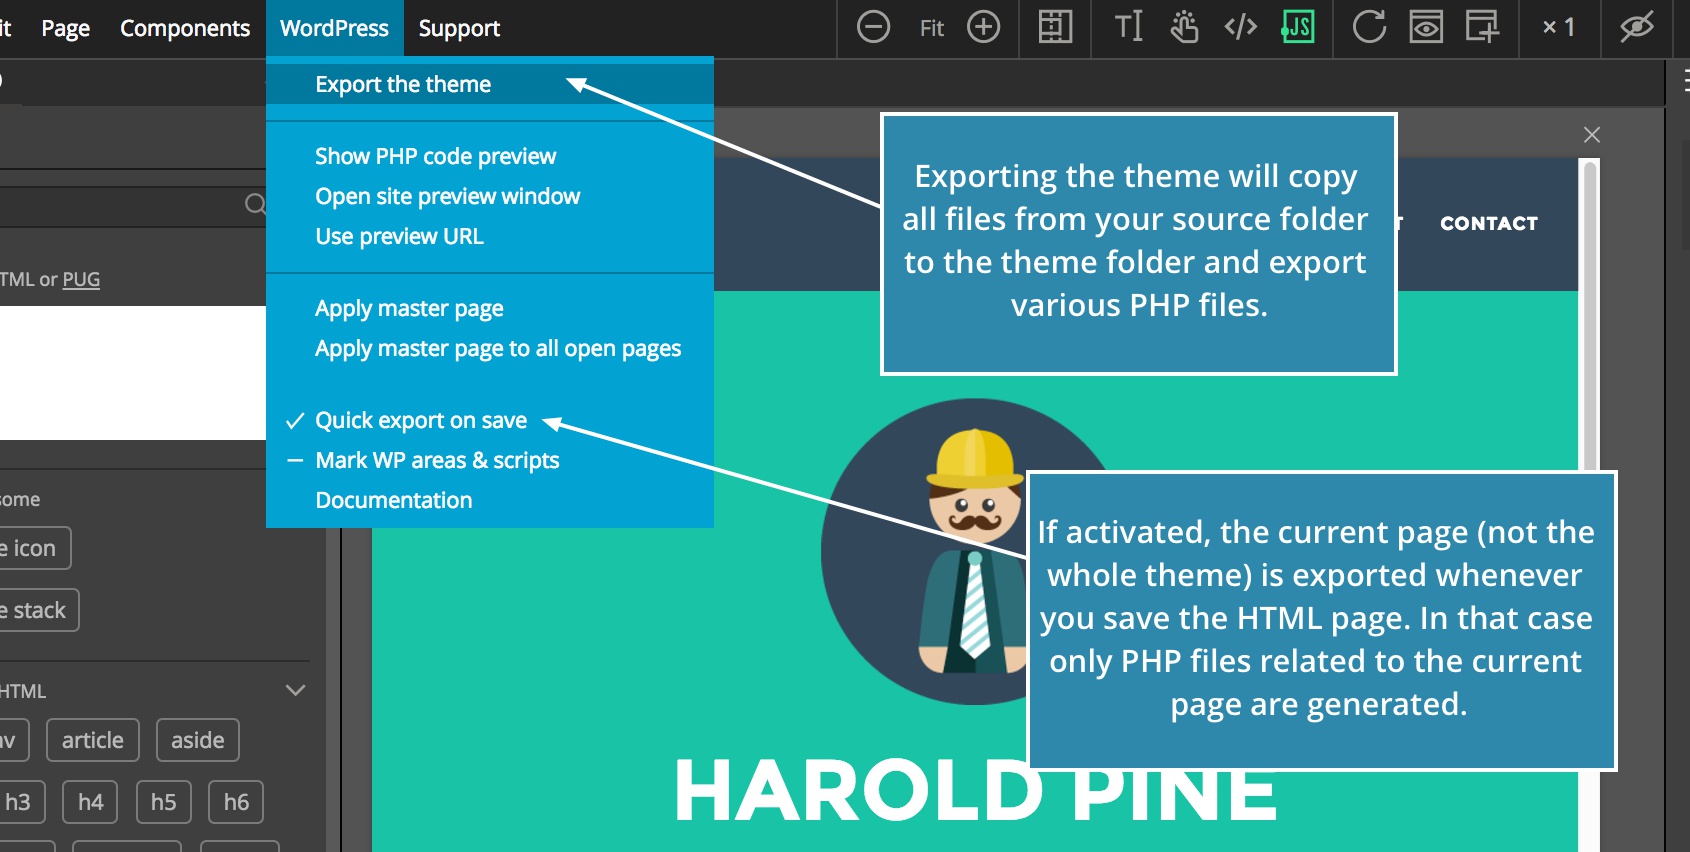
Exporting the theme
Click on the Export WordPress Theme in the top toolbar to export the complete theme, including JS, CSS files and images. Exporting the theme will copy all files from your source folder to the theme folder and export various PHP files.
The current page (not the whole theme) is exported whenever you save the HTML page. In that case only PHP files related to the current page are generated. The export-on-save feature is not available in the trial version. Use full export instead.
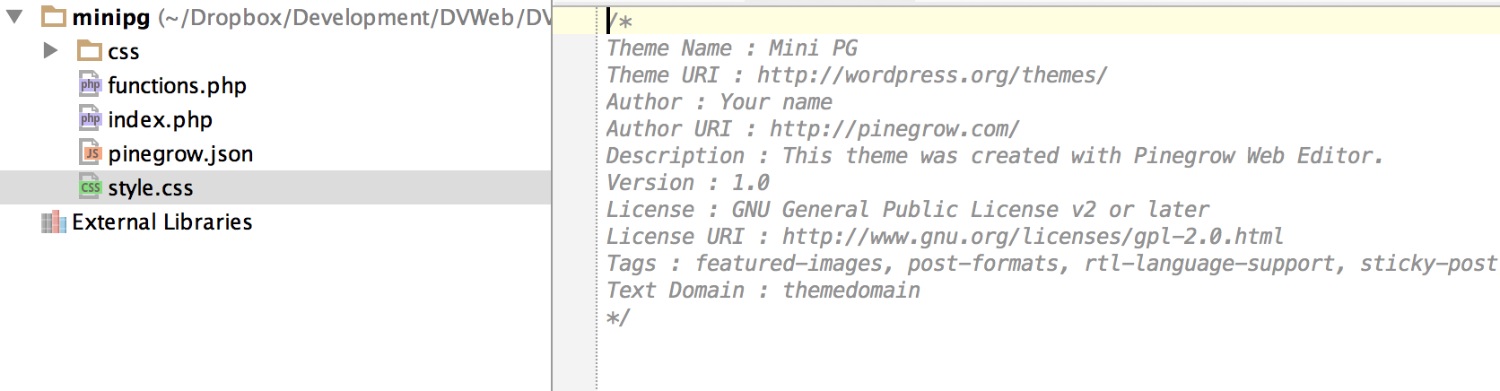
Go to the theme folder and check what files are there.
You’ll notice that index.php, functions.php and style.css were created. Use system file explorer or IDE of your choice to explore exported theme files.
Header, footer and content
A typical WP theme consists of:
Header (header.php) and Footer (footer.php) that contain the code that is same across all pages of the theme. The page is sliced into three parts, like this:
Files like index.php, single.php or archive.php that define what will be on various pages of the site, contain just the content part of the above diagram. Header and footer are included in these files with get_header and get_footer function calls.
Add Site content action from Site section to the element that defines the content part of the page.
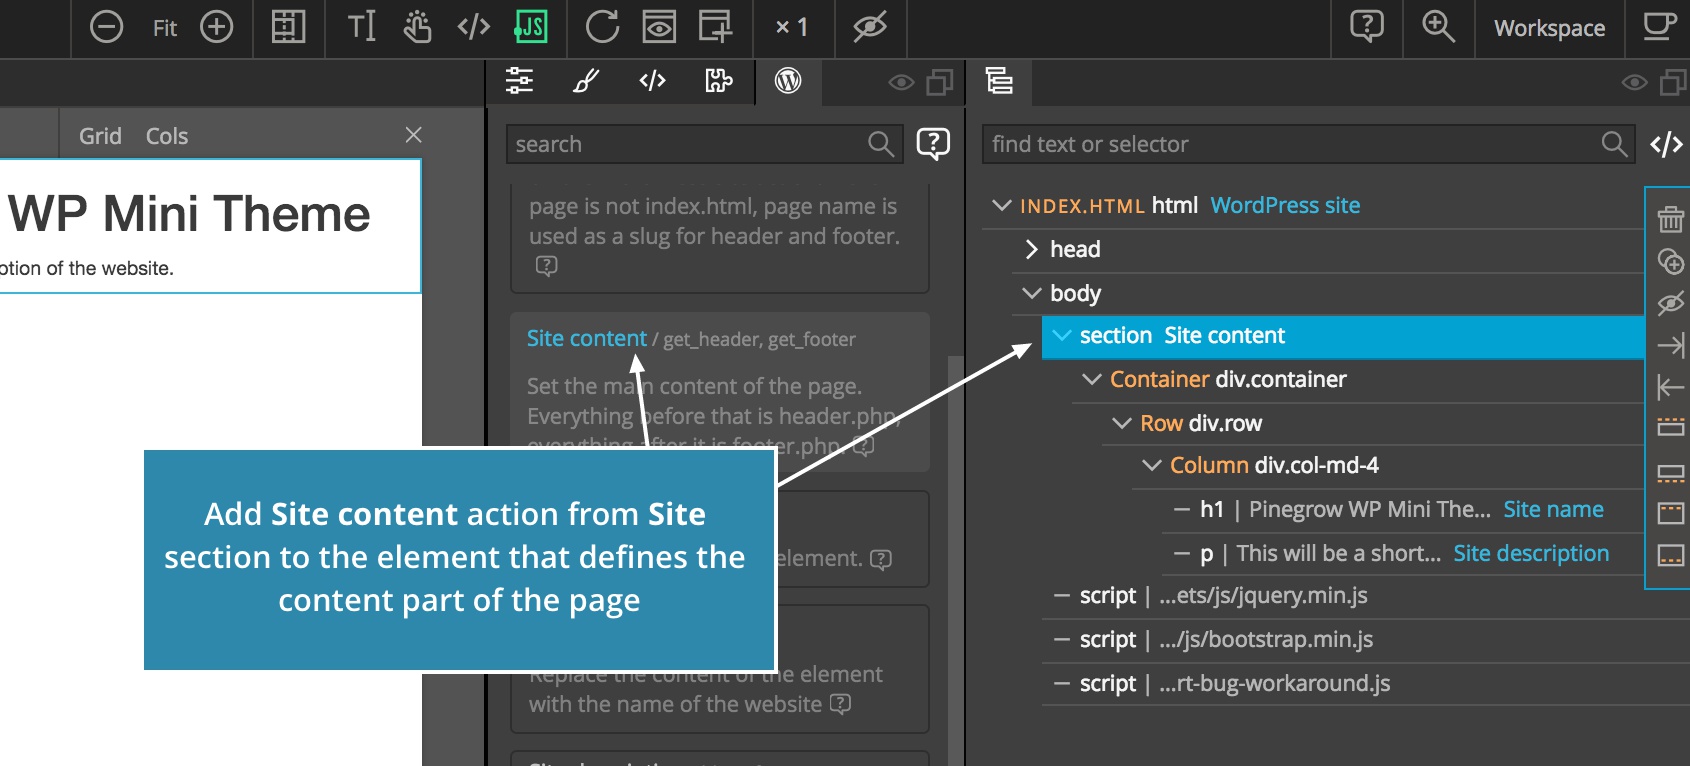
In this example, adding Site content action to section element will split the page into three parts:
- Everything preceding the section element, including the opening section tag will be exported into header.php.
- Everything after the section element, including the closing section tag will be exported into footer.php.
- Everything in between (the content of the section element) will be exported into index.php.
That follows the traditional WordPress approach of slicing up pages. Pinegrow makes this very easy. The content part of the page will be highlighted with a yellow border.
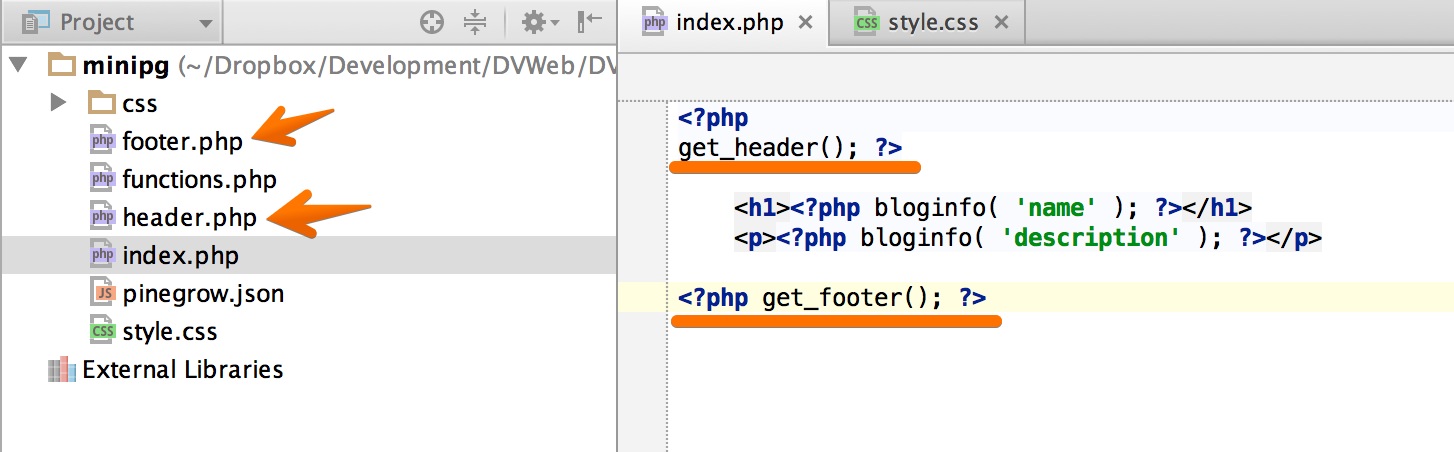
Export the theme (or just save the page) and check generated PHP files:
The Loop
Did you read Converting HTML website to WordPress theme? There are some great loop examples there.
The Loop is a WordPress thing that iterates through posts and displays them on the page. Array of posts is passed from WordPress core to the theme. The theme displays the post with the loop.
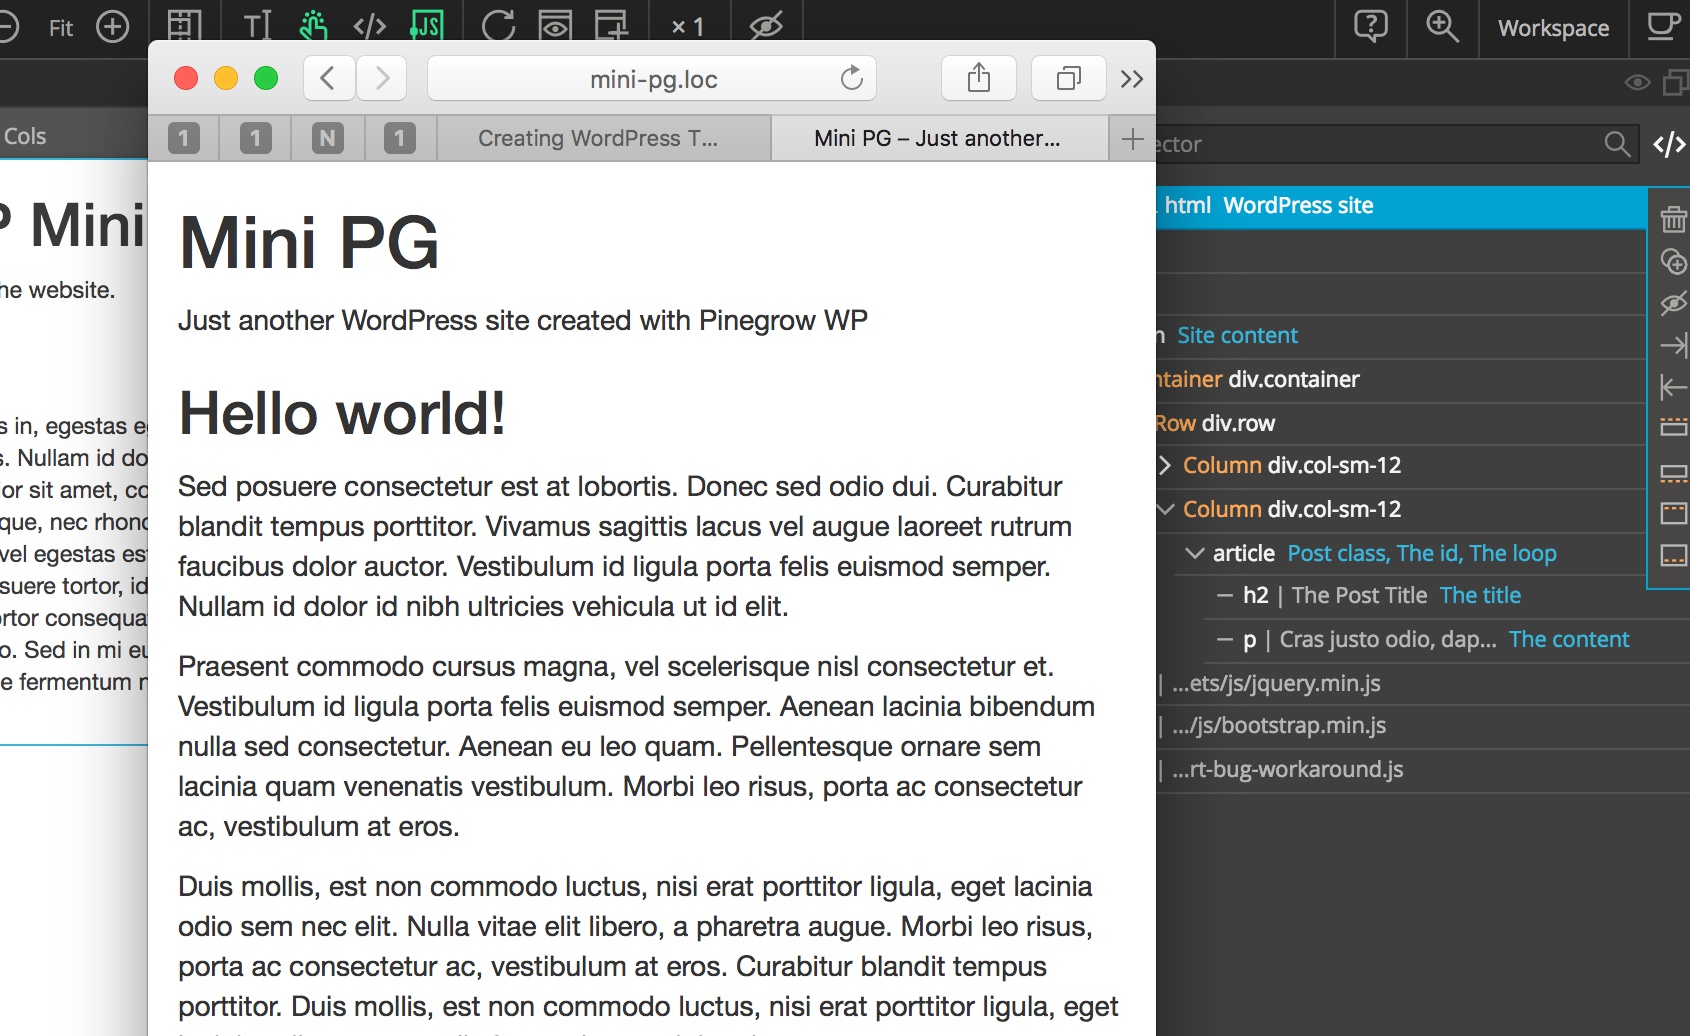
First, we have to define how individual posts will look like. In WordPress, posts are usually enclosed in the article tag. So go ahead and add an article element (from the LIB panel) to the page.
In the article element add H2 that will hold the post title and a P that will hold the content of the post. Put in placeholder texts (you can use Actions -> Insert lorem ipsum).
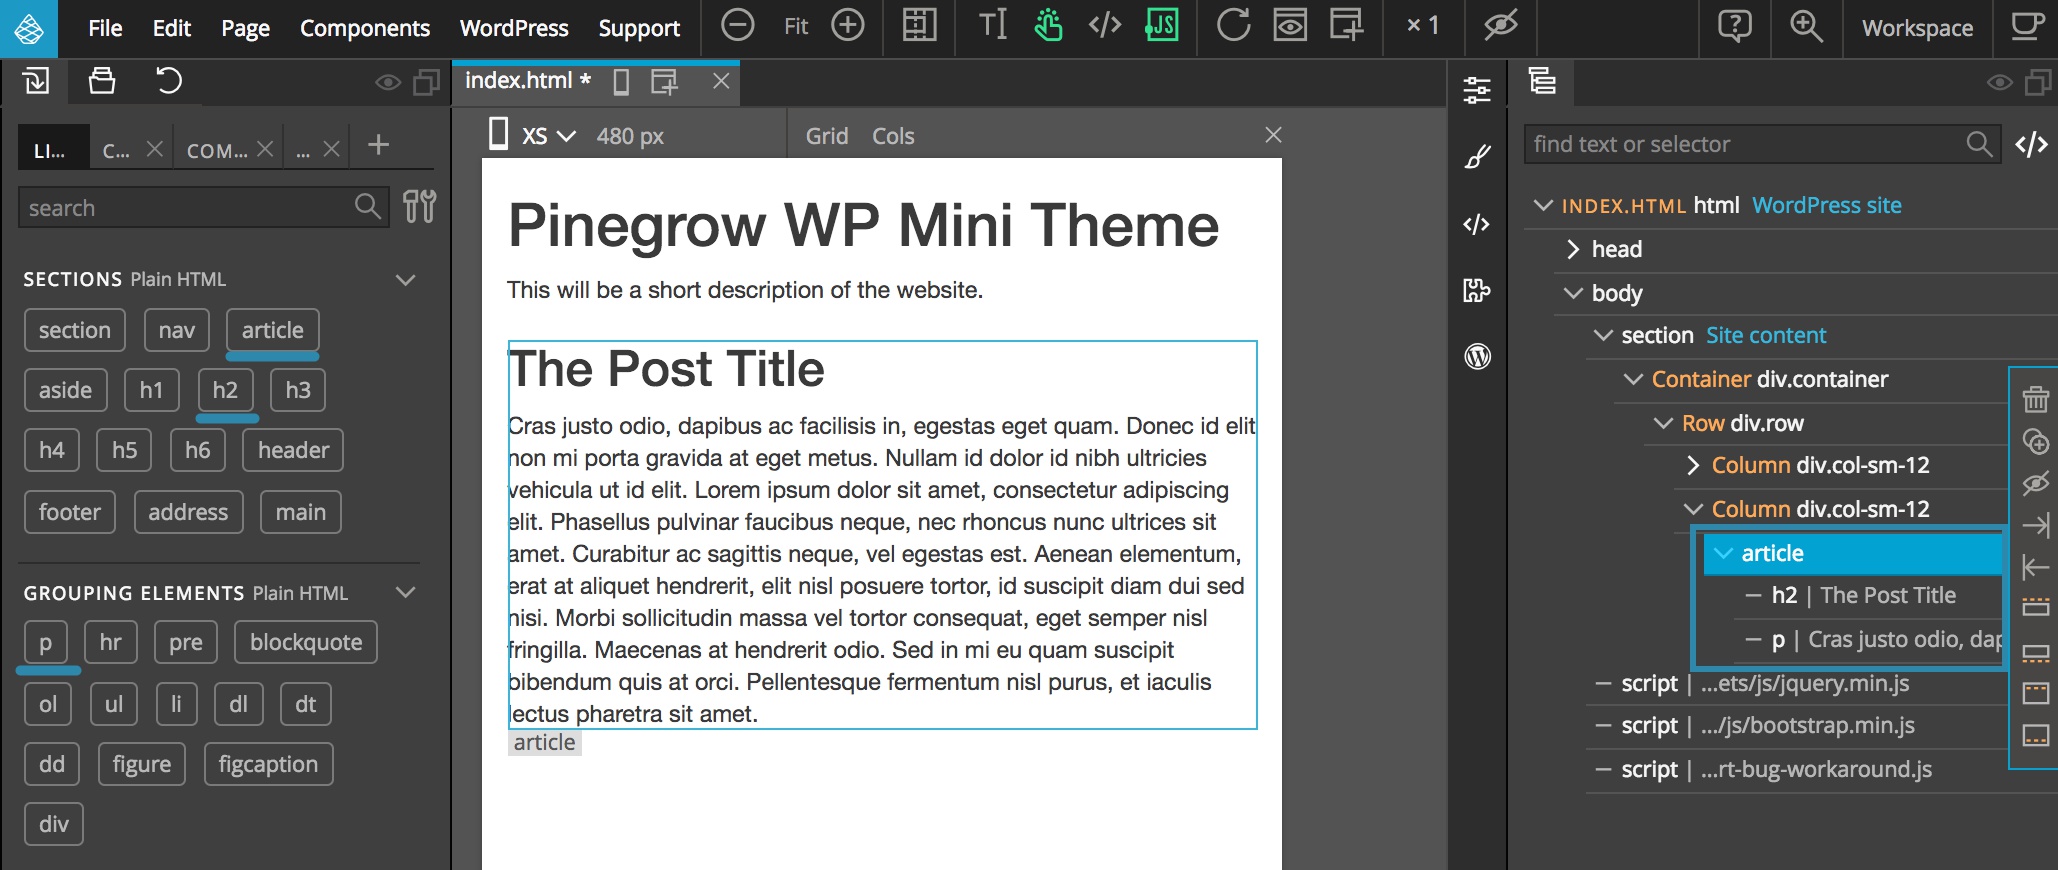
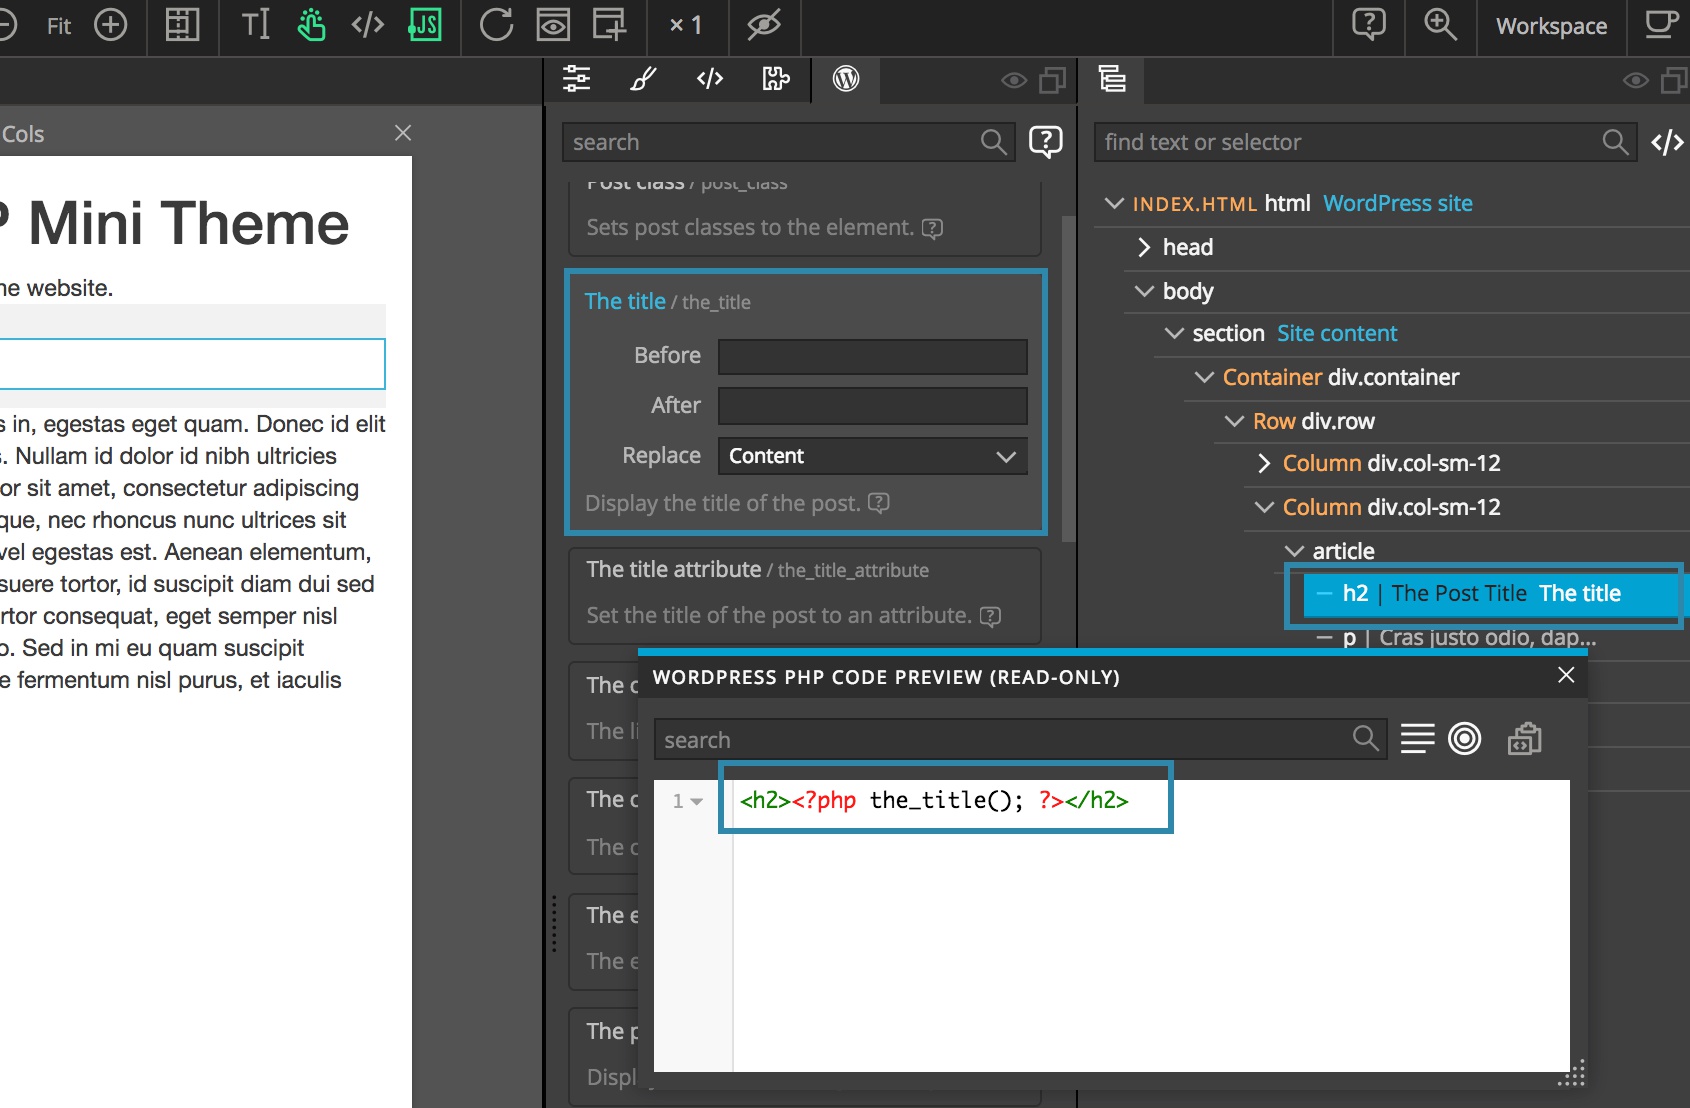
Go to WP panel, select the H2 and add The title action from the Posts section. Set replace to Content. Here you could also set Before and After parameters if needed. Press the help icon to open the WordPress help page for the_title tag. Use PHP code preview to see how the code will look like:
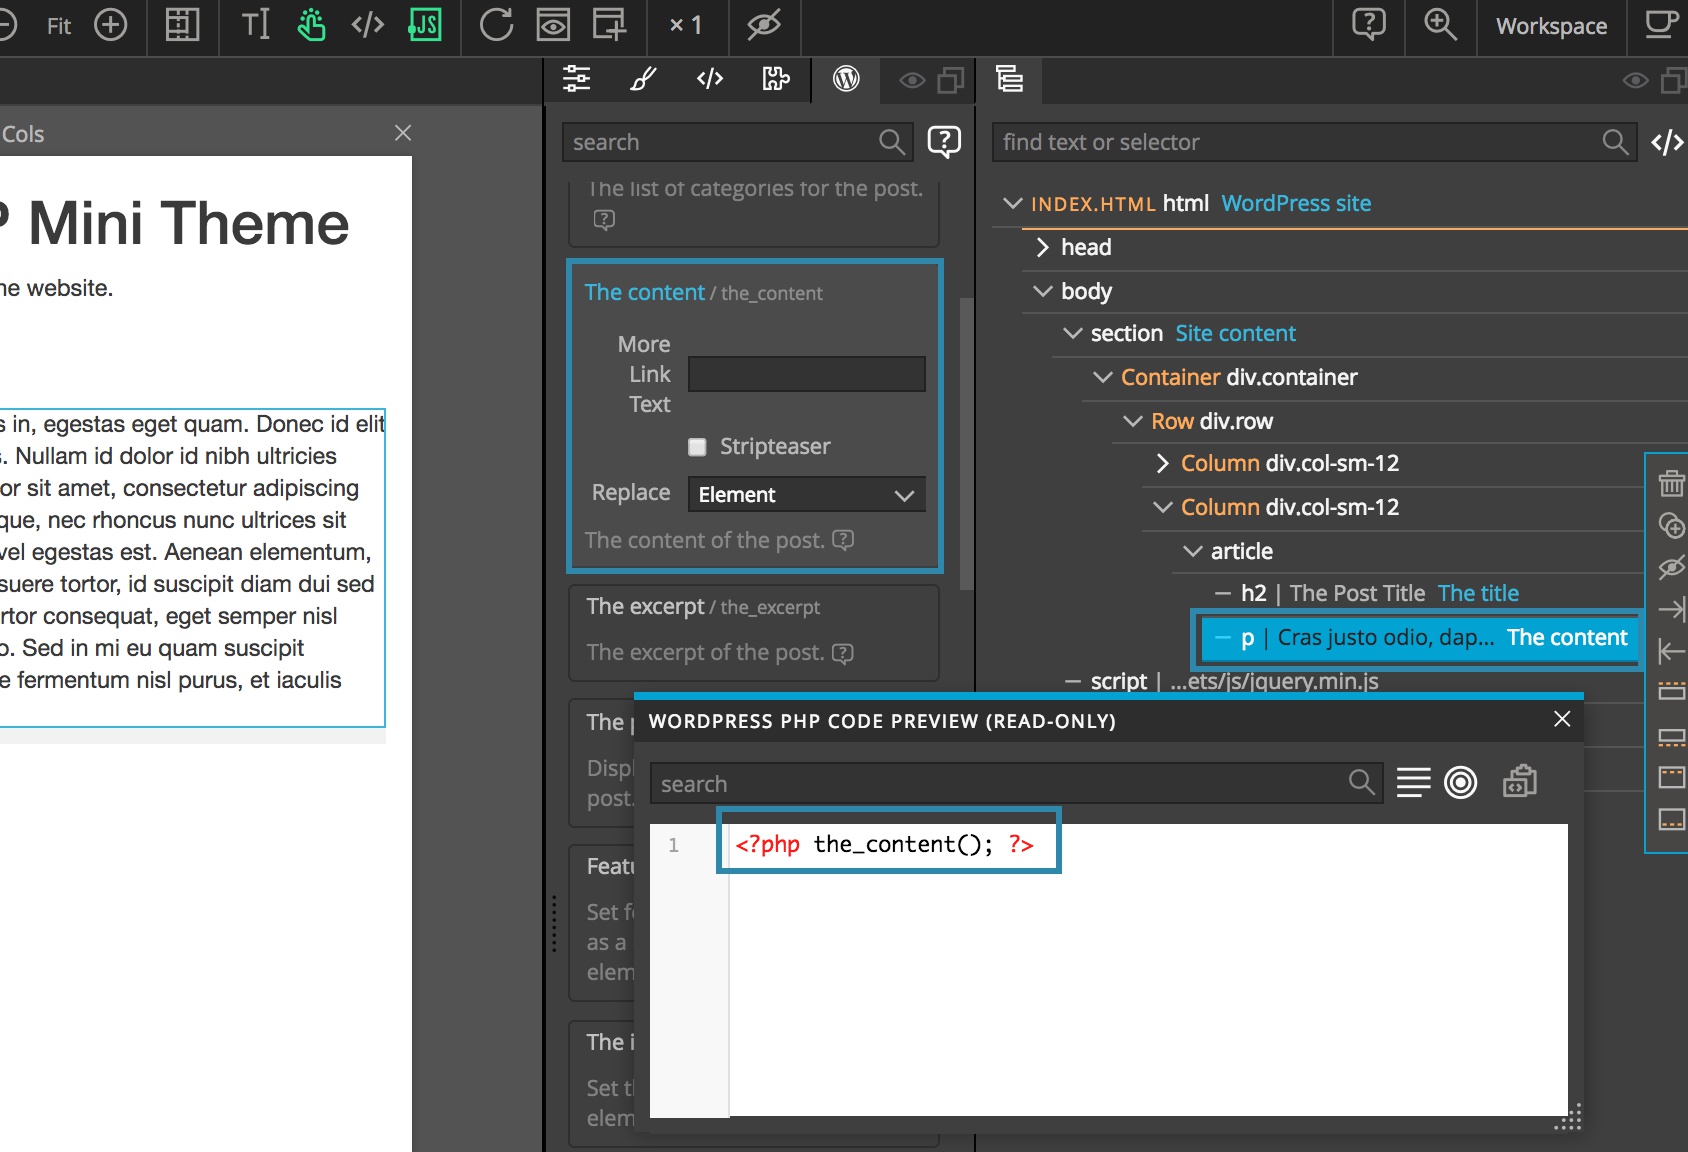
Select the content P element and add The content action from Posts section. Here set Replace to Element so that the whole P will be replaced by the post content.
With that the simple article structure is set.
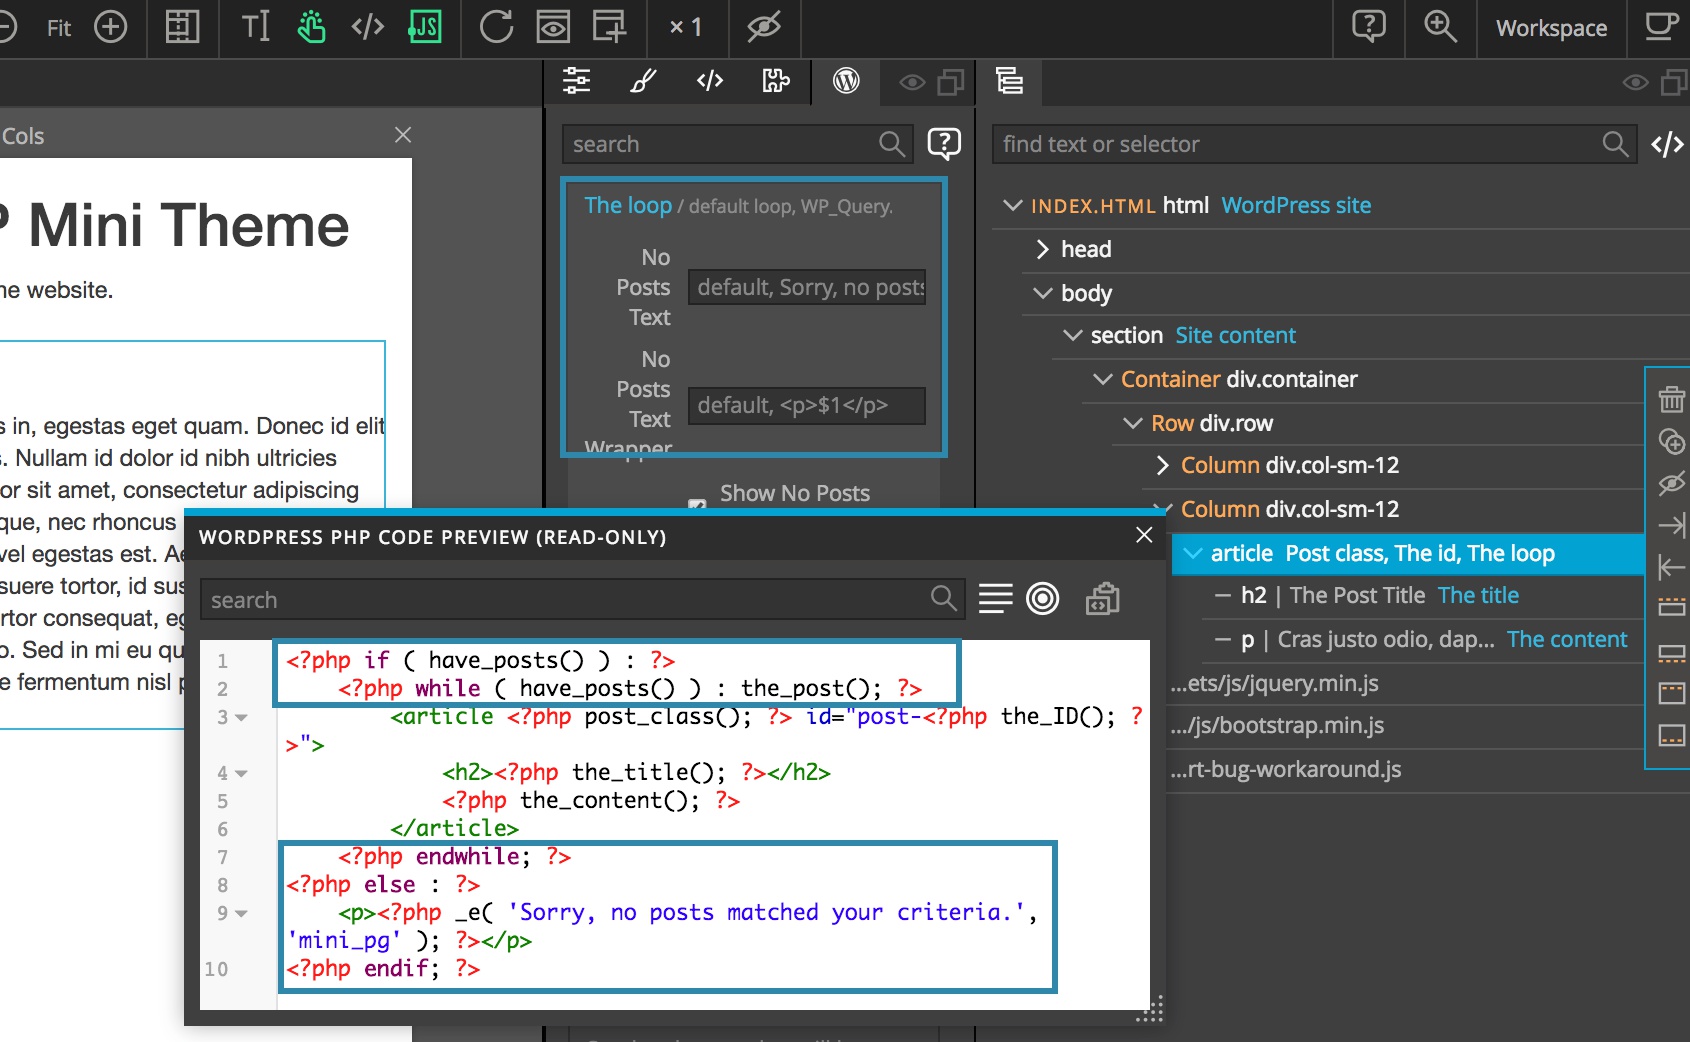
Select the article element and add Post class and The id actions, both from Posts sections. The two will add post classes and post id attribute to the article, according to WordPress convention.

Now, add the loop. Keep the article element selected and assign The Loop action from Loops section. For now, leave default values for all parameters. Check the PHP preview to see how the Loop code is now enclosing the article structure.
Save the page and preview the theme.
Conditionals
There are lots of conditional tags in WordPress, such as is_home, is_single…
In Pinegrow WP all of them plus custom criteria can be used in conditional statements. You can find them in WP panel in Conditionals section.
Add them to the element that needs to be wrapped into a conditional statement.
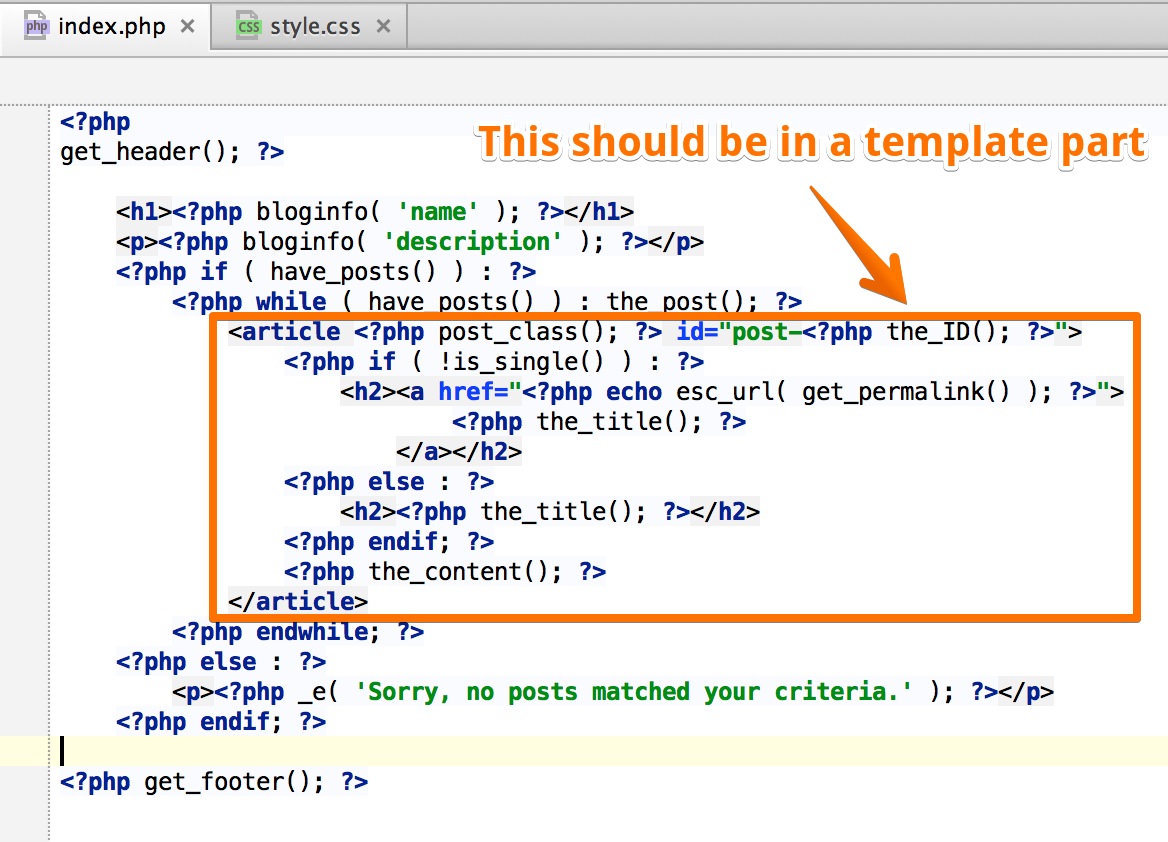
For example, select the first H2 and add is_single action from Conditionals section. Select Not parameter to make the condition negative: !is_single().

Now, select the second H2 and add Else action from Conditionals section. Select the article element to see the complete PHP preview. See how both H2 are enclosed in If … else statement.
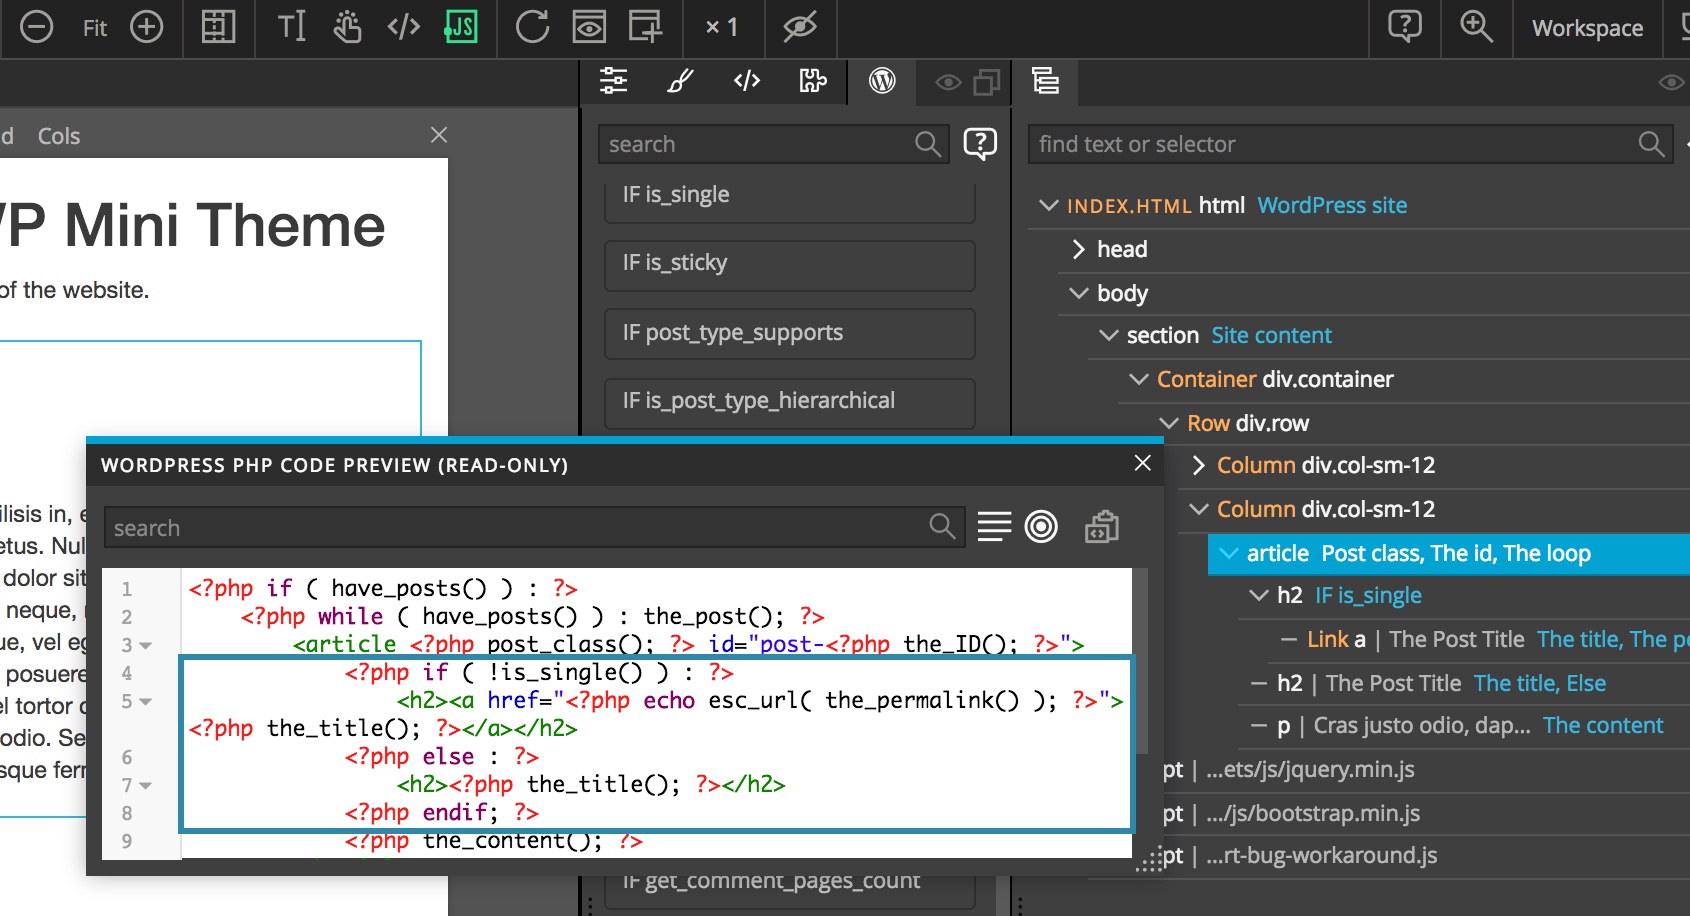
Note: we could avoid using Not with is_single if we would place the H2 without link first and put is_single action on it. Else action would then go to the second H2 with the link.
Save the page and test the site in the browser.
Conditionals can be combined together. For example, you can select the first H2 and add is_home conditional. Check the Not parameter on is_home. By default, conditionals are combined with || (or) operator. Add If options action to H2 to change the operator or to add a custom If condition.
Template parts
In index.php, in the the loop, you’ll notice the complete article HTML structure. We can use template parts to save the article element into a separate PHP file that can then be included in various places in the theme. That’s a proper way to create well-designed WordPress themes that can be easily customised with child themes.
Select the article element and add Define template part action from the Template parts section.
Set the required slug parameter to content. That causes the template part to be saved in content.php file. Name is not required.
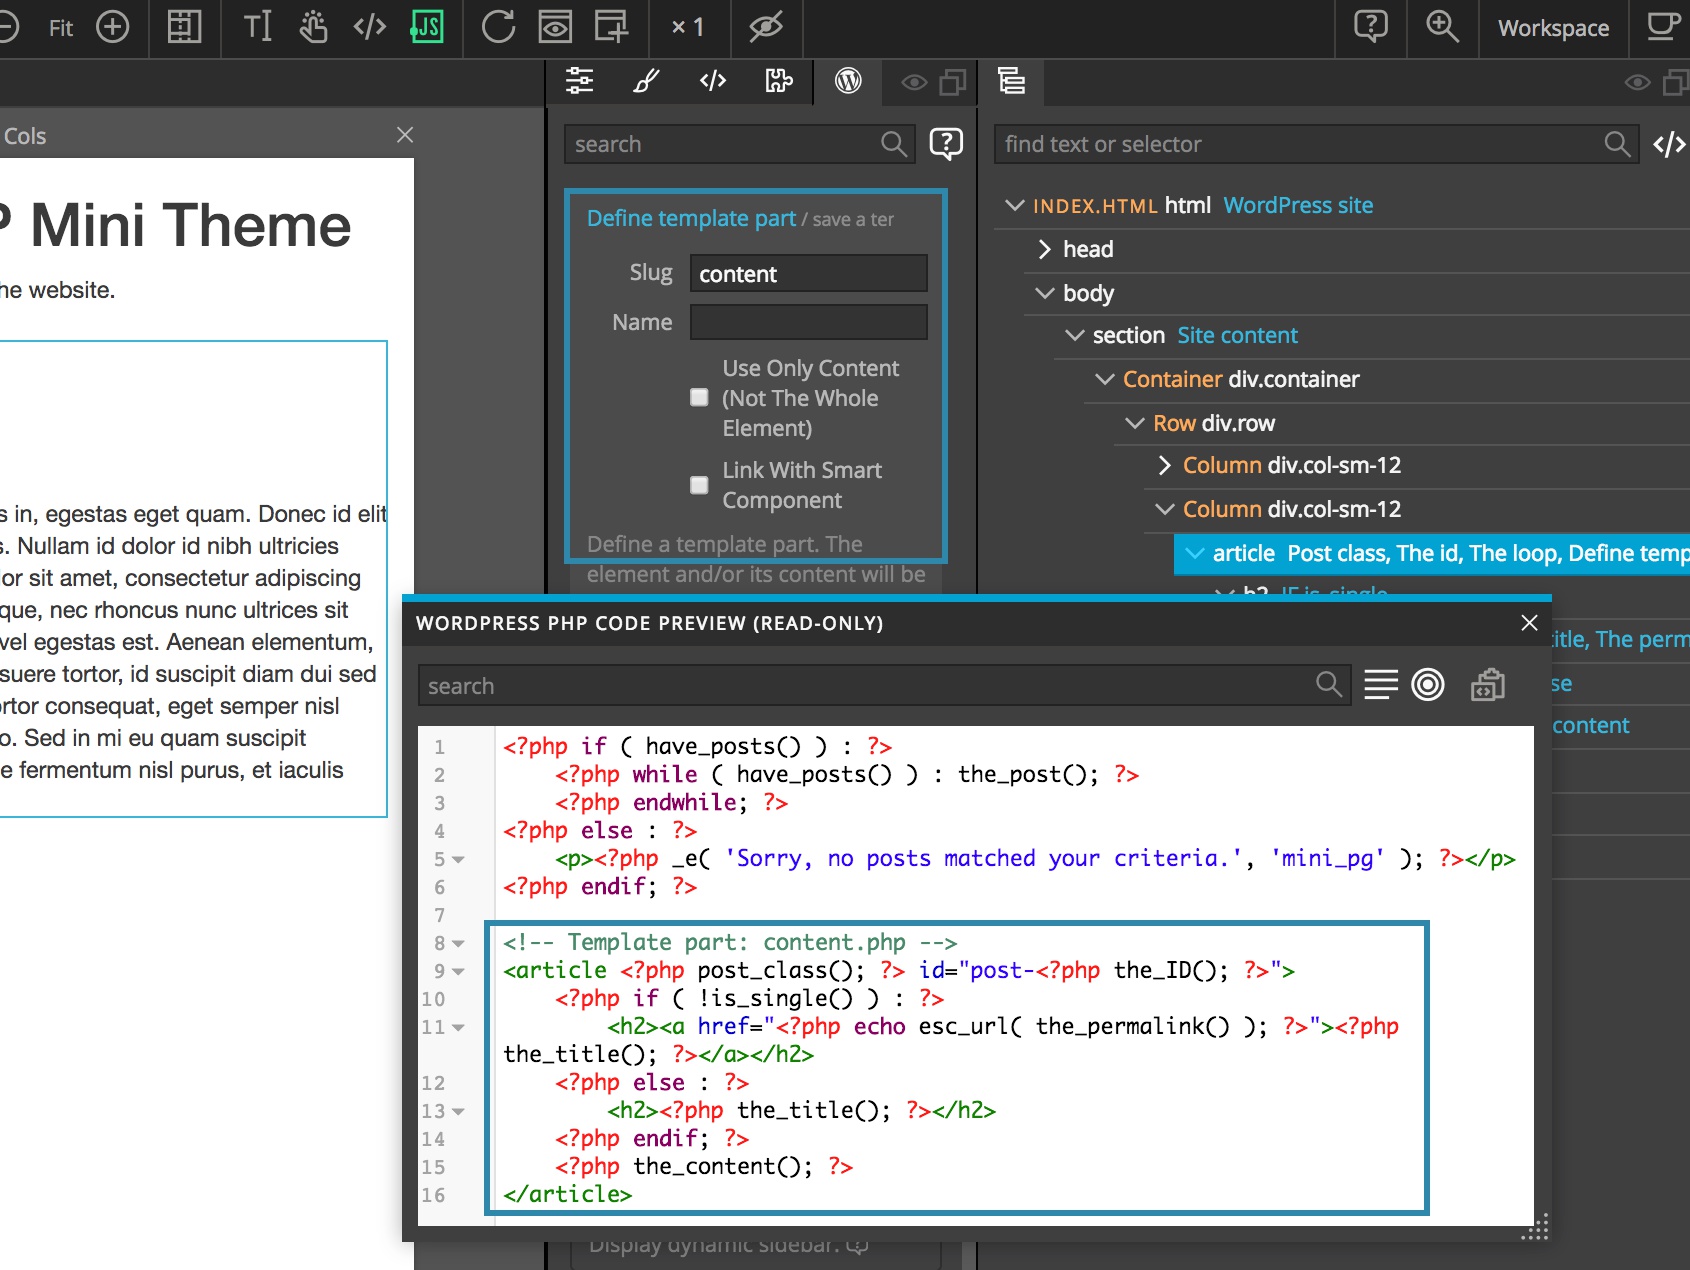
Save the page and check the generated theme files. Content.php was added. But if you reload the site in the browser you’ll notice that posts are not listed.
The reason for that is that it is not enough to define a template part. We also need to include the template part in our theme.
The place for including the part is usually the same place where that same part is defined – in our case, on the article element.
Add Include template part action from Template parts sections to the article element and set the name to content.
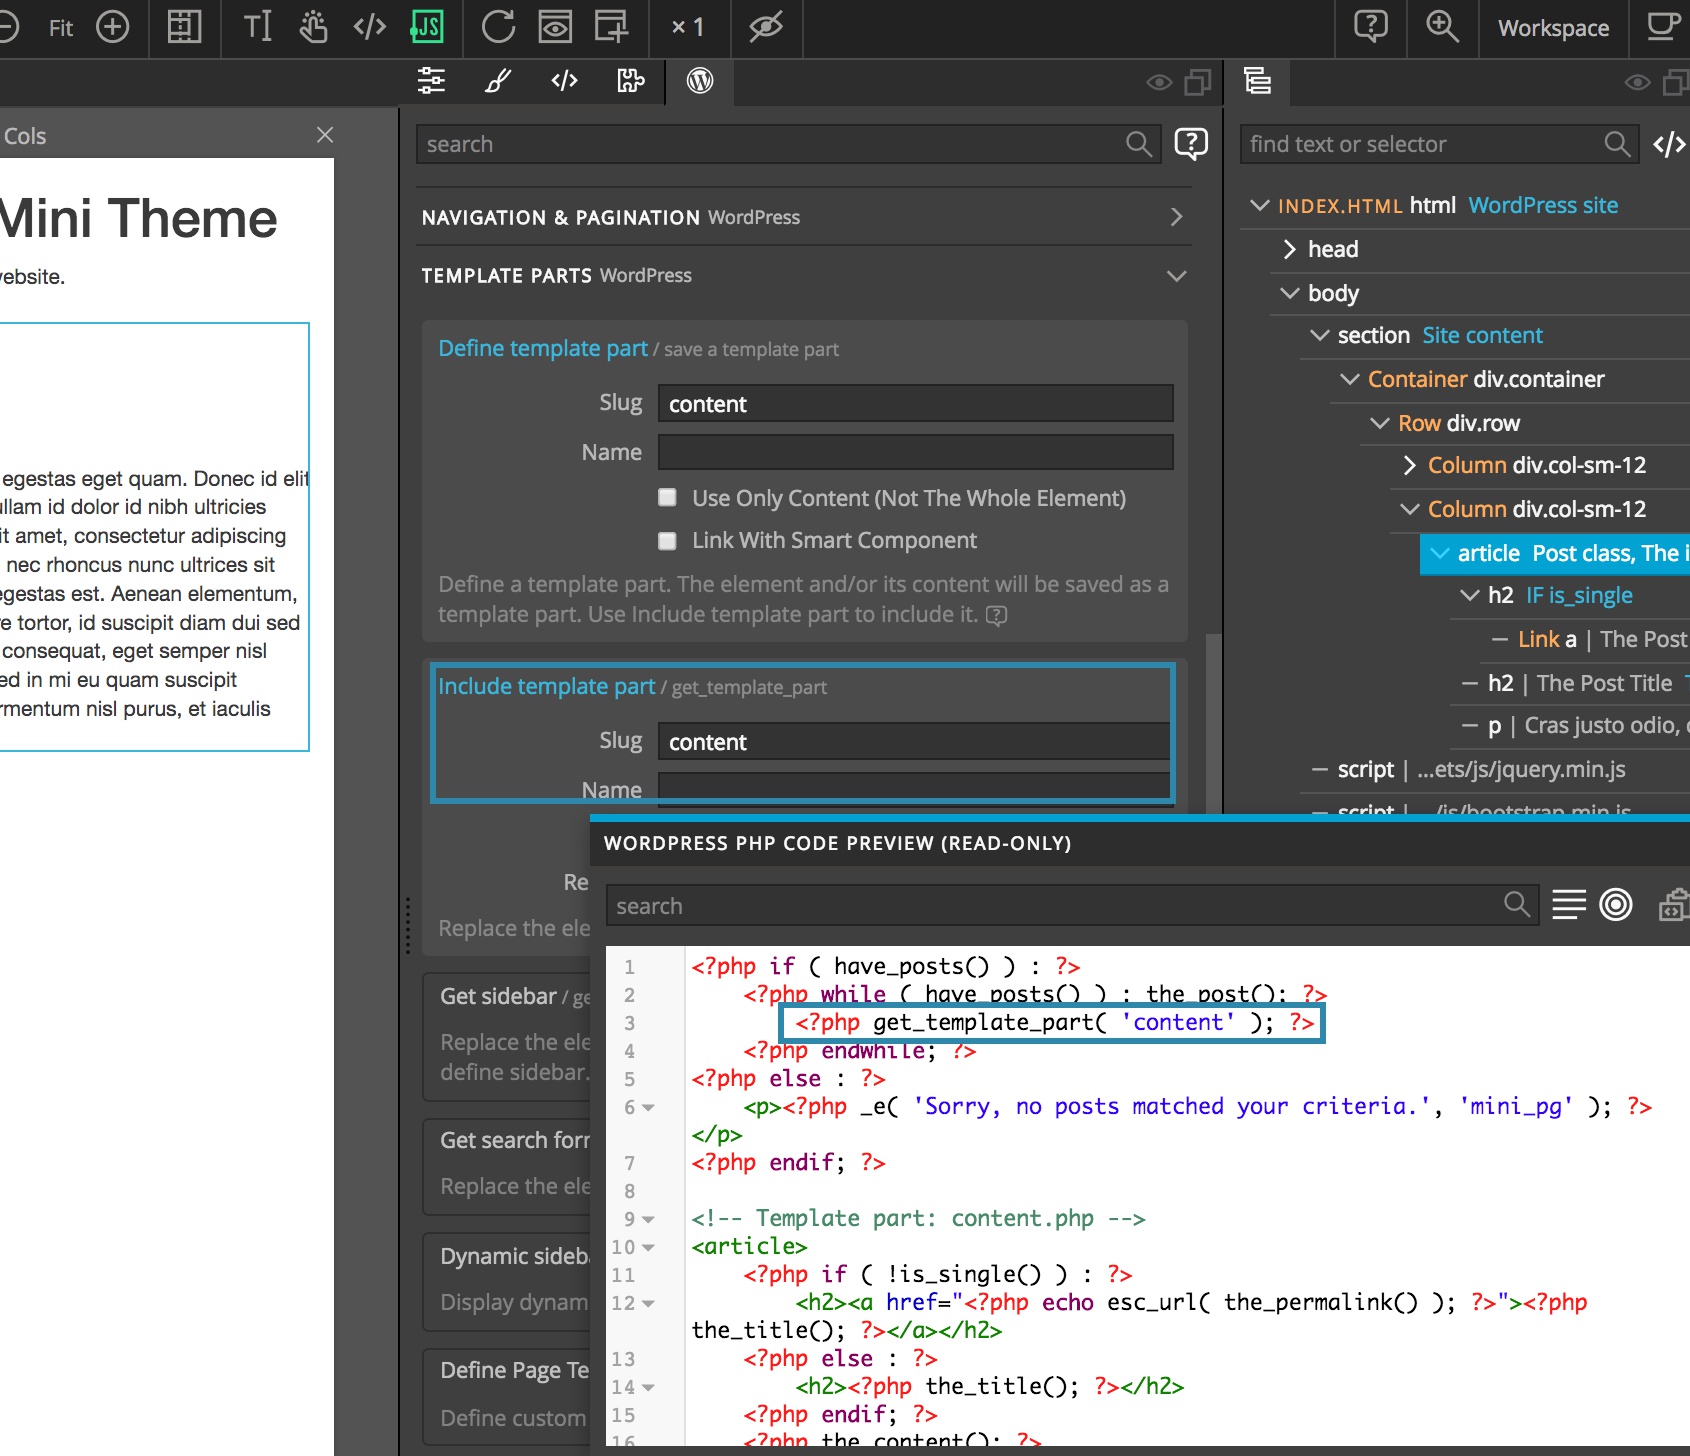
Save the file and reload the website. Posts should now be visible.
Likewise, use Define template part action to define sidebar.php and other reusable template parts.
WordPress reusable components
You can add WordPress enabled elements into Pinegrow’s custom component library and reuse them across different pages and themes. Read more about it in Reusable components.
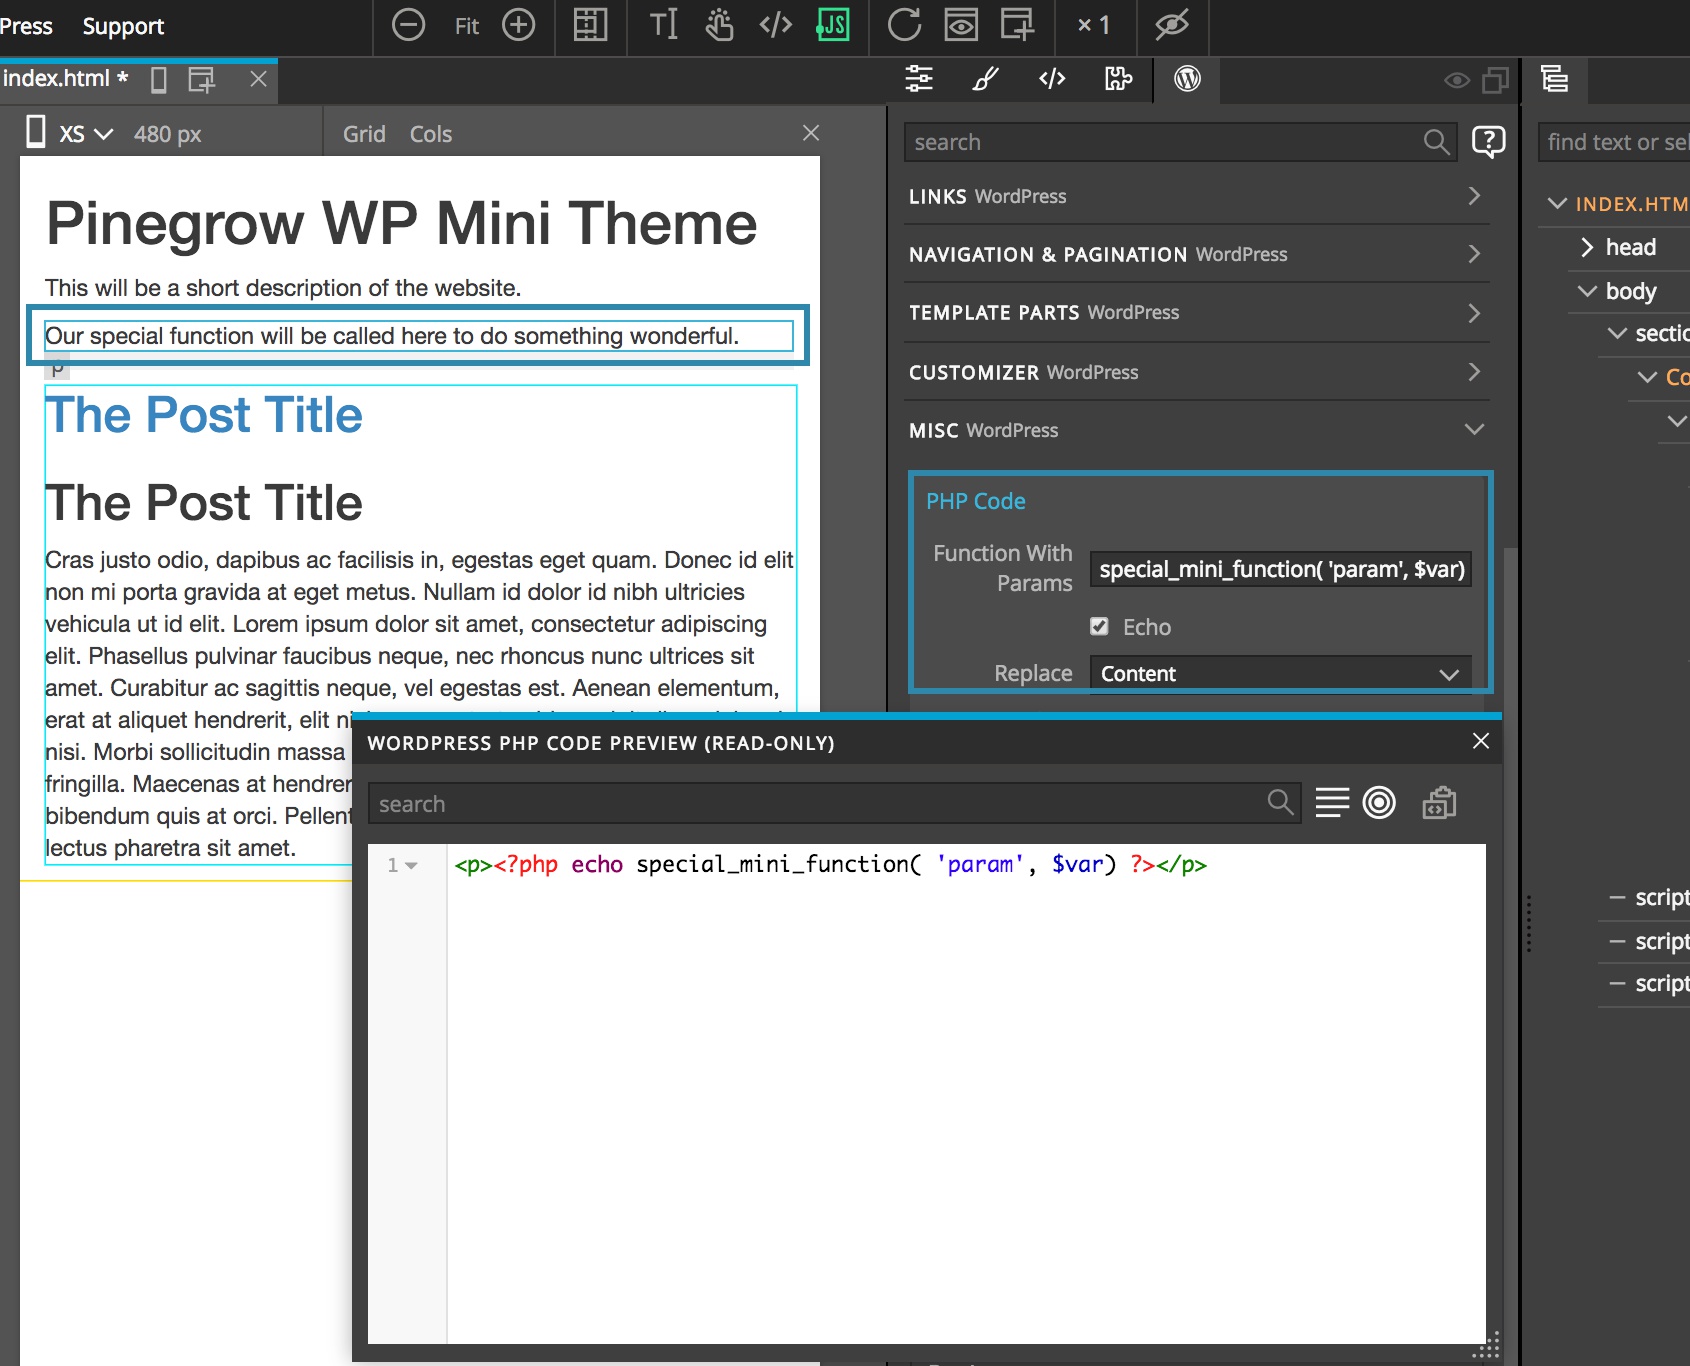
Adding custom PHP code
The power of WordPress themes comes from the ability to include custom PHP code into themes. Pinegrow WP lets you do that as well.
One way to work with custom code is to add PHP code action from the Misc section. You can use it to call functions defined in functions.php or to call any other PHP or WordPress function. You can execute any PHP statement in it.
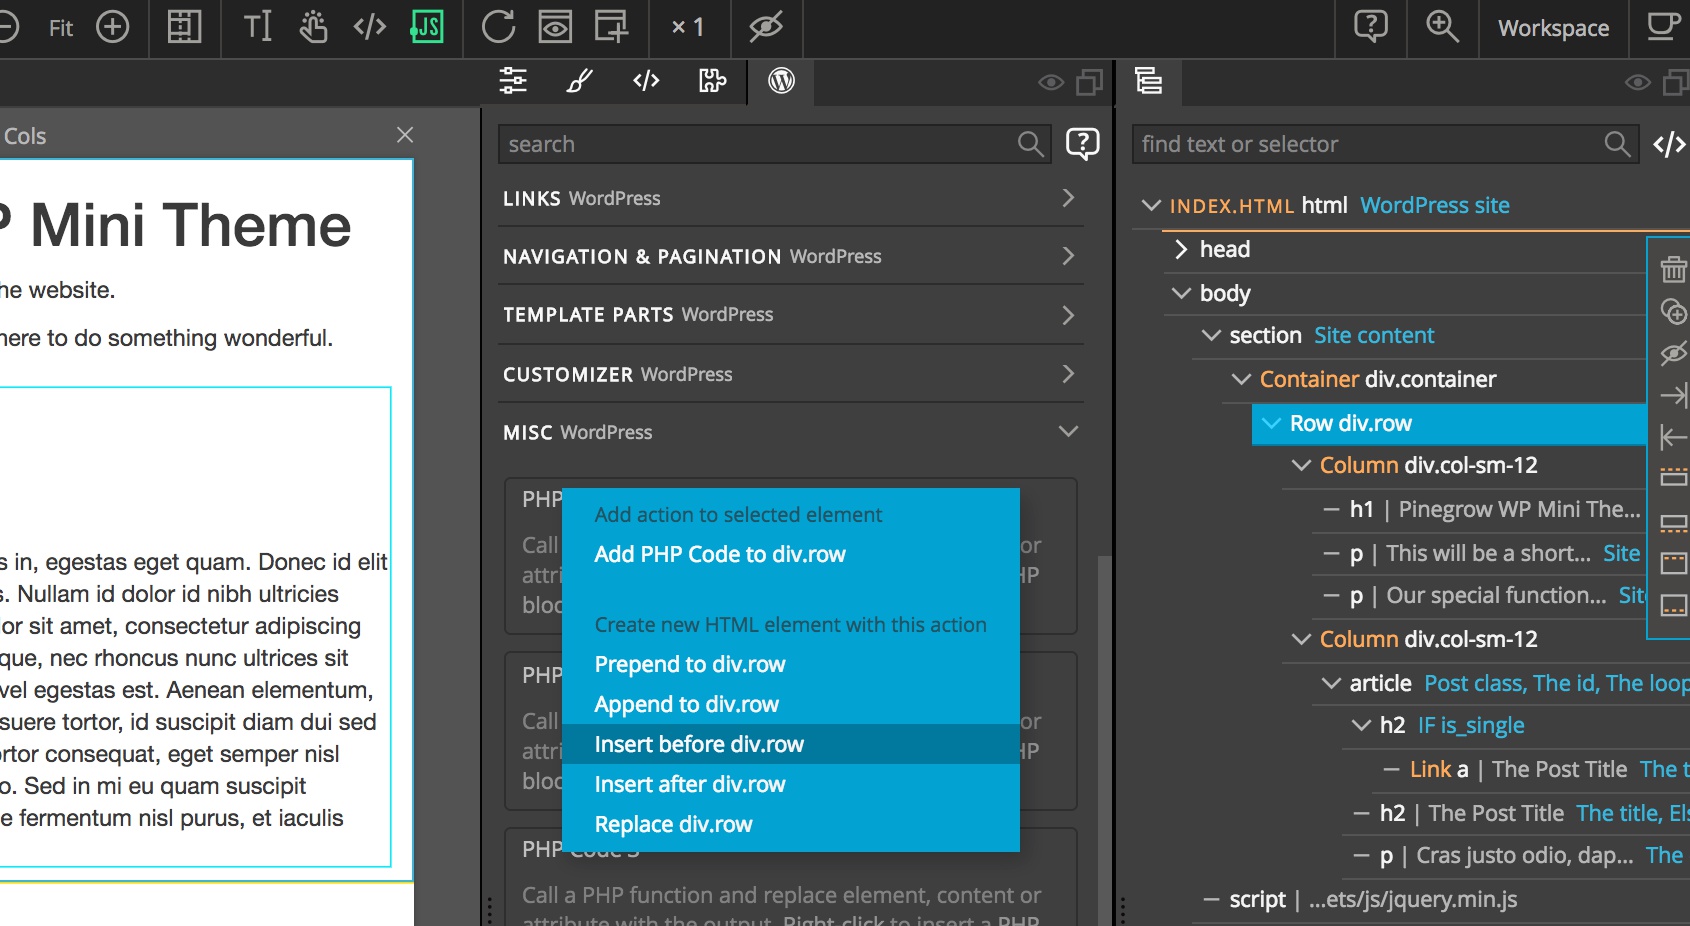
You can also include PHP code blocks by right-clicking on the PHP code action in the WP panel and choosing where to insert it in relation to the selected element.
Note, that <php>…</php> tags are used instead of <?php … ?>, so that code blocks can be properly displayed during editing in Pinegrow. Do not use <?php … ?> syntax in HTML code of Pinegrow WP source files, because that can lead to undesired results.